Bib Overalls
Well-known member
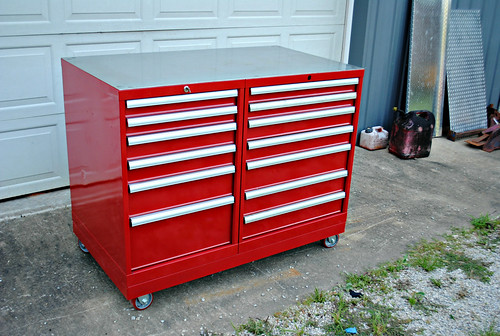
 Lista Mobile Tool Box 01 by Formerly JimboT, on Flickr
Several months ago I found this Lista cabinet on Craigslist. I had my friend Ben at MMS Powder Coating and Sandblasting make it red. I put it on some casters and stepped back and gave it a long look. I didn't like it.
 Lista Mobile Tool Box 03 by Formerly JimboT, on Flickr
So I looked around the shop and spied this Lista cabinet that I have had for years. Same drawers, same height and same width. What if I bolted them together and it all up on casters? The answer; a high end lista roll around tool box and a nice work top.
 Lista Mobile Tool Box 04 by Formerly JimboT, on Flickr
Further, I could swap out drawers with this other Lista cabinet as needed to get the arrangement I wanted for the tool box.
 Lista Mobile Tool Box 05 by Formerly JimboT, on Flickr
First step was to order a stick of heavy angle iron.
 Lista Mobile Tool Box 06 by Formerly JimboT, on Flickr
Over the years I have tried any number of techniques to make 90 degree angle iron corners. This works best for me. All cuts were finalized on the mill. This keeps everything square and tight for welding.
 Lista Mobile Tool Box 07 by Formerly JimboT, on Flickr
I used a corner vice from Grizzly Tool to set everything square and weld ready.
 Lista Mobile Tool Box 08 by Formerly JimboT, on Flickr
Finished corner is strong and looks good. A little grinding on the top and the joint is finished.
 Lista Mobile Tool Box 09 by Formerly JimboT, on Flickr
Here is the frame before we welded in the center crossmember. Overkill? Maybe but it is not like we will be picking it up all the time and it will be on casters.
 Lista Mobile Tool Box 10 by Formerly JimboT, on Flickr
Frame back from Ben at MMC with casters bolted on. Ilike red.
 Lista Mobile Tool Box 11 by Formerly JimboT, on Flickr
The larger cabinet got the treatment at the same time.
 Lista Mobile Tool Box 12 by Formerly JimboT, on Flickr
Now for the top. I used a sheet of 12 Gauge stainless steel because I had it.
 Lista Mobile Tool Box 13 by Formerly JimboT, on Flickr
The only means of cutting material that thick and that hard that I is a skill saw with an abrasive metal cutting disc. I expose the blade about 1/4 of an inch and make multiple passes. If you try to make it in one pass your disc will wander and eventually fail.
 Lista Mobile Tool Box 14 by Formerly JimboT, on Flickr
To hold it in place I positioned the top final and clamped it in place. Then I drilled eight small holes and taped them 10-24. When I lifted the top I drilled the holes in the cabinets to pass a 10-24 stainless machine screw. My friend Randy removed the screw heads positioned the screws to his liking.
 Lista Mobile Tool Box 15 by Formerly JimboT, on Flickr
Then he TIG welded them in place. When the work surface was placed on the cabinets it fit like a tailor made condom.
 Lista Mobile Tool Box 16 by Formerly JimboT, on Flickr
Lista no longer supports their older cabinets. One important feature of Lista cabinets is their system to lock the drawers in place and only allow one drawer to open at a time.. Without these plastic latches the system does not work. The latch on the left is brittle and it has broken. Worthless. The latch in the center is good but no longer available from Lista. The latch on the right is the only replacement I have found. They are available on eBay in lots of 5 for $25 plus shipping. A tad high but the only solution available for replacing broken factory latches.
 Lista Mobile Tool Box 17 by Formerly JimboT, on Flickr
The latches are clamped in place, drilled and secured with two pop rivets.
 Lista Mobile Tool Box 18 by Formerly JimboT, on Flickr
The only thing left to do is replace one of the locking cylinders and it will be ready for tools.
 Lista Mobile Tool Box 19 by Formerly JimboT, on Flickr
I would like to add push/pull handles on the ends at some point but they are not essential and may never never happen.
Last edited: