To avoid these ads, REGISTER NOW!

Dirty old Johnson Model J

FlyingLow

Well-known member
Joined
Mar 10, 2014
Messages
127
Location
Vancouver Island
Well yesterday i rescued a Johnson Model J. Price was right at free but its more bandsaw than I currently have room for unfortunately. Anyway couldn't really pass it up, has my name on it so figured that was a sign.

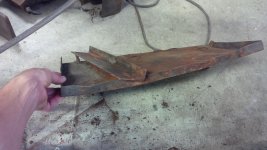
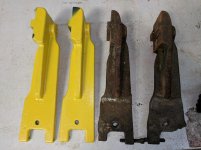
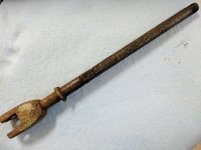
It's been sitting outside for a few years but shows little sign of damage from that, likely the easiest years of its rough life unfortunately. When i first had a quick look at it i overlooked a few issues although i did notice a crack in the bed behind the fence that I'm not sure how it could happen but didn't think it would affect cutting. Anyway I overlooked the fact that the rear legs are broken although structurally repairable (again not sure how you do that, thinking forklift though). The worst of is probably the most crucial, both guide supports have been broken and repaired a couple times, including the screws for adjusting the blade track. I need to look into parts but wonder what the opinions are regarding repair. I'm not looking to fully restore this machine but would like to get it working. I'm not overly concerned with the legs or bed. I'll post pictures from my phone.
 
To avoid these ads, REGISTER NOW!
OP
F

FlyingLow

Well-known member
Joined
Mar 10, 2014
Messages
127
Location
Vancouver Island
Pictures
 

Attachments

  • IMG_20161002_223931.jpg
    IMG_20161002_223931.jpg
    149.3 KB · Views: 329
  • IMG_20161002_223941.jpg
    IMG_20161002_223941.jpg
    157.5 KB · Views: 215
  • IMG_20161002_223955.jpg
    IMG_20161002_223955.jpg
    145.5 KB · Views: 252

Hephaestus29

Well-known member
Joined
Mar 13, 2011
Messages
2,975
Location
Indianapolis
It should still be worth fixing up.
It's a shame, it looks like it was dropped
or fell over. They're rumored to be
notorious for falling over due to the
three leg base ??? I haven't had any
problems with mine tipping over though.
I just use it as a saw I don't know how
they just "turn over"??
Mine doesn't look quite as bad but it
does have one break in one of the
guide arms.
 
OP
F

FlyingLow

Well-known member
Joined
Mar 10, 2014
Messages
127
Location
Vancouver Island
Thanks, I wouldn't mind if it had one break but the fact that each one is missing an adjustment screw concerns me. I wondered if the damage was from pushing material through and hitting the guide arm. I did email Dave this afternoon to inquire about cost of the arms. I afraid of the answer as cash is a little tight for garage projects right now but I feel it would be a good investment.


It should still be worth fixing up.
It's a shame, it looks like it was dropped
or fell over. They're rumored to be
notorious for falling over due to the
three leg base ??? I haven't had any
problems with mine tipping over though.
I just use it as a saw I don't know how
they just "turn over"??
Mine doesn't look quite as bad but it
does have one break in one of the
guide arms.
 

jabberwoki

Well-known member
Joined
May 1, 2009
Messages
6,455
Location
puyallup wa usa
There's an old guy north of Seattle I think that's a cast iron welding genius.
He fixed a big vice of mine and did a great job.
 
OP
F

FlyingLow

Well-known member
Joined
Mar 10, 2014
Messages
127
Location
Vancouver Island
Well I heard back from Dake this morning, arms are available, $60 a piece, guide link is 10 days out but $112 without bearings, blade brushes $45 a pair and hydraulic repair kit $64. Overall reasonable I guess except for the brushes. Hoped the guide link was a little more reasonable though. If I skip the brushes I guess it will be close to $400 Canadian by the time I get it here.
 

Hephaestus29

Well-known member
Joined
Mar 13, 2011
Messages
2,975
Location
Indianapolis
Since you got it free and the base is
busted up, you could just make your
own base. Go ahead and pull the front
leg and maybe sell it to fund fixing up
the thing.
 

Hephaestus29

Well-known member
Joined
Mar 13, 2011
Messages
2,975
Location
Indianapolis
Well I heard back from Dake this morning, arms are available, $60 a piece, guide link is 10 days out but $112 without bearings, blade brushes $45 a pair and hydraulic repair kit $64. Overall reasonable I guess except for the brushes. Hoped the guide link was a little more reasonable though. If I skip the brushes I guess it will be close to $400 Canadian by the time I get it here.

I can't picture the guide link, do you
have a picture ?
 
OP
F

FlyingLow

Well-known member
Joined
Mar 10, 2014
Messages
127
Location
Vancouver Island
I can't picture the guide link, do you
have a picture ?

Guide link is actually the piece between the arm and the "holder" assy which holds the guide bearings. Parts diagram only showed the 2 parts are an assembly but I found out it can be broken down and sold separately. Still waiting on a price for it. Should be better priced than the entire assembly.
 

Attachments

  • IMG_20161004_233218.jpg
    IMG_20161004_233218.jpg
    140.2 KB · Views: 59
OP
F

FlyingLow

Well-known member
Joined
Mar 10, 2014
Messages
127
Location
Vancouver Island
Holder is available on its own for $66. I'll get bearings for it at the local bearing supplier. I can sneak those under the radar of the finance department...
 
To avoid these ads, REGISTER NOW!
OP
F

FlyingLow

Well-known member
Joined
Mar 10, 2014
Messages
127
Location
Vancouver Island
Got the back leg off, it's actually cracked out of the upper bolt hole for the spring attachment bracket too. Thinking I'll just cut a small piece of plate to tie the pieces together.

Cutting fluid tray is pretty beat up but I think I can massage it back into decent enough shape.
 

Attachments

  • IMG_20161008_143144.jpg
    IMG_20161008_143144.jpg
    145.8 KB · Views: 61
  • IMG_20161008_143216.jpg
    IMG_20161008_143216.jpg
    148.1 KB · Views: 54
Last edited:

Hephaestus29

Well-known member
Joined
Mar 13, 2011
Messages
2,975
Location
Indianapolis
I bought some stainless to make a new
tray out of. I was hoping I could find
someone with a finger brake to bend
It up for me in trade or something. It
looks like I might have to just cut it up
and weld it at this point though.
It's .105 thick stainless sheet 4'x8'
There's enough material to make the
tray and the pieces that go on the top.
 
OP
F

FlyingLow

Well-known member
Joined
Mar 10, 2014
Messages
127
Location
Vancouver Island
Well I got some parts from Dake, great service. Thought I had more pics, second picture is of the "hydraulic ram" and the poor condition of it. I am unsure of how to repair it, odd ball thread where it attaches to the piston, it's 20 tpi but tapered on 1/2" rod... Any input?
 

Attachments

  • IMG_20170406_151747.jpg
    IMG_20170406_151747.jpg
    145.6 KB · Views: 46
  • IMG_20170413_231050.jpg
    IMG_20170413_231050.jpg
    146.7 KB · Views: 45

seagiant

Well-known member
Joined
Sep 16, 2011
Messages
297
Hi,
There are a few people that have rebuilt these (Johnson) over at ,"Shop Floor Talk" Forum.

Might want to run a question over there?

I rebuilt a 1945 Horizantal Wellsaw!

Wellsaw is still in business and supported my saw 100% with parts, even though "pricey"!!!
 

Attachments

  • nnnnn.jpg
    nnnnn.jpg
    29.3 KB · Views: 38
Last edited:
OP
F

FlyingLow

Well-known member
Joined
Mar 10, 2014
Messages
127
Location
Vancouver Island
Hi,
There are a few people that have rebuilt these (Johnson) over at ,"Shop Floor Talk" Forum.

Might want to run a question over there?

I rebuilt a 1945 Horizantal Wellsaw!

Wellsaw is still in business and supported my saw 100% with parts, even though "pricey"!!!

Wow that's quite the saw! I'll check out that form thanks.
 

DougWil

Well-known member
Joined
Dec 29, 2015
Messages
545
Location
NW Montana
I really suggest you ditch the legs and build a cart. Lots of wasted space below that can be used for material storage and ballast so it won't tip over.

Here is my 1942?? Wells 8 or 8M with the cart I made for it with a SS chip tray.
I refurbished it about 10 years ago, sandblast, paint all new bearings, seals, replaced the broken and poorly patched guide arm, ring gear and a few other things.

Yes kids, the manufacturer still has parts for a 75 year old 'obsolete' saw. :D

Pimped it out with all SS fasteners and related trim.

Cuts great, and square,,, I use it everyday.


I owned a Johnson J in the past but had to lighten my load when I moved.
It was a very good saw too.
 
OP
F

FlyingLow

Well-known member
Joined
Mar 10, 2014
Messages
127
Location
Vancouver Island
I really suggest you ditch the legs and build a cart. Lots of wasted space below that can be used for material storage and ballast so it won't tip over.

Here is my 1942?? Wells 8 or 8M with the cart I made for it with a SS chip tray.
I refurbished it about 10 years ago, sandblast, paint all new bearings, seals, replaced the broken and poorly patched guide arm, ring gear and a few other things.

Yes kids, the manufacturer still has parts for a 75 year old 'obsolete' saw. :D

Pimped it out with all SS fasteners and related trim.

Cuts great, and square,,, I use it everyday.


I owned a Johnson J in the past but had to lighten my load when I moved.
It was a very good saw too.

Wow that's awesome. I certainly won't be fully refurbishing this band saw at this point, I will certainly get it back in running order though. Looking at the condition of the original trays and legs makes me think I should build a cart like yours. Do you have​ thread for it? Or some pictures of the building of the cart to share? Any idea of the years of manufacture for the model J?
 

DougWil

Well-known member
Joined
Dec 29, 2015
Messages
545
Location
NW Montana
Wow that's awesome. I certainly won't be fully refurbishing this band saw at this point, I will certainly get it back in running order though. Looking at the condition of the original trays and legs makes me think I should build a cart like yours. Do you have​ thread for it? Or some pictures of the building of the cart to share? Any idea of the years of manufacture for the model J?

Sorry I just build stuff with what I can find and adjust from there.
It is very expensive to build something with a specific plan or dimension.

Pretty much all the cart materials came from the scrapyard. Found the SS tray 24" wide, all bent and welded up, I just cut it to length. That sort of determined the rest of the dimensions. It was probably 75 cents/lb back then. But I imagine hundreds if I went to a sheet metal shop and had it made to that size.
That is why I go that route.

The lower SS pan is some kind of commercial food steamer pan.

I just spray bottle on sawing fluid as needed. Flood cooling is very messy, and good bimetal blades last 6 months or longer with the squirt as needed method.

The cart is 2" narrower than the chip tray. So the material storage is 22", 30" and 48".

Wheels were also scrapyard salvage.

All the sheet metal is close to 1/8" thick, so I didn't need corner reinforcement in the material rack areas getting in the way.

I made it 'my height' so I don't have to lift material onto the bed or bend down to put it on.

I think Johnson made that saw up until the early 70s, then it was Dake Johnson, then just Dake.

Dig around, someone will be able to tell the year from the serial number.
That is how I know what year my Well's is, and also why I can't remember exactly what year. ;)
 
Last edited:
OP
F

FlyingLow

Well-known member
Joined
Mar 10, 2014
Messages
127
Location
Vancouver Island
Sorry I just build stuff with what I can find and adjust from there.
It is very expensive to build something with a specific plan or dimension.

Pretty much all the cart materials came from the scrapyard. Found the SS tray 24" wide, all bent and welded up, I just cut it to length. That sort of determined the rest of the dimensions. It was probably 75 cents/lb back then. But I imagine hundreds if I went to a sheet metal shop and had it made to that size.
That is why I go that route.

The lower SS pan is some kind of commercial food steamer pan.

I just spray bottle on sawing fluid as needed. Flood cooling is very messy, and good bimetal blades last 6 months or longer with the squirt as needed method.

The cart is 2" narrower than the chip tray. So the material storage is 22", 30" and 48".

Wheels were also scrapyard salvage.

All the sheet metal is close to 1/8" thick, so I didn't need corner reinforcement in the material rack areas getting in the way.

I made it 'my height' so I don't have to lift material onto the bed or bend down to put it on.

I think Johnson made that saw up until the early 70s, then it was Dake Johnson, then just Dake.

Dig around, someone will be able to tell the year from the serial number.
That is how I know what year my Well's is, and also why I can't remember exactly what year. ;)
Thanks, you have me convinced to ditch the legs. I will likely just run mild steel for the pan though and a square tube frame construction for the rack.

My next question is about the hydraulic ram though... Was filled with water when I got it. I figured just get some 1/2" rod and thread it. Wrong. One end is 1/2-20 thread for the clevis. Other end that threads into the piston is 20 tpi however it is either slightly smaller diameter or has a taper on it... Anyone have any insight to this thread? I don't have a lathe to cut threads, I'm even considering cutting and welding to use the original threads. That part doesn't ride on the seal anyway. In the pictures the longer threaded section is for the clevis.
d382eaebd78133f9933d1ec0336fb8fc.jpg
d30c84070a6f36ead5bf328b69dd1f18.jpg


Sent from my Pixel using Tapatalk
 
OP
F

FlyingLow

Well-known member
Joined
Mar 10, 2014
Messages
127
Location
Vancouver Island
Thanks, you have me convinced to ditch the legs. I will likely just run mild steel for the pan though and a square tube frame construction for the rack.

My next question is about the hydraulic ram though... Was filled with water when I got it. I figured just get some 1/2" rod and thread it. Wrong. One end is 1/2-20 thread for the clevis. Other end that threads into the piston is 20 tpi however it is either slightly smaller diameter or has a taper on it... Anyone have any insight to this thread? I don't have a lathe to cut threads, I'm even considering cutting and welding to use the original threads. That part doesn't ride on the seal anyway. In the pictures the longer threaded section is for the clevis.
d382eaebd78133f9933d1ec0336fb8fc.jpg
d30c84070a6f36ead5bf328b69dd1f18.jpg


Sent from my Pixel using Tapatalk
Sorry, it's been a while since I've posted anything. Anyway I bought new guide arms, one guide and the hydraulic cylinder rebuild kit from Dake and had great service. I bought new guide bearings from the local supplier near me. The cylinder rebuild kit was pricey for what it really is but was convenient I guess.

The hydraulic cylinder rebuild went fine although the oil rod that connects to the piston was badly corroded and would have been bad going through the seal. The clevis end was a standard size but the piston end was an odd tapered thread so I bought 1/2" round stock and threaded the end. Then I cut the rod below where it will touch the seal in normal operation and welded the 2 together. I checked run-out in the drill press and it was pretty good. Its all assembled and seems to work fine.
ac3c71626248ca694c04cab6d9374dab.jpg
9cc94524cb2e3a359cb01ea244ad15d7.jpg
2ae96a94ab25a3d7cb7c5cf7eb8531f0.jpg
9f70ee16d79f530ab0bddcd0c08d0f49.jpg
debab8bd827486358674cca4fb3a8fda.jpg


Sent from my Pixel using Tapatalk
 
OP
F

FlyingLow

Well-known member
Joined
Mar 10, 2014
Messages
127
Location
Vancouver Island
Sorry, it's been a while since I've posted anything. Anyway I bought new guide arms, one guide and the hydraulic cylinder rebuild kit from Dake and had great service. I bought new guide bearings from the local supplier near me. The cylinder rebuild kit was pricey for what it really is but was convenient I guess.

The hydraulic cylinder rebuild went fine although the oil rod that connects to the piston was badly corroded and would have been bad going through the seal. The clevis end was a standard size but the piston end was an odd tapered thread so I bought 1/2" round stock and threaded the end. Then I cut the rod below where it will touch the seal in normal operation and welded the 2 together. I checked run-out in the drill press and it was pretty good. Its all assembled and seems to work fine.
ac3c71626248ca694c04cab6d9374dab.jpg
9cc94524cb2e3a359cb01ea244ad15d7.jpg
2ae96a94ab25a3d7cb7c5cf7eb8531f0.jpg
9f70ee16d79f530ab0bddcd0c08d0f49.jpg
debab8bd827486358674cca4fb3a8fda.jpg


Sent from my Pixel using Tapatalk
So now that it's all assembled I started it up. At some point a previous owner installed a 1725 RPM 1/2 hp motor on it but put the steps on the pulleys were the same as the drive on the saw. Essentially no speed adjustment. I turned it around and started it on the fastest of 3 speeds. Popped the breaker right away. Everything spins freely by hand. Set it to middle speed and plugged into a 20 amp circuit, still popping the breaker. Slowest speed is ok. Cut a piece of 5" square tube very slowly. Motor is very hot but it did it. Talked to a guy at work, he gave me a 1 hp compressor motor but I think it's toast, I don't even know what rpm it is supposed to be and didn't let it run long enough to see what direction it runs. Anyway I think I have to seek out a proper motor and would like to know what RPM motor is supposed to be on the machine. The manual I have says 3/4 or 1 hp but doesn't specify the RPM. Can anyone offer any insight to this please?
f947eb402405dc68784f7a60efe31fdc.jpg


Sent from my Pixel using Tapatalk
 
To avoid these ads, REGISTER NOW!
Top Bottom