
You are using an out of date browser. It may not display this or other websites correctly.
You should upgrade or use an alternative browser.
You should upgrade or use an alternative browser.
DIY Garage Stool
- Thread starter KwikFab
- Start date
larry4406
Well-known member
Was watching YouTube last night and a video for building a shop stool pops up. Same technique you used with the leg spacing template and all!
Although when I first started my fab job, we always made jigs for stuff.
Sometimes I was given larger pieces of scrap to make jigs out of -


Other times I had to just weld stuff onto my main table.

There's a lot of videos and posts about making your own stool. When I saw that guy use a small jig I figured, I should do the same. It's why I have a CNC table
Have to work smarter not harder!
Those large tables above were an order for 30 sets for Disneyland although I'm not sure which location exactly. So if you've been to Disneyland and sat there on one of those tables, I probably made it.
Sometimes I was given larger pieces of scrap to make jigs out of -
Other times I had to just weld stuff onto my main table.
There's a lot of videos and posts about making your own stool. When I saw that guy use a small jig I figured, I should do the same. It's why I have a CNC table
Have to work smarter not harder!
Those large tables above were an order for 30 sets for Disneyland although I'm not sure which location exactly. So if you've been to Disneyland and sat there on one of those tables, I probably made it.


Having been out of town for the week, I was stoked to pick up my pad from the upholstery shop.
She is finally done!


The shop used a foam with a firmness similar to that of the Vyper. Being that it's larger, and wrapped in leather though, does make it a bit more comfortable.
Absolutely stoked with how the whole thing came out.
A few of you bought what I guess I could call a "kit" and I really appreciate the support!
At the moment, I won't be cutting any parts because I've got my CNC table disassembled as it's being sold soon. Waiting for a few things to pan out so I can purchase a larger table.
Hope to see those builds for those that bought a kit!
She is finally done!
The shop used a foam with a firmness similar to that of the Vyper. Being that it's larger, and wrapped in leather though, does make it a bit more comfortable.
Absolutely stoked with how the whole thing came out.
A few of you bought what I guess I could call a "kit" and I really appreciate the support!
At the moment, I won't be cutting any parts because I've got my CNC table disassembled as it's being sold soon. Waiting for a few things to pan out so I can purchase a larger table.
Hope to see those builds for those that bought a kit!
Skyman
Well-known member
That turned out great! Congrats on the fantastic execution.
That turned out great! Congrats on the fantastic execution.
Thanks!
It is stupid comfortable, and that was my whole goal here along with durability.
Part of me is like "this chair is way too nice to be dedicated to shop duty" but that's the whole goal of having it anyway.
Oh and I've still got some leather left over from all of this!
EricN.
Member
BEAUTIFUL ART! Yours looks way better than Viper!
MileHighRover
Well-known member
- Joined
- Mar 13, 2018
- Messages
- 1,118
Damn fine job.
midshipmen89
Well-known member
- Joined
- May 24, 2016
- Messages
- 52
I just bough two Vyper chairs and had them powdercoated to match my toolbox; I thought I was being fancy lol. Outstanding work!
That thing came out pretty freakin sweet.
midshipmen89
Well-known member
- Joined
- May 24, 2016
- Messages
- 52
Man, I didn't want to stomach buying one but two
Tall one for the toolbox and a short one for a welding stool. My Mac guy recently became a Vyper distributer; he was able to do them both for $1100 landed with custom powder. I don't mind giving him business, he's a good guy and has helped my apprentice out a fair bit.
I've burned through three or four $100-200 stools in eight years; I figure if Vyper is around for at least ten years to honor the warranty, I'll come out ahead, and have a better stool throughout. Sam Vimes' economic theory and all that.
Prismatic Powder's Reef Blue (PSB-4304) is a pretty good match for the Snap-on Supersonic Blue, in case anyone was wondering.
Makes sense!
I'm all for supporting local/US made if and when I can otherwise I'll just make it myself.
Speaking of US made, my CNC table is partially disassembled as of a few days ago. Placed an order for an STV CNC table yesterday
But for Vyper chairs, not for me not for that price.
1Bad55Chevy
Well-known member
- Joined
- Feb 20, 2025
- Messages
- 623
I didn't realize I needed a new stool until I saw this!
I picked up some 4" stem mount casters yesterday at HF and some questions.
1. What's the angle of the legs off of the center piece?
I was drawing this up and I was looking at a 20 degree angle tilting down.
2. Compared to the Viper tall stool your legs are much lower to the ground. Does this affect stability of the stool while rolling? It would almost seem the higher the legs mount to the seat the more stable it would be.
3. What would you do different to make it stronger or more stable? I am 6' 5" right over 300lbs so I am slightly heavier then you lol.
I didn't realize I needed a new stool until I saw this!
I picked up some 4" stem mount casters yesterday at HF and some questions.
1. What's the angle of the legs off of the center piece?
I was drawing this up and I was looking at a 20 degree angle tilting down.
2. Compared to the Viper tall stool your legs are much lower to the ground. Does this affect stability of the stool while rolling? It would almost seem the higher the legs mount to the seat the more stable it would be.
3. What would you do different to make it stronger or more stable? I am 6' 5" right over 300lbs so I am slightly heavier then you lol.
I am not at my computer but will be in another half hour.
I'd be happy to provide my measurements directly off CAD and even post the DXF here if the forum allows DXF and/or ZIP attachments.
As for the leg angle, I did a sort of in-between their tall setup and short setup. My sitting height reflects this as it'll sit at 24" about 95% of the time.
The casters I got are rated for I think 350lbs each so we're good there!
If I really wanted to beef it up, I'd use DOM welded to the seat bottom mount. Have it slide up and down inside a slightly larger diameter tube and use hitch pins to lock the seat height in place.
I didn't realize I needed a new stool until I saw this!
I picked up some 4" stem mount casters yesterday at HF and some questions.
1. What's the angle of the legs off of the center piece?
I was drawing this up and I was looking at a 20 degree angle tilting down.
2. Compared to the Viper tall stool your legs are much lower to the ground. Does this affect stability of the stool while rolling? It would almost seem the higher the legs mount to the seat the more stable it would be.
3. What would you do different to make it stronger or more stable? I am 6' 5" right over 300lbs so I am slightly heavier then you lol.
Here are your angles -


And the overall height -

With the actual measurements shown here, you can see my legs aren't too tall or short. The camera angles used when taking pictures of the stool might be throwing it off a bit.
It is extremely stable and my only concern is just how easily and smoothly it rolls away.
The casters roll without an ounce of effort and continue rolling if you let it. And it's really stable when I toss myself back against the backrest.
I just need to replace one of the casters with another one that has a brake.
1Bad55Chevy
Well-known member
- Joined
- Feb 20, 2025
- Messages
- 623
I appreciate you posting that!Here are your angles -
And the overall height -
With the actual measurements shown here, you can see my legs aren't too tall or short. The camera angles used when taking pictures of the stool might be throwing it off a bit.
It is extremely stable and my only concern is just how easily and smoothly it rolls away.
The casters roll without an ounce of effort and continue rolling if you let it. And it's really stable when I toss myself back against the backrest.
I just need to replace one of the casters with another one that has a brake.
On my initial drawings I am looking at mounting the legs at a 65* angle where yours is at 74.9. I am trying to use an acme rod same as you but shorter. My goal wold be an adjustable height range between 24" and 30".
What is preventing your stool from being lowered further? My guess is the acme rod hitting the floor?
BTW... I don't have a bad *** CNC machine so hopefully it comes out decent!
I appreciate you posting that!
On my initial drawings I am looking at mounting the legs at a 65* angle where yours is at 74.9. I am trying to use an acme rod same as you but shorter. My goal wold be an adjustable height range between 24" and 30".
What is preventing your stool from being lowered further? My guess is the acme rod hitting the floor?
BTW... I don't have a bad *** CNC machine so hopefully it comes out decent!
Post up a screenshot, would love to see how big of a leg you're going with that.
As for the height, my chair can go as low as 22" before it bottoms out and hits the concrete but if I actually needed it to be shorter, I can just cut down the ACME rod and sacrifice some height.
As it sits, it has a full range from 22.5" to 30" and both extremes are not what I'll ever set my chair at.
Since you intend to go as high as 30", I can see the need to go with a different base/leg situation.
And if you want to go with something stronger, you could opt for 1.5" diameter ACME rod - https://www.mcmaster.com/98935A924/...Y-pQaJYo37F0SAJJFrvuFoo8Rk5md7cgaArXyEALw_wcB
1Bad55Chevy
Well-known member
- Joined
- Feb 20, 2025
- Messages
- 623
Post up a screenshot, would love to see how big of a leg you're going with that.
As for the height, my chair can go as low as 22" before it bottoms out and hits the concrete but if I actually needed it to be shorter, I can just cut down the ACME rod and sacrifice some height.
As it sits, it has a full range from 22.5" to 30" and both extremes are not what I'll ever set my chair at.
Since you intend to go as high as 30", I can see the need to go with a different base/leg situation.
And if you want to go with something stronger, you could opt for 1.5" diameter ACME rod - https://www.mcmaster.com/98935A924/...Y-pQaJYo37F0SAJJFrvuFoo8Rk5md7cgaArXyEALw_wcB
I dont have any drafting software like that. I am a mechanic so I don't have cool tools like that.
My drawing was on a piece of paper that had that triangle with wheels and the center support pipe. What you are looking at here is similar to your drawings. Side C is labeled "section 1" on your drawing and side A would be "section 2". That should put the bottom of the center support pipe around 11" from the ground with 4" casters. I want to put the top of the center support around 16"-18" from the ground (so center support height between 5"-7"). I need to get the acme rod so I can measure the nut height so I can finalize the measurements and knock out a real drawing.
This should also put my base around 24" diameter with the center section being built out of 2 7/8 diameter pipe.
Attachments

I dont have any drafting software like that. I am a mechanic so I don't have cool tools like that.
My drawing was on a piece of paper that had that triangle with wheels and the center support pipe. What you are looking at here is similar to your drawings. Side C is labeled "section 1" on your drawing and side A would be "section 2". That should put the bottom of the center support pipe around 11" from the ground with 4" casters. I want to put the top of the center support around 16"-18" from the ground (so center support height between 5"-7"). I need to get the acme rod so I can measure the nut height so I can finalize the measurements and knock out a real drawing.
This should also put my base around 24" diameter with the center section being built out of 2 7/8 diameter pipe.
You're good my friend - I have a binder with graph paper on my shelf that I still use when people need me to make something for them. Comes in handy when I'm having to go to them.
The software I use is Fusion 360, and it's completely free to use. No formal training, hell I don't even have a college degree! Just a disabled vet, doing what he can out of his own garage! I'm completely self-taught.
But, I'm always willing to help people figure things out when needed (if anything I know is worth anything). I say this in the event that you wish to get into CAD yourself, it's really easy.
With such a large diameter pipe, what diameter rod are you going to use? On the plus side, whatever rod size you opt to use, McMaster has dimensions for all their stuff.
The nuts for the 1" diameter ACME I used are 0.984" tall.
I'm betting you're going to add some sort of 'bracing' between the bottoms of the legs like Vyper does as well? It'll help to keep the legs from bending laterally in the event that your stool rolled away and flipped with something heavy on top.
Last edited:
Made multiple sets and they've shipped all over; never expected so much interest!
With that said, I do get PM's from time to time here asking for specific details so rather than force someone to go through every post, I will sum up all the details as best as I can here.
1a. If you are creating your own stool bottom, you will find it best to use a hardwood as you will need to install T-nuts for securing your seat to the mount (included in the kit).
Since I am not a wood worker, I opted for a 13.25" diameter ash hardwood at 3/4" thick and had a friend make it for me.
1b. You'll want to purchase T-nuts (as mentioned above). The common size used is 1/4" - 20 but I wanted something stronger so I went with M8. Make sure you order some bolts for your T-nuts as well.
1c. You can allow an upholstery shop to provide the remainder of your stool cushion parts, but I wanted genuine leather so I ordered top-grain leather online measured at 2.6oz/sq ft. And it goes without saying, you can provide the cushion of your choice or allow the shop to provide it.
2. A total of 5 stem casters. Highly encourage getting at least 2 of 5 with brakes, especially if you opt for quality casters as they will roll easily. You also want to consider the size of the stem itself - I went with 1/2" diameter at 1 1/2" tall for easily sourcing steel rod to mount them in.
3. Steel rod for your stem casters. One foot will suffice as you'll cut 5 pieces at 1" long to weld onto the leg ends (included in the kit). I used steel rod with an ID of 0.58"
4. ACME rod for your stool itself. I do not suggest all-thread but others have used it. I went with 1" diameter rod.
5a. ACME nuts for allowing the installation of the rod. You can opt for 2, and supply a handle for locking your rod in place or utilize 3 total with a third acting as a lock nut. One will go inside your center tube, one will get welded to the stool mount.
5b. ACME handle in lieu of a nut. This way you can just lock and unlock your stool without the use of tools.
6. Some sort of footrest whether it be tubed rolled up or thick steel cut as a large round. I paid a shop to roll some 1" diameter tube at an 18" diameter. This will not only give you a place to sit your feet, but also add strength between the legs.
If you've read this far I want to add one more thing - if you are local, I can offer a backrest setup to go with this kit.
I can only provide this to locals as it's rather large and will increase shipping costs exponentially.
1Bad55Chevy
Well-known member
- Joined
- Feb 20, 2025
- Messages
- 623
I am finishing up my stool now of a totally different design so I will start a thread.
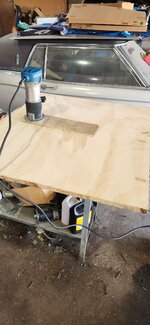
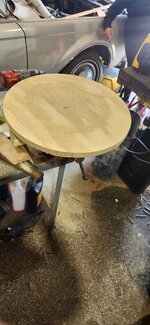
I wanted to chime in on cutting the seat. I used 3/4 ply wood on mine and rigged up a tool out of some crappy paneling to cut it perfectly round with my router. Here are some pictures of how I did it. I was able to cut it in 3 passes with this small router.
I wanted to chime in on cutting the seat. I used 3/4 ply wood on mine and rigged up a tool out of some crappy paneling to cut it perfectly round with my router. Here are some pictures of how I did it. I was able to cut it in 3 passes with this small router.
Attachments

Beerhippie
Well-known member
That would be a species of the genus of Trammels.I am finishing up my stool now of a totally different design so I will start a thread.
I wanted to chime in on cutting the seat. I used 3/4 ply wood on mine and rigged up a tool out of some crappy paneling to cut it perfectly round with my router. Here are some pictures of how I did it. I was able to cut it in 3 passes with this small router.
Biggest I ever made was 23' for cutting the "wild" edges of a 40' dia. yurt platform with a Skilsaw.
PugetDude
ALLIANCE MEMBER
What is it with old hippies and yurts?
Beerhippie
Well-known member
Extremely rich old hippies--not me.What is it with old hippies and yurts?
More lucrative than building platforms is building the furniture to go inside... very similar to interior work on boats, but at least the curve is simple and continuous.
These are yurts in name only--never meant to be moved. A real yurt is portable, as befits a nomad society.
Got notification of this thread being liked
Thought I could add the second stool I made for a repeat customer!


Since I don't have a means of rolling tube, as discussed earlier in the thread, I opted to make my own brace to provide additional strength to the legs and prevent any lateral movement (in the worst case scenario).
With that said, the stool got picked up last week and last I heard is that the whole assembly is being powder coated.
Leather was ordered, and the customer will have their family member do the upholstery.
Hoping to post pics once it's done!
Thought I could add the second stool I made for a repeat customer!
Since I don't have a means of rolling tube, as discussed earlier in the thread, I opted to make my own brace to provide additional strength to the legs and prevent any lateral movement (in the worst case scenario).
With that said, the stool got picked up last week and last I heard is that the whole assembly is being powder coated.
Leather was ordered, and the customer will have their family member do the upholstery.
Hoping to post pics once it's done!
you made two, offer them diy or put together and available to order
I've sold probably 12 or 13 kits so far! Never intended to sell them actually, as I went as far as to publicly share the files I created myself for others to re-create.
Refer to post #185 where I also cover specific parts I used in case someone needs help with picking out parts.
What was originally a chair I wanted to make for myself (both high-end custom, and DIY) turned out to be a project others wanted to embark on as well which I thought was awesome.
driftpin
Well-known member
I went thru the whole thing, that turned out great. Your wood craftsman will appreciate that one you made for him. That's good you can both get something out of it.
Seeing how you made running changes, that's a good sign I'd believe. Not a slave to the original plan, and common-sense makes the final product a better use of your time, and in this case, more-comfortable to boot. Il like the leather instead of vinyl. The larger backrest pad looks and feels better, I expect.

One of my fire-rescue co-workers had an '87 300ZX turbo, in white. That was also a pretty car.
Seeing how you made running changes, that's a good sign I'd believe. Not a slave to the original plan, and common-sense makes the final product a better use of your time, and in this case, more-comfortable to boot. Il like the leather instead of vinyl. The larger backrest pad looks and feels better, I expect.
'86 300zx ?
I had an '84 long ago. I rarely see that era on the road these days.
Great stool project, BTW.
I had a 1986 300ZX 2+2, aero package, the electronic dashboard, t-tops. I bought it from a G.F. w/~60K miles, and it was pretty. I had it for several years and sold it. I spotted yours as an '86 right-away.Good eye! Not everyone knows the subtle differences when going from Zenki to Kouki and the '86 specifically.
Used to own two different '85 Turbo Z31's but they're long gone.
This one's literally got just a few miles on the fully rebuilt motor.
One of my fire-rescue co-workers had an '87 300ZX turbo, in white. That was also a pretty car.
PugetDude
ALLIANCE MEMBER
You had a GF with 60,000 miles on her?I went thru the whole thing, that turned out great. Your wood craftsman will appreciate that one you made for him. That's good you can both get something out of it.
Seeing how you made running changes, that's a good sign I'd believe. Not a slave to the original plan, and common-sense makes the final product a better use of your time, and in this case, more-comfortable to boot. Il like the leather instead of vinyl. The larger backrest pad looks and feels better, I expect.
I had a 1986 300ZX 2+2, aero package, the electronic dashboard, t-tops. I bought it from a G.F. w/~60K miles, and it was pretty. I had it for several years and sold it. I spotted yours as an '86 right-away.
One of my fire-rescue co-workers had an '87 300ZX turbo, in white. That was also a pretty car.
Hopefully those were highway miles, not stop and go...
Meursault74
Well-known member
maybe you've seen this bit by George Carlin. It's vulgar and ****. He talks about "mileage calculation" as well towards the endYou had a GF with 60,000 miles on her?
Hopefully those were highway miles, not stop and go...