To avoid these ads, REGISTER NOW!

DIY heat pump install on house

dscheidt

Well-known member
Joined
Apr 26, 2017
Messages
2,909
Okay, looking for those..

Screen Shot 2024-07-23 at 12.08.49 PM.png

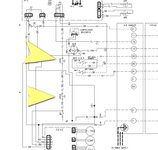
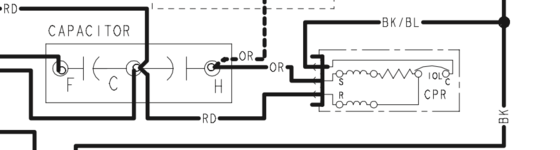
Okay, I see S and R going into the compressor (CPR), and then 'C' over on the right side. I'm guessing those are it.

So, test resistance between
Black/Blue (C) <--> Orange (S)
Black/Blue (C) <--> Red (R)

then

Red (R) <--> Orange (S)

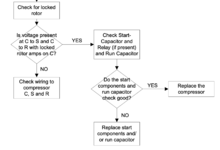
According to the flowchart. Do I have that about right?
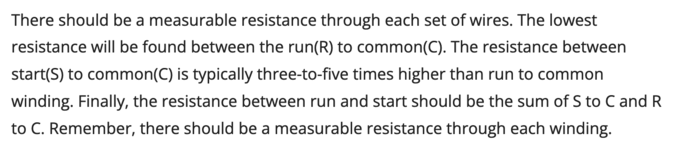
See this: https://m.lennoxpros.com/news/the-proper-way-to-ohm-a-single-phase-compressor (different brand, but it's a compressor, they operate in very similar fashion).
 
To avoid these ads, REGISTER NOW!
OP
T

teknikfrog

Well-known member
Joined
Apr 29, 2023
Messages
216
Okay, bingo:

Screen Shot 2024-07-23 at 12.30.43 PM.png

My measurements:
C to S: 2.2
C to R: 0.8
R to S: 2.8

So perfectly nominal, right?

So that gets us further in the flowchart:

Screen Shot 2024-07-23 at 12.31.34 PM.png

I'm unsure what that "is voltage present" section is asking me to do, help!

EDIT: After reading further, it sounds like a locked rotor would kill the breaker, so I don't think it's that which basically terminates the flowchart. It's a little premature for me to say this but I don't think my compressor is shot. I feel like maybe the contactor is failing or maybe something else like a low pressure cutoff or maybe a bad sensor?

The only thing I'm unable to test would be any current draw as I do not own a clamp meter, but I'm totally willing to run down to Ace and pick one up if you guys think I should!
 
Last edited:

Davefr

Well-known member
Joined
Jan 7, 2010
Messages
11,849
Location
OR
When it cuts out after 3 second is it both the compressor and OFM? If so that would imply the control board is shutting the system down. If the OFM runs but only the compressor cuts out that could be the contactor. At least on my system the contactor only energizes the compressor, The OFM is controlled by a separate relay on the control board.
 
OP
T

teknikfrog

Well-known member
Joined
Apr 29, 2023
Messages
216
When it cuts out after 3 second is it both the compressor and OFM? If so that would imply the control board is shutting the system down. If the OFM runs but only the compressor cuts out that could be the contactor. At least on my system the contactor only energizes the compressor, The OFM is controlled by a separate relay on the control board.
I assume OFM is outdoor fan.....module?

Fan and compressor both cut out together. So that must eliminate contactor as an issue.

The more I marinate on this, the more I think I have a bad sensor. I feel like if it was a leak even the scammiest/dumbest tech would have documented low charge.

I'm definitely feeling like the compressor is not the problem. It runs! It sounds 100% normal how it's always sounded. The windings aren't melted together or open circuit, and the whole thing isn't seized up because IT RUNS.

Tried to go buy a clamp meter but neither of the two hardware stores in this town carry any (lol). Ordered one from amazon.
 

Davefr

Well-known member
Joined
Jan 7, 2010
Messages
11,849
Location
OR
I assume OFM is outdoor fan.....module?

Fan and compressor both cut out together. So that must eliminate contactor as an issue.

The more I marinate on this, the more I think I have a bad sensor. I feel like if it was a leak even the scammiest/dumbest tech would have documented low charge.

I'm definitely feeling like the compressor is not the problem. It runs! It sounds 100% normal how it's always sounded. The windings aren't melted together or open circuit, and the whole thing isn't seized up because IT RUNS.

Tried to go buy a clamp meter but neither of the two hardware stores in this town carry any (lol). Ordered one from amazon.
OFM is outdoor fan motor.

Your compressor is probably just fine. It sounds like the control board is shutting the entire system down to protect it. I think this can be the result of overcharge, undercharge, or maybe the control bd. is faulty. If it's detecting a fault it should be providing a code.

Maybe you could check the various sensors when it shuts down the system. Or temporarily jumper them one at time in "normal" to see which one is triggering the shutdown.

I don't think a clamp meter will tell you much at this point.

Hopefully the other guys can give you some better tips. I'd be studying the service manual for your specific system if you have one.
 
OP
T

teknikfrog

Well-known member
Joined
Apr 29, 2023
Messages
216
OFM is outdoor fan motor.
ah

Your compressor is probably just fine. It sounds like the control board is shutting the entire system down to protect it. I think this can be the result of overcharge, undercharge, or maybe the control bd. is faulty. If it's detecting a fault it should be providing a code.

Yes it is very odd it's not providing a fault code. Kinda points to maybe a control board as the issue.

Maybe you could check the various sensors when it shuts down the system. Or temporarily jumper them one at time in "normal" to see which one is triggering the shutdown.

Yeah I'd like to go down this road I just don't have the resources (documentation) to do so. The folks here have been an absolute lifeline.

I don't think a clamp meter will tell you much at this point.
I agree. I think if the motor was pulling far too many amps there would be other symptoms like weird noises or breakers blowing. That said it would be useful to confirm the RLA amps are correct which I guess would basically confirm the compressor is fine. Wish my automotive gauges worked on a r410 system it would be useful to see what is going on.


Hopefully the other guys can give you some better tips. I'd be studying the service manual for your specific system if you have one.
Boy I wish!

At this point my theories I think are:
- Bad sensor (pressure sensor maybe?)
- Bad reversing valve (maybe its sticking in heat mode? Of course I'm not sure why it would be reversing mid-summer) or controls for reversing valve maybe?
- Bad control board somewhere (though its not the outside EEV!). Maybe a bad capacitor on a PCB somewhere? Had a washing machine I fixed this way.


...the plot continues.
 

Davefr

Well-known member
Joined
Jan 7, 2010
Messages
11,849
Location
OR
After 3 seconds when the system shuts itself down, I'd connect a meter to each of these two sensors. If either one is open the system will shut itself down. It will probably try to restart after a timeout but then shut down again. LPCO = low pressure cutout, HPCO = high pressure cutout. Ignore anything EEV related since it's used in heating mode only and it looks like the diagnostic LEDs on EEV won't give you any indication of LPCO or HPCO status. I suspect it would be easier to measure at the actual sensors then finding where their connections are on the control board.

Trane.jpg
 
Last edited:
OP
T

teknikfrog

Well-known member
Joined
Apr 29, 2023
Messages
216
So, wait for cut out, unplug sensor, check for open circuit on sensor wire leads?

And open circuit means "fault detected" basically?
 

Davefr

Well-known member
Joined
Jan 7, 2010
Messages
11,849
Location
OR
So, wait for cut out, unplug sensor, check for open circuit on sensor wire leads?

And open circuit means "fault detected" basically?
I assume closed = normal and open = fault. I'd connect the ohmeter direct to the sensor terminals upon shutdown. (don't remove the actual sensor or wiring going to it). It you detect an open then jumper that sensor to force "normal" and see if it runs >3 minutes and then shut the system down until the problem is corrected. Has it been unseasonably hot where you live? If so, maybe a refrigerant overcharge and very high ambient temp is pushing that sensor above it's pressure setpoint. Just an idea.
 
OP
T

teknikfrog

Well-known member
Joined
Apr 29, 2023
Messages
216
Okay here is my results from that:

- I located a yellow/red wire at the contactor which I believe connects to the LPCO
- I located a yello/black wire at connector P4 on the control board, which I believe connects to the HPCO

(please correct me if I drew the wrong conclusions!)

I then checked continuity between these two items leaving them connecting. Closed circuit.

I then ran the system, waited for it to shut off and checked again. Open circuit.

So one of these two sensors appears to be causing the trip.

From here I'm not quite sure how to determine which one is the culprit, and then furthermore how I would determine if the sensor is bad or actually detecting a low/high pressure issue.

Great progress though!
 

pcmeiners

Well-known member
Joined
Aug 13, 2009
Messages
7,961
Location
In the only town in Pennsylvania, Bloomsburg.
"That said it would be useful to confirm the RLA amps are correct which I guess would basically confirm the compressor is fine."

Ohm law will give the current draw if you can isolate the line feed to the compressor and check the resistance of the feed lines, and using the following link...

 
OP
T

teknikfrog

Well-known member
Joined
Apr 29, 2023
Messages
216
"That said it would be useful to confirm the RLA amps are correct which I guess would basically confirm the compressor is fine."

Ohm law will give the current draw if you can isolate the line feed to the compressor and check the resistance of the feed lines, and using the following link...

There is no way this would work because as the motor spins up to speed the amp draw changes and all I have is static numbers.

I mean, unless I'm missing something.
 
OP
T

teknikfrog

Well-known member
Joined
Apr 29, 2023
Messages
216
Another small update--I opened up the inside unit and found the status LEDs. All green, no faults ever displayed.

So I guess what I need to determine is do I have a bad sensor, or a good sensor detecting a problem in the system. The only thing I can fathom causing an actual low pressure situation is a clogged expansion valve or something which seems implausible on a system that hasn't had work done anytime recently, that or a bad indoor EEV controller causing the valve to close when it shouldn't. I feel like I read somewhere the reversing valve fails to cooling, so that wouldn't be it.

I suppose I'm running out of things to check without gauges sadly, because I can't just jumper the LPCO without looking at system pressures.....
 

Davefr

Well-known member
Joined
Jan 7, 2010
Messages
11,849
Location
OR
Okay here is my results from that:

- I located a yellow/red wire at the contactor which I believe connects to the LPCO
- I located a yello/black wire at connector P4 on the control board, which I believe connects to the HPCO

(please correct me if I drew the wrong conclusions!)

I then checked continuity between these two items leaving them connecting. Closed circuit.

I then ran the system, waited for it to shut off and checked again. Open circuit.

So one of these two sensors appears to be causing the trip.

From here I'm not quite sure how to determine which one is the culprit, and then furthermore how I would determine if the sensor is bad or actually detecting a low/high pressure issue.

Great progress though!
You'll need to test each sensor separately to determine which one is cutting out. My guess is HPCO. What happens if you run the system during the coolest time of the day? Will it run >3 minutes. If run time varies based on ambient temp you likely have a refrigerant charge issue.
 
OP
T

teknikfrog

Well-known member
Joined
Apr 29, 2023
Messages
216
You'll need to test each sensor separately to determine which one is cutting out. My guess is HPCO. What happens if you run the system during the coolest time of the day? Will it run >3 minutes. If run time varies based on ambient temp you likely have a refrigerant charge issue.
I've tested throughout the day and get the exact same results every time. It's nowhere near peak summer and nothing has been done w/ the system charge in years.
 

Davefr

Well-known member
Joined
Jan 7, 2010
Messages
11,849
Location
OR
Another small update--I opened up the inside unit and found the status LEDs. All green, no faults ever displayed.

So I guess what I need to determine is do I have a bad sensor, or a good sensor detecting a problem in the system. The only thing I can fathom causing an actual low pressure situation is a clogged expansion valve or something which seems implausible on a system that hasn't had work done anytime recently, that or a bad indoor EEV controller causing the valve to close when it shouldn't. I feel like I read somewhere the reversing valve fails to cooling, so that wouldn't be it.

I suppose I'm running out of things to check without gauges sadly, because I can't just jumper the LPCO without looking at system pressures.....
The status LEDs only give you a readout for the EEV but it's not used in cooling mode. Ignore them.

You need to pinpoint which of the two sensors is opening up. Shouldn't be hard to do. Then google "what causes _PCO to cutout heat pump".

I'm betting you have a refrigerant/charge issue. Undercharge (leak) or overcharge. But it could also be a bad sensor or control board.
 
OP
T

teknikfrog

Well-known member
Joined
Apr 29, 2023
Messages
216
The status LEDs only give you a readout for the EEV but it's not used in cooling mode. Ignore them.
No, I meant I checked the status LEDs on the INSIDE air handler.

You need to pinpoint which of the two sensors is opening up. Shouldn't be hard to do. Then google "what causes _PCO to cutout heat pump".
I can do that but I feel like without gauges I have no way to determine if it's a faulty sensor or a real condition.

Guess I'm at a stopping point for now. Maybe I'll pickup a set of gauges.
 

Davefr

Well-known member
Joined
Jan 7, 2010
Messages
11,849
Location
OR
A heat pump can go into high pressure lockout mode for a number of reasons, including:
  • Dirty or clogged air filters
    These can restrict airflow, which can cause refrigerant pressure to increase.
  • Refrigerant leak
    A leak can reduce the amount of refrigerant in the system, causing the remaining refrigerant to work harder and increase pressure. A hissing or bubbling sound can indicate a refrigerant leak.
  • Dirty or blocked condenser coil
    The condenser coil releases heat from the refrigerant, but if it's dirty or blocked, it can't release heat effectively. As the refrigerant warms up, it builds pressure and can trigger the lockout.


  • A low pressure lockout on a heat pump can be caused by a number of factors, including:
    • Refrigerant level
      If the refrigerant level drops below what's needed for proper operation, it can cause pressure issues. This can be due to leaks, an improperly sized unit, or incorrect installation.
    • Cut-in pressure
      If the cut-in pressure on the pressure switch is too close to the tank pre-charge, the switch may trip. A difference of at least 2–5 PSI is needed to prevent this. For example, if the switch cut-in is 40 PSI, the tank pre-charge should be 35–38 PSI or less.
    • Ambient temperature
      Changes in the ambient temperature can affect the pre-charge pressure in the tank, which can cause nuisance tripping when the seasons change.


Davefr

Well-known member
Joined
Jan 7, 2010
Messages
11,849
Location
OR
No, I meant I checked the status LEDs on the INSIDE air handler.


I can do that but I feel like without gauges I have no way to determine if it's a faulty sensor or a real condition.

Guess I'm at a stopping point for now. Maybe I'll pickup a set of gauges.
NO!! Next step is to determine if it's LPCO or HPCO that's cutting out. That's very simple to narrow down.
 
OP
T

teknikfrog

Well-known member
Joined
Apr 29, 2023
Messages
216
NO!! Next step is to determine if it's LPCO or HPCO that's cutting out. That's very simple to narrow down.
Alright! I appreciate all of the help.

I located two wire nuts:
YL <--> YL/BK
OR/YL <--> YL/RD

Pretty sure those are the LPCO. Checked continuity, good.

Ran system till it cut out. Checked continuity, open circuit.

So it sounds like it is the LPCO.

Is there anything I can check from here? BTW I just ordered a gauge set. Been needing to replace my auto gauges anyway so I got a set that can do double duty.
 
To avoid these ads, REGISTER NOW!

brewchief

Well-known member
Joined
Sep 20, 2008
Messages
2,371
Location
Michigan
There are plenty of youtube videos on troubleshooting the trane eev, I suspect that the prior tech was partially right in that you have an eev problem, it sounds like indoor eev is not opening and the unit then pumps itself down and shuts off on low pressure.

Unfortunately stuff like this is the consequence of making everything overly complicated.
 
OP
T

teknikfrog

Well-known member
Joined
Apr 29, 2023
Messages
216
There are plenty of youtube videos on troubleshooting the trane eev, I suspect that the prior tech was partially right in that you have an eev problem, it sounds like indoor eev is not opening and the unit then pumps itself down and shuts off on low pressure.

Unfortunately stuff like this is the consequence of making everything overly complicated.
For Real.
 

American Locomotive

Well-known member
Joined
Jan 8, 2017
Messages
11,014
Location
Rhode Island
Yes, it sounds like the unit is pumping down and cutting out on low pressure.

Something to keep in mind is that the EEV while not "used" for cooling mode, is still part of the circuit. The system is supposed to drive the EEV fully open, so it acts like it's not there.

On page 8 of the PDF, it describes how to short the "Test" pin to closed/open pins, which should drive the EEV to a certain position. It seems like test only works when the system is "on", and it would be difficult to ascertain if the EEV is working with the system making noise. I would disconnect the compressor contactor coil, set system to "cool", and then work the test pins and see if you can hear the EEV moving.
 
OP
T

teknikfrog

Well-known member
Joined
Apr 29, 2023
Messages
216
I'll try testing the outside EEV once my coffee kicks in.

I wonder if there is an equivalent test for the inside one....

EDIT: After re-examining these diagrams, it seems like the outside expansion valve is electronically controlled, and the inside one is not. Wonder why that is....

That would imply that my problem lies with the outside valve as I would expect an electronically controlled system to be less reliable than a mechanical one.

Additionally, assuming the control board is bad, I wonder if there is a way to rig the valve manually so I can get AC with 90* weather on the horizon.....
 
Last edited:
OP
T

teknikfrog

Well-known member
Joined
Apr 29, 2023
Messages
216
Okay new checks:

WARNING THERE IS HIGH VOLTAGE WORK HERE THAT I AM OMITTING FOR BREVITY!!

- I disconnected the two control lines on the contactor (I actually dont think this step is necessary, because the test should work with AC off at the thermostat. the test instructions back this up as well in a note)
- I jumpered the EEV test to open. dead silence
- I jumpered the EEV test to close. dead silence
- I put the contactor back together and re-ran, same results (as expected)
- I went ahead and checked the suction line temp sensor and pressure transducer sensors. I got results back that were middle-of-the range--i.e. those sensors are fine

EEV fault code #6 is for "Valve is not responding to a position change command (Possible stuck valve)"

I'm not getting ANY fault codes.

My conclusion is the EEV control board is bad. And is probably the only failed part. If the valve was bad the controller would be telling me as such.

Anyone have ideas on how I could manually command the valve open without the control board? Because that would get me all the way through summer with air conditioning.
 
Last edited:
OP
T

teknikfrog

Well-known member
Joined
Apr 29, 2023
Messages
216
Agreed.

When questions are formulated clearly the collective genius here is awesome.

Thanks @Ryan !
100% agreed, this place is amazing.

And as the one graciously accepting help it's the least you can do to be detail-oriented and meticulous. Yeah it's great if I can save some money, but the knowledge is priceless.
 

Davefr

Well-known member
Joined
Jan 7, 2010
Messages
11,849
Location
OR
If it were my system, I'd still jumper across LPCO and start the system and see if it runs past the 3 minute mark but probably not more than 5 minutes. That would be conclusive proof that the root cause of the problem is low pressure.

Other than checking filters, coils, electronics there's probably not a whole lot more you can do if the issue is refrigerant related. You'll likely need to recover the refrigerant to go much further with any repairs. That pretty much requires a pro. If you need to find another tech make sure it's a diagnostics tech vs an installation tech and you might be better off looking for a small independent shop vs a large company that only cares about selling new systems.
 
OP
T

teknikfrog

Well-known member
Joined
Apr 29, 2023
Messages
216
If it were my system, I'd still jumper across LPCO and start the system and see if it runs past the 3 minute mark but probably not more than 5 minutes. That would be conclusive proof that the root cause of the problem is low pressure.
I overnighted the EEV control board so I'll have some more insight tomorrow.


Other than checking filters, coils, electronics there's probably not a whole lot more you can do if the issue is refrigerant related. You'll likely need to recover the refrigerant to go much further with any repairs. That pretty much requires a pro.
I think I'm done with HVAC pros. I've already priced out a recovery machine, tank, etc and will not hesitate to go down that road.


If you need to find another tech make sure it's a diagnostics tech vs an installation tech and you might be better off looking for a small independent shop vs a large company that only cares about selling new systems.
I'm just done with the whole thing. I'm still getting follow ups from companies and they are all following the exact same pattern and I smell a rat.

Really appreciate all the help btw.
 
OP
T

teknikfrog

Well-known member
Joined
Apr 29, 2023
Messages
216
Okay, got the new EEV board in. Right off the hop I ran the test.

I could hear a noise on both open and close tests, reminiscent of worm drive motor, kinda like a car seat motor being ran. It was pretty quiet but unmistakeable. I'm fairly certain the old board did not make that noise but I am somewhat doubting myself because..

It did not fix the problem. I'm still having the exact same symptoms. No error code still. LPCO is still tripping to open circuit.

My gauges are in post office limbo I might be able to get them today hopefully. Once those arrive I'll hook them up and watch what the refrigerant is doing. In addition, I'll go ahead and bypass the LPCO. I want to wait till I have gauges so I can tell if there is a true low pressure situation or not.

Really bummed, I was like 70% sure this was going to fix my problem.

To be continued...
 
OP
T

teknikfrog

Well-known member
Joined
Apr 29, 2023
Messages
216
There could be compounding issues. Make sure you drive the EEV to full open before running the compressor
I actually neglected to mention I tried that but it didn't seem to matter.

Okay I have gauges. Some more data points:

System off:
1.jpg
~87 psi by my guesstimation. I believe this is called the saturation pressure? Does 87 seem low? EDIT: I'm going off the 410 markings on the gauges. Should I be using psi instead? I'm used to auto gauges that don't have all these markings. I presume I should probably go off psi. Curious what the 410 markings are for!

Turned the system on and the high side needle did not move a millimeter. Gradually over ~45 seconds the suction side pressure dropped lower and lower until it hit here, and then tripped the LPCO.
2.jpg


Not quite sure what to make of this. Couple thoughts:
- Doesn't look like the LPCO is the problem
- Well obviously the compressor is fine because it's pulling suction
- It has all the hallmarks of a clog
- With the sound of the EEV valve running (worm gear motor sound), I feel like I can probably rule that out
- That leaves the inside TXV. Anyone have any idea how I can test that part? The diagrams I have are all only for the outside condenser unit, I have nothing for the evap side
 
Last edited:
OP
T

teknikfrog

Well-known member
Joined
Apr 29, 2023
Messages
216
Okay now THIS is interesting.

It sits in the suction side "low pressure" state for a while. If I cut power to the unit it immediately goes back to equal pressure high/low.

Anyway, what I just discovered is that I AM UNABLE TO RUN THE EEV TEST when its in this "low pressure" state!! I cannot open or close, it just does nothing at all.

Another data point I can't make heads or tails of; if I command the EEV valve open with test, and hit the contactor, the suction pressure RISES. High pressure side stays in the same spot.

It feels like my problem is an issue with one or more of the following, or maybe even a combo:
- EEV
- TXV
- Reversing valve

EDIT: Actually looking at the evap coil it appears the TXV is ALSO electronically controlled. There is like 5 wires running to it and no sensing bulb in the traditional sense. I'm guessing 2 wires for temp sensing, 2 wires for power, and 1 wire to tell it how far to open. Really would like to find a way to test it!
 
Last edited:
OP
T

teknikfrog

Well-known member
Joined
Apr 29, 2023
Messages
216
UPDATE UPDATE UPDATE UPDATE

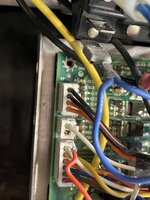
WELL LOOKIE WHAT I FOUND ON THE EVAP EEV CONTROL BOARD:

photo_2024-07-25_14-16-14.jpg
 
OP
T

teknikfrog

Well-known member
Joined
Apr 29, 2023
Messages
216
Red wire not inserted into the port in the middle terminal block?
Yep. Sadly a red herring. The schematic on the door says it is for "optional condensate switch" (I think, kinda hard to read). But I traced it to the other end and the other end is unplugged. So apparently NOT my issue, though another sign of really bad workmanship because not only had that come apart but there was a 1" stretch of wire running to a wire nut and twisted together REALLY poorly. Just absolute clownish buffoonery.

I did end up finding the install manual and air handler documentation crammed above my unit so I'm going over that now. I also found an indoor EEV control test points. The indoor EEV seems like it opens and closes fine according to the test.

Definitely making great progress, even though I am still stuck.
 
Last edited:
OP
T

teknikfrog

Well-known member
Joined
Apr 29, 2023
Messages
216
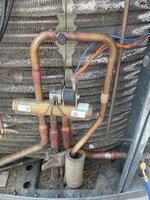
One more data point. Found the reversing valve after some sleuthing. Here is is:

photo_2024-07-25_15-35-15.jpg

Strangely enough there is zero documentation on this thing from the condensor service facts.

Top line is HOT

Left: HOT
Middle: COLD
RIGHT: COLD

Not sure what to make of that. Not seeing a problem I guess but I'm not quite sure on the refrig. routing. No clue how to test. The solenoid does make noise but I can't tell if the internals are moving or not. TBH the solenoid kinda sounds like the only noise that is happening.
 

brewchief

Well-known member
Joined
Sep 20, 2008
Messages
2,371
Location
Michigan
The 87 on the gauge is your saturation temp, the point where both liquid and gas are present. At rest this is going to be basically room( or in this case outdoors) temp. It's around 265 psi without zooming in to much.
 
To avoid these ads, REGISTER NOW!
Top Bottom