To avoid these ads, REGISTER NOW!

Between 705 & 1200 SQ/FT DIY Shop

Workspaces between 705 and 1200 squarefeet.
OP
J

Jeff Ivers

Well-known member
Joined
Apr 9, 2010
Messages
2,552
Location
Oklahoma
Funny... I helped my Dad install that same dishwasher last spring. I'm sure you're already enjoying how quiet it is. Also, don't be afraid to skip rinsing the dishes before loading - apparently that thing really does a good job of cleaning.

Thanks for the info on abilities of the washer. The next time I have company, I will test that out (the non rinse part). On a regular basis, living alone, I only run the dishwasher every 4 or 5 days or so. I have never had the courage to leave food on the dishes for that length of time - concerned about smell, pests and dried on gunk. I can't buy into running it every day for a couple of glasses, a bowl and a plate which is about what I get dirty on a daily basis.
 
To avoid these ads, REGISTER NOW!
OP
J

Jeff Ivers

Well-known member
Joined
Apr 9, 2010
Messages
2,552
Location
Oklahoma
I realized today that it has been a month since I updated this thread. I have been posting elsewhere about the rebuild and improvement of my blast cabinet that I am re-doing. I had fully expected, by now, to post pics of the before and after of the redo. Then we had 11 days of not getting above freezing, an ice storm and 2 snow storms.

My shop is heated and is quite comfortable to work in. However, I let the weather dissuade me from bundling up to walk to the shop, unbundling to work, etc and decided to tackle filing my income tax work and some other indoor items.

blast cabinet 4 r.jpg
A before shot of the blast cabinet I am redoing.

blast cabinet 39 r.jpg
The modified and repainted bin.

blast cabinet 52 r.jpg
The 2 bedframe rectangles I welded to serve as leg stiffeners.

blast cabinet 53 r.jpg
This picture shows one of the 4 remaining holes I am trying to drill right thru where I welded the mitered corners. These 4 holes are eating my lunch. What should I be doing different?
 
Last edited:

bj383ss

Well-known member
Joined
Sep 29, 2011
Messages
3,166
Location
TX
I'm guessing the steel is hardened where you welded it. Is the drill bit sharp? Only other thing I know is to us cutting fluid or possible start with a smaller bit size.

Bret
 
OP
J

Jeff Ivers

Well-known member
Joined
Apr 9, 2010
Messages
2,552
Location
Oklahoma
I am almost done with my blast cabinet project.
blast cabinet 4 r.jpg
Went from this.
blast cabinet 67 r.jpg
To this.

Of course during the work on this project, the weather warmed up enough to go back to mowing. This meant a bit of work to the tractor. Rewelding one of the gauge wheel brackets and replacing one of the fuel filters. Of course what should have been a 15 minute job for the filter replacement took a good 2 hours. Why? Because the factory had stripped the threads on the bolt that held the fuel filter bracket. In the end, I had to grind the head off the bolt which resulted in a break from the edge of the bracket to one of the bolt holes and distortion of the bracket. Had to weld the bracket and reshape it over a piece of exhaust tubing.

Then I had a bit of an issue with the attack Canadian Geese. I was attacked going into the shop by the female who had decided the mulch at the base of the tree 8 feet in front of my shop door was an ideal nesting spot. Now, I enjoy having wildlife on the property, but I highly object to anything that interferes with me getting into my shop. While trying to shoo her away, she sent out an alarm and the male came and attacked me as well. Called animal control, called wildlife department. Bottom line, everyone said can't hurt them but do not let them nest where you don't want them. Finally solved the problem by getting on the Kutbota, putting it in high gear at maximum throttle, and chasing the geese across the property. Chased them about 400 feet at which point they took to the air and did a 180. I did a 180 also, almost turning over the tractor, and chased them another 800 feet with them flying in the air and me flying on the ground. They have not returned in over 2 weeks. Yea!

south barn middle before r.jpg
south barn right before r.jpg
Decided it was time to redo the paving stones in two sections of the south barn overhang. Finished yesterday, but didn't get any done pictures due to rain.

WM type 2 5 r.jpg
Hit an estate sale and picked up my newest restoration project.
 

bj383ss

Well-known member
Joined
Sep 29, 2011
Messages
3,166
Location
TX
Sandblasting cabinet is looking good Jeff. But the geese story is even better! HAHA


Bret
 
OP
J

Jeff Ivers

Well-known member
Joined
Apr 9, 2010
Messages
2,552
Location
Oklahoma
south barn center after.jpg
south barn right after.jpg
Here are pics of the completed pavers work on the south of my barn. According to the experts, one should rent a plate compactor and go over the set pavers. Since some of these are rather thin and brittle concrete (1.5 inch), I decided to forego that and rely on the screeded sand base to get everything level enough.
WM type 2 7.jpg
Although all the metal bits of my estate find Workmate Type 2 are in decent shape, I have never come across such a bad case of delamination.
WM type 2 10.jpg
This is one of the H frames as acquired.
WM type 2 15.jpg
This is a refurbed H frame.
WM type 2 13.jpg
Repainted the folding legs.
WM type 2 14.jpg
Repainted the base.
 

Jayman17

Well-known member
Joined
Feb 6, 2017
Messages
3,793
Location
Seattle, Wa
Jeff, yeah that is quite the delamination on that plywood top. Nice job spiffing up that aluminum h-brace, what did you use on that?

Jay
 
OP
J

Jeff Ivers

Well-known member
Joined
Apr 9, 2010
Messages
2,552
Location
Oklahoma
Jeff, yeah that is quite the delamination on that plywood top. Nice job spiffing up that aluminum h-brace, what did you use on that?

Jay

Jay,

I used a 3M paint/varnish remover wheel chucked in an air angle grinder.
security stand 2 r.jpg
This is a picture of a new wheel. When they wear down too far to use, I punch the mandrel out. I save the left over red pad and chuck those onto a 1/2" drum sander so I can get into tighter spaces.
 

Sifan

Well-known member
Joined
Jul 10, 2018
Messages
580
Location
Southern Illinois
coworker had houseboat on local lake. Overnight, Mama Duck tears up a broom they had left on the deck, makes her nest, and lays her eggs. Mama Duck rudely greets boatowner the next morning. Boatowner goes to national wildlife office to get them to move Mama Duck off his boat. Whoa, Mama Duck while nesting is federally protected and nothing they will do and if boatowner does, he is subject to fines and imprisonment. Lost use of his houseboat for 5 weeks and returned to lots of duck poop.
 
OP
J

Jeff Ivers

Well-known member
Joined
Apr 9, 2010
Messages
2,552
Location
Oklahoma
coworker had houseboat on local lake. Overnight, Mama Duck tears up a broom they had left on the deck, makes her nest, and lays her eggs. Mama Duck rudely greets boatowner the next morning. Boatowner goes to national wildlife office to get them to move Mama Duck off his boat. Whoa, Mama Duck while nesting is federally protected and nothing they will do and if boatowner does, he is subject to fines and imprisonment. Lost use of his houseboat for 5 weeks and returned to lots of duck poop.

That story makes me really glad the geese have not returned since the Kubota chase!
 
OP
J

Jeff Ivers

Well-known member
Joined
Apr 9, 2010
Messages
2,552
Location
Oklahoma
When I last posted about my router table project, I had not yet used it on a project. That has now changed.

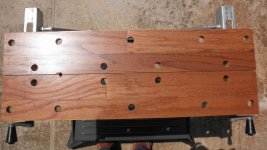
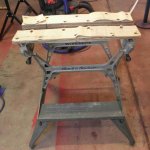
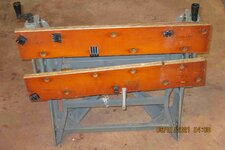
I picked up a Workmate H-frame type 2 at an estate sale and wanted to restore it. I have always admired the aluminum H frames. This one was in very good shape except for the wood jaws had the worst case of delamination I have ever seen.

I had just enough left over 3/8 inch thick red oak flooring to laminate up some replacement jaws. The nice part about this is that I end up with 10 layer, 3/4 inch thick laminated jaws that I have not found any voids in. The bad part is the time it takes to glue this stuff up in stages.

So, I got my glue-ups done and turned my attention to the groove that runs the length of the face of the jaw. I thought I just needed to use my 1/2 inch V veining bit.
WM type 2 22 r.jpg
But the profile was not right. After some careful observation and measuring, I thought I needed a 1/2 inch veining bit with a 108 degree face and a blunt, not pointed, tip. After much research, I found the following:
WM type 2 23.jpg
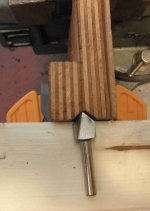
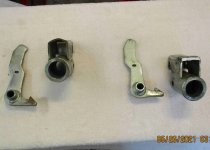
This shows the groove in my replacement jaw next to the groove in the old, delaminated jaw.
WM type 2 24.jpg

Now, back to the router table.

When I started to use the table, I decided to check whether the bit was perpendicular to the table by chucking a 1/4 inch bit in the collet and using an angle gauge. I was about 2 degrees off perpendicular. My lift is going straight up and down, so it must be that the router body is not quite parallel to the lift. I did some judicious sanding of the wood cradle and added some female velcro pads and got to within about .5 degree. I decided that would be good enough for any projects I have planned for the foreseeable future.

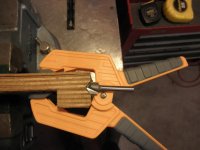
I discovered a featherboard was a requirement to getting a good outcome on the grooves.
WM type 2 25.jpg

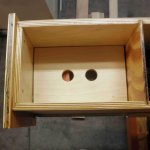
My first test of the router table left a bit more sawdust inside the cabinet than I would like. I have 3 holes in a divider plate to allow the air to flow from the front of the cabinet and out the back. I have taped up 2 of those holes for the next test.

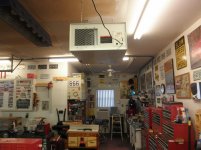
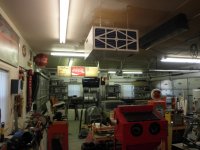
I also finally hung my new air filtration.
Jet air cleaner 1.jpg
Jet air cleaner 2.jpg
Managed to get it hung by myself by sliding it up an 8 foot step ladder and balancing it on top. Unfortunately, I forgot to put an old towel under it and ending up scratching my cabinet.
 

Attachments

  • WM type 2 25.jpg
    WM type 2 25.jpg
    149.2 KB · Views: 55
  • WM type 2 24.jpg
    WM type 2 24.jpg
    116.8 KB · Views: 50
  • WM type 2 23.jpg
    WM type 2 23.jpg
    102.3 KB · Views: 50
  • WM type 2 22 r.jpg
    WM type 2 22 r.jpg
    62.1 KB · Views: 52
  • Jet air cleaner 2.jpg
    Jet air cleaner 2.jpg
    148.2 KB · Views: 58
  • Jet air cleaner 1.jpg
    Jet air cleaner 1.jpg
    135 KB · Views: 68
OP
J

Jeff Ivers

Well-known member
Joined
Apr 9, 2010
Messages
2,552
Location
Oklahoma
I finished the restoration of my estate sale Workmate find.
Going from this:
WM type 2 5 r.jpg
To this:
WM type 2 26 r.jpg
WM type 2 27 r.jpg
WM type 2 28 r.jpg
Also, since building my router cabinet, I have acquired many more bits and my router bit storage box was no longer big enough. To increase my storage space, I did a glue up:
router drawer riser 1 r.jpg
To create a riser for my router bit drawer.
router drawer riser 3 r.jpg
router drawer riser 4 r.jpg
 

Attachments

  • router drawer riser 4 r.jpg
    router drawer riser 4 r.jpg
    89.3 KB · Views: 30
  • router drawer riser 3 r.jpg
    router drawer riser 3 r.jpg
    99.4 KB · Views: 32
  • router drawer riser 1 r.jpg
    router drawer riser 1 r.jpg
    119.7 KB · Views: 35
  • WM type 2 28 r.jpg
    WM type 2 28 r.jpg
    141.1 KB · Views: 40
  • WM type 2 27 r.jpg
    WM type 2 27 r.jpg
    148.9 KB · Views: 44
  • WM type 2 26 r.jpg
    WM type 2 26 r.jpg
    151 KB · Views: 47
  • WM type 2 5 r.jpg
    WM type 2 5 r.jpg
    116.2 KB · Views: 58
OP
J

Jeff Ivers

Well-known member
Joined
Apr 9, 2010
Messages
2,552
Location
Oklahoma
Just a couple of quick pics to try out the new GJ. My revised router bit storage.
 

Attachments

  • router cabinet 88 r.jpg
    router cabinet 88 r.jpg
    149.4 KB · Views: 29
  • router cabinet 87 r.jpg
    router cabinet 87 r.jpg
    292 KB · Views: 41
OP
J

Jeff Ivers

Well-known member
Joined
Apr 9, 2010
Messages
2,552
Location
Oklahoma
I am well into mowing season here, so shop time has been shifted more to maintenance activities.

I have a Kubota BX2380 with an RCK60D belly mower with the drive over deck feature.

The rear gauge wheels on this mower deck are "designed" with a quick release feature to allow the wheel to fold up when preparing to mount or dismount the deck. Unfortunately, I maintain 5 acres with this rig. The entire 5 acres has been ravaged by moles and gophers that made the ground real uneven. In addition, about 1 acre is open wood that I keep mowed. That means frequent roots protruding above the ground that cannot be seen in the grass until after one has mowed over them. So with about 160 hours on the mower, rear gauge wheel latches have failed about 6 times.

In the pic, the left two items are the wheel axle bracket and the hook that engages it. As one can see, the hook wears down and the bracket bends and wears until the wheel will not stay in the down position. Kubota wants $30 for the bracket and $17 for the hook. The right two items are a set that I have just modified in a way that increases time between failures. The bracket has about a 1/16 inch piece of metal welded to the back side to increase the strength of the piece. The hook has had metal added to replace the worn part and then filed to correct shape.
 

Attachments

  • Kubota rear gauge 3 r.jpg
    Kubota rear gauge 3 r.jpg
    390.7 KB · Views: 68
OP
J

Jeff Ivers

Well-known member
Joined
Apr 9, 2010
Messages
2,552
Location
Oklahoma
We have had a ton of rainy weather for the past five weeks. Whenever I could get outside to work, I have been working on my latest big project - unfencing. This one makes me kind of sad. I built the fence 31 years ago (almost 32) and I decided the overall condition was no longer maintainable.


Since it was way to wet to continue on this today, I decided to walk to Harbor Freight to pick up some work gloves. The expedition resulted in my 5th Workmate - a free type 6.
 

Attachments

  • unfence 1 r.jpg
    unfence 1 r.jpg
    1.3 MB · Views: 57
  • unfence 2 r.jpg
    unfence 2 r.jpg
    1.3 MB · Views: 50
  • unfence 4 r.jpg
    unfence 4 r.jpg
    944.2 KB · Views: 48
  • WM type 6 1 r.jpg
    WM type 6 1 r.jpg
    398.1 KB · Views: 50
OP
J

Jeff Ivers

Well-known member
Joined
Apr 9, 2010
Messages
2,552
Location
Oklahoma
Today, I finished removing all the chain link fabric, all the top rails, all the hardware holding the fence fabric on and all the post caps. Now I just have to pull about another 100 posts. If it continues drying out without more rain, I hope to get on that on Monday.

In the mean time, I have continued refurbishing the WM type 6 I picked up off the side of the road.WM type 6 8 r.jpg
All the plastic bits cleaned and treated with natural shine.
WM type 6 9 r.jpg
All the hardware cleaned.
WM type 6 12 r.jpg
Frame re-assembled.
WM type 6 10 r.jpgWM type 6 11 r.jpg
Top and bottom shots of the jaws as I acquired them.
 

bugnut

ALLIANCE MEMBER
Joined
Jul 14, 2012
Messages
3,846
Location
Central Ohio
Jeff, like you I have many roots sticking up that crash into the lawn mower. I wire tied a pvc tube to the mower and stuffed it full of marking flags, like used for new trees or dog fence. When I hit one of the roots I take a moment to stick in a flag.
then I get out the sawzall and do a little root trimmng after mowing. It has saved a couple mower blades and much quieter!

I believe a "you ****" is in order for that workmate!;)
 
OP
J

Jeff Ivers

Well-known member
Joined
Apr 9, 2010
Messages
2,552
Location
Oklahoma
Jeff, like you I have many roots sticking up that crash into the lawn mower. I wire tied a pvc tube to the mower and stuffed it full of marking flags, like used for new trees or dog fence. When I hit one of the roots I take a moment to stick in a flag.
then I get out the sawzall and do a little root trimmng after mowing. It has saved a couple mower blades and much quieter!

I believe a "you ****" is in order for that workmate!;)
Thank you, bugnut! Your flagging and Sawzall operation sounds like a good plan.
 
To avoid these ads, REGISTER NOW!
OP
J

Jeff Ivers

Well-known member
Joined
Apr 9, 2010
Messages
2,552
Location
Oklahoma
No pics today. I got up early and loaded all the scrap steel I had accumulated in the barn, including about 1100 feet of chain link fabric I had just finished removing as part of my unfencing project. Off to the recyclers with the truck bed full and the 5x8 utility trailer piled head high. Turned out I had 1500 pounds for which I received $112. That certainly covered the cost of gas for the trip! Now to get the other 100 or so posts pulled and all the scrap wood hauled off.
 
OP
J

Jeff Ivers

Well-known member
Joined
Apr 9, 2010
Messages
2,552
Location
Oklahoma
Wow, is it really almost August? I have continued plugging away on my unfencing as weather has permitted. I now have about 85 of about 140 posts removed with about 12 chunks of concrete still in the ground.
unfence 7 r.jpg
Some posts broke off but left enough wood that I could still attach my chain and jerk the remnant. On some, there was not enough wood left so I tried drilling and inserting a 5/8 inch lag bolt which pulled out. Also tried attaching a fabricated bracket with tapcons that pulled out. Was left with digging out around and down far enough to get a chain on that would not slip off the top - I swear more digging than when I planted the post.
unfence 5 r.jpg
I had been looking for a long while to find a Mobil 1 16 gallon barrel to add to my Standard and Pennzoil for use in the shop and finally found one.
mobil 1 2 r.jpg
I prefer to spray the untreated bottom of the barrels with Plasti-dip before putting them into service. Hope Don does not notice my crude masking technique.
mobil 1 3 r.jpg
mobil 1 4 r.jpg
All of my barrels are placed on home-made dollys - thanks to surplus bed-frame material.

After much Covid related delay and rescheduling, I finally got to take a trip I had been planning since 11/2019 with my daugher, SIL and 2 grandsons.
cruise 21 departure 4 r.jpg
We departed July 19 on the inaugural sailing of the SOS with full crew and only about 700 passengers for the Alaska coastal waters.
cruise 21 Endicott Arm 1 r.jpg
cruise 21 Endicott Arm 3 r.jpg
Now, to get back to the unfencing grind!
 

Jayman17

Well-known member
Joined
Feb 6, 2017
Messages
3,793
Location
Seattle, Wa
Jeff, I like the idea of putting plastic coat on the bottom of that barrel. Did you board your cruise boat in Seattle?

Jay
 
OP
J

Jeff Ivers

Well-known member
Joined
Apr 9, 2010
Messages
2,552
Location
Oklahoma
Jeff, I like the idea of putting plastic coat on the bottom of that barrel. Did you board your cruise boat in Seattle?

Jay
Jay,

We did indeed depart from Seattle. It is kind of funny that our original cruise was booked to depart from Seattle and stop in Vancouver. Then the re-booked cruise was to depart from Vancouver. When that was canceled and re-booked we ended up leaving Seattle with no stop in Vancouver. Congress actually passed a law to let the cruise ships get back to operations without Canada being in the mix.

Jeff
 
OP
J

Jeff Ivers

Well-known member
Joined
Apr 9, 2010
Messages
2,552
Location
Oklahoma
One of my favorite pictures from the cruise:
cruise 21 Ketchikan 1 r.jpg

I have continued unfencing. I have about 85 of about 140 posts removed. Lately, I have been concentrating on removing chunks of concrete where the post broke off or pulled out of the concrete. I tried using this:
unfence 8 r.jpg
(sorry about the blur!) with this result:
unfence 9 r.jpg
Split the concrete apart. The small piece I could lift out easily by hand.
unfence 11 r.jpg
The large piece I was able to lift after using some wedge anchors to attach a homemade lifting bracket. I had tried tapcons, but they pulled out. I have tried to use the bracket and wedge anchors on complete chunks of concrete, but the anchors end up pulling out. I tried some larger red-head anchors and they pulled out. So, the thing that is working consistently is:
unfence 7 r.jpg
Dig at least 4" deep all around the concrete chunk, so I can wrap a chain around and have room for it to "bite" without slipping off the top of the concrete. unfence 5 r.jpg
This is working, but it is a lot of digging! I have removed about 8 chunks and have about 4 to go, at which time I will move to the south side of the property.

So, I had to take time out to do the weekly mowing and the tractor started acting up. It would not maintain PTO speed unless I held the throttle open by hand. I had experienced some bouts of rough running that I thought were caused by fuel filters, so I had changed the front filter but could not see the rear filter without dropping the mower deck. So, I decided I needed to get that other filter changed. What a pain in the rear! Took me about 2.5 hours to drop the mower, remove a skid plate and get the old filter off. Finally had to back the tractor up on my Rhino ramps before I could finish installing the new filter. Got that taken care of and cleaned the air filter and some other maintenance items, but still had the problem with maintaining rpms. Then I got to looking and discovered the spring on the throttle cable was pushing the throttle closed. I was about to start adjusting the throttle cable when I decided to come in and do some internet research. Turns out a lock nut had vibrated off the bottom of the throttle arm and allowed the arm to loosen.
 
OP
J

Jeff Ivers

Well-known member
Joined
Apr 9, 2010
Messages
2,552
Location
Oklahoma
Responded to a CL ad from a guy looking for Triumph Spitfires/parts. Spent the whole morning rearranging things in the shop to take pics of the Spit. and drag out all the associated parts and take pics of them.
spitfire 2 r.jpg
spitfire 15 r.jpg
spitfire 16 r.jpg
There are more parts, but these are some that are already restored and ready to re-install.

For several years, I have continuously had a Workmate set up in the shop with a table top clamped into it for work space. After restoring 2 WMs this year, I decided that I needed to take the type 6 (tallest) and make it even taller with a locking caster base and use it for the table base. Another step in getting everything mobile. This gives me a table height of almost 37" which I am really going to like - easier on the back.
workmate type 6 19 r.jpg
workmate type 6 20 r.jpg
workmate type 6 21 r.jpg

Yes, I used some of my favorite raw material - bed frame.
 
OP
J

Jeff Ivers

Well-known member
Joined
Apr 9, 2010
Messages
2,552
Location
Oklahoma
Since April, I have been unfencing about 1150 feet of 4' chain link on 4x4 wood posts spaced every 8' with 2x4 top rails. For the first part of the project I kept having rain delays, as the ground was too wet to dig (I refuse to spend my time scraping the mud off the post hole diggers after every plunge!) Then the heat hit and slowed me down to working in the a.m. only. I was rocking along pretty good, removing about 4 posts each morning until last Thursday when I hit the wall. It has been so long since we had a decent rain that all the sudden the soil has turned to concrete. I tried three posts last Thursday and only got the first out of the ground. The next 2 broke off and I was only getting about .5" penetration with the post hole diggers on each jab. So, with 25 posts left to remove, I appear to be stalled until we get some decent rain.

In the mean time, I decided to build a vacuum/dirt devil cart for the shop.
vac cart 1 r.jpg

More bed frame material to start with, of course.
vac cart 2 r.jpg

I want to be able to remove the vac from the cart quickly for cleaning purposes, so I decided thumb screws were called for. I had some threaded knobs for T-track use and with a little rounding of the heads on some bolts, I can create some "thumb screws".
vac cart 3 r.jpg
Here are the 4 "thumb screws" with the bolts epoxied in place.
vac cart 4 r.jpg
Here is one of the "thumb screws" holding down one corner of the vac.
vac cart 5 r.jpg

I wanted a straight shot for the hose running from the vac to the dirt devil, so I measured and built in some threaded risers on the cart to elevate the shop vac platform. Unfortunately, when measuring, I forgot to allow for the casters which I was going to remove from the vac. Fortunately, I had 4 rubber rollers salvaged from an old printer (I think) that made nice spacers.
vac cart 6 r.jpg
I wanted some storage for 1.25" attachments, which meant I needed something 1 3/16" outside diameter to make holders from. Conduit? No. PVC or other pipe? No. Wood dowel? Had to settle for 1 1/8" od.
vac cart 7 r.jpg
Finished cart - with the possible future addition of hose storage brackets. Still thinking on that.
 
OP
J

Jeff Ivers

Well-known member
Joined
Apr 9, 2010
Messages
2,552
Location
Oklahoma
I am still plugging on unfencing. It has been so long since we had a decent rain that the soil is like concrete. I finally went and bought a tool I have never had before - a jabberwoki (my name). The official name is post hole digger/tamper. A long bar with a chisel point on one end and about a 2.5" diameter circle on the other. But how can this be a post hole digger when we all know that real post hole diggers have two handles with two curved and hinged blades that allow one to jab in the ground and the remove what is trapped between the blades?

unfence 13 r.jpg
I now have 9 posts and 7 chunks of concrete still to remove to finish this project. The above is one of the posts that I origially had to really work at setting in the desired location. Obviously, the removal is causing me a lot of work too. The concrete will be removed and I will leave the stone. (I hope)

Forstner box 1 r.jpg
Forstner box 2 r.jpg
One of the small projects on my to-do list was to create a storage box for some forstner bits that I bought in addition to my set to get specific sizes. I was at an estate sale and bought for $1 an open topped box with box joint corners. I knocked it apart, cut down the sides, made a new bottom and top, glued it together, cut the box apart and then made some supports for the bits and added some hinges and clasp from my parts drawers.
 
OP
J

Jeff Ivers

Well-known member
Joined
Apr 9, 2010
Messages
2,552
Location
Oklahoma
A number of years ago I was concerned that an elm tree (over 3' diameter at base) was becoming unhealthy and might fall hitting either my shop or barn. I had the tree topped, leaving about 12-15' of trunk in place. I ran the chain saw around the perimeter to kill the trunk. My thinking at the time was that if the grandsons visited often enough and showed an interest, I might turn the trunk into a tree house.
fallen elm r.jpg

A couple of weeks ago, the trunk fell down. The good news is that it fell due north and missed my car trailer! The trunk was totally eaten up by boring insects. If I were to do this again, I would treat around the trunk on a regular basis for insects.

Meanwhile, I have continued unfencing. In the previous post, I showed the post where the concrete was surrounded by a limestone boulder. Today, I extracted that concrete.
unfence 14 r.jpg
Step one was to cut a couple of slots using a diamond blade on the 4.5" grinder.
unfence 15 r.jpg
Next, I used a masonry bit to drill a series of holes in the slots. After that, I got out my air hammer and a chisel bit and deepened the slots.unfence 17 r.jpg
A couple of whacks with my splitting maul (used as a sledge) split the offending concrete from the boulder.
unfence 18 r.jpg
The remainder of the boulder can stay in the ground!

I am down to 2 posts and one chunk of concrete left. Before I remove them, I will do some box blading and then use a transit to set some t-posts as mowing guides.
 
OP
J

Jeff Ivers

Well-known member
Joined
Apr 9, 2010
Messages
2,552
Location
Oklahoma
Come on now Jeff, you don’t want to do the job halfway, I think you should remove the entire boulder. :lol_hitti

Jay
Sorry for the delayed response, but I did want to let you know I have been down that path once and never again!
 

Attachments

  • Shop 1 unedit.JPG
    Shop 1 unedit.JPG
    444.6 KB · Views: 23
OP
J

Jeff Ivers

Well-known member
Joined
Apr 9, 2010
Messages
2,552
Location
Oklahoma
I can't believe it has been this long since I have posted on this thread. Even more, I can't believe it has been this long since I have done anything neat in the shop. I hope that will change after the holidays.
unfence 22 r.jpg

In early October, a church half a mile from me offered a free dumpster. I was able to haul off 2 loads of posts and rails. Then, on October 29, I loaded the final load of posts and rails that I then hauled to the free landfill day to complete the unfencing project!
north property 1 r.jpg

My property is about a 1/4 mile deep. We had fenced about the front 450 feet on each side after paying a surveyor to survey the property and stake it about every 50 feet back in 1989. Of course, over the years the rest of the stakes had been lost. I had been fairly confident that my fence was just inside the property line. Before I removed the last of the wood posts, I set some t-posts in line with the old fence. Using a builders level, a carpenters level, and a 3 lb brick layers mallet, I set t-posts about every 60 feet from the front all the way to the rear of the property. It was really gratifying to extend the line all the way to the rear of the property and have the line come out straight and meeting the rear corner in the correct place!

north property 2 r.jpg
This shows the line of posts from the barn to where the woods start. The post continue about another 200 feet into the woods.

On November 10, a storm hit and caused hail and wind damage to my house. I am currently very ******* with trying to get the insurance company to do right by me. So, maybe after the first of the year I will find my way back to the shop and something neat.
 

jbrentd

Well-known member
Joined
Jul 8, 2015
Messages
1,039
Location
Northeast Oklahoma
Hello, from a cross-town neighbor. I really enjoyed reading through your thread and seeing all of you projects. The unfencing project was a massive effort...well done.
 
OP
J

Jeff Ivers

Well-known member
Joined
Apr 9, 2010
Messages
2,552
Location
Oklahoma
sorry to hear about your house. Hope all is well
Thank you. It will eventually be fine. Didn't lose that many shingles, but enough to allow water in to stain living room ceiling. Hail has beat to pieces window trim, fascia, drip rail, garage door. Roof is patched but does not match existing roof. The biggest issue is I have been feeling overwhelmed with trying to contact and obtain estimates and the typical(?) foot dragging of insurance company. Storm was 11/10, damage found late next evening, filed claim 11/12, adjuster called 11/23 and wanted to make appointment for the following week! Tried to contact a general contractor today and they can't even talk to me for 8 weeks!
Hello, from a cross-town neighbor. I really enjoyed reading through your thread and seeing all of you projects. The unfencing project was a massive effort...well done.
Thank you and welcome to the thread. Do I remember seeing you are just starting to build a shop?
 

jbrentd

Well-known member
Joined
Jul 8, 2015
Messages
1,039
Location
Northeast Oklahoma
We went through some similar issues in March 2020. Hail totaled our roof and 3 cars, but we were lucky on no damage inside the house.

Thank you and welcome to the thread. Do I remember seeing you are just starting to build a shop?
Yes, the slab was just poured last week.
 
OP
J

Jeff Ivers

Well-known member
Joined
Apr 9, 2010
Messages
2,552
Location
Oklahoma
I almost did not post on here about the storm damage I experienced on November 10. Particularly after the Kentucky disaster. But, this has been consuming me for for the past 41 days.drip edge 2 r.jpg
garage door 2 r.jpg
repaired unmatched roof r.jpg
storm damage 11102021 west d 15 r.jpg

I have been a State Farm homeowners customer for 45 years, covering 3 different houses. State Farm has not previously covered the cost of a roof for me. 16 years ago, I re-roofed the house and shop at my cost and resided both buildings, even though a wind damage event prompted all these changes. State Farm's adjuster showed up 11 days after I filed a claim and prepared an estimate documenting $3400 worth of damage and cut a check for $1400 (after a $2000 deductible). I prepared a response to that estimate, documenting at least 7 deficiencies, and sent it in by certified mail. The adjuster:
1) did not include drying services for the roof
2) called for painting all the trim that had textured vinyl coating peeling off
3) called for replacing the plastic strips bonded to the windows without allowing for breakage
4) called for replacing 2 door panels on the garage door and repainting the 29 year old door (panels no longer available)
5) called for repairing the roof with shingles that do not match the original roof
6) made no allowance for a general contractor
7) did not address diminished value

As of today, I have been able to gain approval of $7500 in repairs, not counting replacing the roof, and have 3 contractors scheduled for mid January to take care of the trim, windows, and garage door. I am still waiting for State Farm to agree that they now owe me for a roof replacement since the shingles they called out are an eyesore and diminish the value of my home. I have been drug into acting as my own general contractor and have spent a great deal of time on this - instead of working in the shop (sorry for the whine).

Have others had similar experiences? It seems to me this company has lost its soul - they have created a culture that is so focused on making money by minimizing claims that they have lost track of the mission that customers have contract with them for - to cover their losses caused by disasters whenever those losses exceed a deductible.
 

Swanny1953

ALLIANCE MEMBER
Joined
Jul 28, 2010
Messages
1,051
Location
Lucas, TX
I have a very jaundiced view of insurance companies - in my opinion, all your premiums buy you is the ability to sue them down the road for the coverage you thought you were purchasing. Just my $0.02!!
 
To avoid these ads, REGISTER NOW!
Top Bottom