To avoid these ads, REGISTER NOW!

Dog Door (my version)

lilscorpion

Well-known member
Joined
Mar 15, 2010
Messages
3,599
Location
Colorado
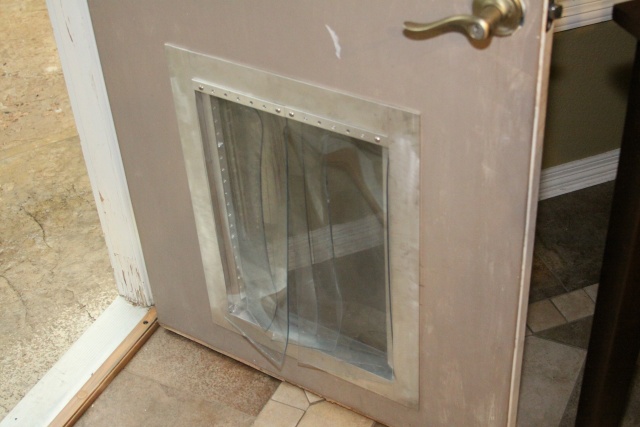
I'm not sure if everyone has a dog door or not but if you do, it's very likely you've questioned how secure it actually is.. Every time I open or close it I am reminded how big a piece of **** mine is and how easy it would be for someone to just kick it in. There are a few doors out there that are supposedly constructed out of durable and quality materials however the prices tend to be adjusted to compensate when they do. An all aluminum door, in the size I have (21 x 15 opening), will run you approximately $400. I pondered just buying one to be done with it but my wife commented "can't you build it for less?" Yes dear...damn.

DogDoorA.jpg


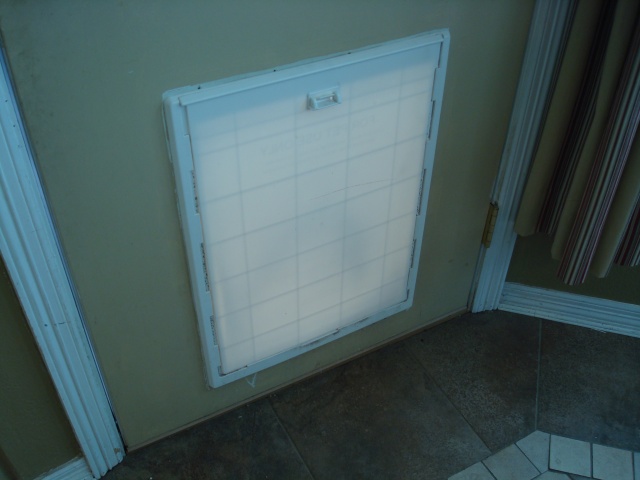
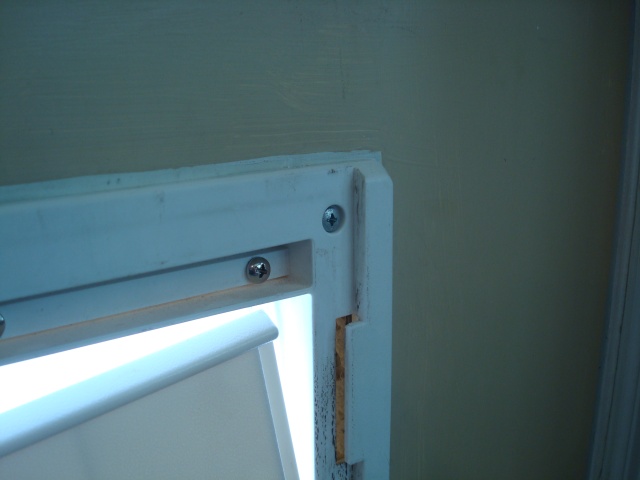
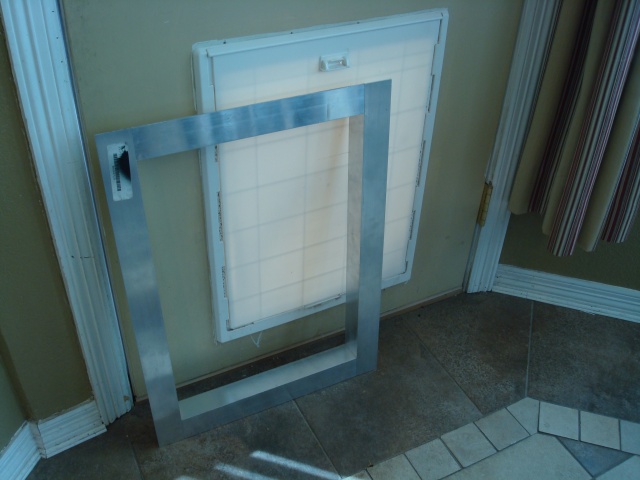
The poor design is obvious from a distance but when you start looking at the doors feature up close, you begin to see just how poor the design of this door really is. For starters, other than the hardware, the constructed purely of plastic. A prybar would pop it right off. If anyone thinks that these doors provide any level of security, wrong.

DogDoorAA.jpg


When building something, I avoid re-inventing the wheel. If all I need to do is make a few improvements to a design, that's all I'll do (unless for some reason I feel the need to way over design something for the fun of it but this is not that project). Every so often I like to put things into Google SketchUp so I can think through the design before I build it. I've been working on this idea for nearly a year now and had been stuck on a stupid design flaw that I couldn't get over until one night my wife "nudged" my creativity by asking if the dog door was ever gonna get fixed.

DogDoorB.jpg


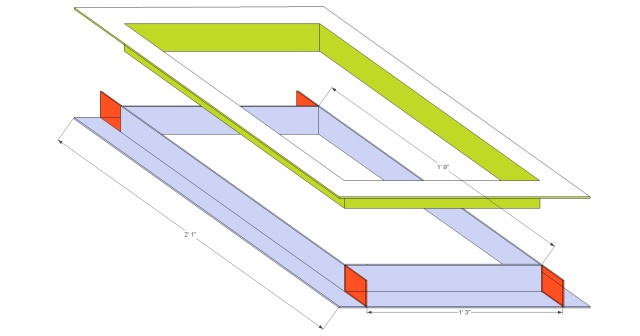
The design is simple really, instead of trying to get crazy creative, I'll make an inner and outer ring that interlock into each other through the door. The outer ring will sleeve into the inner ring (inner being the one inside). I'll use extruded aluminum angle to build the rings as show in the image above. The red colored sections is where the angle will have to be relief cut after being welded.

DogDoorC.jpg


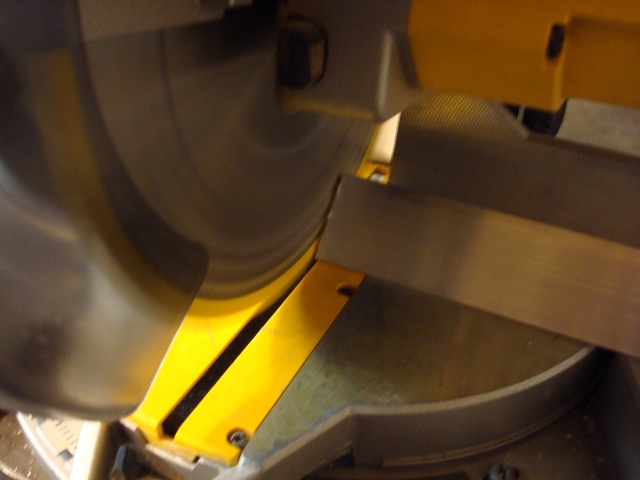
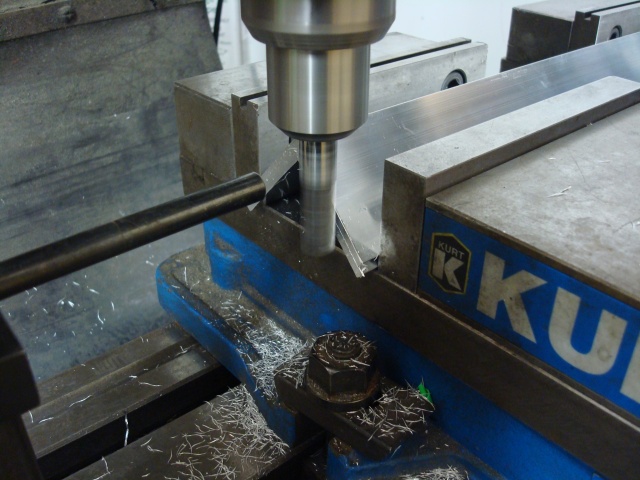
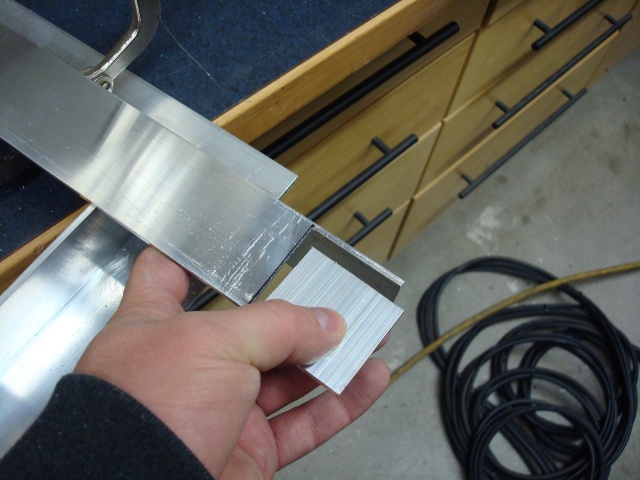
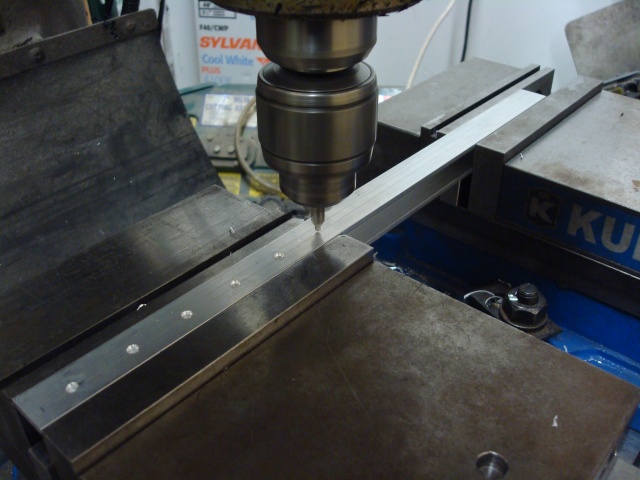
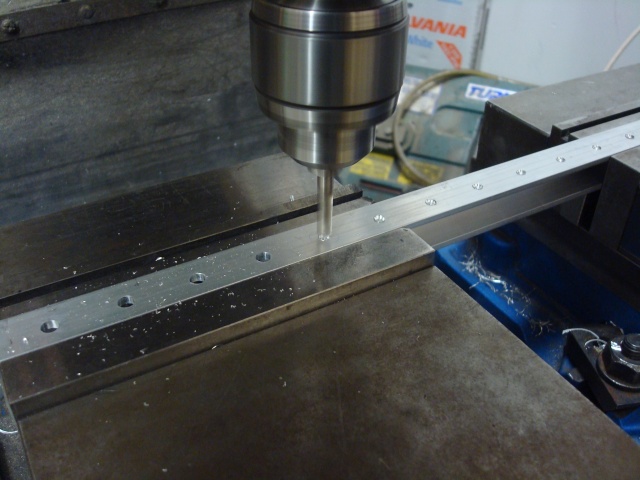
Action shot of me cutting the angle on the miter saw. The cuts are fairly square however I like to true them on the mill to make sure they are perfectly square. This helps during assembly because I can use clamps to pull the assembly square, check it with a square, and then weld. If I don't true the ends, I have to use a square to square them as I clamp them and I'm not a fan of that method.

http://www.3amcook.com/Images/Projects/DogDoorD.jpg

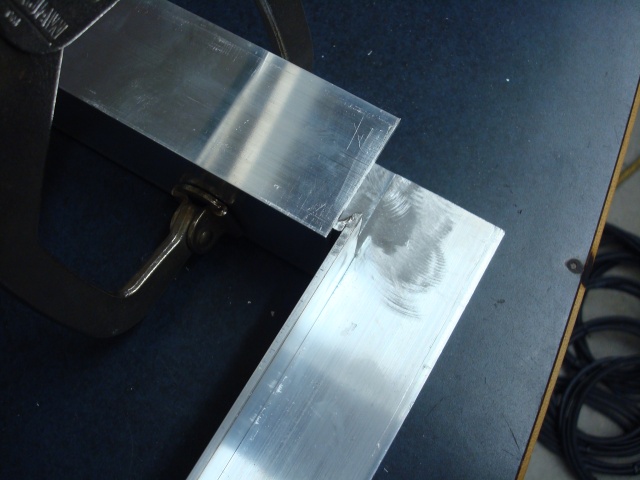
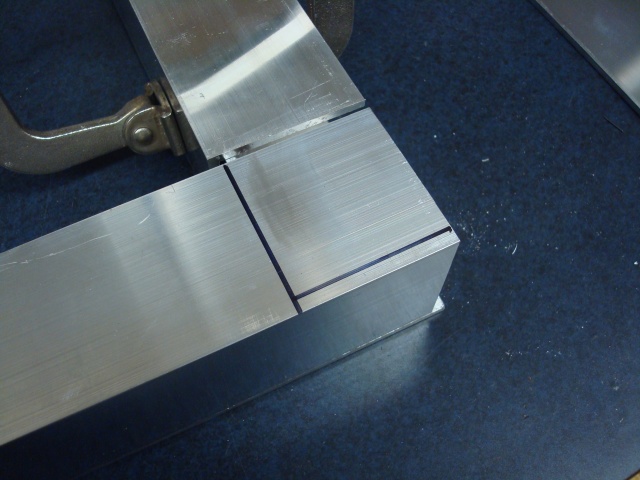
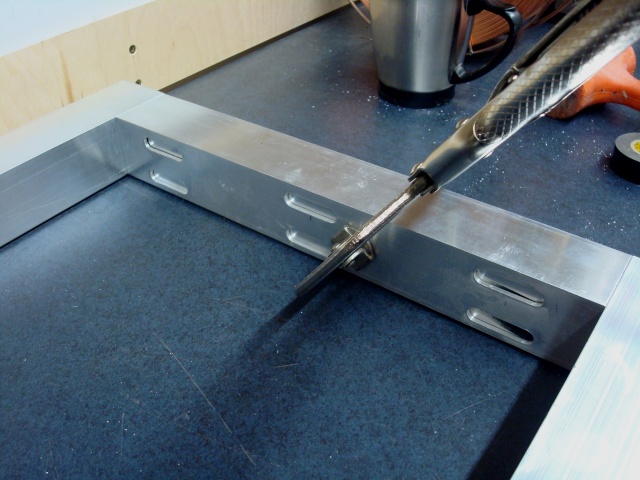
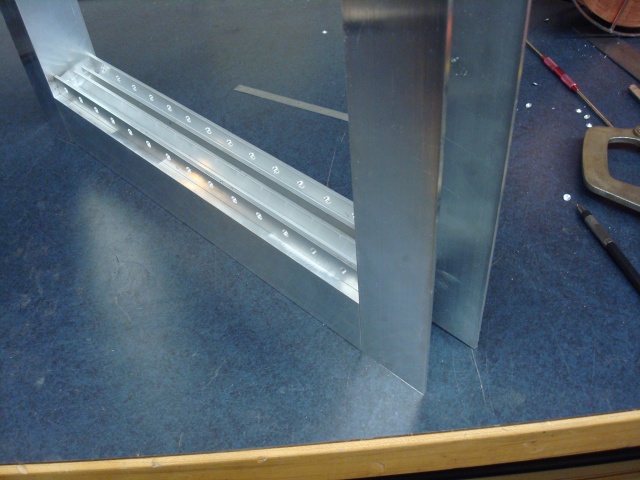
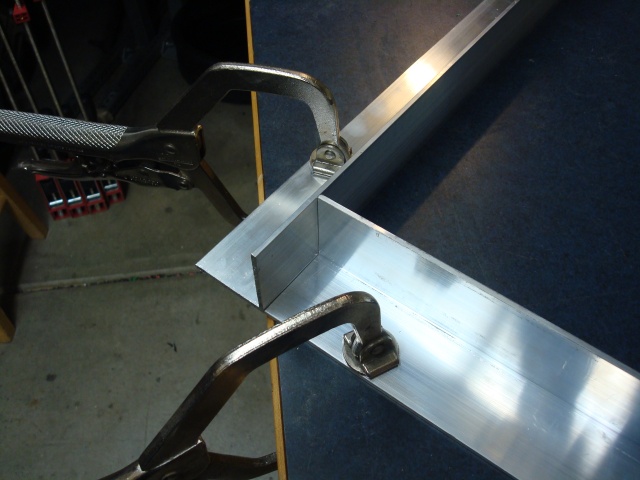
I'll start with assembling the inner ring. With the material cut and squared, I clamp it to the edge of the counter so I can visualize the assembly and then clamp the whole assembly together to see if just doing so results in 90 degree angles. Here's a picture of one of the corners. I will drop a verticle fillet weld down the inner edge here to fuse the corner then I will remove the excess (this is one of the red areas in the sketchup drawing).

DogDoorE.jpg


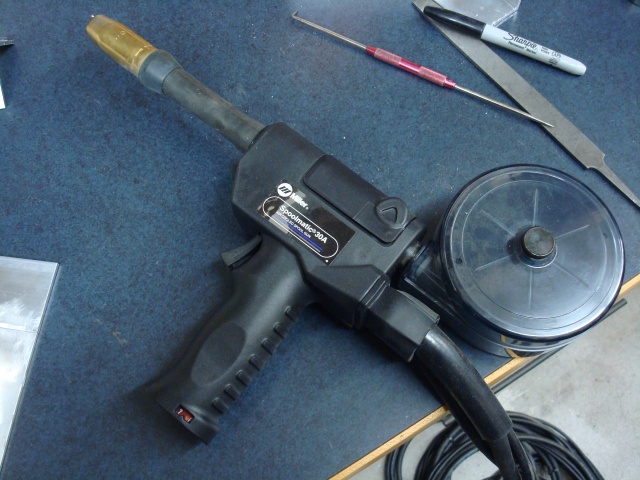
about 6 years ago now I purchased a Miller 212 AutoSet to replace my Miller 250x which had a couple hundred thousand miles on it. At the time I had a miller 3035 spool gun that I used on another one of my machines from time to time. Anyway, Miller's website had an error on it which led me to believe that i could order a 212 AS and plug my spool gun into it. As luck would have it, the 212 AS was the only machine that my gun wouldn't ever fit and to make up for their website error they sent me, free of charge, this 30A without me even asking. If I wasn't blue through and through before, I assure I was after that act of kindness. Anyway, here she is ready to throw down.

DogDoorF.jpg


Beautiful thing about modern technology is that the manuals and pre-sets are usually fairly close. I look it up on the book (or on their moble app from the apple app store), set to the recommended settings, and hammer down. I have maybe a dozen total hours accumulated on spool guns and aluminum mig welding and, even though I have thousands of hours of regular mig welded, the equipment makes me look good. It has been about 3 years since I pulled the trigger on a spool gun. I tested a spot weld on a piece of scrap AL to make sure it was hooked up right, and then threw this down on the first try.

DogDoorG.jpg


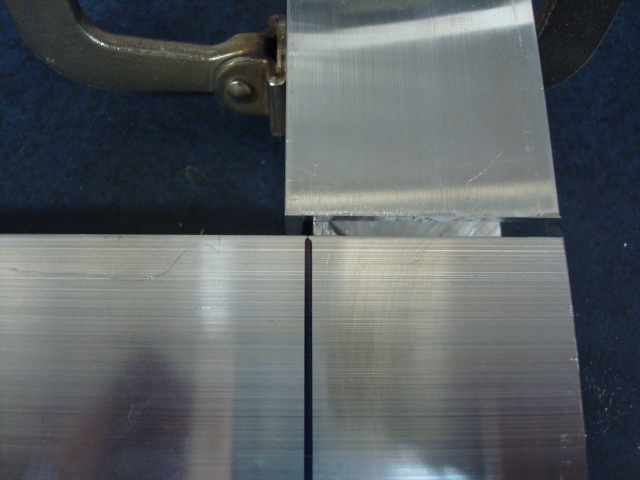
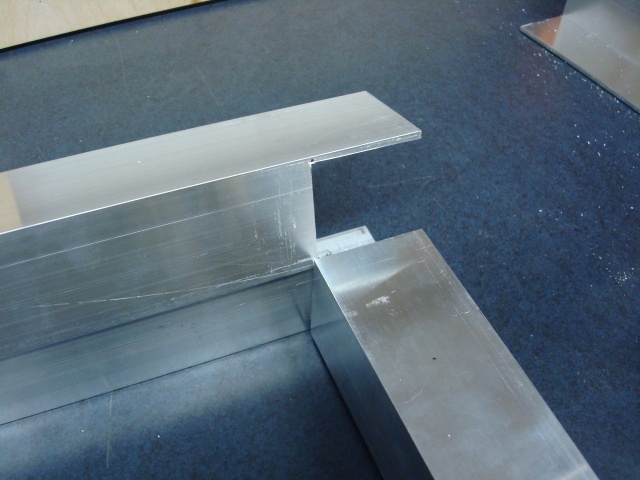
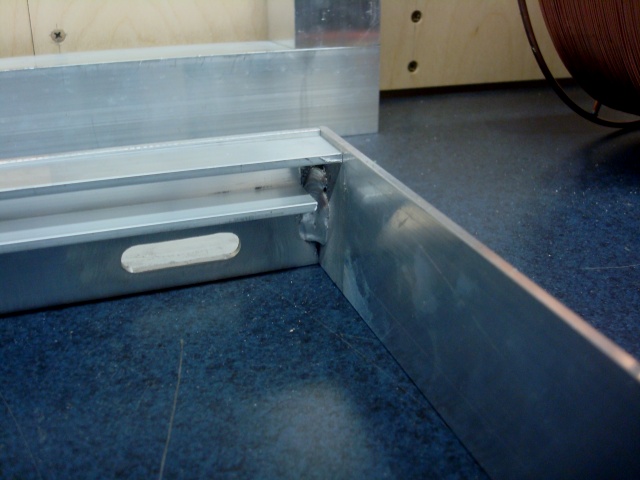
The only thing I don't like about AL welding is that it's fairly difficult to get all of the parts to align up to get a soot-free (no black) weld. I get plenty good penetration but it always leaves a little black. Since you have to push, use argon that hasn't "spoiled", use contaminate free filler, clean the material to get the contaminates off the surface, and fly as you keep your position, it's really easy to fall short in one of those places and get the black soot. As long as I get a good weld I guess. After cutting the corners out I sand them smooth with a small angle grinder and some scotch pads. The measurements are good and it lays nice and flat on the table.

DogDoorH.jpg


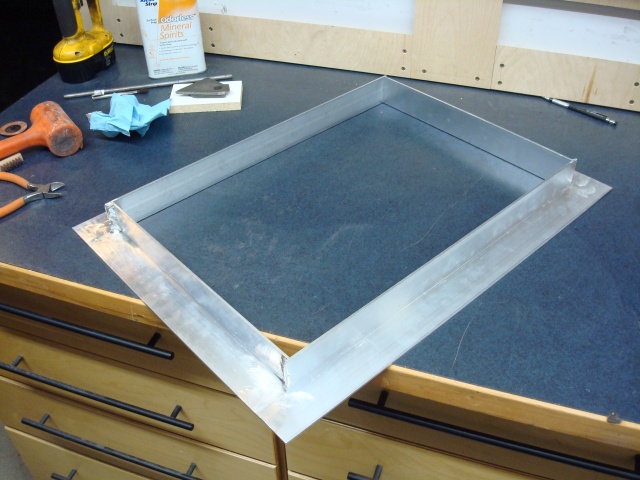
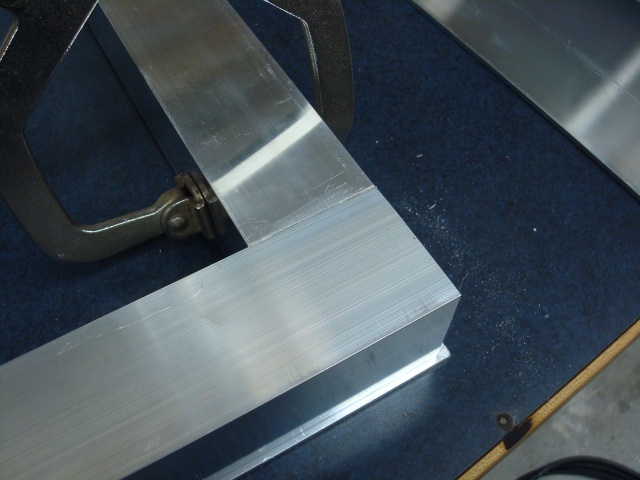
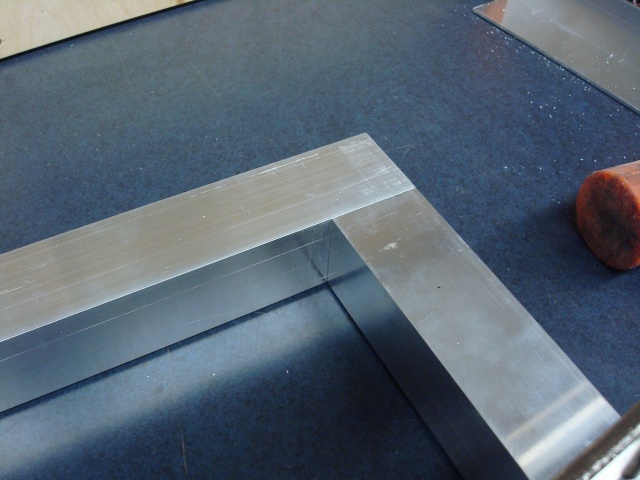
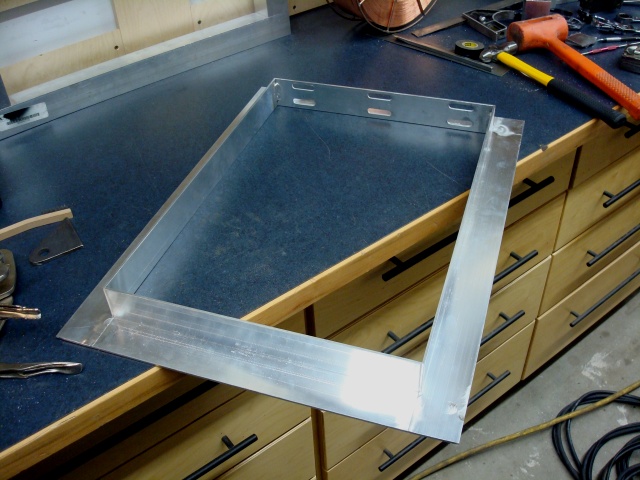
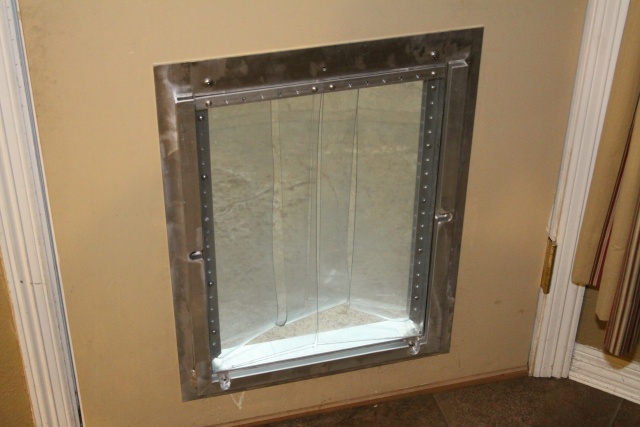
Now that it's fully welded, I see that the 1/8-inch angle is going to be much stronger than I thought it was...probably 1000 times stronger than the plastic **** it will replace. The size measures out correctly - exactly the same size as the previous door.

DogDoorI.jpg


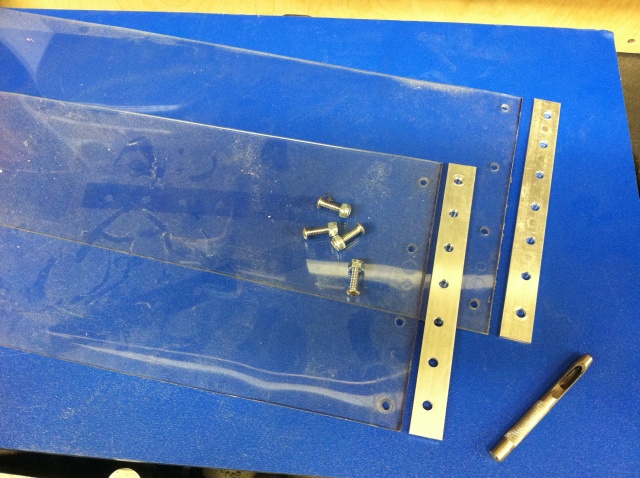
I almost always make mistakes when ordering material. Because I was in a hurry to get started, I just "ordered a couple of sticks" hoping that they'd be enough. Now that I figured my cuts, I was unable to get all of the pieces and, as a result, have to put the project on hold until another stick shows up. The good news is my design looks like it will work well and accomplish what it was supposed to.
 
To avoid these ads, REGISTER NOW!
OP
L

lilscorpion

Well-known member
Joined
Mar 15, 2010
Messages
3,599
Location
Colorado
With the inner ring assembled, it's time to start on the outer ring. This one is a little more complicated and needs to fit inside the inner ring (this prevents there from being a seem to the outside of the house). To get the spacing right, on one top and bottom I insert a piece of 16ga steel to 'shim' it out so that once it's welded and I remove the shim, it will have half of that all the way around and should go together easily. The top and bottom piece need to have just a hair over 1/8-inch clearance on both sides. Something like this.

DogDoorII.jpg


When I assembled the inner ring, I was careful to make sure all of the pieces were the same length and that it was assembled square. Now is where that time investment pays dividends. Since I need to make the outer ring about .060 smaller in both length and width, I need to be fairly careful when cutting the pieces. I start by cutting the upper and lower piece and leave 1/8-inch so I can square both ends on the mill. I keep the two pieces together so that if I do take a tad bit too much off, they're still usable.

DogDoorIJ.jpg


This is where a 3 axis CNC shines. I'm able to use a short end mill and program the Z-axis to move from low to high and then back to low again and I can square up the entire end in a single pop. I grab both sides and trim them to fit on the mill as well. Back to the bench with all four pieces.

DogDoorIK.jpg


Now to mark where I need to relief cut the angle. Because I got the lengths correct I know that (using 2-inch x .125 angle) that I should need a relief that's only 1 7/8-inch wide. I mark where I think it should be and test fit to see if it's correct and it is.

DogDoorIL.jpg


Now I mark a line that's just a hair over .125 of the base of the angle and the square I need to remove is revealed.

DogDoorIM.jpg


A quick check to make sure that all of the lines are marked up. Keep in mind that right now I still have the 16ga steel spacers on one end of the ring for spacing. I use my jig-saw with a metal cutting blade in it instead because it cuts extremely quickly and I have all the control I need. I'm OCD so I'll square things with the mill after I'm done but I could have just left the edge and hit it with a flapper disc because it won't be visible.

DogDoorIO.jpg


After cutting all four ends and squaring them on the mill, I test fit them to see if additional trimming is needed.

DogDoorIP.jpg


I took another skim cut off of one of them but otherwise, perfect.

DogDoorIQ.jpg


Now I need to make some mounts for the plastic flaps. The current door has a single flap that, over time, has warped more than just a little. Even when it was new there was a decent sized gap on either side. Since I'm going to the effort to make a door I figured I might as well address this issue in my design. I'm going to use a double flap front and rear and many little flaps between the two - kinda like you see in manufacturing warehouses between rooms. Since it gets fairly cold here in the winter (not as cold as some places though) I decide to use u-channel instead of angle so I can have additional internal mounting points for thicker foam on cold months.

DogDoorIS.jpg


To add a little more structural integrity to the door I decided to weld the attachments to the upper frame. I don't want the welds to be visible so I want to do them from the inside. I machine some grooves in the top piece so I can weld the u-channel from the inside.

DogDoorIR.jpg


With the slots complete, I clamp it in place to get a final glance and test fit before I weld it all home.

DogDoorIT.jpg


Just as I did with the inner ring, I square it up using my true edges as guides and a large clamp to put enough tension on it so that things stay where I put them. I clamp it to the bench and clamp a small piece of 1/4-inch plate to the bottom of the seem so I know it's perfectly flat on the face where the two pieces join and, after pre-heating, weld it home. I repeat this on all four sides.

DogDoorIV.jpg
 
Last edited:
OP
L

lilscorpion

Well-known member
Joined
Mar 15, 2010
Messages
3,599
Location
Colorado
It lays nice and flat on the bench so it didn't pull at all when I welded it. I did not weld the outside ring from edge to edge like I did the inner ring. Instead I started just over a 1/4-inch in and stopped about a 1/4-inch short. The reason for this is I wanted to hide the weld behind the u-channel I'm attaching for the flaps for no reason other than it looks better and they'll be easier to fit perfectly. I only had to knock about 5/16-inch off to create a clearance for the weld. The test fit reveals about a 1/4-inch lip where the plastic and the stainless trim piece will sit.

DogDoorIW.jpg


Now I need to drill the flap attachment points into the u-channel before I weld it into place. I do the math and can get away with holes drilled on 1-inch centers if I start in from one end 11/16.

DogDoorIX.jpg


I drill them about .020 larger than 7/16-inch (my chosen fastener size) so that the fasteners have a little wiggle room. Set the tooling height and re-run the program.

DogDoorIY.jpg


I've made good progress today and have worked out the few remaining design issues I had. For the first time I slide the inner and outer ring together to see how the line up. The gap is only slightly larger than the math said it would be. All I needed it to do was easily slide together and apart and it'll do. I drop the to top rails in place to see how they fit. With a 1/4-inch gap between the two, there's a perfect lip on the front for the flaps and just enough of a spacing on the inside for the fasteners to clear the slide-in door.

DogDoorIZ.jpg
 
OP
L

lilscorpion

Well-known member
Joined
Mar 15, 2010
Messages
3,599
Location
Colorado
I ordered 2 flaps used for industrial flap doors (maybe 8' long each) and cut them into smaller pieces just long enough to make it from top to bottom and made some sandwich strips out of aluminum to allow a couple of screws to do the work all the way acrosse

DogDoorJA.jpg


The idea was to be able to have more rows of them in the winter and less in the summer to aid in keeping out the cold air (or keeping the cold air in) and help prevent stray flys and other bugs from lucking their way in. I also added the U-rail that the door itself slides in. It's 3/4-inch x 3/8-inch u channel. I had to machine some access grooves to give tool access to the fasteners.

DogDoorJB.jpg


It's a little more obvious in the outside view. I added two more channels on the sides of the door so I could have side mounted flaps. One thing I noticed in the previous door is that the single plastic door allowed a lot of air in on the sides and, ironically, the dogs also always had snow on their back when they entered - except in the middle where the door would touch. I figured that with the side wipers it they'd eliminate the draft and help remove the snow from the dogs (better anyway).

DogDoorJC.jpg


Since the above picture was taken I've removed the third (outer) set of flaps. The dogs could manage their way through them but because they weren't used to the setup yet, they'd wait until the last minute to go out (which would result in them pacing around a little). It's been about a month now and using the door has become an easy affair so there's no reason why the third set can't go back up as soon as the temp drops.

Total cost? Probably about $300, same as the ones I was looking at on line. The difference comes in with the replacement flaps. The on-line versions had replacement flaps starting at $80. I have about 3 sets of replacements stacked up in a drawer in the shop already and I can make as many as I want for a fraction of what a new one would cost from the other guys. All in all, I'm pleased at the results.
 

NHBandit

Well-known member
Joined
Jan 11, 2012
Messages
2,757
Location
East Tennessee
Are you afraid someone really small was going to sneak in through the dog door ? The craftsmanship of your project is awsome. I just question your reasoning ? Don't most burglars just kick the whole door in so they can simply walk in ?
 
OP
L

lilscorpion

Well-known member
Joined
Mar 15, 2010
Messages
3,599
Location
Colorado
Are you afraid someone really small was going to sneak in through the dog door ? The craftsmanship of your project is awsome. I just question your reasoning ? Don't most burglars just kick the whole door in so they can simply walk in ?

Well the door isn't exactly small. The existing hole is the result of the previous owner needing the biggest dog door ever made. Without any effort I can crawl through it and I'm 6'1" x 235. The door itself is steel and a replacement isn't worth the effort because the doors I looked at, in similar quality, don't have the hinges in the same location so I'd have to replace the jamb with the door (though not a big deal, an expensive door). Regardless, all of that to get a smaller dog door and I'd be left with the same problem. Smaller door that can be kicked in so I'd still have to build a beefier one. The construction of this dog door wouldn't allow the door itself to be kicked in, they'd have to take the main door with it. With a 5/16-inch thick 6061 door that's locked into the rails you'd probably kick the door in instead.

Now to answer the question directly. Am I concerned someone will sneak in through the dog door? Nope, not anymore. :rocker:

I live in a decent part of town where there are people home on a few sides of me almost all day. No one will break into my house if they have to make noise. With the new door, they'd have to which makes my wife feel much more secure. I have two big dogs and a few average sized guns with an undisclosed sense of aim. I take every effort to not be a statistic and, when possible, do what I can to avoid having my wife tell me we have to move because I hate, hate, hate moving...and at the same time it was fun to build the dog door (which does weigh in on the equation).
 
Last edited:

Craddosk

Active member
Joined
Oct 2, 2012
Messages
41
Are you afraid someone really small was going to sneak in through the dog door ? The craftsmanship of your project is awsome. I just question your reasoning ? Don't most burglars just kick the whole door in so they can simply walk in ?

The construction looks great, but I'm pretty sure I could crawl through that dog door, depending on the dogs inside...
 

Schleprock

Well-known member
Joined
Feb 21, 2012
Messages
258
Location
Calgary
I subscribed just so I can see the finished project because it's cool. In reality I don't think you have to really worry about anyone coming through that because if I'm a burglar and I see a "BIG" dog door I'll look for a house with the "small" dog door lol.
 

kbs2244

Well-known member
Joined
Nov 11, 2006
Messages
14,065
The workmenship is great.

But it looks to me that someone wouldn't have to crawl through.
The door latch seems to be within reach of the hole.
 

metal1313

Well-known member
Joined
Apr 28, 2009
Messages
3,416
Location
clinton NJ
what makes it secure, sure the frame is strong but its still just plastic flaps, unless when you arent home you drop a solid plate in the inside grooves
 

rsanter

Well-known member
Joined
Dec 22, 2007
Messages
18,493
Location
visalia ca
a dog door that size will never really be secure. many people will fit into that and it is becoming more common for people to use children to go through the smaller dog doors (told to me by a cop friend).
either train to dog to open the door like you would or train them to protect the house and yard.
when he scares off a would be thief you serve him up a big steak....he will make the connection ......

bob
 
To avoid these ads, REGISTER NOW!

Ign

Well-known member
Joined
Jul 7, 2006
Messages
12,769
Location
Butte Peak ND
Holy over-engineered but nice work.

I had a much bigger hole framed out and hung an old piece of rubber bedliner under the trim on the inside. For security I've been saving a piano hinge forever, I'll put plate on that, swing it closed and lock from the inside. But mine's in a fixed wall.
 

Oldbear

Well-known member
Joined
Aug 31, 2011
Messages
620
Location
Linden, Alberta, Canada
My uncles dog sleeps in front of the doggie door - she likes the draft. It looks to be about the same size as yours - and she rubs the sides as she goes through - burglars would be wise to pick the next house...
 

CNGsaves

Well-known member
Joined
Sep 26, 2012
Messages
13,233
Location
KS and OK
Did you engineer the groove on inside so you COULD slide in steel plate??

Now that would make it secure when you're out of town, as couple wing screws could be added at top of plate to secure it in groove.

On related note, saw a guy on TV who "invented" a Staples Easy button thing that dog was taught to push near door (ie inside) when he wanted out, and it would chime a bell for homeowner to let dog out.

IDEA: Couple that with IFR chip in dog that automatically slid up the security plate (when dog was outside and wanting back in), THEN you would really have an invention for high-end customers.

Anyway, cool Revision 1.0 of your brainstorm. Eventually you might have steel plate sliding up and down within middle of solid core door !! Keep plugging away until you've got $1K version to sell the Hollywood and Beverly Hills types. :D
 
Last edited:

Jagmandave

Well-known member
Joined
Nov 6, 2011
Messages
6,302
Location
Overland Park, Ks.
I appreciate the workmanship, but your reasoning has me baffled. If no one will try to come in thru the door because of the dogs, why did it need to be replaced at all?

At any rate, great workmanship! I also would want a security panel to lock the dogs in and keep the riff raff out.

We have small dogs, I could use a cat door for ours, I doubt even a small child could worm their way thru that! :lol:
 

Ign

Well-known member
Joined
Jul 7, 2006
Messages
12,769
Location
Butte Peak ND
{snip}On related note, saw a guy on TV who "invented" a Staples Easy button thing that dog was taught to push near door (ie inside) when he wanted out, and it would chime a bell for homeowner to let dog out.

IDEA: Couple that with IFR chip in dog that automatically slid up the security plate (when dog was outside and wanting back in), THEN you would really have an invention for high-end customers.{snip}

My BIL just trained his golden to ring a bell hanging from a string on the door knob.

And the latter already exists, it's just in the collar so the dog door trips open whenever the dog gets within ** proximity. It's all over DIY network.
 

Heavy Metal Doctor

Well-known member
Joined
May 26, 2010
Messages
5,417
Location
Mason Dixon Line
Very nice workmanship, but I guess I'm another who would question the point of the work.
We bought a ready made electronic dog door that is just about as secure as the wall itself. more weather tight than flexible flaps, opens with the click of a switch or activated by a transmitter the dog wears on it's collar. It has slide bolts that engage when it's closed so no one can slide it up. The frame and mounting is just about as strong as the wall it's mounted through. If someone wanted in bad enough to break it up, then there's 40-eleven other points around the house they'd find easier than the dog door....besides, we added IP cameras and controls to view and control all of it remotely......
 
OP
L

lilscorpion

Well-known member
Joined
Mar 15, 2010
Messages
3,599
Location
Colorado
Guys, don't let the "why" be the thing. It's "because" and that's all there is to it. I had a door that had a hole from previous dog doors - I didn't want to buy a new door and I can make the hole smaller so the dog door needed to fit/fill the hole - this requirement limits the options. Don't get me wrong, there were some that would work out of the box but none, actually made out of metal, were in the cheaper range making the decision to build easier. The origin of the project was nothing more than a "$300 for that thing?" moment followed by 20 hours of labor because I like to and just to prove I can. I really only was sharing something I built and showing how I went about it. And to answer the question: There's a metal plate that slides down into the groove to prevent anyone from coming in.
 

loranger

Well-known member
Joined
Feb 2, 2012
Messages
789
Location
DFW, TX
Nice job! I will probably steal your plans except use steel since I dont have a spool gun. I need a larger size door (110lb Doberman) and the plastic crappy one from Home Depot leaks when it rains.
 

jhelrey

Well-known member
Joined
Sep 15, 2010
Messages
7,242
Location
MN
The only thing I would do is put a keyed deadbolt on the inside/outside. Just so someone could not reach in and turn it.

Looks great!
 

ToddG

Well-known member
Joined
Oct 15, 2011
Messages
109
One of my friends bought a doggy door that comes with a proximity sensor you put on the dogs collar. When he gets about 2 feet from the door it slides up! He was worried about coyotes coming in the house.

I wonder if a heavy duty version could be fabbed up?
 
OP
L

lilscorpion

Well-known member
Joined
Mar 15, 2010
Messages
3,599
Location
Colorado
One of my friends bought a doggy door that comes with a proximity sensor you put on the dogs collar. When he gets about 2 feet from the door it slides up! He was worried about coyotes coming in the house.

I wonder if a heavy duty version could be fabbed up?

Interesting. One of my dogs lays inside or outside the door (depending on season) so I wonder if that would be a problem fr a door like that?

I'm sure a heavier duty version could be built as long as you could figure out the sensor part or reuse the stuff off of the existing one.
 
To avoid these ads, REGISTER NOW!
Top Bottom