To avoid these ads, REGISTER NOW!

Don Campbell's Workshop

OP
D

Don Campbell

Well-known member
Joined
Dec 20, 2013
Messages
652
Location
Gaylord , Michigan
Thanks ,
My crude tools were all I could ever afford , I still never owned a nice welder my whole life and never will. But I get by and I look at the positive and really enjoy my little projects. It is fun sharing them with so many nice people.
All of my projects are also on my webpage if you ever want to check them out at
www.doncambellmodels.com
I have had a daily blog for 8 years now about many different interests i have and my family.
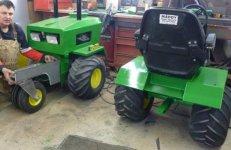
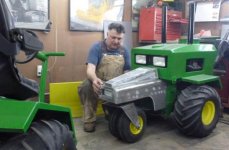
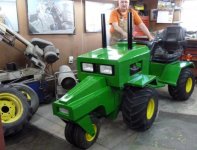
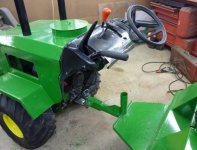
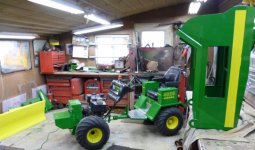
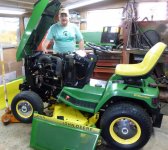
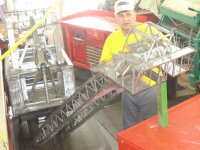
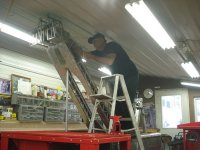
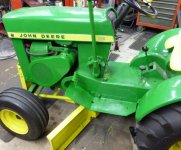
Todays progress picture shows me after grinding the welds and applying auto body filler to the welded seams. I should get the back half sulky ground and body filler applied this afternoon .
 

Attachments

  • aaabondohood.jpg
    aaabondohood.jpg
    43.2 KB · Views: 409
To avoid these ads, REGISTER NOW!
OP
D

Don Campbell

Well-known member
Joined
Dec 20, 2013
Messages
652
Location
Gaylord , Michigan
Next step , green paint . You can see the t-handle and the steering wheel for my grandson. Both can be removed when hooking both units together.
After a few days I will sand the paint and buff it out . Then paint a yellow stripe on the side of the hood.
 

Attachments

  • aaapaint.jpg
    aaapaint.jpg
    38.5 KB · Views: 359
OP
D

Don Campbell

Well-known member
Joined
Dec 20, 2013
Messages
652
Location
Gaylord , Michigan
Today I removed the front snowblade and started the design for a narrow front swivel steering set up. I had the tri-rib tires laying around for two years and decided to experiment a little.
 

Attachments

  • aaatriribtires.jpg
    aaatriribtires.jpg
    35.8 KB · Views: 232
OP
D

Don Campbell

Well-known member
Joined
Dec 20, 2013
Messages
652
Location
Gaylord , Michigan
One step closer today to getting this buttbuggy project done.
I worked on the narrow front swivel nose sheet metal. Also boxed in a third light on the front. Should get the front done tomorrow and then it will be time to do the last part and that is the hitch.
 

Attachments

  • aaalight.jpg
    aaalight.jpg
    33.7 KB · Views: 240
OP
D

Don Campbell

Well-known member
Joined
Dec 20, 2013
Messages
652
Location
Gaylord , Michigan
Here is todays progress as I did the body work and painted the front narrow front section. Just 8 bolts to remove it and install the snow blade. Once I get the articulating hitch built I may remove the front and just put a cute bumper on the front.:headscrat
 

Attachments

  • aaadoodlebugnarrow.jpg
    aaadoodlebugnarrow.jpg
    43.5 KB · Views: 266
OP
D

Don Campbell

Well-known member
Joined
Dec 20, 2013
Messages
652
Location
Gaylord , Michigan
Thanks ,
That JD paint is getting mighty expensive , ha,ha.
Two weeks on vacation and yesterday I headed back to the workshop . This week I should finish the doodlebug project . Yesterday I took 1/4 in. plate steel and cut out the parts for the hitch with the Plasma Cutter. This morning I got everything welded together . I also did a little fun steering wheel project for it . The doodlebug is sure not my proudest accomplishment:dunno:
But it has been fun and i am sure my grandson will enjoy it too . I am also working on finishing the two fender mounted storage boxes.
 

Attachments

  • aaahitch.jpg
    aaahitch.jpg
    64.9 KB · Views: 205
OP
D

Don Campbell

Well-known member
Joined
Dec 20, 2013
Messages
652
Location
Gaylord , Michigan
Todays progress picture shows the storage boxes completed and painted. Also the hitch parts and the steering dash . The square box on the right side is the new nose piece to replace the narrow front assembly. Today I will paint the yellow parts. I should test drive it this weekend :beer:
 

Attachments

  • aaaboxpainted.jpg
    aaaboxpainted.jpg
    34.6 KB · Views: 191
OP
D

Don Campbell

Well-known member
Joined
Dec 20, 2013
Messages
652
Location
Gaylord , Michigan
I just enjoy being in the workshop , not that I don't want to spend time with my wife .Our power went out the other day so I went in to talk to her and she seemed very nice :lol_hitti
Today is the next to the last post for this project . Tomorrow I hope to test drive it and have Deb take a video and share it. Then I will move forward to the next project. This has been a unique project for sure:confused:
I got the decals and the diamond plate floor done on the sulky . It should look cute hooked to my 1/2 scale jd 4020 with my little 3 year old grandson riding behind me. ;)
You can also see the hood on the bench and I got the yellow painted on . Next I will put the black border around the yellow.
Thanks again for all the nice comments.
 

Attachments

  • aaadecals.jpg
    aaadecals.jpg
    56.6 KB · Views: 281

Ross/Kzoo

Well-known member
Joined
Oct 22, 2013
Messages
2,191
Location
Richland Mi.
Don, do you come up with the idea and then get the parts or do you have the parts on hand and then come up with the project?
 
OP
D

Don Campbell

Well-known member
Joined
Dec 20, 2013
Messages
652
Location
Gaylord , Michigan
I already had the walk behind snowblower that did not work, I also had the four tires and rims laying around for 2 years. I had no idea how this was going to look . Each week it just progressed to whatever /who know what ? ha,ha. doodlebug.
I have always liked to build things that are a little different . If I take my little projects to a tractor show sometime I want people to come to my display and be a little surprised what they see instead of the same old thing. I know I sure enjoy seeing the unusual things and that is what I remember the most after I go home.
 
OP
D

Don Campbell

Well-known member
Joined
Dec 20, 2013
Messages
652
Location
Gaylord , Michigan
It is FINISHED:pimpflash
Not sure if I like it or not but it is different :rocker:
I have a few spots to touch up with paint this morning and will be driving it after lunch . Should get the video on You-Tube this afternoon .
Next week I will get going on the next project for my jd 110 round fender tractor .:dunno:
 

Attachments

  • aaadecalshood.jpg
    aaadecalshood.jpg
    78.5 KB · Views: 202

Ross/Kzoo

Well-known member
Joined
Oct 22, 2013
Messages
2,191
Location
Richland Mi.
Well we sure enjoy seeing what you come up with. When you get done with your creations they look like they would have come from the factory like that. They should hire you as the development consultant.
 
OP
D

Don Campbell

Well-known member
Joined
Dec 20, 2013
Messages
652
Location
Gaylord , Michigan
Today I pulled out 7 of my ten little tractors for the first time this year. I had to putter with a couple carbs to get gas going again but 9 out of ten ran great. I did not try to start the narrow front tractor. I will start that another day when I have more energy to pull the rope :3gears:
Also the second photo shows me changing the oil and filters in the 455 Diesel I used this winter . :thumbup:
 

Attachments

  • aaaherd.jpg
    aaaherd.jpg
    68 KB · Views: 341
  • aaachangeoil.jpg
    aaachangeoil.jpg
    70.5 KB · Views: 244
To avoid these ads, REGISTER NOW!

DenisG

Well-known member
Joined
Jul 14, 2013
Messages
1,278
Location
Milwaukee
Thanks again,
I can show some techniques soon but if you go to the webpage and go to workshop there are a few pics there now.
Todays pictures show my poor variety of Welding equipment that has built all these projects for the last 43 years. I have two 225 Lincoln Buzz Boxes , and four small Lincoln wire welders. None of them hooked up to gas, I just use .030 fluxcored wire.
Pretty sad setup but never had the money to buy a $4,000.00 welder. My whole life I have just got by with the minimum tools and made the best of it. But I am proof you can build decent stuff with no expensive tools. These little welders have gotten a real workout over the years and only one of them did I burn out the motherboard. One of them I bought used at Traverse City at the Pawn shop for $225.00 and it had never been used. I'm sure some of you can relate to never having enough money.

Don, of your welders, which do you use most? Do you have tricks that you use for avoiding "burn through" when welding sheet metal?
 
OP
D

Don Campbell

Well-known member
Joined
Dec 20, 2013
Messages
652
Location
Gaylord , Michigan
Thanks ,
I use the old Lincoln 225 buzzbox for welding anything over 1/8 in. thick. I use the Lincoln 130 wire welder and the Lincoln 100 for the 18 ga. welding . The P&H 5700 was a fun project and so was the BE 1950. Burn through is rare for me after welding so much 18 ga. I mostly spot weld every 4 inches to avoid warping and distortion. I never weld a bead at all with the thin metal. The spot welds are more than sturdy.
 

Attachments

  • aaaallwheelsteer.jpg
    aaaallwheelsteer.jpg
    88.6 KB · Views: 311
  • P&H3.jpg
    P&H3.jpg
    44.3 KB · Views: 385
  • bucyrusdonerearview.jpg
    bucyrusdonerearview.jpg
    101.2 KB · Views: 429

burleyfarm

Well-known member
Joined
Feb 19, 2009
Messages
401
Location
Northern Michigan
It is FINISHED:pimpflash
Not sure if I like it or not but it is different :rocker:
I have a few spots to touch up with paint this morning and will be driving it after lunch . Should get the video on You-Tube this afternoon .
Next week I will get going on the next project for my jd 110 round fender tractor .:dunno:

What are your plans for the RF Don?
Its snowing on my side of town. What's your weather like?
 
OP
D

Don Campbell

Well-known member
Joined
Dec 20, 2013
Messages
652
Location
Gaylord , Michigan
Tractor number 3 is now in the workshop . Todays photos show the progress on the belly blade I am building for my jd 110 round fender. I always wanted a garden tractor with a center blade on it so by the end of this week I will finally have one :lol:
The one photo shows the 48 inch wide blade under the tractor . The other photo shows the blade after bending and capping the ends and drilling and bolting on the cutting edge . Next I am working on the design and cutting out the first parts for the blade circle . I should have it done and painted by Wed. night . I am also putting a working vertical exhaust stack on it with a rain cap . I like the big tractor look of vertical exhaust :lol_hitti
I'll post the pics of the parts tomorrow afternoon before I weld them all together. This is really a project anyone can do in a small workshop to make use out of a older lawn tractor that does not have a mower deck. :thumbup:
 

Attachments

  • aaabellyblade2.jpg
    aaabellyblade2.jpg
    65.8 KB · Views: 171
  • aaabellyblade3.jpg
    aaabellyblade3.jpg
    58.5 KB · Views: 142

swissguy

Well-known member
Joined
Mar 4, 2014
Messages
121
Location
Switzerland
That's nuts. You could sell those at any price you asked.

Don, wow! Nice work! Congrats!
A guy in my neighbourhood is trying to sell his collection ( 190'000 Swiss Francs is about $ 216'000!!)
Shipping to the USA not included :lol:
Come over here and I'll get the 2 of you together.

http://www.ebay.de/itm/Baumaschinenmodelle-RC-Massstab-1-2-5-XXL-/271458928631?orig_cvip=true&clk_rvr_id=625990913523&clk_rvr_id=629353013913
Keep up!

Greetings from Switzerland (where English is not the native language)
 

Creative Fab

Well-known member
Joined
Mar 2, 2014
Messages
155
Location
Sanford MI
Did you add the skiff of snow from Sunday morning to your snow total? I was in Gaylord working on the North Branch ORV route Sunday and was not happy to see it snowing. But this thread gives me new appreciation for the snow belt, how else would we get to see all your projects that long cold MI winters allow you to build?

Awesome work sir!
 
OP
D

Don Campbell

Well-known member
Joined
Dec 20, 2013
Messages
652
Location
Gaylord , Michigan
Thanks , looks like our snow total is just 170 inches for the winter, dang we were hoping for 200 inches.:lol_hitti
The Silver Spade was a awesome machine , I was invited down to Ohio and climb on it before it was demolished but we did not go. It was a great machine to build a model of :thumbup:
Todays progress pics show the blade circle mounting brackets all cut out.
Tomorrow I will work on the front hitch brackets and then join them all together. :dunno:
 

Attachments

  • aaacircle.jpg
    aaacircle.jpg
    34 KB · Views: 214
  • aaacircle2.jpg
    aaacircle2.jpg
    33.6 KB · Views: 254
  • boomtopdetailsd.jpg
    boomtopdetailsd.jpg
    97 KB · Views: 330
  • donspade7done.jpg
    donspade7done.jpg
    63.4 KB · Views: 438
OP
D

Don Campbell

Well-known member
Joined
Dec 20, 2013
Messages
652
Location
Gaylord , Michigan
Thanks,
I sure had fun building the models in my little workshop. :shocking:
Todays grader blade progress shows the front mounting brackets hooked to the front mower plate with a 1/2 inch rod . You can also see I have built the support frame from pipe with two center supports. Very easy to hook on and unhook . Tomorrow I will build the lift brackets and should get it painted:drool:
Sometimes my little workshop isn't tall enough :dunno:
 

Attachments

  • cableguy3.jpg
    cableguy3.jpg
    80.5 KB · Views: 195
  • aaabellyblademounts.jpg
    aaabellyblademounts.jpg
    76.4 KB · Views: 189
OP
D

Don Campbell

Well-known member
Joined
Dec 20, 2013
Messages
652
Location
Gaylord , Michigan
Todays progress on the grader blade shows it painted and mounted on the old round fender 110. :rocker:
I am very pleased how it turned out ;)
Next I will convert the stock muffler to a big upright exhaust stack :3gears:
 

Attachments

  • aaabladepainted.jpg
    aaabladepainted.jpg
    46.8 KB · Views: 122
OP
D

Don Campbell

Well-known member
Joined
Dec 20, 2013
Messages
652
Location
Gaylord , Michigan
Todays progress picture from the workshop show the new vertical exhaust stack . Gives the big tractor look:lol_hitti
Now I will make a generator belt cover for it. :eyecrazy:
 

Attachments

  • aaapipe2.jpg
    aaapipe2.jpg
    57 KB · Views: 132
OP
D

Don Campbell

Well-known member
Joined
Dec 20, 2013
Messages
652
Location
Gaylord , Michigan
Todays workshop project picture shows the generator belt cover fabricated and painted on the jd 110 round fender tractor. Tomorrow I will get started on the next tractor , got a couple unique ideas for this next tractor . I already built different fenders for it and put larger tires on the back and front after welding new spindles on the front . Also had to put a exhaust stack on, ha,ha. :3gears:
 

Attachments

  • aaawheelhorse1.jpg
    aaawheelhorse1.jpg
    56.4 KB · Views: 150
  • aaabeltguard.jpg
    aaabeltguard.jpg
    48 KB · Views: 131
OP
D

Don Campbell

Well-known member
Joined
Dec 20, 2013
Messages
652
Location
Gaylord , Michigan
Today the next garden tractor hits the workshop . It has been in the shop before and I built rear fenders for it, wheel adaptors for larger rear tires, new five bolt spindles for larger front tires. But this visit to the shop will tranform it even more as I stretch the frame 5 feet and build a mini grader.
I pulled the axle , rolled it forward five feet and set the walk behind snowplow blade in the center . That gives a very rough look at my idea.:headscrat
 

Attachments

  • aaagrader1.jpg
    aaagrader1.jpg
    94.6 KB · Views: 174
OP
D

Don Campbell

Well-known member
Joined
Dec 20, 2013
Messages
652
Location
Gaylord , Michigan
Workshop progress picture today shows me cutting out some 6in. and some 3in. steel tubing for the front grader frame beam. I bought this saw 20 years ago, used it five times and it has set for 18 years . Was going to put it on Craigslist for $200.00 last year. Then I started puttering with garden tractors. I am so glad I kept it.:)
 

Attachments

  • aaagrader5.jpg
    aaagrader5.jpg
    84.1 KB · Views: 130
  • aaagrader4.jpg
    aaagrader4.jpg
    85 KB · Views: 139
OP
D

Don Campbell

Well-known member
Joined
Dec 20, 2013
Messages
652
Location
Gaylord , Michigan
Next step is I have the front tube frame attached to the rear frame section. Today I will build the front axle brackets and attach it to the tube frame.:headscrat
 

Attachments

  • aaagradertube.jpg
    aaagradertube.jpg
    95.3 KB · Views: 134
OP
D

Don Campbell

Well-known member
Joined
Dec 20, 2013
Messages
652
Location
Gaylord , Michigan
Got the front axle / frame parts cut out and welded in place. Today I will beef up the center frame braces more . Also will work on the steering .
 

Attachments

  • aaagrader7.jpg
    aaagrader7.jpg
    75.5 KB · Views: 145
OP
D

Don Campbell

Well-known member
Joined
Dec 20, 2013
Messages
652
Location
Gaylord , Michigan
I spent the whole day yesterday redesigning the steering system. Got it done and it steers great. Now today I will get back to the frame beefing it up and then I can start the actual grader blade building :rocker:
I made several steel models of graders too. :lol:
 

Attachments

  • aaagrader8.jpg
    aaagrader8.jpg
    83.7 KB · Views: 191
  • ACgrader.jpg
    ACgrader.jpg
    112.1 KB · Views: 213
To avoid these ads, REGISTER NOW!
Top Bottom