So how would you do a 5 hole lug pattern?
All you guys just look at them? No button pushing?
Sent from my iPhone using Tapatalk
Like this... posted in another forum a few months ago...
"Worked on the steering wheel adapters this past week. I was doing a test fit Monday night and found the wheel adapter I had in my stash was to small to fit the Astro column. I ordered an adapter kit from Summit. While I was waiting for that I got to work making the upper adapter plate. This is the piece that will go between the steering wheel and the PCS paddle shifter unit. It will use 5 #10-32 x 1 1/2" long SHCS to bolt the PCS unit onto the extension. The extension will bolt to the new adapter when it comes in. (hopefully)...
I dug out a chunk of 1/2" thick aluminum plate and laid out the bolt circles on it. One for the 5 bolts that go thru the PCS unit and one for the three bolts that hold on the steering wheel and horn button asm. After clamping the piece in the mill I drilled a center hole for "zero" for the next operation.
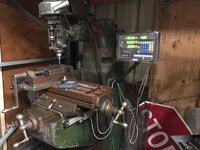
 Using the bolt pattern feature on the DRO made drilling both of the bolt patterns easy.
 This feature sure does save a lot of time over hand laying out all of these holes. With the piece clamped in and zeroed all I have to do is plug in the both circle diameter, the number of holes, the start and end angles (in this case 0 and 360) and hit enter. The first hole location is a dead straight move in the X out tot he radial position of the first hole. In the pic that would be the one to the right in the picture.

Every consecutive hole after that is reached by simply pressing the down button to move the next hole and twisting the mill handles until both X and Y are zeroed out. It makes doing this a no brainer...
Here the five outer holes have been drilled and I am starting on the three inners.

Once all of the holes are drilled I re-zero the cutter, which has been changed out for a counter bore tool and re-run the program.

With all of the holes done I could get the three inner holes tapped for 1/4-20's.
Chunking off the excess material so I can get the adapter turned round in the lathe.

After a few minutes of trimming. Using the hold downs from a clamping kit on the saw makes this kind of off hand cutting a whole lot easier. Sure beats doing it by hand on the vertical. This way I can do other things while the H/V is cutting.

I made this mandrel years ago for another project. The small pilot is sized for the .422 dia. tap drill for a 1/2"-13 thread. I drilled the center hole out to that so I could use the mandrel to chuck the adapter in the lathe.


Spinning in the lathe. I use real light cuts here and take my time.

After it was good and round I chamfered the edges and cleaned up the surfaces with some ScotchBrite while it still spinning.

All cleaned up and ready for a test bolting. This will get painted satin black to match the rest of the column.

With everything bolted together it all fits and looks pretty good. I know it looks tall but this will put it right about where it needs to be for the new seat placement.


Gotten a lot done so far this week... Thanks for following.
Mark"