
You are using an out of date browser. It may not display this or other websites correctly.
You should upgrade or use an alternative browser.
You should upgrade or use an alternative browser.
E-tek Restorations: PROJECT THREAD
- Thread starter e-tek
- Start date


Re: E-tek Resto's 56 Chevy Truck
Woo-hoo!! Great work on that seat frame Trent.
For those of you following the thread, the original bench was upholstered in basic grey and black vinyl. I suggested and the owners decided on this one change, which we felt would up the entire truck. Braithwaites' (Upholstery Shop) work is always top shelf!
Can't wait to slide that into the truck, but it will have to wait a couple weeks until I return from a trip to Europe to visit the Ferrari Factory and other key European automotive trade shops!
r6_cannibal
Well-known member
Re: E-tek Resto's 56 Chevy Truck
Can't wait to see that seat in the truck!
Have fun on your trip e-tek! Say hi to Luca for me")
Can't wait to see that seat in the truck!
Have fun on your trip e-tek! Say hi to Luca for me
Omphaloskeptic
Well-known member
Re: E-tek Resto's 56 Chevy Truck
e-tek, we're not expecting you to bring us back any souvenirs from your trip, but you had better take plenty of pictures to share with us on your return! Living the good life vicariously through the reality of others more fortunate! LOL
e-tek, we're not expecting you to bring us back any souvenirs from your trip, but you had better take plenty of pictures to share with us on your return! Living the good life vicariously through the reality of others more fortunate! LOL
HOTFR8
Banned
Re: E-tek Resto's 56 Chevy Truck
That seat looks great.
That seat looks great.
Re: E-tek Resto's 56 Chevy Truck
Damn. That's some fine work on that couch!
They call those 'seats' in the catalogs and all... No. Those are finely-designed couches stuffed into cars.
I'd take my great-grandma's '57 Olds 88 coupe's seat over any other I've sat in. Front or back. They're both couches.
Damn. That's some fine work on that couch!
They call those 'seats' in the catalogs and all... No. Those are finely-designed couches stuffed into cars.
I'd take my great-grandma's '57 Olds 88 coupe's seat over any other I've sat in. Front or back. They're both couches.
airsanford
Well-known member
Re: E-tek Resto's 56 Chevy Truck
I'm sure you're aware if this, the Ferrari factory tour requires advance reservations. I'm not sure if the various tour outfits take care of this or not.
While you're in the area, be sure to do the Ducati factory tour and museum. I spent more time there than I did at Ferrari.
I'm sure you're aware if this, the Ferrari factory tour requires advance reservations. I'm not sure if the various tour outfits take care of this or not.
While you're in the area, be sure to do the Ducati factory tour and museum. I spent more time there than I did at Ferrari.
Re: E-tek Resto's 56 Chevy Truck
In addition to painting the garage floor, working on the wife's walk-in closet and pulling a 390 ci BigBlock out of a '68 1 ton (I needed a spare mill for my Galaxie), I found a few minutes to get the fresh seat into the '56 and take these pics....


Looks SHARP!! What'dya think?!?!?

In addition to painting the garage floor, working on the wife's walk-in closet and pulling a 390 ci BigBlock out of a '68 1 ton (I needed a spare mill for my Galaxie), I found a few minutes to get the fresh seat into the '56 and take these pics....
Looks SHARP!! What'dya think?!?!?
djjsr
Well-known member
Re: E-tek Resto's 56 Chevy Truck
Looks good! You moved the gas tank?
Looks good! You moved the gas tank?
Stuart in MN
Well-known member
Re: E-tek Resto's 56 Chevy Truck
Will the truck be getting a rubber floormat, or carpeting?
Will the truck be getting a rubber floormat, or carpeting?
Stuart in MN
Well-known member
Re: E-tek Resto's 56 Chevy Truck
Good - I think a truck like that would look wrong with carpet. Can you get them in colors? The floor mat in my '66 F-100 has a few cracks, but the reproductions for that model are only available in black (my truck is blue) so I haven't replaced it.
Good - I think a truck like that would look wrong with carpet.
Can you get them in colors? The floor mat in my '66 F-100 has a few cracks, but the reproductions for that model are only available in black (my truck is blue) so I haven't replaced it.


Slowboat
Well-known member
Re: E-tek Resto's 56 Chevy Truck
I'm sure you are aware of this, but marine epoxy has very poor UV resistance - you are going to need to give it a bunch of coats of varnish or some other UV inhibitor - otherwise the epoxy will quickly yellow and fail.
I'm sure you are aware of this, but marine epoxy has very poor UV resistance - you are going to need to give it a bunch of coats of varnish or some other UV inhibitor - otherwise the epoxy will quickly yellow and fail.
Stuart in MN
Well-known member
Re: E-tek Resto's 56 Chevy Truck
I would imagine this truck is not going to be left parked out in the weather very much, plus UV resistance isn't quite as important in Canada as it would be in the southern US. For a hobby truck, it will probably last quite a while.
I would imagine this truck is not going to be left parked out in the weather very much, plus UV resistance isn't quite as important in Canada as it would be in the southern US. For a hobby truck, it will probably last quite a while.
Re: E-tek Resto's 56 Chevy Truck
While you guys discuss the UV hardiness of marine epoxy's, I'll go ahead and show you the other stuff we got done today
Trent has been BUSY!!


The window frames are a bit of bee-otch to put back together: fat new seals, rivets, felts....jeez


While you guys discuss the UV hardiness of marine epoxy's, I'll go ahead and show you the other stuff we got done today
Trent has been BUSY!!
The window frames are a bit of bee-otch to put back together: fat new seals, rivets, felts....jeez
onewaydave
Well-known member
Re: E-tek Resto's 56 Chevy Truck
Not to leave the fuel filter yet. They were added on by the customer at least as far back as the '63. I remember a glass cylinder with metal ends. A bronze-like mesh insert acted as the filter. Similar to the gravity feed bowel shown in a previous post, but less effective IMO.
Doubt if they are still made.
Dave.

Re: E-tek Resto's 56 Chevy Truck
Holy Cr^P. Ever have one of those super-frustrating days where a seeminly simple task takes HOURS longer than it should and you can't find what you need, try it 5 different ways and even cut your head open....and then the WIFE comes in and figures it out in 5 seconds....No? Oh. Well never mind then.
Today I installed the window runner felt kit, the vent window and runner and the door glass assembly's.
First off, I installed the window side felts, AKA Cat Wiskers, which snap in on either side of the window opening slot. You have to use a screwdriver to squeeze one end of the clip to get it started in hole, then push really hard to snap it in. You can't do these later, as the window will be in the way (same on most cars).
Next comes the large window runner felt on the door side. This item is slid down into the door and seated in a clip near the bottom of the runner:

Poor photo, but this is looking down into the door. The new felt is slid into the clip in the runner:

Now with most cars - and all others I've done - you slide the window down into the door and either tip it sideways to engage the rollers, or attach felted bolts through the window into the regulator arms......not so with the General. Not so at all.
After 2 or 3 hours of trying the above, scratching the **** out of the freshly painted window frame in the process, I took a break to re-paint the frame. While waiting for it to dry, I decided to try the other door, this time with the vent glass in. No go. Then I decided to remove the runner from the window and attach it first, then send the glass down and attach it. While that worked to get the channel on reg arm wheels, I still couldn't get the glass in with the vent runner attached in. Then I took the vent glass out, put the door glass in and tried to install the vent glass and runner. Couldn't get it by the door glass. No go....

So I'm looking on-line, searching forums, studing the manual and generally being pissed off when the LOVELY - and incredibly SMART - Mrs E-tek walks in. I tell her of all my trials and she says: "I'll bet you have to pull it all half way out, put the door glass between the two runners and slide it all in together." "Right", I say. Women.....
So while I go back to the manual, she asks if I want a Pumpkin-Spice Blizzard (DQ Does It Right!) and is off on her cloud of loveliness....
Now - back to the probelm at hand:

As you can see, I decided to install the vent glass loosely, then slide the door glass into both runners, then squeeze it all together and attach the door glass to it's lower channel and then the vent runner on the bottom and it's small screws on top. The glass was now captured between the two felt runner bars and I was able to slide it up and down.
Bingo!!! SUCCESS!!!! Up, down, up, down, up, down. I could have done that all afternoon - thinking of Mrs E-tek of course!!! Damn woman - brilliant. Not sure if I'll tell her though because she's been right on a few things lately and I'm trying to preserve what's left of my manly dignity.

After about 10 (maybe 15) minutes of enjoying the now perfectly working door and vent glass assemblies, in walks Mrs E-tek with my Blizzard. Yummy. She asks how I got it together. Hmmmmm - how could I not tell her how much she just helped me? I did of course and she felt nearly as good as I did!

Holy Cr^P. Ever have one of those super-frustrating days where a seeminly simple task takes HOURS longer than it should and you can't find what you need, try it 5 different ways and even cut your head open....and then the WIFE comes in and figures it out in 5 seconds....No? Oh. Well never mind then.
Today I installed the window runner felt kit, the vent window and runner and the door glass assembly's.
First off, I installed the window side felts, AKA Cat Wiskers, which snap in on either side of the window opening slot. You have to use a screwdriver to squeeze one end of the clip to get it started in hole, then push really hard to snap it in. You can't do these later, as the window will be in the way (same on most cars).
Next comes the large window runner felt on the door side. This item is slid down into the door and seated in a clip near the bottom of the runner:
Poor photo, but this is looking down into the door. The new felt is slid into the clip in the runner:
Now with most cars - and all others I've done - you slide the window down into the door and either tip it sideways to engage the rollers, or attach felted bolts through the window into the regulator arms......not so with the General. Not so at all.
After 2 or 3 hours of trying the above, scratching the **** out of the freshly painted window frame in the process, I took a break to re-paint the frame. While waiting for it to dry, I decided to try the other door, this time with the vent glass in. No go. Then I decided to remove the runner from the window and attach it first, then send the glass down and attach it. While that worked to get the channel on reg arm wheels, I still couldn't get the glass in with the vent runner attached in. Then I took the vent glass out, put the door glass in and tried to install the vent glass and runner. Couldn't get it by the door glass. No go....
So I'm looking on-line, searching forums, studing the manual and generally being pissed off when the LOVELY - and incredibly SMART - Mrs E-tek walks in. I tell her of all my trials and she says: "I'll bet you have to pull it all half way out, put the door glass between the two runners and slide it all in together." "Right", I say. Women.....
So while I go back to the manual, she asks if I want a Pumpkin-Spice Blizzard (DQ Does It Right!) and is off on her cloud of loveliness....
Now - back to the probelm at hand:
As you can see, I decided to install the vent glass loosely, then slide the door glass into both runners, then squeeze it all together and attach the door glass to it's lower channel and then the vent runner on the bottom and it's small screws on top. The glass was now captured between the two felt runner bars and I was able to slide it up and down.
Bingo!!! SUCCESS!!!! Up, down, up, down, up, down. I could have done that all afternoon - thinking of Mrs E-tek of course!!! Damn woman - brilliant. Not sure if I'll tell her though because she's been right on a few things lately and I'm trying to preserve what's left of my manly dignity.
After about 10 (maybe 15) minutes of enjoying the now perfectly working door and vent glass assemblies, in walks Mrs E-tek with my Blizzard. Yummy. She asks how I got it together. Hmmmmm - how could I not tell her how much she just helped me? I did of course and she felt nearly as good as I did!
Last edited:
Omphaloskeptic
Well-known member
Re: E-tek Resto's 56 Chevy Truck
Mrs. E-Tek... Beauty and brains! How did you get so lucky?
There is nothing more frustrating to a guy who thinks he's somewhat mechanically inclined, to be stymied while working on a car/truck part that he is convinced was the first part on the assembly line, and the rest of the vehicle was built around it!
Re: E-tek Resto's 56 Chevy Truck
Moderators?
--------------------------------------------------------------------------------
You have some great talent. I can't wait to see the finished product.
useless spam link
Moderators?
Re: E-tek Resto's 56 Chevy Truck
When I pulled all the lights out of the boxes to get them ready for re-install, we had 2 clear and one amber lenses......so we where trying to figure out if it had clear or ambers in front.....
This morning I checked the pics of it before teardown......

Anyone know for sure?
When I pulled all the lights out of the boxes to get them ready for re-install, we had 2 clear and one amber lenses......so we where trying to figure out if it had clear or ambers in front.....
This morning I checked the pics of it before teardown......
Anyone know for sure?
Omphaloskeptic
Well-known member
Re: E-tek Resto's 56 Chevy Truck
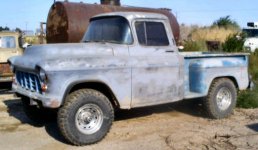
Y'mean like this one?

They seem to have been made with both - depending either on the day, what was in the parts box, or maybe a US/Canada difference....

Here's what looks like a "survivor", with clear lenses....so I'm gonna suggest they go with that.

Google'd 'images' for an unmolested picture....Looks like they were amber.
Y'mean like this one?
They seem to have been made with both - depending either on the day, what was in the parts box, or maybe a US/Canada difference....
Here's what looks like a "survivor", with clear lenses....so I'm gonna suggest they go with that.
Last edited:
djjsr
Well-known member
Re: E-tek Resto's 56 Chevy Truck
The clear lenses were original. Seems like a lot of them got changed to amber over the years. I have both but stuck with the original clear.
The clear lenses were original. Seems like a lot of them got changed to amber over the years. I have both but stuck with the original clear.


Motown 454
Well-known member
- Joined
- Sep 25, 2008
- Messages
- 1,359
Re: E-tek Resto's 56 Chevy Truck
Very nice! its coming out great.
Very nice! its coming out great.
Dan in Pasadena
Well-known member
Re: E-tek Resto's 56 Chevy Truck
e-tek,
Catching up on your thread after being away awhile. Looks outstanding.
Can you tell me what type of sandblast equipment you're using? Is it just a pot type blaster because I have one (though I've not used it in years). My '55redo is undergoing some of the same things yours is - cluster redo, seat, window rubber/seals (ugh!). Any and all tips on the window rubber, felts and wind wing rivet installations would REALLY help me.
...After removing the upholstery I sand blasted the springs in my back yard.

e-tek,
Catching up on your thread after being away awhile. Looks outstanding.
Can you tell me what type of sandblast equipment you're using? Is it just a pot type blaster because I have one (though I've not used it in years). My '55redo is undergoing some of the same things yours is - cluster redo, seat, window rubber/seals (ugh!). Any and all tips on the window rubber, felts and wind wing rivet installations would REALLY help me.
Richball
Active member
Re: E-tek Resto's 56 Chevy Truck
I noticed that you have not milled the edges of the bed planks before you applied the finish. Is that something you are planning to do later? Here is a link with the dimentions if you need them.
http://www.gmcpauls.com/47-72_BedWood_Info.htm
We did our '58 short fleetside in old reclaimed mohgany shipping crate wood. It lasted almost 30 years of real use and exposure to the weather. I like the look of the White Oak your using.
Looking good!
Re: E-tek Resto's 56 Chevy Truck
Hi Dan and Rich, thanks for the Q's! In both cases, this is work done by the Owners Son-In-Law. I beleive he used a Pot-type Sandblaster for the seat. Seams to have done a good job of it. I know for sure that the main thing aboutsandblasting is to have a DRY air supply - meaning a dessicant or heated dryer (dessicant being easiest/cheapest in small shop settings).
As for the window assemblies, I could NOT find any good info - either on-line, in forums, the FSM, or the parts books - on proper assembly, especially the sequence. I wrote an account of the process above, but will be adding a bunch more detail to the account I put on my blog. Check it out in a few days at http://e-tekrestorations.blogspot.com/ and/or feel free to ask when you get into it!
As for the wood, do you mean for overall fitment, or the edges? I mentioned milling the edges and I think he's going to do it prior to a second/third coat - I'll have to ask. I'd love to see a photo of your truck and bed wood (the old/reclaimed wood sounds cool!)
Last edited:
Re: E-tek Resto's 56 Chevy Truck
For the sandblasting I used a 5 gallon pressurized pot blaster with a 18.5 cfm compressor and inline air/water filter/dryer. Make sure to keep the sand and sandblaster dry when storing it. Generally I set up in my backyard by tacking the poly tarp to the fence. By lifting the edges of the tarp I'm able to get the sand into a big pile in the center which I then put back into the blaster. ALWAYS wear a proper respirator and personal safety equipment. Now that I have a good proceedure worked out it only takes me about an hour to set up, blast and then clean up. But it's still easier just to send it out.
The box wood comes with milled edges. I think i'm just going to light sand the boards after one coat of marine epoxy.
Re: E-tek Resto's 56 Chevy Truck
Stay tuned this week to this thread, as well as to my blog (link below). We're going to work the entire week on the truck and try to get her buttoned up. The gas tank is now ready and along with the chrome pieces, bed wood and other items, we have what we need to get it to 97%. Gonna be fun!
Stay tuned this week to this thread, as well as to my blog (link below). We're going to work the entire week on the truck and try to get her buttoned up. The gas tank is now ready and along with the chrome pieces, bed wood and other items, we have what we need to get it to 97%. Gonna be fun!
Re: E-tek Resto's 56 Chevy Truck
Check it out here:http://e-tekrestorations.blogspot.com/2011/10/as-promised-today-was-8-hour-romp-in.html
Check it out here:http://e-tekrestorations.blogspot.com/2011/10/as-promised-today-was-8-hour-romp-in.html
Re: E-tek Resto's 56 Chevy Truck
Lots of bits and pieces coming togther this week - of course somethimes you have to go backwards to go forward again!
Check the blog for todays update! http://e-tekrestorations.blogspot.com/2011/10/as-promised-today-was-8-hour-romp-in.html
Lots of bits and pieces coming togther this week - of course somethimes you have to go backwards to go forward again!
Check the blog for todays update! http://e-tekrestorations.blogspot.com/2011/10/as-promised-today-was-8-hour-romp-in.html
Re: E-tek Resto's 56 Chevy Truck
Just wanted to say "Thank You" to all who are checking out the blog. I know it's easier to read it here, but I've gotten to the point where posting everything 2 or 3 times on different sites was getting rather time consuming - especially now that it's coming to the final stages and there's lots to post!
Whether it's Jack asking for a vote, or members directing us to their sites, it's a great community to be a part of! Once again - my appreciation to my GJ bretheren!
Just wanted to say
"Thank You" to all who are checking out the blog. I know it's easier to read it here, but I've gotten to the point where posting everything 2 or 3 times on different sites was getting rather time consuming - especially now that it's coming to the final stages and there's lots to post!Whether it's Jack asking for a vote, or members directing us to their sites, it's a great community to be a part of! Once again - my appreciation to my GJ bretheren!