
You are using an out of date browser. It may not display this or other websites correctly.
You should upgrade or use an alternative browser.
You should upgrade or use an alternative browser.
Eastern PA shop addition
- Thread starter tweidman
- Start date
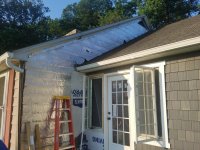
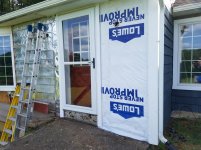
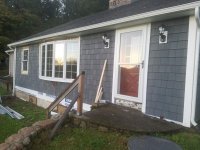
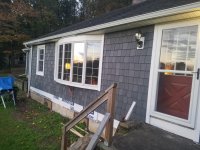
The last two days I spent removing the old rotted wall and the windows from the front of the breezeway. Then I re-framed the wall and installed new sheathing. After that I installed home wrap and flashed out the window and door openings. I was able to install my new door and the windows.
Now I can get back to siding this section like I started out to do three weeks ago.
Now I can get back to siding this section like I started out to do three weeks ago.
Attachments


Magneto
Well-known member
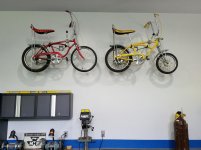
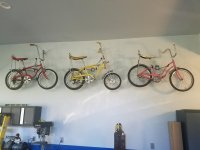
I bought some better wall mounts for my stingrays this weekend and hung another one up on the wall. What a heavy beast that yellow one is.
I had a blue colored 3 spd Schwinn stingray with the white sparkly seat when I was a kid. They look great on the wall.
dittle fart around
Well-known member
My first bike was a stingray. The dad said they were the first sold at the Schwinn dealership in Pontiac. I had one and my brother had one.
Always have been a trend setter I guess
Always have been a trend setter I guess
My first bike was a stingray. The dad said they were the first sold at the Schwinn dealership in Pontiac. I had one and my brother had one.
Always have been a trend setter I guess
The stingray style bicycle was something the kids in LA came up with in the really early 60"s, then in 1963 Schwinn came out with the first commercially available "stingray", then after their success, many other imitators followed.
Both of my were built in 1972. The krate bike (yellow) was mine as a kid.
1/2 Cup
Member Emeritus
The last two days I spent removing the old rotted wall and the windows from the front of the breezeway. Then I re-framed the wall and installed new sheathing. After that I installed home wrap and flashed out the window and door openings. I was able to install my new door and the windows.
Now I can get back to siding this section like I started out to do three weeks ago.
tweidman looking great...

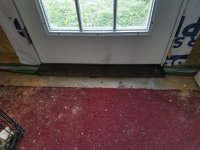
This past weekend I tacked a few things. One major issue that came up was the 100 amp service line that I installed under the old window seat at the front of the breezeway. After finding rot in that wall and my wife decided that she really wanted a door there since we were removing the rotted wall. The only issue with that, was how to install a door and not have the service line in the way or vulnerable to damage.
I decided the best thing to do is hide the service line under a piece of C-channel. I found some channel up in the wood shop and cut it to size, counter bored some mounting holes and then installed it. It work perfectly, the door clears it, as it is the same height as the threshold, and the line is fully protected from damage. Now I need to finish the framing on the inside to hide the rest of it.
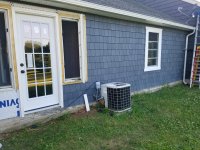
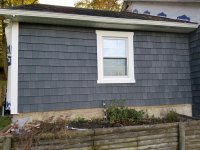
After that I moved outside and I was able to side the entire section of the house in one day and I was able to get the window trim built and mounted.
The only thing left is the trim around the casement window at the door.
Now half the front of the house is complete, I hope the rest of it goes more smoothly.
I decided the best thing to do is hide the service line under a piece of C-channel. I found some channel up in the wood shop and cut it to size, counter bored some mounting holes and then installed it. It work perfectly, the door clears it, as it is the same height as the threshold, and the line is fully protected from damage. Now I need to finish the framing on the inside to hide the rest of it.
After that I moved outside and I was able to side the entire section of the house in one day and I was able to get the window trim built and mounted.
The only thing left is the trim around the casement window at the door.
Now half the front of the house is complete, I hope the rest of it goes more smoothly.
Attachments
Last edited:
This past weekend I was able to strip the adjoining gable wall. I also worked at trying to finish the trim around the windows and door at my breezeway. I ran out of material so I only got one window trimmed out.
My wife also decided that my wall of stingrays would not be complete without a girls bike up there. So I hung up the lil' chik for her.
My wife also decided that my wall of stingrays would not be complete without a girls bike up there. So I hung up the lil' chik for her.
Attachments
We just replaced our problematic Cadillac right before it went out of warranty. Which allowed me to get some shop time in with the new vehicle. I wanted to add a hitch and the dealer quote seemed a bit high. I figure, how hard could it be, I have installed hitches before and it has never taken very long.
Now I see why it was so expensive, you have to remove the entire bumper cover and replace the bumper to install the hitch. My helper Kelleher was there to make sure I was doing it right.
I also received my brake parts in the mail for the brake job I need to do next week.
Now I see why it was so expensive, you have to remove the entire bumper cover and replace the bumper to install the hitch. My helper Kelleher was there to make sure I was doing it right.
I also received my brake parts in the mail for the brake job I need to do next week.
Attachments


Finallygotit
ALLIANCE MEMBER
...... I figure, how hard could it be.....

I knew what was coming.
1/2 Cup
Member Emeritus
tweidman Tow hitches on some new cars are a real pain some times..
Regards
Regards
tweidman Tow hitches on some new cars are a real pain some times..
Regards
Yeah, I love the way that it is integrated into the design and that it almost disappears once you have the bumper cover installed. Although, now I have to pay to get the new cover painted to match the vehicle.
It actually wasn't that hard to install, it was just unexpected to see my brand new vehicle stripped down that far for something I was imagining to be a fairly simple task.
I did get a bit more done on the siding, although this return wall has been slow going. I did not get any picture of the progress but I will try and snap a few tonight.
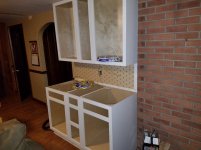
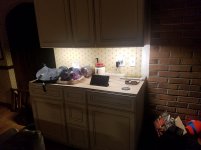
I also switched gears and started hanging few kitchen cabinets this past Friday since my outside work was rained out. The cabinets went quick, but figuring out where to run my new power and lighting wiring took some time. We have a new prep sink going in on the left side.
We also got another distraction for me last week, as if I needed another distraction. Our other setter fathered a litter with our breeders female. Since I just lost my spaniel we figured we would take one of the puppies rather then a stud fee. Now we have two silly Red and White Irish Setters running around our house Father and son
I also switched gears and started hanging few kitchen cabinets this past Friday since my outside work was rained out. The cabinets went quick, but figuring out where to run my new power and lighting wiring took some time. We have a new prep sink going in on the left side.
We also got another distraction for me last week, as if I needed another distraction. Our other setter fathered a litter with our breeders female. Since I just lost my spaniel we figured we would take one of the puppies rather then a stud fee. Now we have two silly Red and White Irish Setters running around our house
Father and son Attachments
![FB_IMG_1502733136744[1].jpg](/forum/data/attachments/558/558660-5a2a48325c6dff5121cd72752e6d291a.jpg)

Finallygotit
ALLIANCE MEMBER
Hey, that turned out pretty nice!
Some more progress this weekend. I was able to strip both layers of siding and the soffit off this next section. I also removed the colonial fluted trim from around the door. I swapped the front door with a door from our breezeway in order to get more light into the foyer. I replaced the colonial trim with some plain vinyl (which seems more fitting for a cape cod) and it matches the window trim.
The exterior light, out side of the door, was in corner of the soffit and did not light up the entry very well. I decided to add two wall mounted fixtures on both sides of the door. It took a while to fish all of the wire, but it's one of those now or never items. I still need to run and get the electrical boxes and siding light mounts to finish that up.
Once the door trim was back up, I was able to get the storm door back on, but I was unable to finish getting all the trim pieces mounted before I had to clean up.
If I would have had the lighting and few more minutes I could have really shown some progress... Maybe Tuesday?
I'm still waiting on flashing in order to finish the gable from last week.
Attachments
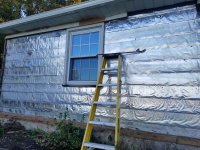
We had some rain over the Holiday weekend, so I did not get to complete too much on the exterior. I was able to remove all of the steel siding and the cedar siding and wrap the main part of the front of the house. I removed the trim from the double hung window so that I could get a measurement for a new window. I also started to remove the trim on the bay. The upper trim is screwed down and has been a total pain.
I was also able to get the section between the door and the corner completed and the door trim finished.
During the rain I wired up the outlets and under cabinet lighting in the kitchen where I had installed the cabinets a couple of weeks ago.
Getting the wire to the breaker box was no easy task, but it's all done now.
Attachments

I was on vacation and missed a few weekends working on the house, but last weekend I was back at it. I finally found someone to make some flashing for me and I was almost able finish the gable end. At the top is a vent and I still need to figure out how to tackle that, probably custom?
After a day running ladders and standing on the roof, I changed gears and started working on the front again.
I was able to get half of this next section completed. I still have to trim out the bay window, which should be fun with all those funky angled miter cuts I need to figure out.
I also went to Home Depot to price out my double hung window. I could not believe the price they quoted me, $850. The standard size window is only $350, but the problem is that it is that the standard is 1/2 inch too big. Now I'm not sure what to do, but I can't do much more on the front before I need to have that new window installed.
Attachments

Finallygotit
ALLIANCE MEMBER
$850?? They're proud of their windows, aren't they?
I think I would figure out a way to make that window opening a half inch bigger for $500.
YMMV
They're proud of their windows, aren't they? I think I would figure out a way to make that window opening a half inch bigger for $500.
YMMV
$850??
I think I would figure out a way to make that window opening a half inch bigger for $500.
YMMV
Yeah, that's probably what I will do.
It's an Anderson 400 series window, which is a nice window. I'm not sure why the custom size would blow the price up like that?
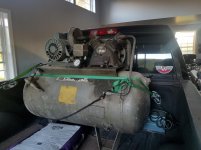
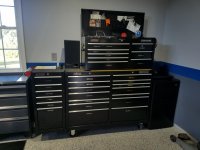
I picked up this baby from work this week. The supervisors ordered it to be scrapped. I asked if I could have it if your plan is to scrap it? They said yes.
The pump is a little slow dues to it's age, but otherwise it works great.
I may put a new pump on it, but for now I think I will try and use it as is...
I ordered the guys at work a new 80gal 5 hp Quincy, boy is that thing nice.
The pump is a little slow dues to it's age, but otherwise it works great.
I may put a new pump on it, but for now I think I will try and use it as is...
I ordered the guys at work a new 80gal 5 hp Quincy, boy is that thing nice.
Attachments
Last edited:
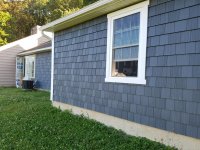
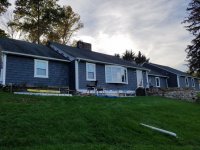
This weekend I was able to get a few more things done. I was able to finish up the siding on the main body of the house. I still need to trim out the window and the above the bay window, but otherwise it's complete.
I decided that putting new construction windows in was not worth the hassle and cost, so I will just seal the replacement windows better and trim them out in vinyl.
Sunday it rained so I moved inside and finished my under counter lights. I also installed all the doors and drawer and got them all adjusted up. After that I went out to the garage and made room for my new compressor and added a locker type cabinet to help get stuff off of the floor in the garage.
Attachments
Striker-7
Active member
Stumbled across this thread today, very nice work and design!
A quick question: what is the siding you're using on the shop addition and house exterior renovation? My home is a early 30's era bungalow sided with cedar shake, and that siding looks like a great compromise for the garage I'm contemplating (more like extended procrastination)...
A quick question: what is the siding you're using on the shop addition and house exterior renovation? My home is a early 30's era bungalow sided with cedar shake, and that siding looks like a great compromise for the garage I'm contemplating (more like extended procrastination)...
Stumbled across this thread today, very nice work and design!
A quick question: what is the siding you're using on the shop addition and house exterior renovation? My home is a early 30's era bungalow sided with cedar shake, and that siding looks like a great compromise for the garage I'm contemplating (more like extended procrastination)...
The siding is a Tapco product and is available on-line. They have tons of colors available. I really like the product, it doesn't have that cheap vinyl siding look of many of the lap style vinyl.
Striker-7
Active member
The siding is a Tapco product and is available on-line. They have tons of colors available. I really like the product, it doesn't have that cheap vinyl siding look of many of the lap style vinyl.
Quick dig through the web came up with this: http://www.foundrysiding.com/products/siding/shake/splitshake which appears to be the stuff. I've been leery of vinyl siding for reasons of fragility in cold weather (shattered a panel with a rock tossed from a snow-thrower) and chalking from UV exposure, but they claim to be immune from these menaces. Time will tell, eh?
Thanks for the tip!
Yup, you found the site. Mine are the 7" perfection shingle. They sent me some samples so that I could verify the style and color I wanted. This stuff is fairly thick and heavy. I can't see it shattering like that builder grade ****. Time will tell on the chalking or fading....

I almost finished the main body of the house this past Saturday. The trim around the windows really slowed me down. I still have to finish the soffit and one small piece of fascia flashing. Sunday it rained/ drizzled most of the day so I moved inside. My daughter gave me her dorm fridge after she graduated from College and I found a spot next to my toolbox to put it. I was also able to clean some stuff up and move an extra locker to my old garage. I also hung my bike rack up in the old garage to get some of my bicycles out of the way. I forget to take a pictures of that but I will get some, it's a real piece of design and engineering.  It came from a bicycle shop I managed back in the day. I can't believe it took me over two years to hang it back up after the move.
It came from a bicycle shop I managed back in the day. I can't believe it took me over two years to hang it back up after the move. Attachments

Finallygotit
ALLIANCE MEMBER
That house shot looks nice. The trim work around the soffit's, fascias and windows is not something to rush through. As much of a pain as it is, slow and steady will produce very good results you will be proud of going forward.
That house shot looks nice.
Thanks. It's getting there, slowly but surely.
Here are the pics of the old garage with the bike rack and locker.
The bike rack with the sliding hangers is a real space saver.
I am storing my fuel and car washing supplies in the cabinet.
Attachments


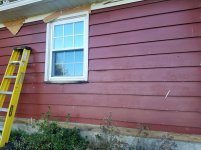
I was able to get a lot done this past weekend. I also decided to document all of the stages I have to go through before I even start my siding job.
First, I have to remove all of the old steel siding. Then I can remove the thin Styrofoam that is nailed to the house and remove all of the aluminum that all of the trim is wrapped in. Then, remove all of the cedar siding and wood trim. After that I can remove the soffit and the old soffit light fixture. Now I am finally ready to start with the new stuff.
First, I have to remove all of the old steel siding. Then I can remove the thin Styrofoam that is nailed to the house and remove all of the aluminum that all of the trim is wrapped in. Then, remove all of the cedar siding and wood trim. After that I can remove the soffit and the old soffit light fixture. Now I am finally ready to start with the new stuff.
Attachments


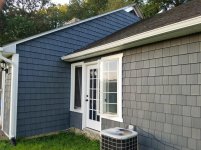
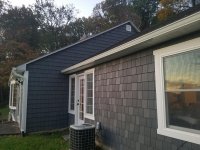
I finished the last section of the front of the house on Sunday and from the street it will look finished. I also added an LED motion sensor light in place of the old soffit light. I still have to install the gable vents and finish the one gable section. I also have to finish a few pieces of soffit around the bay window. Other then some finish work, like the trim screws, the front will be complete, which was my goal for 2017.
Attachments

MJW
New member
Finally getting back to work on the Sawmill. Drove by on the way back from Jacktown with my son on Sunday, definitely like the new siding.
1/2 Cup
Member Emeritus
tweidman, great progress
Regards
Regards
Finally getting back to work on the Sawmill. Drove by on the way back from Jacktown with my son on Sunday, definitely like the new siding.
I missed Jacktown this fall, I did not want to take the time away from the siding. What are you working on now down at the sawmill?
MJW
New member
I missed Jacktown this fall, I did not want to take the time away from the siding. What are you working on now down at the sawmill?
Weed whacking
new back tires for the Massey 10
supporting the floor beams on the "bad side of the mill" so I can clean it out.
More roof tarpage.
Magneto
Well-known member
Wow! Peel back those coverings and start anew. Your place is looking great!
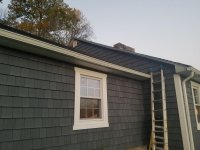
I only had one good weather day this weekend, but I did manage to get my trim screws cleaned up and all of the bay window trim fastened. I added a drip edge to the bay to keep the water away.
Most of my time was spent finishing the gable and gable vent. I almost got both sides completed, but a ran out of flashing on the left side. I needed a 27" piece and my remaining flashing ended up being 20". Those gables don't look like that much work, but with two angled cuts per siding section and all the running up and down the ladder, they take a long time.
Sunday I started on my new oven install in the kitchen. My wife says she needs in before Thanksgiving. I was able to move some plumbing further away from the back of the oven opening, which I asked the hired plumber to do when he was there. I don't know why I bother to hire any jobs out, it seems like I have to go back and fix it anyway. I also put a masonry blade on my circular saw to see how cutting the brick in the oven opening will go? I only cut about an inch and I can already see what a dusty mess this will be.
Attachments
One evening last week I was actually able to spend some time working on my truck in the new shop.
I had a wheel bearing go out from an overheated rotor, due to a stuck caliper.
Wow, what a difference a new bearing made, I did not realize how noisy my truck had become.
I was also having issues with my blend door, which was stuck in the defrost position. After ripping the dash apart, I found that there are two actuators that operate the climate control. I wasn't sure which one was giving me issues until I opened them up. In the pic you can see that there are no teeth left on that one gear. No wonder it wasn't working.
Since I finished up the last few things in the front of the house, I decided to go back to the garage side and do some work. I was able to get another corner mounted and most of the siding mounted on the return wall. Then the darkness made it too difficult to work.
I was also able to run my 40 amp circuit for the new double oven install. That turned out to go fairly smoothly. I ordered a masonry blade for my reciprocating saw in order to cut the brick in the oven opening. I figure that will make a lot less dust, but we will see how that goes?

