To avoid these ads, REGISTER NOW!

Above 1200 Sq/FT Eastern Washington Workshop - Building 2

Wokspaces above 1200 squarefeet.
OP
S

slodat

ALLIANCE MEMBER
Joined
Feb 6, 2010
Messages
3,679
Location
Central-ish, WA
Keep plugging away. Gotta ask, are you under the age of 40? You seem to have a ton of energy.


Nope. I’m 46. I live in a tiny town, and have no social life. I spend one, sometimes two evenings a week with the lady. The rest of my time outside of work is in my shop. I leave at 6am and don’t leave the shop most nights until after 9pm.
 
To avoid these ads, REGISTER NOW!
OP
S

slodat

ALLIANCE MEMBER
Joined
Feb 6, 2010
Messages
3,679
Location
Central-ish, WA
I wasn’t able to use the style faucet I wanted with the existing sink. The overflow was where the faucet outlet would be. I found a cast iron sink on Home Depot’s website that looked very similar. It arrived today. It’s just sitting in place for now. It slipped right into the old mounting bracket.

I couldn’t be happier with it!

d11a0e386779aa7852969fcb2b3da201.jpg
 

Attachments

  • d11a0e386779aa7852969fcb2b3da201.jpg
    d11a0e386779aa7852969fcb2b3da201.jpg
    789.9 KB · Views: 2
OP
S

slodat

ALLIANCE MEMBER
Joined
Feb 6, 2010
Messages
3,679
Location
Central-ish, WA
Thank you for stopping by and commenting. This little half bath it going to turn out nice. At some point, when I have time, I’ll get the two walls sheathed and some point.

Yes, she’s rather amazing [emoji6]
 
OP
S

slodat

ALLIANCE MEMBER
Joined
Feb 6, 2010
Messages
3,679
Location
Central-ish, WA
Had to wait on some adhesive this afternoon, so I got this done. Really happy with the way it turned out. Had a leak at first, but got it fixed.

d467e17f83992f6cbe3dc2e1d8acbe84.jpg
 

Attachments

  • d467e17f83992f6cbe3dc2e1d8acbe84.jpg
    d467e17f83992f6cbe3dc2e1d8acbe84.jpg
    716.6 KB · Views: 1

Jayman17

Well-known member
Joined
Feb 6, 2017
Messages
3,793
Location
Seattle, Wa
Glad to see some progress with this shop space since last time I checked. Good job, it's looking good. Having those walls removed made a huge difference.
Nice to have a clean bathroom too. :thumbup:

Jay
 
OP
S

slodat

ALLIANCE MEMBER
Joined
Feb 6, 2010
Messages
3,679
Location
Central-ish, WA
I bought materials to do this quite a while ago. Today was the day to replace the storage unit style roll up door with a 36” man door.

2c3e7d3da99e7d4462caf3f8572d2ae6.jpg

e9f0341a072b8eeeb798fdee36956c4c.jpg

Out with the old..
3a354a013446079a2cd1cfc11b69c173.jpg

81d6325da8131d8c9395f61625665fe3.jpg

Some writing on the door jamb under a few layers.. Looks like building was built in 1950. Consistent with the date in the toilet tank.
83735575177d58999019511fd261deed.jpg

Just barely had enough height to get the pre-hung door in.
333d3a4d4680a5bb4e7424e8b1e9c6bb.jpg

Framed in.
a43f789dae4ef1067f9e19bdb665544d.jpg

Sheathing..
4b216001027e07f18d3a949d2846b901.jpg

Done! (For today)
e81f75fba68d48d8b3c07242a9e87461.jpg
 

Attachments

  • e81f75fba68d48d8b3c07242a9e87461.jpg
    e81f75fba68d48d8b3c07242a9e87461.jpg
    586.8 KB · Views: 0
  • 83735575177d58999019511fd261deed.jpg
    83735575177d58999019511fd261deed.jpg
    993.1 KB · Views: 1
  • a43f789dae4ef1067f9e19bdb665544d.jpg
    a43f789dae4ef1067f9e19bdb665544d.jpg
    609.2 KB · Views: 1
  • 2c3e7d3da99e7d4462caf3f8572d2ae6.jpg
    2c3e7d3da99e7d4462caf3f8572d2ae6.jpg
    673 KB · Views: 1
  • 3a354a013446079a2cd1cfc11b69c173.jpg
    3a354a013446079a2cd1cfc11b69c173.jpg
    698.3 KB · Views: 1
  • e9f0341a072b8eeeb798fdee36956c4c.jpg
    e9f0341a072b8eeeb798fdee36956c4c.jpg
    744.2 KB · Views: 1
  • 4b216001027e07f18d3a949d2846b901.jpg
    4b216001027e07f18d3a949d2846b901.jpg
    589.6 KB · Views: 1
  • 81d6325da8131d8c9395f61625665fe3.jpg
    81d6325da8131d8c9395f61625665fe3.jpg
    692.1 KB · Views: 0
  • 333d3a4d4680a5bb4e7424e8b1e9c6bb.jpg
    333d3a4d4680a5bb4e7424e8b1e9c6bb.jpg
    553.2 KB · Views: 1

54earl

Well-known member
Joined
Jan 7, 2012
Messages
55
Location
Eastern Idaho
Benn following your other thread for a while, just found this one. I have the opposite problem in my small town, everyone is moving here makes "storage" expensive.
Keep up the good work.
 
OP
S

slodat

ALLIANCE MEMBER
Joined
Feb 6, 2010
Messages
3,679
Location
Central-ish, WA
Thank you for checking out my thread and cheering me on!

Ran to the store to get paint.

0f3eb2cf116472902265e4cc6f1f3938.jpg

ee3a517ffe6a68484b4ebce607f6785c.jpg

Next up is making the trim filler piece for the left of the door.

Got this guy for doors, trim, cabinets and other smaller projects.

e4cea55b14f55711af97bcec31263349.jpg

It’s hot outside!
 

Attachments

  • 0f3eb2cf116472902265e4cc6f1f3938.jpg
    0f3eb2cf116472902265e4cc6f1f3938.jpg
    642.9 KB · Views: 2
  • ee3a517ffe6a68484b4ebce607f6785c.jpg
    ee3a517ffe6a68484b4ebce607f6785c.jpg
    815.1 KB · Views: 1
  • e4cea55b14f55711af97bcec31263349.jpg
    e4cea55b14f55711af97bcec31263349.jpg
    786.7 KB · Views: 1

ptgarcia

Well-known member
Joined
Nov 15, 2016
Messages
1,202
Location
Alta Loma, CA
Looks good, but shouldn't the handle side of the door jam have double studs? I don't know if it really matters, though.
 

mike93lx

ALLIANCE MEMBER
Joined
Dec 9, 2013
Messages
37,382
Location
Richmond, VA
I wasn't sure. I split the locks with the horizontal. I'll sister up another vertical. Thanks for the suggestion.

Usually an opening would have a jack stud and a king stud, but that's because there would be a header to hold up. Since that doesn't apply in your case, it really shouldn't matter. Another stud may stiffen the wall up and it might make the door a little bit more secure, but it really isn't necessary.

Love the work you've done so far. I would love to have a space like that!
 
OP
S

slodat

ALLIANCE MEMBER
Joined
Feb 6, 2010
Messages
3,679
Location
Central-ish, WA
Ahh! My thinking wasn’t too far off. I knew there was a lintel over the opening.. Because it’s barely 3 feet on the outside dimension I felt it was really solid. It’s 2x6. I’ll sister up a jack stud.

Was able to finish paint last night. Calling the outside done.

2e14d61479db20d75572336c9fe38f84.jpg
 

Attachments

  • 2e14d61479db20d75572336c9fe38f84.jpg
    2e14d61479db20d75572336c9fe38f84.jpg
    641.9 KB · Views: 20
To avoid these ads, REGISTER NOW!

drivesitfar

Well-known member
Joined
Oct 23, 2013
Messages
35,997
Location
Pacific Northwest
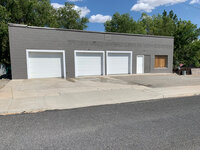
SD: your garage is looking great. I bought a house that was built out of cement block 30+ years ago and i'm still living in it. i've put on two different sidings cause first LP siding was a bust, but the hardie plank looks pretty good now.

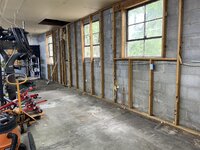
not that you have time or funds at the moment to side the outside of your building, but if you do gluing and using framing 1.5 inch nails will hold on the 1x4's so you can put siding up if you want to some day. here's a few pics.

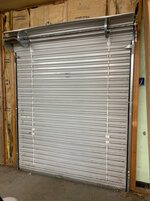
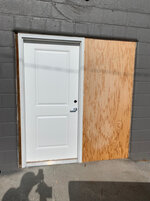
nice work on the garage doors and it looks like you might have found some old growth wood for the framing. also the front door looks solid, but I might have centered it, but if you like it that's all that counts or new siding will fix that down the road.

keep up the great work cause you can't be getting much sleep with all the work you are doing so hope you are getting some.

in case you have to do any drilling i just picked up a couple (milwaukee & dewalt) rotohammers with a bunch of SDS & SDS plus bits that work great compared to the old concrete bits and a half inch drill.

good luck!!
 

Attachments

  • Siding ready to paint next week after Quad dries.jpg
    Siding ready to paint next week after Quad dries.jpg
    149.7 KB · Views: 276
  • removing last of siding from south side of house and shed.jpg
    removing last of siding from south side of house and shed.jpg
    113.4 KB · Views: 299
  • prepped with 1x4's for hardie plank now tar paper and siding 1.jpg
    prepped with 1x4's for hardie plank now tar paper and siding 1.jpg
    149.1 KB · Views: 272
OP
S

slodat

ALLIANCE MEMBER
Joined
Feb 6, 2010
Messages
3,679
Location
Central-ish, WA
Still love this building and all your progress, keep it up!

Thanks for stopping by and cheering me on!

Drives - plan is to paint the building exterior with the same elastomeric paint I used on my shop. Probably in a dark blue, with white trim and doors. This is a ways out.
 
OP
S

slodat

ALLIANCE MEMBER
Joined
Feb 6, 2010
Messages
3,679
Location
Central-ish, WA
Not a whole lot. I was in the building the other day and I could hear some birds chirping in the dropped ceiling. Today I went over and removed the nest. Pulled all the muck out and filled a few holes in the cinder blocks the birds and bugs were using to get in the building.

I plan to move the ‘54 Chevy down the street next weekend after the lift is installed at the shop. Once the car is out I’ll spend a day in this building cleaning and organizing. It’s a mess right now.

Big picture I’d like to get the second ceiling removed and paint the upper ceiling and walls this year. Thinking I’ll do half at a time.
 

rixtrix1

Well-known member
Joined
Aug 25, 2013
Messages
3,010
Location
Chandler, AZ (from west NE)
Nice to see you're still plugging away on this project! I've been following from the beginning, just no comments. Is the area to the right of the removed trees part of the property, too, in front of and behind that low fence?
 
Last edited:
OP
S

slodat

ALLIANCE MEMBER
Joined
Feb 6, 2010
Messages
3,679
Location
Central-ish, WA
Yes, facing the building the property goes from the street on the left to the alley on the right. Depth is from the frontage street to about 10' out from the backside of the building. It backs up to a lot full of old junk with some unkept, really tall trees that I'll most likely have to spend some cash trimming down at some point.

I'll slowly plug away on it. It's probably my lowest priority. I really want to get my '54 Chevy at least running and driving this year.
 
OP
S

slodat

ALLIANCE MEMBER
Joined
Feb 6, 2010
Messages
3,679
Location
Central-ish, WA
Lucked into some help working on the building. Plan is to move everything in bays 1-3 (left three when facing the building from the front) to the fourth. Once they are completely empty, hang plastic to isolate the areas. Drop the drywall from the ceiling and any wall coverings. Pull the insulation. Disassemble the framing. This will eliminate the posts and the second ceiling. Once this mess is hauled off and the area is cleaned up, two coats of Kilz Original oil base primer and a coat (or two) of semi-gloss latex. Bright white like my shop.

Then break it all down and move everything to the newly painted end. Rinse and repeat on the remaining bay of the building. Removing everything will expose the cinder block walls, allowing me access to get all of the cracks and holes sealed up. Goal is eliminate the bug and dust infiltration as much as I can.

25 gallons of Kilz, 15 white semi-gloss.

d01cec97d3192a7629c45b8edfaee0d3.jpg

Before photos:

1ae26b6b43cb571bf1fd546cccbf06eb.jpg

0d7188dfd879b0aa98fdb88cd3d25b5b.jpg

e64819f6a6e1c180b0151056af373784.jpg

65a8b8edc8802e640d44240acddf7d12.jpg

bba46d5cd751ec62320674b11ba6f8d3.jpg
1603db92686504eed5d18626610a6d1d.jpg

bffe4501ac91248bff73bd5db082f07e.jpg
 

Attachments

  • e64819f6a6e1c180b0151056af373784.jpg
    e64819f6a6e1c180b0151056af373784.jpg
    225.6 KB · Views: 19
  • bffe4501ac91248bff73bd5db082f07e.jpg
    bffe4501ac91248bff73bd5db082f07e.jpg
    275.5 KB · Views: 8
  • 1603db92686504eed5d18626610a6d1d.jpg
    1603db92686504eed5d18626610a6d1d.jpg
    191.4 KB · Views: 2
  • bba46d5cd751ec62320674b11ba6f8d3.jpg
    bba46d5cd751ec62320674b11ba6f8d3.jpg
    176.6 KB · Views: 2
  • d01cec97d3192a7629c45b8edfaee0d3.jpg
    d01cec97d3192a7629c45b8edfaee0d3.jpg
    292.9 KB · Views: 3
  • 1ae26b6b43cb571bf1fd546cccbf06eb.jpg
    1ae26b6b43cb571bf1fd546cccbf06eb.jpg
    200.5 KB · Views: 2
  • 0d7188dfd879b0aa98fdb88cd3d25b5b.jpg
    0d7188dfd879b0aa98fdb88cd3d25b5b.jpg
    203.1 KB · Views: 3
  • 65a8b8edc8802e640d44240acddf7d12.jpg
    65a8b8edc8802e640d44240acddf7d12.jpg
    311.2 KB · Views: 3

GreyOwl

Well-known member
Joined
Oct 23, 2007
Messages
549
Location
North Las Vegas
Wow! That looks like a nightmare of wiring to cleanup too!
I haven’t seen rounded block in door openings in a long time. Cool!
 
OP
S

slodat

ALLIANCE MEMBER
Joined
Feb 6, 2010
Messages
3,679
Location
Central-ish, WA
Made a lot of progress today. Ready for demo!

b5fd406892e5b732baef7c27a0dd1fc2.jpg

271c8f9fb4d01513080143f43c991f2e.jpg

2f66a6c311271ec8f6d28bd1bfd2424c.jpg
 

Attachments

  • 2f66a6c311271ec8f6d28bd1bfd2424c.jpg
    2f66a6c311271ec8f6d28bd1bfd2424c.jpg
    150.8 KB · Views: 1
  • 271c8f9fb4d01513080143f43c991f2e.jpg
    271c8f9fb4d01513080143f43c991f2e.jpg
    156.5 KB · Views: 0
  • b5fd406892e5b732baef7c27a0dd1fc2.jpg
    b5fd406892e5b732baef7c27a0dd1fc2.jpg
    342.5 KB · Views: 0
OP
S

slodat

ALLIANCE MEMBER
Joined
Feb 6, 2010
Messages
3,679
Location
Central-ish, WA
Lower ceiling and a lot of the framing is out.

Plan to paint the trusses and bottom side of roof for now.

784e3913bbf321ccb43345e455a65c6f.jpg

19d1aa691cc9b69209aac72c403c5e5c.jpg

d8125c4e28c27976ab12a49e52009e65.jpg

Upper ceiling is coming down now.
 

Attachments

  • d8125c4e28c27976ab12a49e52009e65.jpg
    d8125c4e28c27976ab12a49e52009e65.jpg
    204.3 KB · Views: 0
  • 19d1aa691cc9b69209aac72c403c5e5c.jpg
    19d1aa691cc9b69209aac72c403c5e5c.jpg
    167.5 KB · Views: 0
  • 784e3913bbf321ccb43345e455a65c6f.jpg
    784e3913bbf321ccb43345e455a65c6f.jpg
    140.8 KB · Views: 1
OP
S

slodat

ALLIANCE MEMBER
Joined
Feb 6, 2010
Messages
3,679
Location
Central-ish, WA
Ceiling demo went well. Had to drop the upper (original) ceiling, too. Going to paint the rafters (and walls) bright white. Should look nice and serve as a clean, blank canvas for whatever is next down the road.lots of cleanup left to do.

The painting is going to be a lot of work. I know the end result will be a dramatic improvement.

981b740e9bfe837b37ce6330d32cb6ab.jpg
 

Attachments

  • 981b740e9bfe837b37ce6330d32cb6ab.jpg
    981b740e9bfe837b37ce6330d32cb6ab.jpg
    477 KB · Views: 1

ODIS

Well-known member
Joined
Apr 30, 2012
Messages
2,110
Location
Pacific Northwest
Going to be a very nice space! Hope you will frame your progress pictures and hang them on the wall in this space just as a reminder of how you took the place from “pigs ear” to “silk purse.” Tons of work and will be a place to build your Hot Rods!
 
Last edited:

Toolfool

Well-known member
Joined
Aug 22, 2011
Messages
4,981
Location
Tallahassee, FL
You don't have enough paint. :eyecrazy:

Rent an airless sprayer and a baker's scaffold. Put your full hazmat suit on and go for it. It's going to be a nice space.
 
Last edited:
OP
S

slodat

ALLIANCE MEMBER
Joined
Feb 6, 2010
Messages
3,679
Location
Central-ish, WA
Thanks guys!

Absolutely! I have a small scaffold that’s perfect for this and I own a sprayer. I sprayed about 200 gallons in my shop. I fully suit up, including a full face respirator. It’s still a total mess.

I’m sure I need more paint now that the rafters are getting painted. I have 45 gallons currently.

Scaffold is 2x12’s on steel and wood saw horses. Worked great for demo.

783c4fc4f4680f7c25d0bfce0da4285b.jpg
 

Attachments

  • 783c4fc4f4680f7c25d0bfce0da4285b.jpg
    783c4fc4f4680f7c25d0bfce0da4285b.jpg
    140.8 KB · Views: 2
Last edited:
OP
S

slodat

ALLIANCE MEMBER
Joined
Feb 6, 2010
Messages
3,679
Location
Central-ish, WA
The two ceilings were a few inches apart. Best I can tell the second ceiling was put in to cover the ugly existing ceiling.

I will be hanging drywall on the ceiling joists. Have some cleanup work to do before the drywall goes up. Then, paint.
 

mybigwarwagon

Well-known member
Joined
Nov 4, 2009
Messages
4,428
Location
Vale, Nc
One of the few things I am truly allergic to is fiberglass insulation. I mean wind up in the hospital unable to breathe allergic. That bathroom was giving me the willies just looking at it.

Great work on it so far. Can't wait to see it further along.
 
To avoid these ads, REGISTER NOW!
Top Bottom