To avoid these ads, REGISTER NOW!

"Ell" shaped small socket wrench?

rick carpenter

Well-known member
Joined
Jan 20, 2011
Messages
3,781
Location
Huntsville, East Texas
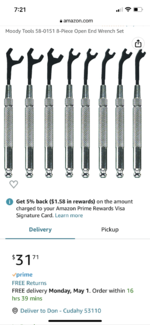
I'm looking for a small "ell" shaped socket wrench to adjust the hinge nuts on chromebooks...

image_67215105.JPG

They're held in tension by the springs, and over time they come loose. I've managed to tighten them with needle-nosed pliers but that is a rather gorilla-ish approach and I will eventually deform or break something in that area. It is not feasible to remove the covers immediately above them so I'm hoping someone knows of small very-thin-wall sockets (like hex-formed steel tubing?) perhaps brazed onto the short legs of "ell" shaped handles (like hex keys?). I can't measure them with regular sockets but they're maybe 5mm.

EDIT: The replies made me think, and I'm thinking it's probably a hex head screw rather than a nut on a stud. Same solution required though.
 
Last edited:
To avoid these ads, REGISTER NOW!
OP
R

rick carpenter

Well-known member
Joined
Jan 20, 2011
Messages
3,781
Location
Huntsville, East Texas
Thanks, y'all.

Find a socket that fits and weld an Allen wrench into the drive side

Ed; probably even epoxy would do okay.
A regular socket has walls too thick.

Remove the hinge, adjust, reinstall?
I'd need to remove the nut to disassemble the hinge, which would require the very tool I'm looking for.
 

RTM

Well-known member
Joined
May 13, 2019
Messages
13,190
Location
SF Bay Area

dchawk81

Well-known member
Joined
Jul 31, 2014
Messages
14,381
Laptops are usually obsolete by the time their screen hinges wear out. 🤷
 

tamaraw

Well-known member
Joined
Jun 6, 2022
Messages
843
A few thoughts:
  • Laptop or phone hinges are typically one unit, not something that is assembled or meant to be adjusted/serviceable.
  • It does not seem to have been installed the way that you are trying to access it. It is common to have a plate leading off of each side of the hinge that is screwed or riveted to the chassis/deckplate and screen assembly.
  • There's some obvious impact damaged right next to that hinge... which is probably the cause of the issue.
What model is this?
 

Fly YX

Well-known member
Joined
Jul 31, 2017
Messages
1,418
Do you think you could get in there with one of these? I used them to work on Riso machines.
 

Attachments

  • IMG_5774.png
    IMG_5774.png
    1.5 MB · Views: 62
To avoid these ads, REGISTER NOW!

rancherbill

Well-known member
Joined
Oct 18, 2007
Messages
5,335
Location
Foothills County, Alberta, Canada
Measure it, buy a cheap *** socket, put the socket on an extension and spin it in a drill and grind it against a grinder or with an angle grinder. I have ground down several sockets to get into locations that were really really tight on a Mitsubishi Engine.

Presto - thin wall sockets. BTW you and shorten socket also. I have several mid length sockets.
 
Last edited:

RTM

Well-known member
Joined
May 13, 2019
Messages
13,190
Location
SF Bay Area
Do you think you could get in there with one of these? I used them to work on Riso machines.
I have a set of those, less useful than hoped due to the thickness of the jaws, was thinking of thinning the leading edge to a bit more of a point.
 
OP
R

rick carpenter

Well-known member
Joined
Jan 20, 2011
Messages
3,781
Location
Huntsville, East Texas
A few thoughts:
  • Laptop or phone hinges are typically one unit, not something that is assembled or meant to be adjusted/serviceable.
You're probably right that they're not meant to be adjusted... but I have been able to tighten these screws with needle-nose pliers. That is not something I'd like to continue to use.
  • It does not seem to have been installed the way that you are trying to access it. It is common to have a plate leading off of each side of the hinge that is screwed or riveted to the chassis/deckplate and screen assembly.
There's too much componentry/etc in the way to do that. The black and white wires inside the sheath are the wifi connection under that clear plastic hold-down cover. Especially finicky. If they pop off once, they're difficult to put back and they tend to do it again and again til we relegate the chromebook to parts status.
  • There's some obvious impact damaged right next to that hinge... which is probably the cause of the issue.
You may be right about that too. However, just the day-to-day carrying of these by students puts a lot of internal racking or compression/tension stresses on them. I may make 6-8 repairs a day of chromebooks simply by reseating the battery or trackpad connections. This particular one and the others we have like it are 'loaners' for when students don't bring a chromebook or a fully-charged chromebook to school. Almost worn-out and abused regular student-issue chromebooks are turned into loaners. We need to squeeze as much life out of what we have before we part them out.
What model is this?
3120 or 3180. Our newest model is the 3100.
 
OP
R

rick carpenter

Well-known member
Joined
Jan 20, 2011
Messages
3,781
Location
Huntsville, East Texas
Do you think you could get in there with one of these? I used them to work on Riso machines.
I don't think those would work. What I need are sockets as thin-walled as...


on a very small scale. Very little torque will be needed.

We had a Risograph machine in the shop in the late 80s or early 90s when they were fairly new to the US.
 

tamaraw

Well-known member
Joined
Jun 6, 2022
Messages
843
There's too much componentry/etc in the way to do that. The black and white wires inside the sheath are the wifi connection under that clear plastic hold-down cover. Especially finicky. If they pop off once, they're difficult to put back and they tend to do it again and again til we relegate the chromebook to parts status.
Those button type antenna connectors are meant to be removed for service, not just a one-time use thing.

If you only press loosely or at an angle however, they may not fully seat, sounds like that might be what's happening to you?

If it is giving you grief, you could try with the wifi card off the board (finger putting pressure on both sides) so that you don't have to worry about stuff flexing when it is mounted to the chassis. If you do it on the board, I would advise that you press down on the antenna connector with a fingernail rather than the pad of your fingertip. Fingertips are soft, they have more give, the connector can wobble, and you can't see what you are doing as well.

Either way, once connected, give it a slight upward pull to verify that it is secure. The whole process shouldn't take more than a few seconds.
 

Fly YX

Well-known member
Joined
Jul 31, 2017
Messages
1,418
I don't think those would work. What I need are sockets as thin-walled as...


on a very small scale. Very little torque will be needed.

We had a Risograph machine in the shop in the late 80s or early 90s when they were fairly new to the US.
I was a control engineer at my previous job. We had seven Mark Andy presses but for smaller jobs we had about 10 Riso rz 990/1090 the maintenance department would not work on them and they had a third-party company come in to do maintenance and repair. I got suckered in to look at them and repaired a few of them. Guess who had to work on them from now on! They were all pretty much wore out and head over 9 million impressions on them. Apparently, when I left there, they could not get anybody to work on them so they ended up having to buy used ones. He would never buy any new. It did not help either that the material being used in them was not what it was designed for.
 

rust in the eye

Well-known member
Joined
Oct 2, 2017
Messages
2,793
Location
Chicagoland
Doesn't look to me like clearance for anything.
What about grinding a shallow axial groove into the flats of the hex so as to be able to twist it by levering against, the bracket above?
 
To avoid these ads, REGISTER NOW!
Top Bottom