To avoid these ads, REGISTER NOW!

Above 1200 Sq/FT Engineer's Multi-Purpose Shop

Wokspaces above 1200 squarefeet.

Culture

Well-known member
Joined
Oct 28, 2017
Messages
126
Location
Houston, Texas area
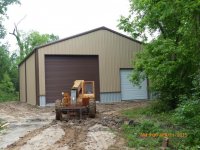
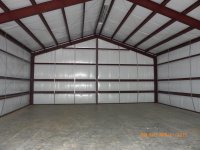
I have been reading this board for a while but have never made a post. Now that I have finally finished my shop (are shops ever really done?), I feel the need to show others what I have done. My shop is comprised of a 40x50 metal building with a 16' eave height. One side (1000 SF) is unfinished and used as garage space. The other side is two stories, providing 400 SF air condition office space (first floor), 600 SF air conditioned shop space (first floor), and 1000 SF of storage space (second floor).

With some help from my wife, I did all the work except for 1) the building pad, 2) the concrete foundation 3) the insulated metal building shell, 4) the load center, 5) the drywall finishes and 6) the insulation.

So, off the the races. The building pad is 12 inches high and was put in at unknown cost as part of the house which I was building at the same time on the same site ("free" per the contractor but I know I really paid for it somewhere). The building was elevated because the site is very flat and experienced flooding during heavy rainfall. You will see some photos showing why this was a VERY good idea.

View media item 85341
I am a structural engineer and I designed the foundation. Given that it is a light duty building, I used a 5 inch slab with #4 bars at 14 inches on-center. The metal building was supplied by Mueller and the anchor rods were designed using their supplied base reactions.

View media item 85342
View media item 85343
View media item 85344
 
Last edited:
To avoid these ads, REGISTER NOW!

welder57

Well-known member
Joined
Feb 26, 2011
Messages
414
Your pictures did not come thru, at least not on my computer. Where are you located?
 
OP
C

Culture

Well-known member
Joined
Oct 28, 2017
Messages
126
Location
Houston, Texas area
[Hopefully the photos will show this time]

I am located in the Houston, Texas area. I ordered an engineered metal building from Mueller. I.e. the plans were stamped by a registered professional engineer. I was willing to pay the cost because metal buildings are designed at the very edge of allowable factors of safety, and we have hurricanes in Houston area (the design wind speed at my site is 125 mph). Based on non-engineered bids, it probably cost me $3k-$5k for the engineered building, which would include the extra steel (relative to the non-engineered building) and engineering fees.

I live in an unincorporated area of Texas so I was not require to get the building permitted in any meaningful sense of the work.

I paid $22,300 for the concrete foundation and metal building erection (one contract), and $23,200 for the building including the windows and doors.

View media item 85515
View media item 85516
 
Last edited:

ChaseDE

Well-known member
Joined
Aug 25, 2016
Messages
2,178
Location
Delaware
[Hopefully the photos will show this time]

I am located in the Houston, Texas area. I ordered an engineered metal building from Mueller. I.e. the plans were stamped by a registered professional engineer. I was willing to pay the cost because metal buildings are designed at the very edge of allowable factors of safety, and we have hurricanes in Houston area (the design wind speed at my site is 125 mph). Based on non-engineered bids, it probably cost me $3k-$5k for the engineered building, which would include the extra steel (relative to the non-engineered building) and engineering fees.

I live in an unincorporated area of Texas so I was not require to get the building permitted in any meaningful sense of the work.

I paid $22,300 for the concrete foundation and metal building erection (one contract), and $23,200 for the building including the windows and doors.

K9fIaQ2.jpg


35ZTIuQ.jpg


nIiitYv.jpg


Rq0wcV4.jpg

Your Imgur links aren't working, here they are though.

try to attach to the forum via "manage attachments"

EDIT: after visiting the links manually i see them in your post. Imgur is funky, attach directly to forum if you can.
 

Attachments

  • 35ZTIuQ.jpg
    35ZTIuQ.jpg
    152.6 KB · Views: 330
  • K9fIaQ2 (1).jpg
    K9fIaQ2 (1).jpg
    153.2 KB · Views: 288
  • nIiitYv.jpg
    nIiitYv.jpg
    147.6 KB · Views: 327
  • Rq0wcV4.jpg
    Rq0wcV4.jpg
    127.1 KB · Views: 315

tx_mike

Active member
Joined
Jul 13, 2014
Messages
39
Location
Richmond TX
where in Houston area are you? where you happy with your contractor? I live in Richmond and looking to do a 30x40 but cant decide between something like yours or a pole style building.
 
OP
C

Culture

Well-known member
Joined
Oct 28, 2017
Messages
126
Location
Houston, Texas area
Your Imgur links aren't working, here they are though.

try to attach to the forum via "manage attachments"

EDIT: after visiting the links manually i see them in your post. Imgur is funky, attach directly to forum if you can.

Thanks, I have uploaded the pictures to the forum album and they appear to be working.
 
OP
C

Culture

Well-known member
Joined
Oct 28, 2017
Messages
126
Location
Houston, Texas area
where in Houston area are you? where you happy with your contractor? I live in Richmond and looking to do a 30x40 but cant decide between something like yours or a pole style building.

I am also in Richmond. I used RSC out of Beasley and was reasonably happy. Working in construction, I find that reasonably happy it about is good as it gets.
 
OP
C

Culture

Well-known member
Joined
Oct 28, 2017
Messages
126
Location
Houston, Texas area
After the shell was complete, I had the electrical contractor who was building my house run power to the building and install a load center. This may have been a mistake a mistake as the electrical contractor worked solely on wood framed houses and did not know how to work on metal buildings. I reworked the meter box mounting and load center mounting after they had already installed them (but before they were energized) but was not able to do it how it should have been done due to the main cables already being run. $1645 to get power to the building, including the underground line, meter box and load center.

I had a 200 amp panel installed. The contractor thought it was WAY to large :).

View media item 85535
 
Last edited:

LXCam

ALLIANCE MEMBER
Joined
Apr 23, 2013
Messages
19,078
Location
AZ
Everything looks good bud. And based upon the comment about your house roper that last picture is of his work right?
 

readhead

Well-known member
Joined
Dec 8, 2012
Messages
6,175
Location
Durango, Co.
Good looking building. Good choice on the ridge vent. Curious about one OHD and one coil door. Is the strapping on the inside of the girts called out because of wind? All the buildings I have put up had the strapping on the outside.
 

FJ 432

Well-known member
Joined
Aug 2, 2010
Messages
3,724
Location
Littleton Colorado
Nice job. I love the big roll up door. I assume the shop will be on the small door side?

Is that your house pictured in the concrete/ rebar photo? It looks like you'll have a separate driveway to the shop.
 

LXCam

ALLIANCE MEMBER
Joined
Apr 23, 2013
Messages
19,078
Location
AZ
It's that obvious, isn't it :).


I was praying so but I've seen worse.

Btw the shop really turned out nice, your contractor did an excellent job on the structure. It's refreshing to not see footprints or dirt on the insulation. How long till you can do a driveway so you can end that muddy mess?
 
Last edited:
OP
C

Culture

Well-known member
Joined
Oct 28, 2017
Messages
126
Location
Houston, Texas area
Nice job. I love the big roll up door. I assume the shop will be on the small door side?

Is that your house pictured in the concrete/ rebar photo? It looks like you'll have a separate driveway to the shop.

Yes, the small door is the shop, and the large door the garage. However, the small door was my biggest mistake (the be explained) and gets removed later.

The concrete/rebar photo is the shop building. The driveway leads to the house garage, and them continues to the shop building. The shop building sits about 75-80 feet behind the house.
 
To avoid these ads, REGISTER NOW!
OP
C

Culture

Well-known member
Joined
Oct 28, 2017
Messages
126
Location
Houston, Texas area
Good looking building. Good choice on the ridge vent. Curious about one OHD and one coil door. Is the strapping on the inside of the girts called out because of wind? All the buildings I have put up had the strapping on the outside.

Thanks. The ridge vents have worked well, not a single drop of water intrusion during Hurricane Harvey's 40 inches of rain.

The OHD is insulated and was intended to open into an air conditioned shop. This was a mistake in retrospect as I will later discuss.

The strapping is to give the girts vertical support off the eave strut since their strong axis is horizontal to resist the wind loads. I have never seen exterior strapping, maybe I am misunderstanding what you mean?
 
OP
C

Culture

Well-known member
Joined
Oct 28, 2017
Messages
126
Location
Houston, Texas area
Btw the shop really turned out nice, your contractor did an excellent job on the structure. It's refreshing to not see footprints or dirt on the insulation. How long till you can do a driveway so you can end that muddy mess?

The contractor did a good job on everything but the girt straps, which were incorrectly connected to the eave strut.

The driveway came way to much later, as it was to wet to pour for about six months after I needed it. It was one of the wettest years in Houston history.
 

readhead

Well-known member
Joined
Dec 8, 2012
Messages
6,175
Location
Durango, Co.
On all the buildings I have erected if it called out girt straps they were installed on the outside and were not visible after the insulation was installed.
 
OP
C

Culture

Well-known member
Joined
Oct 28, 2017
Messages
126
Location
Houston, Texas area
On all the buildings I have erected if it called out girt straps they were installed on the outside and were not visible after the insulation was installed.

OK, I understand now. You are correct. My erector "forgot" to install them and I had him put them in after the insulation was in place. This caused me some problems during the build-out, as I will discuss later.
 
OP
C

Culture

Well-known member
Joined
Oct 28, 2017
Messages
126
Location
Houston, Texas area
The first step of work for me was to move all my stuff into the building (Pro-tip, finish your shop then move in). I had no choice, my wife agreed to my dream shop on the understanding that nothing would ever be stored in the house garage except cars. At this time I build temporary shelves along one 50 foot wall for storage. I used 2x4 frames and OSB shelves. I used 7/16" and 5/8" for light and heavy storage.

Second, I installed install two 20 amp outlets at the load panel for use during the build-out (two circuits).

Third, I installed lights in the half of the shell which was going to be left open. I installed 10x 4 bulb T8 fixtures. This is about twice the light I would have installed if the area was only going to be used for garage parking, but it was going to be my workshop for at least a year, and I wanted good light for working on vehicles in the future. I had only wired wood frame construction prior to this time so I had to learn all about MC cable. I used plug in shop lights because they were cheaper and faster to install than hard-wired lights. Total cost for lights, bulbs, cable and miscellaneous components was $987 plus a lift. I lost the receipt for the lift.

So here is what my packed shop looked like once I moved and and had the lights installed:

View media item 85565
View media item 85567
View media item 85568
View media item 85569
View media item 85570
 
OP
C

Culture

Well-known member
Joined
Oct 28, 2017
Messages
126
Location
Houston, Texas area
Just realized I left out the construction of the driveway. The shell was completed in April 2015, but I was not able to get a driveway in until Sep 2015. That summer was extremely wet, making driveway construction impossible. Even worse, my home builder cut off the drainage from the rear of the property to the front, creating a lake at the location of the shop driveway (see photo).

I installed a temporary sump pump, and when the rains let up in the fall I was able to get the driveway in. The driveway installation was a disaster; fill soil was improperly compacted, the contractor did not order pumpable concrete (although the pump truck showed up), and the concrete sat in one of the trucks too long before being poured because it could not be pumped. My neighbor allowed me to cut his fence and bring two of the concrete trucks through his property to the the rear of of mine to pour the rear half the driveway. By the time this half was poured, the concrete in the remaining trucks was too old and I would not allow the front half to be poured (even the concrete at the rear half was older than generally allowed (90 minutes), but I cut the contractor some slack). The contractor poured the front half a few days latter using buggies. Sadly, the contractor would have poured half-cured concrete if I had let him. They started pouring in one area in the front half before I could stop him and I made him chip it out. The concrete had been in that truck for about 3-4 hours when they started pouring :mad:.

In the end, the driveway is three years old now and I have not had any problems yet. Driveway cost was $13,500. I am pretty sure I overpaid.

Mud pit:
View media item 85576
Giving up on pumping, concrete slump way to high.
View media item 85577
Placing concrete
View media item 85578
Finishing concrete
View media item 85580
 
Last edited:
OP
C

Culture

Well-known member
Joined
Oct 28, 2017
Messages
126
Location
Houston, Texas area
Work on the interior build-out was delayed until February 2017 when I retired. I constructed a 25x50 freestanding, insulated wood framed building inside of the insulated metal shell. The has resulted in a building which is extremely energy efficient. The insulated building is divided into a 20x20 foot office and a 20x30 foot shop. The ceiling is constructed of i-joist designed for a 90 psf load and the second flood is used for heavy storage.

I framed the building by myself so i built is using 8x9 foot sheathed panels which i tilted into place. I used the OSB sheathing as an air barrier, all joints are caulked and/or gasketed and the OSB is painted to seal against air infiltration.

Lumber delivery:
View media item 85536
View media item 85537
The first wall panels:
View media item 85604
View media item 85605
 
OP
C

Culture

Well-known member
Joined
Oct 28, 2017
Messages
126
Location
Houston, Texas area
Given the number of panels I had to construct, I build a jig supported oh saw horses to building the panels. I framed the panels on the jig, and set the frames on the floor to sheath. One of the biggest challenges was moving the frames and tilting up the panels by myself. A second big challenge was having to constantly relocate the contents of the shop. O really, really wish I could have done this work before I moved in.

The wood framing is structurally connected to the metal building at the girts where adjacent, but when fully framed will be self-supporting (shear wall both ways and anchor bolts).

Panel frame jig:
View media item 85629
Framing progress:
View media item 85630
View media item 85631
View media item 85632
 

LXCam

ALLIANCE MEMBER
Joined
Apr 23, 2013
Messages
19,078
Location
AZ
Very nice.

Btw I made that same mistake once and only once on a concrete order. It was a month before our wedding and I decided to poor a patio in the back for our party. The first time I ordered correctly but the morning of the poor had to cancel because of rain. Later that day I called and reinstated the order but didn't do a once over with them. The following weekend my pumper showed up and laid out 200ft of hose and shorty there after my mud arrived and no pump mix. To add to this joy only one of three of my buddies made it over to help. Not only did I wheel barrow all ten yards back there, but skreeded and floated it. No sooner did we get the rock salt tamped into it, the skies opened up. It was a glorious day :spit:
 
OP
C

Culture

Well-known member
Joined
Oct 28, 2017
Messages
126
Location
Houston, Texas area
Very nice.

Btw I made that same mistake once and only once on a concrete order. It was a month before our wedding and I decided to poor a patio in the back for our party. The first time I ordered correctly but the morning of the poor had to cancel because of rain. Later that day I called and reinstated the order but didn't do a once over with them. The following weekend my pumper showed up and laid out 200ft of hose and shorty there after my mud arrived and no pump mix. To add to this joy only one of three of my buddies made it over to help. Not only did I wheel barrow all ten yards back there, but skreeded and floated it. No sooner did we get the rock salt tamped into it, the skies opened up. It was a glorious day :spit:

Ouch. I hope your one friend stayed to help once they found out what they were going to have to do. My contractor at least had power buggies.

My situation was also partially my fault. I insisted that my unsophisticated small-time contractor pump the concrete to avoid driving concrete trucks on my driveway and yard. He did not really know what was required to pump concrete. I, on the other hand, have been involved in numerous concrete placements using pumping (concrete structures are my specialty). I should have made sure he know what he was doing.

I have to ask, what was the rock salt for? Surface texture? Salt and reinforced concrete are natural enemies. In commercial projects anywhere deicing salt is used or near the coast we spend lots of effort to make sure no salt gets into the concrete.
 
Last edited:
OP
C

Culture

Well-known member
Joined
Oct 28, 2017
Messages
126
Location
Houston, Texas area
One of the important things I realize now is that I should have built a 4x8 work table on castors. Instead I kept manually moving things around. I built a mobile work table after I was done :-(.
 

LXCam

ALLIANCE MEMBER
Joined
Apr 23, 2013
Messages
19,078
Location
AZ
Yes the salt gives it a pitted texture like you used to see done for pool decks. It's a really simple deal of tamping large rock salt right after your last run with a finish trowel. Then watering the slab over a couple days dissolves the salt. This then leaves you (when done properly) a nice non skid surface. In my case with the downpour it looked like Edward James Olmos after a meteor shower facial.

I run large CIP projects as a living and you'd never see anything like this on a project. This slab was 100% patio so there wasn't any rebar or mesh in the pour to be concerned about degradation. I have the same finish on the courtyard patio at my current home. I'll grab a picture in a bit.
 

LXCam

ALLIANCE MEMBER
Joined
Apr 23, 2013
Messages
19,078
Location
AZ
Wow you really went to town on that area. I take it this became a mezzanine when it was all finished. I bet screwing or nailing off the sheeting to your rim joist was lots of fun on the exterior sections. :p

Sorry, this will be my last sidetrack.

IMG_6050.jpg

IMG_6049.jpg
 
Last edited:
OP
C

Culture

Well-known member
Joined
Oct 28, 2017
Messages
126
Location
Houston, Texas area
Wow you really went to town on that area. I take it this became a mezzanine when it was all finished. I bet screwing or nailing off the sheeting to your rim joist was lots of fun on the exterior sections. :p

Sorry, this will be my last sidetrack.

Yes, the mezzanine is a storage area with a design load of 90 PSF (1000 SF of storage :)). I nailed the sheeting to 9x8 panels then tilted the panels into place. I nailed the rim joist to the in-place sheathing using a palm nailer (there is about an 8 inch gap). It was slow :).
 
Last edited:
OP
C

Culture

Well-known member
Joined
Oct 28, 2017
Messages
126
Location
Houston, Texas area
Yes the salt gives it a pitted texture like you used to see done for pool decks. It's a really simple deal of tamping large rock salt right after your last run with a finish trowel. Then watering the slab over a couple days dissolves the salt. This then leaves you (when done properly) a nice non skid surface. In my case with the downpour it looked like Edward James Olmos after a meteor shower facial.

I run large CIP projects as a living and you'd never see anything like this on a project. This slab was 100% patio so there wasn't any rebar or mesh in the pour to be concerned about degradation. I have the same finish on the courtyard patio at my current home. I'll grab a picture in a bit.

LOL James Olmos. Yeah, I cannot see how it could cause any problems without rebar or mesh present. As far as I know salt has no effect on concrete itself.
 

Robey5

Well-known member
Joined
Jan 18, 2010
Messages
406
Location
North of Detroit, Mi
Wow. That is a big place. Lots of obstacles to deal with in placement.

I *think* that the pink 2x4 lumber has to do with insulation qualities. Someone I am sure will be able to confirm, but ... why is this used?
 
OP
C

Culture

Well-known member
Joined
Oct 28, 2017
Messages
126
Location
Houston, Texas area
Wow. That is a big place. Lots of obstacles to deal with in placement.

I *think* that the pink 2x4 lumber has to do with insulation qualities. Someone I am sure will be able to confirm, but ... why is this used?

The dye means that it is stud length. I was framing for a 9 foot ceiling, so the studs need to be 9' - 1.5" (bottom plate) - 3.0" (double top plate) + 1/2" drywall (ceiling) = 104" . However, to provide proper clearance for the drywall at the bottom of the wall, they are cut in my area to 104 5/8."

This leaves a 5/8" gap between the concrete floor and bottom of the 9' drywall panel. You do not want your drywall in contact with the concrete, which transmits moisture.
 
Last edited:
To avoid these ads, REGISTER NOW!
Top Bottom