To avoid these ads, REGISTER NOW!

Epoxy-coat finished finally!

evmain

Member
Joined
Jul 30, 2007
Messages
17
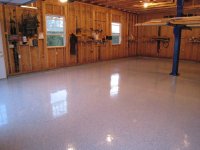
Just finished my garage floor with Epoxy-Coat. Actually did it last Saturday. I had to wait for the temperature and humidity to drop here in the East. I am very pleased with the finish so far. Have not really driven on it yet, but I don't expect any problems. Garage is detached and is 30 X 40.

I strongly recommend the product but I have a few suggestions that will help I think.

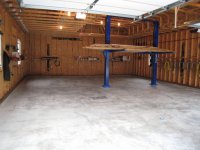
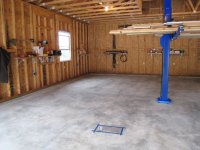
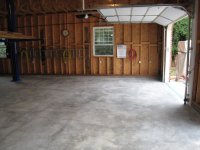
I spent a lot of time with the prep, probably 4 times the amount of time to put it down: Rented an EDCO grinder. I used the coarse stones. My concrete is very hard and smooth. I had to add weight to the grinder to make it do anything. Ground it 4 or 5 times. Then I acid washed it with the acid from Epoxy-Coat. I was not impressed with it. I think if I use it again on my house garage I will buy a stronger acid from our local Brick Co. It only fizzed for about 20-30 seconds. Then I used the baking soda. After that I powerwashed it. It set for about a week and a half before I felt comfortable with the weather. My concrete also has fiber in it so I used one of those propane torches over the whole floor. I did not have any pieces of fiber stick up when I finished.

As for the putting down the finish I did not have any help. If you have someone you think could help I recommend it. I am very **** about stuff and I prefer to do things myself. I spent a lot of time with figuring out how much to mix up and decided to divide the garage into 12 equal sections of about 6 1/2 feet by 14 1/2 feet, roughly 100 sq. feet each. I ordered 3 kits and figured I would divide it up and use it all. This worked out great, except I had one little spot that I need to touch up and I don't have any left. I would recommend saving a little of the epoxy for this reason. I do have some of the hardener left. I called the company and they are very nice and helpful. They are actually going to send me some gray epoxy to touch it up.

I decided I did not like the little squeege and 9" paint roller, so I bought a larger squeege and 18" paint roller, buy extras and take them back if you do not use them. I HIGHLY RECOMMEND THIS!!!! This stuff sets up extremely fast! I could only finish 2 sections and had to switch to a new roller. They got as hard a a rock. If everything I have heard about the faster epoxy sets the better, then this stuff is the best on the planet. You have to keep moving. I mixed 2 qts. epoxy and 1 qt. hardner per section. I bought little measuring containers and a few buckets from our local dollar store to mix in. I poured it out and cut it in the edges, then used the squeege and rolled it once. Then I mixed up the next section and did the same. When that was done I went back and rolled the first section a second time and spread out the flakes. What an adventure, to me this is the most difficult part. I found it challenging to keep them even. At the last minute I ordered a lot more flakes than came in the kit. I am glad I did. The thicker you put them down the easier it is, plus I think it looks better. I also divided my flakes up into 12 equal containers ahead of time. Make sure you have enough. I had to ease up a little towards the end to have enough.

All in all it took about 3 hours. It is a very messy job. Make sure you put cardboard and plastic down where you are mixing it if there is a surface you want to protect under it.

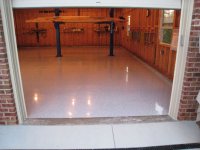
It has a very high gloss and I love the fact it is a one coat process. I felt great when I was finished knowing that was all I had to do. I can't imagine going back and needing to put a second coat on. For those of you that are wondering about putting it on wood. I laid the cut in brush on the pressure treated plate. I am attaching a picture of the epoxy stuck to it. I tried with a razor blade to get it off. It won't even touch it. I did not prep the wood obviously and it still attached to it like you would not believe. I would have no problem at all putting Epoxy-Coat on a wood surface.

Finally, I strongly recommend Epoxy-Coat, don't be afraid to put it down, just prepare for everything ahead of time. I am attaching pictures and if you have any questions, please ask. I like it so much my next project is my house garage, this will be little more challenging because it has been used for 19 years. Hope this wasn't too long, just wanted to help anyone that might be thinking of doing a similar project. Enjoy!
 

Attachments

  • IMG_0511.JPG
    IMG_0511.JPG
    55.5 KB · Views: 352
  • IMG_0513.JPG
    IMG_0513.JPG
    58.3 KB · Views: 272
  • IMG_0515.JPG
    IMG_0515.JPG
    54.8 KB · Views: 258
  • IMG_0542.JPG
    IMG_0542.JPG
    53.5 KB · Views: 437
  • IMG_0551.JPG
    IMG_0551.JPG
    58.7 KB · Views: 1,082
  • IMG_0543.JPG
    IMG_0543.JPG
    58.1 KB · Views: 635
  • IMG_0553.JPG
    IMG_0553.JPG
    63.1 KB · Views: 990
Last edited:
To avoid these ads, REGISTER NOW!
OP
E

evmain

Member
Joined
Jul 30, 2007
Messages
17
I forgot to upload them. They are now in a separate thread. I will try to edit that.

Sorry,

Eddie
 

Cult Hero

Well-known member
Joined
Mar 30, 2006
Messages
47
Location
Santa Barbara
wow, looks great. I think I am going the Epoxy Coat route too. I have a smaller 2 car garage, only 22x20. Do you think I could get by with one kit?
 
OP
E

evmain

Member
Joined
Jul 30, 2007
Messages
17
I would say if you can swing it to buy one kit and a half. They do sell a half kit. You can put this stuff on up to 1/2 inch thick if you could hold it to that. I put on as thick a coat as I could. I used 3 full kits for a little less than 1200 sq. ft. One kit would probably do it, but for another $150 you could save a little for repair later. Just my opinon. You won't be disappointed with this stuff.
 

Fast Cop

Well-known member
Joined
Aug 10, 2007
Messages
57
Where did you buy your epoxy-coat? Is this the stuff they sell at Home Depot?
 

69lkmno

Well-known member
Joined
Sep 15, 2005
Messages
137
Location
San Diego - Oceanside
I've had my epoxy floor for almost 2 years now and still happy with it. I just have a bottle of diluted simple green that I spray on some oil stains and it wipes off easily.
 

toms73novass

Well-known member
Joined
Nov 10, 2005
Messages
483
Location
grand island, ny
Those of you who used epoxy coat a few questions.

After applying the epoxy you broadcast the flakes do they lie fairly flat in the coating since there is no topcoat?

Did you use the non slip alum oxide or are the flakes enough of an anti slip?
 
OP
E

evmain

Member
Joined
Jul 30, 2007
Messages
17
They do lie flat. I might of had 2 or 3 that didn't. I simply took a razor blade and cut them off. I did not use the alum oxide. It seems to be fairly slip resistant with the vinyl flakes. I have not had water on it yet.
 

curlyws6

Well-known member
Joined
Mar 7, 2007
Messages
112
Location
Eastern North Carolina
Your floor looks awesome! I have got to get my floor done soon.... think I'll wait until it cools off some so I run into humidity problems (east coast humidity is a killer right now).
 

RickP330

Well-known member
Joined
Apr 12, 2007
Messages
831
Location
Middle Island, NY
Hey,
Great job dude. You didn't by chance add up the cost and come up with a total of price per square foot including materials only? I didn't set any economy records on my floor, but I think it came out great and yours also looks like a great job.
Regards,
Rick
 

snorvet

Well-known member
Joined
Oct 29, 2005
Messages
777
Location
Northern Illinois
Those of you who used epoxy coat a few questions.

After applying the epoxy you broadcast the flakes do they lie fairly flat in the coating since there is no topcoat?

Did you use the non slip alum oxide or are the flakes enough of an anti slip?

Mine lie flat - but I put on a clear coat. This was a mistake because the clear yellowed a little under the tires. I'm going to sand off the clear coat in a couple of years and reapply a better clear.

I didnt use any anti slip - the sand blaster and heavy chips made it almost rough enough - I've slipped a few times when its been wet, but its ok if you walk across it normally.
 
OP
E

evmain

Member
Joined
Jul 30, 2007
Messages
17
All in all with the 18" rollers and larger squeege and things, it came out to almost exactly $1.00 per sq. ft.
 

Fast Cop

Well-known member
Joined
Aug 10, 2007
Messages
57
evmain, did you do your floor in sections? If yes, how long did you wait from one section to the next? Did you have any trouble when you started the next section with cutting in? What I mean is can you notice where one section finishes and the next starts. With the time it takes to mix a new pot of epoxy how much did the section your did previous set up and was the next section able to bled in with the first one without being able to notice a line?

OK, I think I was clear, let me know if I was not.
 
OP
E

evmain

Member
Joined
Jul 30, 2007
Messages
17
Yes, I did it in 12 sections of about 100 sq. ft. each. I really didn't have much trouble blending each section as long as you get it spread out quickly. The thicker it is the faster it sets. I used a 1/2 gal. and a 1 qt. plastic container and had them ready to pour together. It is self leveling and it sort of blends itself together. Shouldn't be a problem, although I would not do it in 90 degree weather.
 

mvanbens

Member
Joined
Jun 6, 2007
Messages
10
Location
South East MI
EVMAIN,
Did you make a set of those spiked shoes for apllying the chips or were you able to get around the sections enough for even application? Thanks.

-Matt
 
OP
E

evmain

Member
Joined
Jul 30, 2007
Messages
17
Yes I made a set, but only because I wanted to be prepared just in case. I did not use them. I used drywall screws through 1/2 inch plywood. They would have worked, but I never used them.
 
To avoid these ads, REGISTER NOW!

SteveL

Well-known member
Joined
Jan 14, 2005
Messages
760
Location
St. Louis, MO
You mentioned that the clear coat yellowed under the tires. Did you use Epoxy Coats clear or another brand?

Garage looks great!!!:bowdown:
 
OP
E

evmain

Member
Joined
Jul 30, 2007
Messages
17
To answer the last 2 posts. The Epoxy-Coat that I used is a one coat process. It does not use a clear coat, therefore should not yellow. They ( http://www.epoxy-coat.com/ ) did tell me that it may yellow if used outside the garage doors, so I masked it off right under the garage door seal. The squeegee is used to spread it out quickly after you mix and pour it on the floor. It will harden very quickly if not spread out. Then you roll it. So far I love the floor. I have done several brake jobs and even pulled the rear axles on my son's Tahoe.

Eddie
 
Last edited:

SteveL

Well-known member
Joined
Jan 14, 2005
Messages
760
Location
St. Louis, MO
Eddie,

Thanks for the reply. What's weird is that I e-mailed Epoxy Coat and asked about a clear coat and got this response.

Yes the clear coat kit is $244.95 for a 3 gallon kit or $149.95 for a 1.5 gallon kit.

Craig S. Jones
Epoxy-Coat, Inc. www.epoxy-coat.com
Performance Floor Coating Systems, Inc. www.performancefloor.com
1-800-841-5580 x23


I did not see anything on their site that mentions a clear coat. I am wanting to put a clear coat on after the color chips to seal everything in. I take it you did not see any need to do that? Don't you feel the chips sitting on top of the coating or do they actually kinda sink in?
 
OP
E

evmain

Member
Joined
Jul 30, 2007
Messages
17
They explained to me, it is also on the first page of their site, that the more coats of anything you put on the more likely it is to delaminate. That is why I liked their one coat system. Yes, you can feel the flakes a little, but that is what keeps it from being so slippery. They do lie flat.
 

woohoo

Member
Joined
Jul 17, 2007
Messages
18
When I talked to Epoxy-coat a couple of weeks ago, they recommended that you NOT put a clear coat on. Not sure why, but maybe the yellowing and delaminating is why....

So, If I understand correctly, you pour the epoxy on the floor, use the squeegee to spread it out, then you roll it. That's it? Does it stay wet enough long enough to spread it out uniformly and without any roller marks?
 
OP
E

evmain

Member
Joined
Jul 30, 2007
Messages
17
Yes, you do NOT use a clear coat. This is about as easy as epoxy gets, I think. One coat and you are done. You have to keep moving, you have about 15 minutes per batch. I did about 100 sq. ft. at a time.

Correct, mix, pour, squeege, roll first time, do another area, then go back and roll a second time and spread flakes. It is self leveling so any roll marks will flow out.

It is great stuff, but you can't stand back and admire your work until you are done.
 

woohoo

Member
Joined
Jul 17, 2007
Messages
18
Does it leave you sufficient time to spread the flakes? What about problems when you overlap the next section to the old section. I might have to do this all by myself, so I'd like to know if what the problems might be.....
 

SteveL

Well-known member
Joined
Jan 14, 2005
Messages
760
Location
St. Louis, MO
I'm also doing mine by myself and plan on doing one side of the garage up to a seam in the floor and then doing the other side a few days later. Reason for this is that I have to move everything, cabinets, compressor, blast cabinet, etc, to one side and then after the first side cures, move everthing to the finished side and start over. Wow that was a long sentence! make sense?

So, I will not be over lapping the epoxy along the seam. The plan is to mix all of the epoxy together with out the hardener in one container so that there is no chance of a color issue and then mixing small batches from that. I will also separate the chips in to equal parts so that I can get some consistency when they are applied. What would you do different?

Oh, and as you say that it is self leveling, I have a floor drain so the floor slopes slightly toward the drain. Is this going to be a problem?
 
OP
E

evmain

Member
Joined
Jul 30, 2007
Messages
17
I will try to answer both posts together. I did almost 1200 sq. ft. by myself in around 3 hours. Yes I had time to spread out the flakes. I did not have any trouble blending the different sections in. I had 12 sections. The floor drain should not be a problem unless the fall to it is very drastic. I don't see a problem with doing it on different days. I think if you read through Epoxy-Coats website it will tell you what to do about recoating, such as after so many hours you may have to rough up with sandpaper. I am sure there will be a little overlapping even with a seam. The main thing is to be prepared with everything you can think of. You will not have time to run to the store to pick up anything. Have plenty of rollers and whatever you can think of, you can always take them back if you don't use them. I think my original post sums it up pretty well. I highly recommend 18" rollers and a larger squeegee than they give you in the kit. Good Luck!!!
 

bandit_99

New member
Joined
Aug 15, 2007
Messages
2
I did mine on Tuesday night--- the tips and comments here are spot on. I actually had a small amount left in my bucket when I added the 2 parts to make another batch- I was working quickly because it was hot as hell and the stuff sets up FAST- well, the error cost me pretty big because the last batch started clumping up in less than 5 minutes. I barely got done cutting in, and squeeged out some more and that was the end of it.

Their patch/repair kit is supposed to cover 75 sq feet. I'm hoping that covers my blunder.

I dealt with them on the phone about a dozen times for the whole ordeal. Their lady that answers the phone and craig or greg are both very nice, knowledgable and respectful. Some other yahoo got on to answer some questions for me and was a total jackass. I should have gotten his name to let his management know to keep him licking stamps or something where he doesn't have to talk to anybody.
 

SteveL

Well-known member
Joined
Jan 14, 2005
Messages
760
Location
St. Louis, MO
One last question.............did you cut in the edges as you went or go around the entire perimiter first? I can imagine needing about 12 brushes if you did a section at a time. My concern of doing the whole perimiter first is that the flakes would not stick as it will be set up before you start rolling the main areas. Right? Also, is there a reason you stopped short of the door edges and would you go all the way to the driveway if you had it to do over? Sorry, that was 2 questions.

Your floor looks great by the way! Nice job!
 
OP
E

evmain

Member
Joined
Jul 30, 2007
Messages
17
No, I cut in the edges as I went. For some reason it did not set up as quick on the brush. I did almost 1,200 sq. ft. in 12 different sections and used 2 of the 3 brushes that Epoxy-Coat supplied in the kit. The reason I did not go all the way to the driveway is that they said it would eventually yellow from sunlight, so I taped it off right under the garage door seal. I would do that again. By the way if you tape off an area you should really try to get the tape up before it sets up completely. I am not sure how you would do it if it set up over top of the tape. I pulled mine off as soon as I could after I spread the flakes. Just watch that you don't do it too soon and it runs. I would say about 30 minutes or so depending on the temperature. I think it would hold up fine outside, I just didn't want it to turn yellow. Good Luck, it will be fine!
 
Last edited:

Havok1327

New member
Joined
Aug 20, 2007
Messages
4
Location
St. Louis, Mo
Evmain, I'd also like to know how many more pounds you bought. I'm hoping to get the same look as you did on your floor.

I just ordered my kit this past Thursday and the person I spoke with suggestion an extra 4lbs of flakes for a Medium coverage on a 700sq/ft garage.

Take a look at their web site to see how they define medium.
 
OP
E

evmain

Member
Joined
Jul 30, 2007
Messages
17
I bought 6 extra pounds plus what came with the kit. That was for almost 1200 sq. ft. I would think 4 lbs. for 700 would be adequate.
 

SteveL

Well-known member
Joined
Jan 14, 2005
Messages
760
Location
St. Louis, MO
Also need to know how many pounds of chips come with the satndard kit? They show standard, medium and heavy coverage on the site but do not say how much is needed to do the different coverages. Best I can figure is that the standard kit comes with a 1 pound bag. I'm doing just under 800 sq ft and want a light to medium coverage.
 

snorvet

Well-known member
Joined
Oct 29, 2005
Messages
777
Location
Northern Illinois
I cant remember the exact size, but it seems like I got about a pound of chips per kit from Epoxy-Coat. To be safe I bought 2 or 3 boxes of Rustoleum chips and mixed them with the epoxy-coat chips before installation. I went semi-heavy with the chips.

Here's a pic of the kit:

epoxykit.jpg
 
To avoid these ads, REGISTER NOW!
Top Bottom