

I learned quite a bit from this site when I was choosing my new garage flooring system, so I promised myself when I was done, I'd do a full write-up on my experience. I apologize if there's quite a bit of detail, but hopefully it will help someone else.
The Choice:
My garage is new, approx 25-feet x 30-feet, insulated and heated. The slab and foundation were poured 7-months ago. Light car work, no welding and no real chemicals or solvents unless you count lawn mower fuel/oil. I do run real sticky tires on my car, so I was concerned about that.
This application took place in December in the northeast in 30-degree temps in a heated garage.
I decided that before any vehicles were on the slab, I wanted to seal it now when the cleaning process would hopefully be easier and the garage is empty. I had concerns about every kind of flooring system, but knowing I didn't want to do it over and over again, I decided to try to get a system that will stand up over time. After doing my research, I decided against water-based epoxies, urethane coatings, and clear coat epoxies, just because they didn't seem durable over the long haul. I decided against VCT-tile simply because I didn't want the tile-installation hassles/complexities of glue-ing down tile to my floor, or the potential problems of tire marking. I decided against Race Deck simply because of the cost. I'm also sort of holding that sort of system in reserve should the Epoxy floor go bad in the future.
In the end the single-coat application of Epoxy-Coat, along with the long term durability I found in my research made it the clear choice for me. The price was right, the product looked good, and they happily answered all of my questions.
Supplies:
I ordered 1 Epoxy-Coat full-kit, 1 half-kit, 1 extra pound of chips and then purchased 2 roller frames and some extension poles @ Home Depot. Since each kit came with chips, anti-skid, roller, mixer blade, squeege and cut-in brush, it worked out well. I also purchased some extra Muriatic Acid at Home Depot just in case.
Preparation:
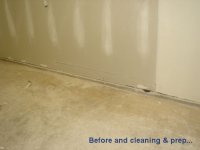
I spent a few hours with a paint scraper removing drywall-spakle, paint drips and any other surface debris, and swept & vacuumed the garage thoroughly. I put tape over my floor drain to protect it from the surface prep acid.
I wet the surface and working in small sections at a time I used a garden sprayer to spray on the Epoxy-Coat surface prep/water mix. DO follow the instructions for mixing (including sequence and water temp)--this stuff is dangerous so protect your eyes and skin. Mine did not foam or bubble extensively in most areas, so I scrubbed and re-applied and even applied some of the diluted Muriatic acid to be safe. In the end, short of diamond-grinding, I did the best I was able to do. I used about 4 large boxes of baking soda and sprinkled it over the surface to neutralize the acid, then used a garden hose and triple rinsed the surface. I followed all of this with a pressure washing to remove any last debris or contamination, and swept out any remaining water with a broom & squeege.
I ran a de-humidifier in the garage for the week between preparation and application. I also ran the forced-air heat with a thermostat setting of about 70F to help dry the area and to help get the slab temperature up to at least the 50F minimum temp for application. I did monitor the floor & air temps to be sure I was ok.
At Epoxy-Coat's recommendation, I filled the expansion cracks with acrylic caulk and did my best to also fill any small cracks with acrylic caulk. I let this dry for about 3 days before the Epoxy-Coat application.
Finally I put small wooden strips under the garage door to attempt to get a clean line at the garage door, without getting epoxy stuck to the garage door rubber weather seal.
Application preparation:
Knowing how messy this stuff can be, I setup an old tarp in a hallway leading to the garage. I setup two of the epoxy coat buckets, one for pre-mixing the Part-A mix and one for mixing the epoxy, each with their own cordless-drill mixing blade. I setup my rollers, extension poles, extension pole squeege and cut in brushes with containers to hold them once they had been used. I took two pieces of plywood and drove multiple screws (about 12 in each) through them to make spikes, and screwed an old pair of shoes to them. DO make spike shoes, you'll need them. Be sure to use shoes that are easy on/off (like clogs) and be sure to use plywood and screws that won't break or chip off into your fresh epoxy.
I marked the single-batch side of my measuring stick so we didn't get confused mixing our batch sizes (one side has marks for a double-batch). Be sure to also charge up your cordless drill batteries (2) since the mixing will wear at least one of them out in mid application.
Planning the application:
The supplied measuring stick creates a batch of about 100 sq ft. You need to map out your application sections BEFORE you start. I figured out the total number of batches my 1.5 kits would make (in my case it was 6) and divided my garage into 6 sections, each about 25 feet by 4.5 feet. This was the most confusing part for me, figuring out how large a section to do with each batch and not have too much or too little epoxy mixture. I marked my sections at each end with some painters tape. I also divided my chips and my anti-skid sand equally into 6-bags each for the 6-sections above to keep the application as even as possible.
Application of Epoxy-Coat:
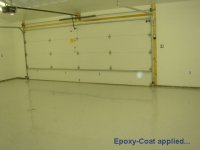
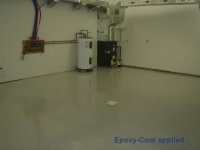
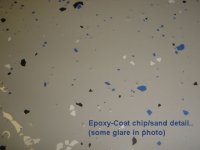
I opened all of my Part A containers and dumped them into one bucket and pre-mixed this for 3 minutes. Then using the measuring stick, I poured Part B to the first line and Part A to the second line (2-parts A to 1-part B with Part B going in first), and mixed this with the second mixer blade for 3 minutes. I then quickly poured the entire container on the floor and frantically cut in the edges with the cut in brush. It didn't help that our first section had the furnace and hot-water heater as obstacles to cut around. I then squeege'd the Epoxy around the entire section. It helped a lot to have the wife continue holding the mixing bucket upside-down to get the last drips out on the floor (this stuff moves slow). I followed this with the roller which really starts to make the floor look nice as it evens out the color. We then repeated the mixing process and applied Epoxy to the 2nd section (cut, squeege, roll). I then donned the spike shoes and walked on the 2nd section to re-roll, apply the chips and apply the sand to the first section. This is why you need the spikes--this and when you get to the last section you'll find yourself painted into a corner otherwise. I tossed the chips and sand up as high as possible to make the application random. We repeated this process until the floor was complete. In the end whether it was because of the outside temp & humidity or something else, we had considerably more time to work the epoxy than I expected. We had plenty of time to cut-in, squeege, roll, re-roll and chip with no panic and no premature hardening, although we never let it sit in the bucket for more than a minute or two---they say this is when it will harden the fastest. I also ended up with a medium chip application and a LOT of chips and sand remaining...probably didn't need the extra pound of chips, but I do have another floor to do in the spring so I'm sure they'll get used.
Clean-up:
We dumped any remaining part A or B into a bucket and dumped our cut-in brushes, squeege & rollers in the mix to harden and throw out. Despite our careful and documented mixing, we had more Part B remaining at the end than I was comfortable with. I reviewed the wife's video tape and each batch was accurate. Not sure why we had leftover Part B but we did. I will warn you that Part A is forever. If not hardened with Part B, it remains incredibly sticky, doesn't wash off and doesn't dry. I've now had the Part A mixing blade outside through rain and snow for several weeks and it's still sticky.
Dry time:
I checked the following morning and the floor seemed to be drying, but still soft enough to see a finger print if you pushed hard. We continued running the dehumidifier and furnace set at 70F.
Disaster strikes:
Mother nature doesn't seem to care much about months of research, weeks of preparation, hundreds of dollars and a day of meticulous application. While away from home, we had a 1-inch per hour rainstorm on top of 10-inches of snow and 40MPH winds. With only 1-day drying time on epoxy that already seemed to be drying slowly, this drove water under the garage door (wooden strips unfortunately still in place) and it pooled at my taped over floor drain. This created a stain around the drain and in two paths coming in from the door. Not being sure what to do, I decided to walk out barefoot to un-tape the drain. This worked well until I go close to the wet part and sure enough the epoxy was still soft enough to stick to my feet. As you can imagine the scene was not pretty. Scampering around barefoot trying to towel up water and not damage soft epoxy. In the end the stain wouldn't come out and I did make a few comical permanent foot-prints in the epoxy.
*** I hit the 1000 character limit so I'll add a 2nd post to complete the story below the pictures ***
The Choice:
My garage is new, approx 25-feet x 30-feet, insulated and heated. The slab and foundation were poured 7-months ago. Light car work, no welding and no real chemicals or solvents unless you count lawn mower fuel/oil. I do run real sticky tires on my car, so I was concerned about that.
This application took place in December in the northeast in 30-degree temps in a heated garage.
I decided that before any vehicles were on the slab, I wanted to seal it now when the cleaning process would hopefully be easier and the garage is empty. I had concerns about every kind of flooring system, but knowing I didn't want to do it over and over again, I decided to try to get a system that will stand up over time. After doing my research, I decided against water-based epoxies, urethane coatings, and clear coat epoxies, just because they didn't seem durable over the long haul. I decided against VCT-tile simply because I didn't want the tile-installation hassles/complexities of glue-ing down tile to my floor, or the potential problems of tire marking. I decided against Race Deck simply because of the cost. I'm also sort of holding that sort of system in reserve should the Epoxy floor go bad in the future.
In the end the single-coat application of Epoxy-Coat, along with the long term durability I found in my research made it the clear choice for me. The price was right, the product looked good, and they happily answered all of my questions.
Supplies:
I ordered 1 Epoxy-Coat full-kit, 1 half-kit, 1 extra pound of chips and then purchased 2 roller frames and some extension poles @ Home Depot. Since each kit came with chips, anti-skid, roller, mixer blade, squeege and cut-in brush, it worked out well. I also purchased some extra Muriatic Acid at Home Depot just in case.
Preparation:
I spent a few hours with a paint scraper removing drywall-spakle, paint drips and any other surface debris, and swept & vacuumed the garage thoroughly. I put tape over my floor drain to protect it from the surface prep acid.
I wet the surface and working in small sections at a time I used a garden sprayer to spray on the Epoxy-Coat surface prep/water mix. DO follow the instructions for mixing (including sequence and water temp)--this stuff is dangerous so protect your eyes and skin. Mine did not foam or bubble extensively in most areas, so I scrubbed and re-applied and even applied some of the diluted Muriatic acid to be safe. In the end, short of diamond-grinding, I did the best I was able to do. I used about 4 large boxes of baking soda and sprinkled it over the surface to neutralize the acid, then used a garden hose and triple rinsed the surface. I followed all of this with a pressure washing to remove any last debris or contamination, and swept out any remaining water with a broom & squeege.
I ran a de-humidifier in the garage for the week between preparation and application. I also ran the forced-air heat with a thermostat setting of about 70F to help dry the area and to help get the slab temperature up to at least the 50F minimum temp for application. I did monitor the floor & air temps to be sure I was ok.
At Epoxy-Coat's recommendation, I filled the expansion cracks with acrylic caulk and did my best to also fill any small cracks with acrylic caulk. I let this dry for about 3 days before the Epoxy-Coat application.
Finally I put small wooden strips under the garage door to attempt to get a clean line at the garage door, without getting epoxy stuck to the garage door rubber weather seal.
Application preparation:
Knowing how messy this stuff can be, I setup an old tarp in a hallway leading to the garage. I setup two of the epoxy coat buckets, one for pre-mixing the Part-A mix and one for mixing the epoxy, each with their own cordless-drill mixing blade. I setup my rollers, extension poles, extension pole squeege and cut in brushes with containers to hold them once they had been used. I took two pieces of plywood and drove multiple screws (about 12 in each) through them to make spikes, and screwed an old pair of shoes to them. DO make spike shoes, you'll need them. Be sure to use shoes that are easy on/off (like clogs) and be sure to use plywood and screws that won't break or chip off into your fresh epoxy.
I marked the single-batch side of my measuring stick so we didn't get confused mixing our batch sizes (one side has marks for a double-batch). Be sure to also charge up your cordless drill batteries (2) since the mixing will wear at least one of them out in mid application.
Planning the application:
The supplied measuring stick creates a batch of about 100 sq ft. You need to map out your application sections BEFORE you start. I figured out the total number of batches my 1.5 kits would make (in my case it was 6) and divided my garage into 6 sections, each about 25 feet by 4.5 feet. This was the most confusing part for me, figuring out how large a section to do with each batch and not have too much or too little epoxy mixture. I marked my sections at each end with some painters tape. I also divided my chips and my anti-skid sand equally into 6-bags each for the 6-sections above to keep the application as even as possible.
Application of Epoxy-Coat:
I opened all of my Part A containers and dumped them into one bucket and pre-mixed this for 3 minutes. Then using the measuring stick, I poured Part B to the first line and Part A to the second line (2-parts A to 1-part B with Part B going in first), and mixed this with the second mixer blade for 3 minutes. I then quickly poured the entire container on the floor and frantically cut in the edges with the cut in brush. It didn't help that our first section had the furnace and hot-water heater as obstacles to cut around. I then squeege'd the Epoxy around the entire section. It helped a lot to have the wife continue holding the mixing bucket upside-down to get the last drips out on the floor (this stuff moves slow). I followed this with the roller which really starts to make the floor look nice as it evens out the color. We then repeated the mixing process and applied Epoxy to the 2nd section (cut, squeege, roll). I then donned the spike shoes and walked on the 2nd section to re-roll, apply the chips and apply the sand to the first section. This is why you need the spikes--this and when you get to the last section you'll find yourself painted into a corner otherwise. I tossed the chips and sand up as high as possible to make the application random. We repeated this process until the floor was complete. In the end whether it was because of the outside temp & humidity or something else, we had considerably more time to work the epoxy than I expected. We had plenty of time to cut-in, squeege, roll, re-roll and chip with no panic and no premature hardening, although we never let it sit in the bucket for more than a minute or two---they say this is when it will harden the fastest. I also ended up with a medium chip application and a LOT of chips and sand remaining...probably didn't need the extra pound of chips, but I do have another floor to do in the spring so I'm sure they'll get used.
Clean-up:
We dumped any remaining part A or B into a bucket and dumped our cut-in brushes, squeege & rollers in the mix to harden and throw out. Despite our careful and documented mixing, we had more Part B remaining at the end than I was comfortable with. I reviewed the wife's video tape and each batch was accurate. Not sure why we had leftover Part B but we did. I will warn you that Part A is forever. If not hardened with Part B, it remains incredibly sticky, doesn't wash off and doesn't dry. I've now had the Part A mixing blade outside through rain and snow for several weeks and it's still sticky.
Dry time:
I checked the following morning and the floor seemed to be drying, but still soft enough to see a finger print if you pushed hard. We continued running the dehumidifier and furnace set at 70F.
Disaster strikes:
Mother nature doesn't seem to care much about months of research, weeks of preparation, hundreds of dollars and a day of meticulous application. While away from home, we had a 1-inch per hour rainstorm on top of 10-inches of snow and 40MPH winds. With only 1-day drying time on epoxy that already seemed to be drying slowly, this drove water under the garage door (wooden strips unfortunately still in place) and it pooled at my taped over floor drain. This created a stain around the drain and in two paths coming in from the door. Not being sure what to do, I decided to walk out barefoot to un-tape the drain. This worked well until I go close to the wet part and sure enough the epoxy was still soft enough to stick to my feet. As you can imagine the scene was not pretty. Scampering around barefoot trying to towel up water and not damage soft epoxy. In the end the stain wouldn't come out and I did make a few comical permanent foot-prints in the epoxy.
*** I hit the 1000 character limit so I'll add a 2nd post to complete the story below the pictures ***


")