Justin – I can only take partial credit. I caught the GJ bug at some point and am just spreading the disease. I do say, though, that the fabrication squares are more handy than anticipated. I had to use The Google on “GMW” (assuming it’s Genuine Metal Works) and am thinking you are trying to get even with me by showing me more cool tools. I’m now almost convinced I need to build one of those neat fabrication tables with all the holes in it. I just need to find me some ¾” plate, a mag drill, and, and, and…
Dan - Need….more….tools….
") Slodat
Slodat – I think we all are!
Thanks for stopping by!
Been busy, seems like lately it’s been multiple things at once.
My brother-in-law had some issues with his 2006 Charger. Said it was shaking really bad at stop lights but smoothed out when driving. Put it in drive, foot hard on the brake, and gave it a little gas. Sure enough the motor jumped up on the driver side. Bad motor mount. Had him get both the driver and passenger side, just in case. Very little clearance and was only able to get to some of the bolts from the top and some from the bottom. Glad I have the lift. After finally freeing the part there wasn’t any one spot big enough for it to pass through. Had to remove the airbox tube and two heat shields, one attached to the motor mount itself and then one for the exhaust manifold, in order to gain the necessary clearance for removal and replacement of the new mount. Installing the new mount was fairly easy, but then I spent 15-20 minutes trying to get the heat shield re-attached to it. After a bit of frustration I checked the passenger side mount (identical) and found out that the manufacturer didn’t bother threading the holes in the casting. So I had been trying to thread a bolt into a solid hole. There was just enough room to fit a tap, but no tap handle. Ended up using a tiny wrench on the end to tap the two holes. I really didn’t want to remove and replace that mount again. After spending four hours getting the driver side replaced, we called it a night.
 20200208_173307
Did some more (enjoyable) work on by friends Scout.
The original clutch set-up on this vehicle was purely mechanical, levers and pivot-points and such. He chose to go with this master/slave cylinder set-up. The new master cylinder fit nicely in the hole where the original clutch rod passed through. The bottom flange we were able to bolt-through for attaching, but the top flange matched up with the top radius of the box it’s mounted to, so welded a stud there instead.
 20200211_164523
Made a new bracket for the slave cylinder, which will attach with two of the bolts that mate the transmission bell housing to the motor.
 20200211_164554
Made progress on the new steering set-up. Had to make another puller for the steering wheel. Simple yet effective.
 20200209_104909
Need some more parts to finish so that’s still pending.
Also, since we replaced the floor plans we decided to scrap the old seat base and fabricate something new. Making new framework and plan on putting in a lockable, under-seat storage drawer/compartment. The old base was bent sheet metal welded to the floor. The new one will be bolted through the floor and removable. Here’s the start of it:
 20200211_164441
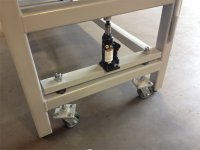
I did manage to make some small progress on my own stuff. Stitch welded the grinder table frame to the top.
 20200208_092633
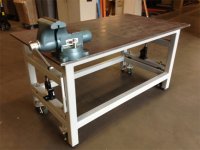
Of course the belt sander feet bolt holes line up perfectly with the frame, so needed to drill through the top and the square tubing. I didn’t like the thought of the bolt sticking out below the frame, figure if I store stuff under the table or use a chair to sit and grind things, something (knees/arms) may catch on that exposed nut/bolt. Thought it would be neat to recess the bolt-through locations. Notched out a section and welded in some C-channel. Did not think this would compromise strength too much for what this table is for. And once again, while I thought I was being cool…I turned out to be the fool. I did not anticipate that little bit of welding would warp the table, especially with all the other framework in place. I was wrong. I stuck some half inch tubing in the middle and clamped down the edges, which helped flatten it out some, but there’s still a slight convex bow to the top.
 20200211_164306
If I put it top-side down and stand on the frame it flattens out OK, but it’s still a little bit bowed. At this point I’m not sure what to do. Was thinking if I cut a small slit in the square tube between the notches it would be easier to bend it perfectly flat. But then I’d have to weld that up, so not sure how well that would work, even with clamping things down well. I don’t want to go and make a bad situation worse. Also thinking that since the bow is minimal and can be flattened with some small force, that maybe when I put the legs on and put the cross-bracing between them it will force it back to flat. I’m probably over-thinking things, considering this is just a table to put my grinder on and it doesn’t need to be a surface plate by any means. It still bothers me.
This also makes me reconsider the new welding table I wanted to make. Originally planned for a solid-top surface, but now thinking a fixture table with all those 5/8” holes would be nice, too.