To avoid these ads, REGISTER NOW!

Everything Fiberglass Thread

OP
R

RivennHewn

Well-known member
Joined
Jun 4, 2011
Messages
10,356
Location
PNW
Puget,

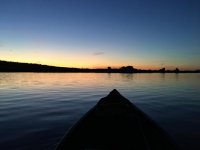
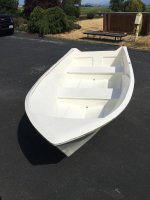
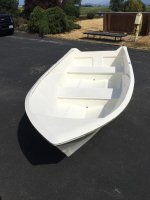
We ran from the keystone Launch down to Hazel point.

About an hour on the way down, but a bit of headwind and waves slowed down the return trip.
 
To avoid these ads, REGISTER NOW!
OP
R

RivennHewn

Well-known member
Joined
Jun 4, 2011
Messages
10,356
Location
PNW
Got another opportunity to get some work in on the skiff today.

All the biaxial is laid up. Now to add the chop strand at the edges and smaller contours.

I’ll have to grind some rough areas out first, and a few air bubbles:(
 

Attachments

  • 23ADE19B-3EAC-490F-8083-9959F685231E.jpg
    23ADE19B-3EAC-490F-8083-9959F685231E.jpg
    101.3 KB · Views: 54
  • 1D5443AD-F434-40CD-8F59-4B581EFFD737.jpg
    1D5443AD-F434-40CD-8F59-4B581EFFD737.jpg
    123.1 KB · Views: 52
  • 91140024-20FF-47E4-8CC8-292BE8FBEC50.jpg
    91140024-20FF-47E4-8CC8-292BE8FBEC50.jpg
    138 KB · Views: 58
OP
R

RivennHewn

Well-known member
Joined
Jun 4, 2011
Messages
10,356
Location
PNW
Vacuumed out the boat and wiped it all down with acetone a couple times, the started to locate and mark all the air bubbles and rough areas that need more attention.

One more round of minor repairs, then on to finishing!

Last pic was last night. A high, slack tide and a beautiful sunset!

Nice night to go for a row in the Gheenoe
 

Attachments

  • B2C4DFF4-E128-491B-BD96-59C591A703F1.jpg
    B2C4DFF4-E128-491B-BD96-59C591A703F1.jpg
    78.8 KB · Views: 39
  • E3A7B186-17FB-45E4-91A0-26C1048E0E8F.jpg
    E3A7B186-17FB-45E4-91A0-26C1048E0E8F.jpg
    157.7 KB · Views: 42
  • 0709FA21-F359-420D-8B5E-323F4FA29002.jpg
    0709FA21-F359-420D-8B5E-323F4FA29002.jpg
    147.7 KB · Views: 40
Last edited:

theoldwizard1

Well-known member
Joined
Feb 22, 2011
Messages
43,076
Location
SE MI
Outdoor project. I need some 4'x8' panels that have to be waterproof, durable, good shear strength, light weight and reasonable cost. I keep coming back to fiberglass over plywood.

I can find 1/8" plywood (actually about 3mm) but it is for "interior use" (meaning the glue is not water resistant). I would likely apply one coat of epoxy, wait for it to "tacky", apply a second coat and then glass. Repeat on the opposite side.

How many layers of what type of fiberglass would I need to get a good "waterproof", durable panel on 1/8" plywood ?
 
OP
R

RivennHewn

Well-known member
Joined
Jun 4, 2011
Messages
10,356
Location
PNW
Felt like I needed a day off, so i skipped out on work and started chasing the air bubbles/voids.

The Fein multi master with 60 grit and the carbide grout tool removes the material gast without kicking up too much dust!

The biaxial material has its advantages, but it has its limitations too.

Most of the bubbles are where I tried to conform it to tight radius contours.
 

Attachments

  • E79BD1E2-CF18-43FC-8D9E-73FB884BDD09.jpg
    E79BD1E2-CF18-43FC-8D9E-73FB884BDD09.jpg
    127.9 KB · Views: 50
  • 4B6C1625-0072-487A-8107-500A8087ACE9.jpg
    4B6C1625-0072-487A-8107-500A8087ACE9.jpg
    148.2 KB · Views: 52
Last edited:

Firebrick43

Well-known member
Joined
May 12, 2015
Messages
13,975
Location
West central Indiana
Outdoor project. I need some 4'x8' panels that have to be waterproof, durable, good shear strength, light weight and reasonable cost. I keep coming back to fiberglass over plywood.

I can find 1/8" plywood (actually about 3mm) but it is for "interior use" (meaning the glue is not water resistant). I would likely apply one coat of epoxy, wait for it to "tacky", apply a second coat and then glass. Repeat on the opposite side.

How many layers of what type of fiberglass would I need to get a good "waterproof", durable panel on 1/8" plywood ?
You don’t need to wait for it to be tacky. Just brush it on, lay the cloth and squeegee it down. And repeat. 2 layers of 4 - 6 oz cloth should be adequate, 3 layer pretty bullet proof. Might have to fill the weave with another coat after the first dries. If it’s not in the water, paint with a marine paint like awlgrip or petit and you add enough glass/epoxy you will probably be ok for an exterior project. I made a camper shell for my 01 Dakota out of 1/4 ply and epoxy and it was holding well up when I got rid of the truck 13 years later.

However marine ply is available in Charlotte at Johnson workbench and Detroit at peoples lumber and would be the best choice.
 
OP
R

RivennHewn

Well-known member
Joined
Jun 4, 2011
Messages
10,356
Location
PNW
Finished laying up the chop on the contours.

Tomorrow I’ll sand off any rough spots and the seat patches, then start playing with some gel coat!
 

Attachments

  • 40645FEE-4C3D-42B9-8098-834845670A7C.jpg
    40645FEE-4C3D-42B9-8098-834845670A7C.jpg
    113.8 KB · Views: 46
  • DD8EBF4C-506B-480D-B55B-D168407186DA.jpg
    DD8EBF4C-506B-480D-B55B-D168407186DA.jpg
    146.4 KB · Views: 39
OP
R

RivennHewn

Well-known member
Joined
Jun 4, 2011
Messages
10,356
Location
PNW

Attachments

  • E4DD847D-6993-4D48-ADC2-458292199334.jpg
    E4DD847D-6993-4D48-ADC2-458292199334.jpg
    100.5 KB · Views: 68
  • 51AB0D36-CC2A-4313-B62A-DD7C723961D4.jpg
    51AB0D36-CC2A-4313-B62A-DD7C723961D4.jpg
    115.9 KB · Views: 69
  • AD16D2ED-3709-4A26-BC25-FA0B380CC0D8.jpg
    AD16D2ED-3709-4A26-BC25-FA0B380CC0D8.jpg
    149.3 KB · Views: 68
OP
R

RivennHewn

Well-known member
Joined
Jun 4, 2011
Messages
10,356
Location
PNW
Another tiny step forward.

Laid up a couple layers of material on the transom that I Opened up months back.

I’ll be adding a few layers of chop, overlapping the existing material, to tie it all together.
 

Attachments

  • A3BD50D1-5873-40EE-86B8-1721FB844E1F.jpg
    A3BD50D1-5873-40EE-86B8-1721FB844E1F.jpg
    126.1 KB · Views: 60

Jorg50

Member
Joined
Oct 8, 2010
Messages
16
There are nice projects here but I would like to learn the mixture proportions for the epoxy and resin, something that shouldn't be done is mixing large quantities because the will not be enough time to work with also the amount of heat that it will generate.
 
OP
R

RivennHewn

Well-known member
Joined
Jun 4, 2011
Messages
10,356
Location
PNW
Jorg,

Mixing the epoxy is easy. The pumps are measured, you just mix 5 pumps resin and 1 pump hardener.
 

Attachments

  • 6B5D9716-696D-4062-B3E3-D89216CEA148.jpg
    6B5D9716-696D-4062-B3E3-D89216CEA148.jpg
    57.3 KB · Views: 43
OP
R

RivennHewn

Well-known member
Joined
Jun 4, 2011
Messages
10,356
Location
PNW
Negative. The pumps automatically dispense a 5 to 1 ratio. It is 1 pump hardener to 1 pump resin.

You’re correct. I misspoke.

I only used the penetrating epoxy on the wooden parts, and that was a good while ago
 
Last edited:
OP
R

RivennHewn

Well-known member
Joined
Jun 4, 2011
Messages
10,356
Location
PNW
Kinda hit something of a milestone today.

Laid up the last of the glass, a 3rd layer of the 1708 On the transom and blended in the edges with some chop.

One last round of sanding/detailing and it’ll be time to turn it all white!
 

Attachments

  • 62112D35-1CAF-4FC2-91BA-3AFBFB5B039A.jpg
    62112D35-1CAF-4FC2-91BA-3AFBFB5B039A.jpg
    144.4 KB · Views: 45
OP
R

RivennHewn

Well-known member
Joined
Jun 4, 2011
Messages
10,356
Location
PNW
Washed it with hull cleaner, wiped it down with acetone, and turned it white.
 

Attachments

  • 26369F07-DCD6-4D77-9FE7-0FBFED611FF9.jpg
    26369F07-DCD6-4D77-9FE7-0FBFED611FF9.jpg
    89.2 KB · Views: 54
  • A5365ECF-55BC-4A83-BC51-D50688C99BB6.jpg
    A5365ECF-55BC-4A83-BC51-D50688C99BB6.jpg
    65.8 KB · Views: 56
OP
R

RivennHewn

Well-known member
Joined
Jun 4, 2011
Messages
10,356
Location
PNW
Everything is going to be all white.


Wet sanding in the rain kinda *****.

The curing agent added into the gel coat forms a thin wax layer that blocks the air, allowing it to cure fully.

It has to be removed prior to another layer of the gel coat.
 

Attachments

  • B32CC9A4-9302-4AB0-BAD2-87A11C8D34CB.jpg
    B32CC9A4-9302-4AB0-BAD2-87A11C8D34CB.jpg
    89.2 KB · Views: 49
To avoid these ads, REGISTER NOW!
OP
R

RivennHewn

Well-known member
Joined
Jun 4, 2011
Messages
10,356
Location
PNW
Very nice shop/basement space Rivenn.

Glass work coming along. Looks like you have settled in at the new place.

CT


Thank you.

Making progress on setting up the shop, and the boat.
I’m taking next week off work, hoping to put a big dent in the to-do list.

1st up is sewing the leathers on my oars!
 

Attachments

  • 29E06800-F617-4A34-913F-7DCDD3DD8EE2.jpg
    29E06800-F617-4A34-913F-7DCDD3DD8EE2.jpg
    148.3 KB · Views: 96
  • 39228669-FC09-4F22-B0EA-B5D97DF935DA.jpg
    39228669-FC09-4F22-B0EA-B5D97DF935DA.jpg
    152 KB · Views: 87
  • C2D3869B-BF3C-4CDB-AD64-B8350EE46838.jpg
    C2D3869B-BF3C-4CDB-AD64-B8350EE46838.jpg
    150 KB · Views: 79
  • E80701A2-27DB-48A8-AE88-EB427CFD97A3.jpg
    E80701A2-27DB-48A8-AE88-EB427CFD97A3.jpg
    149.9 KB · Views: 77
OP
R

RivennHewn

Well-known member
Joined
Jun 4, 2011
Messages
10,356
Location
PNW
A nice task for a late afternoon when you don’t want to annoy the neighbors.
 

Attachments

  • 38FD6C52-F17C-4844-8B5F-B7EAB2C268F2.jpg
    38FD6C52-F17C-4844-8B5F-B7EAB2C268F2.jpg
    148.9 KB · Views: 77
  • 996C0376-896D-4B73-9DF4-976372158B19.jpg
    996C0376-896D-4B73-9DF4-976372158B19.jpg
    75.8 KB · Views: 81
  • E4155A4C-8120-4E3D-9E0B-8167753F4056.jpg
    E4155A4C-8120-4E3D-9E0B-8167753F4056.jpg
    128.4 KB · Views: 83
OP
R

RivennHewn

Well-known member
Joined
Jun 4, 2011
Messages
10,356
Location
PNW
Is it even Saturday night if you’re not melting bees wax and pine pitch to seal your oar leathers?

At midnight
 

Attachments

  • D98CAF0B-EE9A-4C20-8A95-CFB6A8CB052B.jpg
    D98CAF0B-EE9A-4C20-8A95-CFB6A8CB052B.jpg
    117.8 KB · Views: 75
  • 7E228637-041A-442C-9C71-D0B65261EE21.jpg
    7E228637-041A-442C-9C71-D0B65261EE21.jpg
    84.9 KB · Views: 86
OP
R

RivennHewn

Well-known member
Joined
Jun 4, 2011
Messages
10,356
Location
PNW
Almost all one color.
 

Attachments

  • 5B19DA5A-E2F5-43B1-B8A7-FD6C803505B9.jpg
    5B19DA5A-E2F5-43B1-B8A7-FD6C803505B9.jpg
    86.4 KB · Views: 66
OP
R

RivennHewn

Well-known member
Joined
Jun 4, 2011
Messages
10,356
Location
PNW
One last round of spot glazing putty prior to the last layer of gel coat. Hopefully.

Time to turn attention to the outside.
 

Attachments

  • DE6E9882-DD72-4DC7-A25E-B7B9A65D1AAB.jpg
    DE6E9882-DD72-4DC7-A25E-B7B9A65D1AAB.jpg
    40.5 KB · Views: 45

Skiff Builder

Well-known member
Joined
Jun 7, 2016
Messages
1,776
Location
Southern NJ Coast
Outdoor project. I need some 4'x8' panels that have to be waterproof, durable, good shear strength, light weight and reasonable cost. I keep coming back to fiberglass over plywood.

I can find 1/8" plywood (actually about 3mm) but it is for "interior use" (meaning the glue is not water resistant). I would likely apply one coat of epoxy, wait for it to "tacky", apply a second coat and then glass. Repeat on the opposite side.

How many layers of what type of fiberglass would I need to get a good "waterproof", durable panel on 1/8" plywood ?

https://www.clcboats.com/modules/catalog/product.php?category_qn=boat-building-supplies-epoxy-fiberglass-plywood&subcat_qn=marine-plywood-cedar-strips&code=okoume-marine-plywood

Another way to glass that ply is to cut glass, roll it up dry on a stick. Lay down a heavy coat epoxy ( don't fuss with it), roll out cloth into wet epoxy, roll or squeegee it down. another fill coat or two when tacked up.
6 oz woven glass
 
OP
R

RivennHewn

Well-known member
Joined
Jun 4, 2011
Messages
10,356
Location
PNW
Another hard lesson learned today.

Went into a large, nation wide, marine supply store and asked for a roller for gel coat that wouldn’t fall apart.

The last cheap roller I used left lent in my finish.

Instead of doing my own research, I trusted the trusted professional, and bought what he gave me.

The phenolic core did not fall apart, but the foam sure did. Made a mess out of my finish coat, and cost me a quart of gel coat. Lesson learned.

The bright side is, my oar leathers with rubber stops came out awesome.
 

Attachments

  • 1032CA3E-0942-4D2B-AA9D-B077ADC78C50.jpg
    1032CA3E-0942-4D2B-AA9D-B077ADC78C50.jpg
    151.8 KB · Views: 55
  • B3EBB5A0-6657-4A7A-B18D-3A4DB68C8516.jpg
    B3EBB5A0-6657-4A7A-B18D-3A4DB68C8516.jpg
    94.5 KB · Views: 51
  • 8659E114-1A87-4AC8-AC9F-9C73A1084032.jpg
    8659E114-1A87-4AC8-AC9F-9C73A1084032.jpg
    102.6 KB · Views: 47
OP
R

RivennHewn

Well-known member
Joined
Jun 4, 2011
Messages
10,356
Location
PNW
Thinking about spraying the floor and seats with “webbing”.
The spray on splatter texture.

Anybody ever try this?
 

Attachments

  • 9DD3ACD0-22C7-43B9-BE01-02F70ECB7750.jpg
    9DD3ACD0-22C7-43B9-BE01-02F70ECB7750.jpg
    143.7 KB · Views: 48

Monza Harry

Well-known member
Joined
Dec 29, 2018
Messages
1,433
Location
Windsor ON
I was told that was applied by just "flicking your paint brush lightly loaded with paint. Personally I prefer the sand in the paint for traction. You might have some luck with a undercoating or texture paint gun. Harry
 

ez-duzit

Well-known member
Joined
Jun 24, 2013
Messages
5,094
Location
Marina del Rey
"Webbing" is particularly effective on areas that are roughly prepped or otherwise not a smooth, fair surface, where the weave shows through on woven roving, for example.

For areas where you will step and want a nonskid surface, Griptex should be applied.
 
OP
R

RivennHewn

Well-known member
Joined
Jun 4, 2011
Messages
10,356
Location
PNW
The exterior of the boat is nice and smooth, but the interior is 1960’s level craftsmanship. Nothing like the nice smooth glass we have today.

I love the texture. Reminds me of boats I grew up on.

I think the webbing will add to the texture, and provide some wear resistance.

I’m thinking just the floors and seats. I could try the brush flick thing, but want to control it. I’m thinking a sprayer will do better
 

Attachments

  • F5F0091D-3EB4-4419-B056-0805EB4E910B.jpg
    F5F0091D-3EB4-4419-B056-0805EB4E910B.jpg
    86.7 KB · Views: 45
  • 9DF83FBC-8C3A-4E19-85CC-4A11A8B51945.jpg
    9DF83FBC-8C3A-4E19-85CC-4A11A8B51945.jpg
    148.4 KB · Views: 55

Edward_Anderson

New member
Joined
Aug 9, 2011
Messages
3
For the "webbing" you purchase "Webbing Solution" mix 40-60% with gelcoat, thin to taste with styrene. I also like to mix surfacing agent with it for extra insurance. Catalyze it the same 1.5% like the regular gelcoat mix and then spray from your favorite spray gun.

I always shoot a scrap to get the mixture just right.
 

Attachments

  • image2.jpg
    image2.jpg
    84.1 KB · Views: 63
  • image1.jpg
    image1.jpg
    127.3 KB · Views: 69
OP
R

RivennHewn

Well-known member
Joined
Jun 4, 2011
Messages
10,356
Location
PNW
With the inside complete, less the spray texture/webbing,

I figured it was time to flip it over and start the bottom paint
 

Attachments

  • 2CD4562F-3AA9-42A9-A13F-34BFC0E90BBB.jpg
    2CD4562F-3AA9-42A9-A13F-34BFC0E90BBB.jpg
    145.3 KB · Views: 47
  • 005DC7E0-2197-4781-9AE8-0B57136E7DC9.jpg
    005DC7E0-2197-4781-9AE8-0B57136E7DC9.jpg
    145.3 KB · Views: 42
  • 9E29CB92-19AB-4026-A054-9D8398167CC6.jpg
    9E29CB92-19AB-4026-A054-9D8398167CC6.jpg
    141.7 KB · Views: 41
OP
R

RivennHewn

Well-known member
Joined
Jun 4, 2011
Messages
10,356
Location
PNW
At least I’m in the shade!
 

Attachments

  • B4E654C2-D825-447B-AE79-02C5C01D3EC5.jpg
    B4E654C2-D825-447B-AE79-02C5C01D3EC5.jpg
    149.6 KB · Views: 37
OP
R

RivennHewn

Well-known member
Joined
Jun 4, 2011
Messages
10,356
Location
PNW
Blocking is the fun part, right?
 

Attachments

  • EC3F4320-69A5-401D-BB3C-AEDA2CE97C40.jpg
    EC3F4320-69A5-401D-BB3C-AEDA2CE97C40.jpg
    147.1 KB · Views: 43
OP
R

RivennHewn

Well-known member
Joined
Jun 4, 2011
Messages
10,356
Location
PNW
I feel like I’m running out of sunny, 80 degree days.

Better get a coat of Paint on this thing!

A final wet sand and a bit of detailing , and I’m ready for the epoxy primer.
 

Attachments

  • 6A8300CB-4065-4BA3-8712-2D31DC05ADB5.jpg
    6A8300CB-4065-4BA3-8712-2D31DC05ADB5.jpg
    151.5 KB · Views: 35
OP
R

RivennHewn

Well-known member
Joined
Jun 4, 2011
Messages
10,356
Location
PNW
Another step in the right direction.

1coat of 2 part epoxy primer.
 

Attachments

  • F459802D-4FA7-48B8-8271-D04C65E2641F.jpg
    F459802D-4FA7-48B8-8271-D04C65E2641F.jpg
    115.5 KB · Views: 44
OP
R

RivennHewn

Well-known member
Joined
Jun 4, 2011
Messages
10,356
Location
PNW
Or so I thought.

Not sure if I didn’t mix the epoxy right for the temperature/ direct sunlight, or what.

It didn’t lay down. Lots of stipple and roller marks.

Back to blocking the whole thing down again:sad:

Good thing I don’t have a deadline for this project!
 

Attachments

  • D185268C-C70A-4A1F-9689-5721E254F824.jpg
    D185268C-C70A-4A1F-9689-5721E254F824.jpg
    85.4 KB · Views: 36
  • DE5C8735-0807-4BB5-A17F-4305B8698D04.jpg
    DE5C8735-0807-4BB5-A17F-4305B8698D04.jpg
    116.5 KB · Views: 33
To avoid these ads, REGISTER NOW!
Top Bottom