To avoid these ads, REGISTER NOW!

fabricated tools that make your life better!

owenst7

Well-known member
Joined
Oct 19, 2011
Messages
632
Location
Anchorage/Reno
When I did my motor/trans to rear end I had the motor tilt down 3 degrees and the rear end up 3 degrees and the centerlines ran parallel BUT not aimed at each other. Just what I read and learned???

Doesn't look like he's working with a live axle. Probably runs a single cardan and doesn't have to account for torque wrap.
 
To avoid these ads, REGISTER NOW!

sberry

Banned
Joined
Jun 18, 2005
Messages
35,747
Location
Brethren, Michigan
This isn't relly a tool but it replaced one. The nut on this line was recessed on some hyd part and the dealer must have had a special wrench. I twisted my brain to come up with something then modified the nut and added an extension. I drilled the threads out of a nut, cut it in half and welded the halves to the original nut. Sticks out far enough to get an adjustable on it.
 

Attachments

  • nut extension.JPG
    nut extension.JPG
    33.6 KB · Views: 305

ClintNZ

Well-known member
Joined
Sep 6, 2012
Messages
107
Location
Rotorua, New Zealand
Made the 20T press a while back. This week's job is replacing some landcruiser suspension bushes. Remembering how much of a PITA this job was last time I did it on a mate's press using various sockets I decided to machine up some punches with a nice square end, perfect size 0.5mm smaller than the hole & a nut to attach to the 20mm threaded pin on my press.

rP1030682_zps11442fe7.jpg


It took a little while to machine down the big chunk of stock I had on the 'lil Atlas, but man, they made the job so easy!

Cheers
Clint
 

Wrench 2201

Well-known member
Joined
Feb 8, 2012
Messages
84
Location
Central, IN
@ manimal, aren't you worried about having a 0 degree working angle? Without any angle on the u-joints your bearings won't spin and will self-destruct in short order. Or am I missing something?
 

Skyline

Well-known member
Joined
Nov 11, 2008
Messages
3,586
Since I figured that I needed to roll my front fenders, I was going to buy an Eastwood fender roller, but when I saw one, I thought that I might be able to make a better one.

I'm sure that I spent a lot more time and money then what I could have just purchased one for, but that is how I roll (pun partially intended, LOL).

Some of the features that I thought that I could improve on or add are the following:

* Larger rolling wheel that helps bend the metal more gradually.
* More robust design to minimize flex, for a more controlled movement.
* Counterweight to keep the tool upright, so the operator does not have to hold it doing adjustments. Also, this keeps the tool from swinging into the brake caliper (if left attached).
* Adjustable main body extension using a lead screw, for fine adjustments during the procedure. This also helps avoid having to use two hands to adjust length.
* Ergonomic handle at roller for control and leverage.
* Fixed heat gun (to soften paint), with foot switch for control. It is attached with a magnetic mount, if it is needed to be operated manually.
* I was going to mount the IR heat gun to the roller to monitor the temperature, but reading it upside down without a mirror was an annoyance. LOL

Eastwood fender roller.
post-fenderroller.jpg


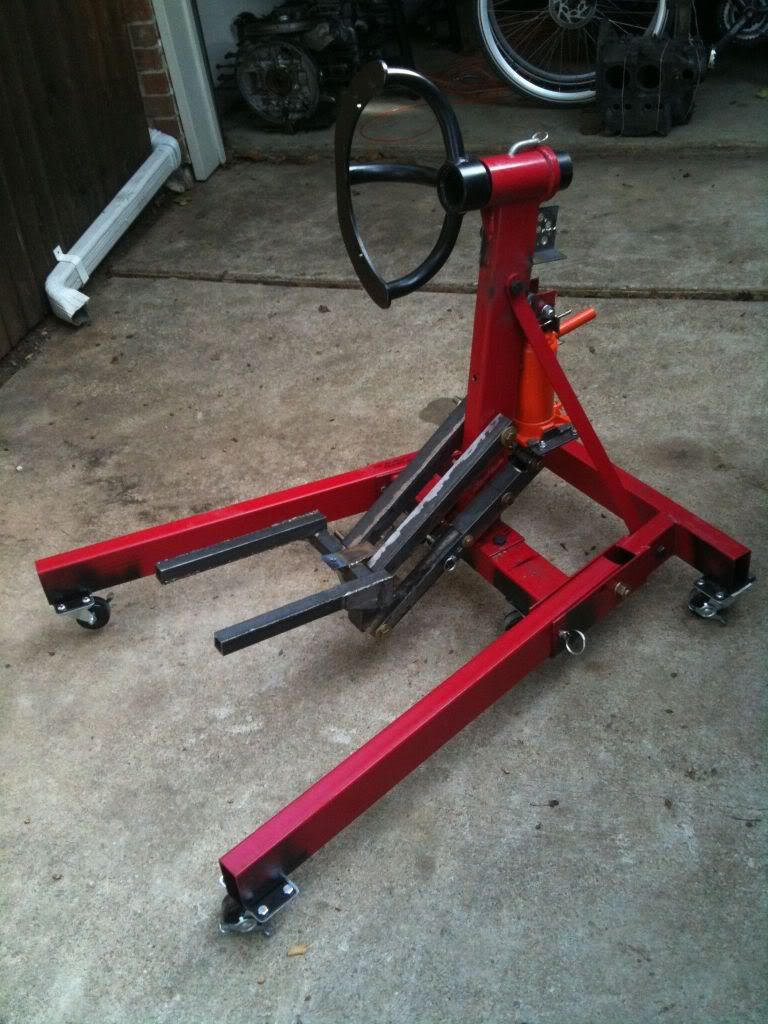
Mine (pardon the lack of paint).
P1010948.jpg


P1010949.jpg


P1010951.jpg


P1010952.jpg


P1010953.jpg

That's awesome. Seems to me that more than any of the tweaks you made to the design, the vertical adjustment capability makes it all worthwhile. BTW...I've always just used a wooden baseball bat rolled between the tire and fender with decent results.
 
OP
E

E.rodz

Well-known member
Joined
Nov 11, 2009
Messages
2,434
Location
st.paul MN.
ok no one ever said I was fast! still working on my 10 dollar investment and I hope this is going to work attempting to use this with air power :dunno: I just make this up as I go and I am not afraid to fail so maybe it will work maybe not so stay tuned for the results.


larry_g

Well-known member
Joined
Apr 28, 2007
Messages
16,886
Location
oregon
ok no one ever said I was fast! still working on my 10 dollar investment and I hope this is going to work attempting to use this with air power :dunno: I just make this up as I go and I am not afraid to fail so maybe it will work maybe not so stay tuned for the results.


I didn't run the numbers but do you know that the cylinder you are using will push with a force of ~50% greater than the retract force.
Force pushing = pressure times area of piston.
Force retracting = pressure times area of the piston minus the area of the rod.

You have a heavy rod cylinder there.

lg
no neat sig line
 
OP
E

E.rodz

Well-known member
Joined
Nov 11, 2009
Messages
2,434
Location
st.paul MN.
I didn't run the numbers but do you know that the cylinder you are using will push with a force of ~50% greater than the retract force.
Force pushing = pressure times area of piston.
Force retracting = pressure times area of the piston minus the area of the rod.

You have a heavy rod cylinder there.

lg
no neat sig line
i just noted you commented on this and i think your right. on the cylinder it still had a double mechanical advantage. but i am just about to try it out and see what direction to go next.

I love the super high tech well built miter saw vacuum thing mixed with good ol tape on the hose!! Love it.
everything needs a little red neck ingenuity !lol.
 

larry_g

Well-known member
Joined
Apr 28, 2007
Messages
16,886
Location
oregon
i just noted you commented on this and i think your right. on the cylinder it still had a double mechanical advantage. but i am just about to try it out and see what direction to go next.

.

Well if you find the cylinder is a bit short of power then you can attach it to the other side of the pivot point and use it in the push direction instead of retract.

Good luck

lg
no neat sig line
 
OP
E

E.rodz

Well-known member
Joined
Nov 11, 2009
Messages
2,434
Location
st.paul MN.
Well if you find the cylinder is a bit short of power then you can attach it to the other side of the pivot point and use it in the push direction instead of retract.

Good luck

lg
no neat sig line

thanks for the heads up there are always options! lets just see how this plays out.
 
OP
E

E.rodz

Well-known member
Joined
Nov 11, 2009
Messages
2,434
Location
st.paul MN.
here is one i just finished up a couple of weeks ago. i bought a jd2 model 3 bender used and swag off road gear make a conversion for a air over hyd. ram just need to weld it up. designed a stand and a cart for it and bolted a harbor freight roller on to it as well. now to figure out how to use it???

 
OP
E

E.rodz

Well-known member
Joined
Nov 11, 2009
Messages
2,434
Location
st.paul MN.
made one this weekend I ordered a air over hyd ram for my swag off road bender conversion and it was the wrong cyl. so instead of sending it back and paying for shipping again I just kept it and as I was thumbing through craigs list i stumbled on a transmission jack head for a floor jack and as I tripped over the air over hyd. ram i thought I have an idea!!! a couple hrs. later this is what it turned out like.


aka Larry

Well-known member
Joined
May 2, 2012
Messages
8,058
Location
Eastern, NC
Anyone has used the Kreg jig knows that while it works like a champ, it makes a big mess. I usually drill with one hand and hold the shop vac with the other while drilling the pocket holes. With longer pieces this gets to be a PITA, so today I came up with a solution. I wanted to attach something to the jig or clamp to hold the vacuum nozzle in place. It just so happens that 1.5" DOM roll bar tubing is the perfect size for the nozzle. I took a short section and cut a notch to fit the jig and welded it to the side of the clamp as seen here. It works great and didn't cost a dime.

20150516_145702_zps2qv6vylb.jpg


20150516_145653_zpsgdz2hezn.jpg


20150516_145557_zpslijsc3ax.jpg


20150516_145505_zpsr6ommzql.jpg
 

spectre6000

Well-known member
Joined
May 8, 2015
Messages
75
Location
Deer Creek Canyon, CO
Here's a one-man engine build/lift/stand I built a while back to work on my VWs. The engines are lightweight (air cooled) and come out of the back/bottom quite easily. They were designed to be worked on outside the vehicle, and once you get to customizing it becomes necessary quickly to pull the engine to do some things. Back when I had the bus in the photos, I would pull the engine to make various modifications pretty regularly. Since it was my driver, I had to be able to take it from running/driving/stopping, do whatever it was I wanted to do, and get it back to running/driving/stopping over the course of a weekend at most (typically that would mean less than a day). With this stand, I could have the engine out and at working height with no assistance in maybe 30 minutes at a leisurely zen pace. Not that I ever loath working on my cars, but this thing made it an absolutely relaxing affair.

It's based on a HF folding stand for space considerations (I only had a barely two car garage at the time, and two one car garages right now) and it needed to allow a floor jack to go between the legs. This was my first real welding project, so it is what it is.

Folded for storage:
PhotoSep2443036PM.jpg

PhotoSep2443048PM.jpg

PhotoSep2443102PM.jpg


Ready to receive an engine:
PhotoSep2443313PM.jpg

PhotoSep2443329PM.jpg


With the lift at full height, it allows the yoke to be bolted to the block, and it just slides into place:
PhotoSep2443432PM.jpg

PhotoSep2443443PM.jpg


Mount for different generations of crankshafts (36hp/T1 on the right, and TIV on the left):
PhotoSep2443352PM.jpg


I never got around to some of the other fixtures/jigs/trays I meant to build. Ended up moving halfway across the country and only got access to that stuff again a little over a year ago. There's a GM 6.2L diesel sitting on the stand at the moment...
 

kazlx

Well-known member
Joined
Oct 30, 2012
Messages
2,851
Location
Tustin, CA
A little shop organization last night. Tired of digging in the pile on top of my lathe. Still need to layout and drill more holes.

https://scontent-ord1-1.**.fbcdn.net/hphotos-xpa1/v/t1.0-9/11226540_10153335650659168_4943401680628802317_n.jpg?oh=8e604ffb7eb0cca39a8b32d409517bee&oe=5604E42B
 
OP
E

E.rodz

Well-known member
Joined
Nov 11, 2009
Messages
2,434
Location
st.paul MN.
biggest score yet! picked this up a couple weeks ago now in the process of cleaning, dissassembling,and painting it up.now to make some tools to make this thing work!


To avoid these ads, REGISTER NOW!
OP
E

E.rodz

Well-known member
Joined
Nov 11, 2009
Messages
2,434
Location
st.paul MN.

Jo Diesel

Well-known member
Joined
Aug 26, 2015
Messages
402
Location
St. Johns MI
My press. Still need to mount the 36x3" cylinder and find a hydralic power unint
E0BACBD6-E44D-4F5B-B4F2-A63A89D2C3DF_zpsrcawthbl.jpg

Torch hole cutter. Needed to cut 12 3" holes out of 3/8 plate. Made out of a 7.3 Power Stroke water pump
A403958F-2F5C-4980-9511-1416A0F90535_zps2uoagg8v.jpg


Cut lot nicer holes after I got the Oxy tank refilled.
 

Toolhorder

Well-known member
Joined
Nov 9, 2009
Messages
5,711
Location
Montana
If you have a grade 8 bolt in the same size they make great one off taps. Really any bolt will work in softer metal or wood.

On the grinder, round over the end a little (make it sort of cone shaped) grinding just thru the threads. The idea is it gets started in the hole easier.

With a file or dremel or grinding disk on an angle grinder, put a sharp channel in the bolt long ways. You want to cut thru the threads, going deeper at the end of the bolt. Keep the leading edge sharp, and even a little undercut if you can. This edge is what will actually cut the threads. Grind off the other edge of the groove to allow clearance into the groove.

When you drill the hole for the tap, go slightly bigger than a normal tap set and the threads will be easier to cut.

It takes longer to describe than to do, and can really save your bacon if you are on a jobsite/etc and don't have the tap you need.

Sorry no pics, but it really is a use it and forget it tool....

zuk

I've done this before at work when I needed a M14x1.0 and my "Master" Hanson set didn't have it. Works good in a pinch.
 

Fordguy1964

Well-known member
Joined
Mar 3, 2015
Messages
3,915
Location
Houston County, Alabama
It ain't pretty but it worked... I didn't have room to get a belt tensioner in to pry the power steeering pump over on my car. I grabbed a short piece of all thread a washer and some conduit and made this belt tensioner. It goes between the pulleys in the groove and doesn't scratch my freshly painted pump.
 

Attachments

  • Tool 1.jpg
    Tool 1.jpg
    152.1 KB · Views: 198
  • Tool 2.jpg
    Tool 2.jpg
    152.7 KB · Views: 148

Hinrix6

Active member
Joined
Oct 19, 2010
Messages
43
I had to remove the clutch master cylinder on my '98 F150 work truck this weekend. The line that goes to the transmission is held on at the master cylinder by a small roll pin. The pin could not be pushed out by hand, and there is no room to tap the punch with a hammer. Even if there were, the master cylinder is a composite (plastic) that would probably break. I had one of those "assembly required" furniture wrenches in my shop. I drilled a hole in the handle, tapped threads, and bent it into a "C" shape. I used a bench grinder to adjust the size of the machine screw and taper the end to fit inside of the roll pin. Finally, i bent the screw so it could be threaded in by hand, since there was no room for a screwdriver. It worked great to press the pin out, and then back in when I reinstalled the master cylinder.
 

Attachments

  • Roll Pin Remover 1.jpg
    Roll Pin Remover 1.jpg
    67.9 KB · Views: 106
  • Roll Pin Remover 2.jpg
    Roll Pin Remover 2.jpg
    143.4 KB · Views: 146
OP
E

E.rodz

Well-known member
Joined
Nov 11, 2009
Messages
2,434
Location
st.paul MN.
embarking on my biggest Fab.project yet. decided to build a fab table to build more elaborate fabrication projects.:scared: :headscarf hey I never claimed to be smart!


Provincial

Well-known member
Joined
Sep 21, 2011
Messages
6,871
Location
Near Salem, OR
E.rodz, I love the secure tool storage in the background of the last two photos!

That is a big project, but it sure will be nice when done. Where did you source the slotted square tubing?
 

kbs2244

Well-known member
Joined
Nov 11, 2006
Messages
14,065
I am in on the back wall question!
Can you share without giving away too much?
 

brownbagg

Well-known member
Joined
Mar 20, 2006
Messages
5,208
i made a car rotisserie couple year ago. I been thinking about how to get it to sit on its end with a car on it, you know vertical but still be able to spin it
 

HORDERofTOOLS

Well-known member
Joined
Feb 12, 2014
Messages
67
Location
SIDNEY, OH
E.rodz...what's the big wheel next to you English wheel for? Doesn't go in the English wheel does it?


Sent from my iPhone using Tapatalk
 

HORDERofTOOLS

Well-known member
Joined
Feb 12, 2014
Messages
67
Location
SIDNEY, OH
Just noticed your English wheel swings out...cool idea, how do you lock it in place when working it?


Sent from my iPhone using Tapatalk
 

Joe69

Well-known member
Joined
Sep 6, 2009
Messages
2,371
Location
Muncie, Indiana
I had to remove the clutch master cylinder on my '98 F150 work truck this weekend. The line that goes to the transmission is held on at the master cylinder by a small roll pin. The pin could not be pushed out by hand, and there is no room to tap the punch with a hammer. Even if there were, the master cylinder is a composite (plastic) that would probably break. I had one of those "assembly required" furniture wrenches in my shop. I drilled a hole in the handle, tapped threads, and bent it into a "C" shape. I used a bench grinder to adjust the size of the machine screw and taper the end to fit inside of the roll pin. Finally, i bent the screw so it could be threaded in by hand, since there was no room for a screwdriver. It worked great to press the pin out, and then back in when I reinstalled the master cylinder.

I had that roll pin fall out going down the road once, in a 99 F450. I replaced it with a cotter pin I had with me. I left the cotter pin in it. Much easier to get out.

Joe
 
To avoid these ads, REGISTER NOW!
Top Bottom