To avoid these ads, REGISTER NOW!

Between 705 & 1200 SQ/FT FIRE Destroyed Garage & New Rebuild FINALLY!

Workspaces between 705 and 1200 squarefeet.
OP
F

Fireguy50

Well-known member
Joined
Sep 28, 2020
Messages
81
Location
Michigan
ARGHHHH!
(I need a bigger font) My 3rd new door came in, because it's ~400lbs I'm checked all the corners for any cracks or damage in other areas, but it looked good. Then I noticed it looks the same as the previous doors, I read the build sticker and sure enough it's still... BACKWARDS!πŸ€―πŸš‡

That's the 3rd $3,000 Patio Door they've custom built, and it's WRONG!πŸ˜’πŸ™„ At least the building quality is great, but all LEFT side doors.😐 Now I'm waiting for a 4th Patio Door built in a RIGHT SIDE (hopefully).🫀

First, Second & Third doors are all LEFTs!πŸ’€
PXL_20250219_152137184~2.jpgImage_268826.jpgImage_866453.jpg


The regional managers for the Store and Jeld-Wen have discussed my order, not just their normal talks about sales quotas, profits, and products to promote. They are now pulling the prior doors out of the discount area into the back, and saving them, trying to negotiate Jeld-Wen to accept ALL of the incorrect doors back. (IMO I'm surprised they don't have insurance for these type of mistakes, instead of trying to discount them, and write it off their profit/loss taxes). Transport these over to the Florida Coast where these will sell fast. Here in the Midwest it's just a security home defense use case (the rare tornado would just tear these out with the wall); but we'd always have more time to get to the safe room and prepare for the criminal or weather.

It will be nice to eventually get the 40+ year old aluminum Patio Door with broken seals and internal water stains replaced. I'm starting to wonder when I ask for a refund, but they've kept advocating for me, no additional charges, and don't blame me for these $3,000 Patio Doors they don't want (so far away from the standard coastal hurricane zone).

Garage has been slow going with this "situation" over the door mistakes. I started to staple the insulation into some of the stud bays before they get covered with an air hose reel. Electrical is practically done, just need to run air lines in a few areas before I can close up the walls.
 
Last edited:
To avoid these ads, REGISTER NOW!
OP
F

Fireguy50

Well-known member
Joined
Sep 28, 2020
Messages
81
Location
Michigan
I got an infection in my hand, after they performed 3 I&D cutting me open like a fish to flush out the infection; they hospitalized me (before it would require an amputation) for a week on broad spectrum antibiotics until they got the results on exactly what infection was trying to kill me. After a month of antibiotics and 3 months of physical rehabilitation I got most of my hand use back.
PXL_20250509_153021228~2.jpg

It's been a rough summer with the constant heat waves. But now I have Air Conditioning! I removed all the controls from the AC and installed regular HVAC contractor so it will run just like a standard HVAC system and thermostat on the wall. No display, No remote control, No Wi-Fi, No Chinese App on my phone. Just Standard HVAC!
Picsart_25-08-10_20-40-22-700.png
Picsart_25-08-10_20-39-58-581.png
Picsart_25-08-10_20-40-42-157.png
 
Last edited:

thammel

Well-known member
Joined
Oct 3, 2005
Messages
2,259
Location
Maryland
Ouch - your hand!!! So what was the infection? Do you know how it started? Thank God for modern medicine!!
 

Jeff Ivers

Well-known member
Joined
Apr 9, 2010
Messages
2,587
Location
Oklahoma
Glad to hear they got that infection licked for you. Hope you regain full use of the hand. Do you have PT scheduled?

On another note, that reminds me of the roommate I had at the hospital years ago. He had an infection that spread into his testicle. They cut his testicle open and kept it open while they sent him to some type of whirlpool bath treatment twice a day to keep the infection cleared out and allow things to heal from the inside out. Shudder!
 
OP
F

Fireguy50

Well-known member
Joined
Sep 28, 2020
Messages
81
Location
Michigan
Ouch - your hand!!! So what was the infection? Do you know how it started? Thank God for modern medicine!!
I don't really want to talk about the initial injury; but definitely follow your physicians advice! I was on the basic antibiotics within 12 hours of the injury from my primary physician calling in a prescription.πŸ‘ But when it started swelling up he had me into a hand surgeon the next morning.πŸ‘ And after the 3rd hand surgeon visit, he said it's not a simple infection and I had to be admitted.😳🫀 They all acted fast to treat me; I never went to the ER, they had a room already waiting for me up in the Infectious Disease wing; even though I wasn't contagious, I had a private room with the hazmat stuff and positive air pressure door, etc.😁😎🀣

It ended up being an uncommon strain of Staphylococcus that required a $2,142.39 antibiotic they don't typically prescribe. But I got that filled and I was fine after that; just required physical rehabilitation for 3 months to get my range of motion and strength back. I'm helpless if I can't open jars in the kitchen!🀣
Glad to hear they got that infection licked for you. Hope you regain full use of the hand. Do you have PT scheduled?

On another note, that reminds me of the roommate I had at the hospital years ago. He had an infection that spread into his testicle. They cut his testicle open and kept it open while they sent him to some type of whirlpool bath treatment twice a day to keep the infection cleared out and allow things to heal from the inside out. Shudder!
I already did 3 months of PT, hence the continuing delays on the garage. I need to finish a few electrical items, check the air lines for leaks, then finish covering the walls and ceiling with insulation.
Then I can hang the furnace on the rafters before the winter comes!

Testicles are important; I'm keeping mine safe right where they are! 😳🀯
 
Last edited:
OP
F

Fireguy50

Well-known member
Joined
Sep 28, 2020
Messages
81
Location
Michigan
I need to finish up the work in the rafters and close up the insulation!
  • Connect the thermostat wires to the ceiling fan, so turning on the thermostat "Fan" actually turns on the shop fan.πŸ‘ (I already got a 24vac to 240vac relay designed just for this).😁
  • Finish the last wall receptacle on the back wall, I'm going to run the 12/2 over the rafters and back down. I don't feel like drilling a corner stud! Or trying to pull Romex in a tight stud corner.⚠️
  • Finish the fire alarm wiring.
  • Add the exterior lights on back door.😎
  • The 240V Welder & Lathe outlet needs a better metal box, not happy with the plastic boxes.🀬
  • Need to add the wall box for the Air Compressor that will be outside behind the garage.😎
  • Need to add another wall box in the back wall to get power to my Shed some other day in the future. The shed would be much improved with some lights and the potential for an outlet in the back of the property.πŸ€”πŸ€·πŸ»β€β™‚οΈπŸ‘
I also want to hide an extra 60 gallon air tank up in the rafters to gain floor space! Extra capacity is more better'er! πŸ€”πŸ˜
 
Last edited:
To avoid these ads, REGISTER NOW!
OP
F

Fireguy50

Well-known member
Joined
Sep 28, 2020
Messages
81
Location
Michigan
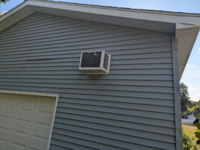
I got some work done in the ceiling, not enough yet. BUT; Because this is an 840 SQ/FT (x 12ft tall) garage, I need more circulation inside the structure. I wired the shop fan to the wall thermostat to make sure that (cheap) window AC Unit and Mr Heater Nat-Gas furnace is fully circulated and prevent warm/cold spots in extreme weather.

4,000+ CFM ceiling mounted shop fan:
Picsart_25-08-13_20-37-13-398.png
 
Last edited:
OP
F

Fireguy50

Well-known member
Joined
Sep 28, 2020
Messages
81
Location
Michigan
Okay! 🫀 I need to stop playing in the garage because I miss it and it's not done (likely never be done we know how these projects "creep" always something new to add or upgradeπŸ˜‚ ).

But I really need to finish some medical documents after being in the hospital. I can't keep distracting myself with work in the garage. Time to focus on my "homework"! πŸ«€πŸ˜‚

Could be a week before I add more updates.
 
OP
F

Fireguy50

Well-known member
Joined
Sep 28, 2020
Messages
81
Location
Michigan
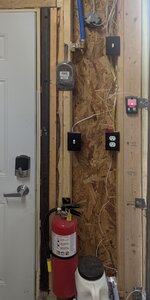
I've finished the most complicated stud bay in my garage; between the 16x8 main garage door and the 3ft access side door.πŸŽ‰
  • I still love that 1/4in x 2in x 6ft steel bolted to the King Jack studs holding the access door solid!
  • I have a Schlage Encode Smart Deadbolt that has different access codes for everyone I allow into my garage. Some are temporary, some have limited hours of access each day, some only on specific days; depending on who they are and if I trust them into MY Garage!πŸ˜’πŸ€¬
  • I don't have a keyed door knob, it felt unnecessary once the deadbolt was locked secure or they have approved access.
  • The round outlet box for one (of the four) exterior lights outside the doors.
  • Air line wall fitting; that goes to a 60 gallon air tank up in the rafters to save floor space, while the 3HP 10.2CFM Air Compressor will be mounted in an enclosure behind the garage (to reduce noise in the garage).
  • Light switch for the exterior lights (I don't use the manual switch often, it has a smart switch inside that box; the home automation turns on all the property exterior lights from 15min after Sunset until Dawn. It knows the exact time of the Sun each day).
  • Metal scoop I have for the bucket of rock salt on the floor during winter.
  • Garage door wall mounted button, I didn't want to use the unnecessary wireless battery button that came with the opener. It's not difficult to run a wire and never worry about batteries or problems with wireless connection!
  • Light switch for the main interior garage lights; 10x 4ft LED shop lights seem to be the right amount of lighting for a 24x35 840 SQ/FT garage.πŸ‘
  • 120VAC 20Amp receptacle. (I have too many but is that actually possible?πŸ˜‚ ) I installed recepticals every 6ft instead of the required 8ft, plus 2 ceiling mounted retractable coils in the center near each end of the garage for easy access to an extension cord.
  • 20lb Fire Extinguisher.🧯 (Some free advice; Always call 911 BEFORE using a fire extinguisher!⚠️ It's best to have a standby Fire Truck already on route to your location even if you put out the flames alone.πŸŒŠπŸ‘πŸ‘¨β€πŸš’ Than to use up your fire extinguisher(s), and the fire continues to spread, but your necessary Fire Department backup hasn't been notified yet to save you...πŸ”₯πŸ₯΅πŸ€¦πŸ»β€β™‚️ Call 911!πŸ‘ (Trust me I have experience)πŸ˜₯
  • 10lb Rock salt shaker on top of the 5 gallon bucket I keep dry salt in.
  • Can't forget the garage door safety eye at the very bottom.
Now I can insulate the stud bay and finish the wall covering. Like the rock salt scoop with end up on the pegboard.
1000030902.jpg
 
OP
F

Fireguy50

Well-known member
Joined
Sep 28, 2020
Messages
81
Location
Michigan
As I get closer to insulating the ceiling:
  • Need to finish the electrical (that is primarily in the rafters)
  • Get the garage doors perfectly set (those springs are right where I need to staple the fiberglass insulation and tape the 8mil Polyester Diamond Reinforced Aluminum Faced Reflective. And 4mil vapor barrier on the walls, then my HVAC won't be so wasteful!πŸ‘
  • Finish the 135F Heat Detector (fire detector) with the strobe light and alarm bell on the front of the garage. So I hopefully never have to do a full rebuild after any future accidental fire destroys everything.πŸ˜₯🀬πŸ˜₯πŸ’©πŸ˜₯❀️‍πŸ”₯πŸ˜₯
  • Finish running the air lines to the 4 drops, and back wall where the 240VAC and air line will go outside to my custom built "Mini-Split" Air Compressor system.
  • Thermostat wires for the AC, Furnace & Circulation Fan.
  • Internet network cables for security cameras and WiFi Access Points, to cover my entire property.
  • Run the Nat-Gas line for the 50,000 BTU Mr Heater furnace that will hang from the rafters (I've had in storage waiting for it's turn) to prevent frozen winters inside my garage.❀️‍πŸ”₯πŸŽ‰πŸ₯³ (This gas line will also be large enough to run a generator behind the garage, keep that noise away from the house while I'm sleeping).
I'm building a custom "Mini-Split" Air Compressor inside a steel box enclosure with; the compressor, 240-motor, finned cooler (to drop the air temperature down to remove the water moisture), large cooling fan, heater for the bottom of the compressor in winter)

Before I close off the ceiling with insulation; the compressor is going outside to reduce noise inside, while the Air Tank is going up in the rafters to maximize floor space! The old air tank was kept in the opposite corner from where the fire started, and all it needed was a bath in the driveway with carwash soap and a brush, and it looks close to new again!
I removed and switched the bulkheads; the 3/4 side air exit with bottom 1/4 drain. Now when it's set on its side up there, it will still drain any remaining water from the tank.πŸ’¦πŸ‘

Before:
Driveway West_0_playback_1758339255342~2.jpg

After:
Inside New Garage_0_live_1758340155263~2.jpg

(Yes that's a stop sign so my wife knows when to stop backing into the garage. Just because the garage is 35ft deep, doesn't mean she gets to park anywhere she wants)πŸ™„πŸ˜‚
 
Last edited:
OP
F

Fireguy50

Well-known member
Joined
Sep 28, 2020
Messages
81
Location
Michigan
It's been far TOO cold for any real progress. The sudden Polar Vortex along with our typical Lake Effect Snow has been brutal this year. I just want to hibernate!πŸ₯Ά
great-lakes-lake-effect-nasa-satellite-photo-print-46.jpg
Every day there is a prolonged Whiteout and major crash on one of the highways around here.
1390521621000-I--94-crash.jpg

Unfortunately I didn't complete the work in the rafters so I could get that insulation in the rafters with the vapor barrier. I got the Nat-Gas line run up to the ceiling for the furnace. But any heat that is generated would just escapes out the soffet to ridge vent circulation!πŸ«€β„οΈ

I had been struggling with the large 16x8x2 325lb garage door, trying to figure out why it was having intermittent problems and weird noises. Despite everything was installed plumb and level, laser on the left track shows it to be true, right side as well (but difficult to photograph with it being 8in from the wall!.πŸ€”
PXL_20250131_155848277.MP.jpg
But I finally I got out the laser level back out to keep hunting and to discover the truth.

Despite the New Garage was built level, plumb & Square. The builders had to make adjustments to fit on the 1996 concrete pad. I knew they cut back 4in off the front of the NW corner of the 8in Block wall to square up the foundation. But I didn't know they were cutting and shimming the corners to keep the new structure level, and that caused me a year of garage door struggles! I assumed that the concert floor was level, but I was foolish to trust it, the concert pad drops 2+ inches over the 16 foot threshold. But the builder's compensated to keep the new structure level and that fooled me!πŸ€”πŸ€¦β€β™‚οΈπŸ«€. That was causing the door to bind in the tracks as everything else was level and pulling the door up at an angle.
Temporarily I ripped a 2x4 x 10ft down to a giant shim and glued it on the floor where the door sets.
PXL_20260118_203949966.jpg
then I loosened both of the drums to get the cables back to even lengths and the door works flawlessly: "Perfectly balanced as all things should be!" The laser level never lies!
PXL_20260118_203829658.NIGHT.jpg
Now for the DRASTIC PERMANENT REPAIR:
  1. Purchase a 16in Concrete Saw with water lubrication system & a 9amp SDS Rotary Hammer Drill (with bit assortment).
  2. Bore out a 4in piece out of each side of the concrete slab where the cuts will meet; an attempt to preventing future stress cracks from that radius.
  3. Cut a 2-3 foot section out from the front of the garage concrete pad from those planned radius bores, enough room to level the threshold, while blending it back to the original pad. Hopefully less than 30 bags of concrete!
  4. Remove the old concrete, and dump it at a concrete recycling plant
  5. Dig a 4 foot deep footer in that NW corner on the low side to prevent this from sinking anymore in the future.
  6. Drill LOTS of side holes into the old slab for rebar tied into the new concrete pour.
  7. I'm highly considering adding 10 Ton Floor Anchors to do auto body pulls, or whatever might need to be tied down!😁 For $70 each I can't think of a reason not to install them.πŸ€” Would you a set in your floor, or why not?
  8. Run the rebar in all the old slab holes, at least 2 bars that runs across the entire length the sides, a couple rods that go down into the new 4ft footer, and the rebar necessary for those aviation cast iron anchor points (if I decide to do that as well.πŸ€”πŸ˜
  9. Cut a 2x4 x 16 foot shim exactly level, and Tapcon it to the driveway.πŸ“ To be used as the level reference point in the front.
  10. Caulk the new expansion joint to the driveway so it won't fall off during the fresh concrete pour.
  11. For 30 bags of concrete, and it needs to be finished well so it's level, I don't want to waste energy mixing concrete would like to reduce the hard manual labor. It's only $85 per day to rent one of these new Concrete Mud Mixers that "extrudes" completely mixed concrete to the worksi

Screenshot_20260202-001428.png

All of that would cost $750, and I would have a level garage door threshold, own a 16in Concrete Saw and 9Amp SDS Rotary Hammer Drill (with attachments), and Garage Floor Anchors?πŸ€·β€β™‚οΈπŸ˜πŸ»

Sorry it's not a fantastical update with big 3 phase tools, fancy woodworking, cool floor covering or a kitchenette in the corner. Next year I'll have heat and won't have to struggle to survive!πŸ«€β„οΈπŸ₯Ά
 
Last edited:

zanyad

ALLIANCE MEMBER
Joined
Apr 26, 2018
Messages
2,924
Location
NE Ohio
Man, that must've been frustrating! Glad you figured it out and looking forward to seeing the concrete works!
 
OP
F

Fireguy50

Well-known member
Joined
Sep 28, 2020
Messages
81
Location
Michigan
Man, that must've been frustrating! Glad you figured it out and looking forward to seeing the concrete works!
Definitely! Wife would be able to park in the garage safe from the snow and extreme cold weather for a week. Then after I'd get an error code from the opener, and she would be stuck outside. She didn't feel comfortable opening my large 16x8x2 325lb door manually because she couldn't reach it when it was up.πŸ«€πŸ€¦β€β™‚οΈ
Then I'd have to fix the error code, and the cycle continued for months, until I figured out the door was unlevel and the right NW cable was 2in longer than the SW cable.
Added the giant shim and got the drums and tension cables equal. Now it's working great.
Except I have a 2by glued to the floor!πŸ™„
 
To avoid these ads, REGISTER NOW!
Top Bottom