To avoid these ads, REGISTER NOW!

First Post - First Tool Box Restore

kac0825

Well-known member
Joined
Dec 19, 2013
Messages
89
Location
Ocala
Hello everyone, this is my first post on here and also my first tool box restore. I'm pretty active on a lot of the toyota trucks forums, so when I ran across this site I was pretty excited.

Being a college student means i'm on a tight budget, so I wasn't really able to go out and drop $1500.00 on a tool box. However, I also wanted something that had a name and quality backing it. After reading through several restore threads, I decided to do the same. I've also been cruising through ebay and craigslist looking for tools. Picked up an old oil hole Cornwell right now, thats quickly becoming my favorite 1/2" ratchet.

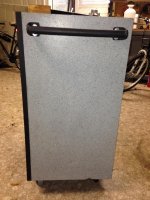
I picked this up for $150.00. It has it's issues, and there was very little on craigslist near by for the same cost. Has new slides on 3 of the drawers, and a new snap on logo. Considered the couple of rust issues at the bottom and the tiny holes in the drawer, did i over pay?

And now the problems, the PO decided it would be a good idea to paint it with Zolatone. The stuff they used to put inside the air stream travel trailers. It's a huge PITA to get off. There are 3 small holes in the back, and two of the drawers have a little rust in the corner which lead to another tiny hole. He used a rust inhibiter, sanded it down, then painted.

So, my plan of action is to remove drawers (The hacksaw thing isn't working for me, so i have to figure another way), sand the entire thing down, weld patches in the holes, bondo, prime, and paint. My question is though, for anyone familiar with Zolatone, he painted over the original stamp. If I strip it and sand the box, will I be able to recover the stamp?

Thanks, and if anyone has advice or criticism please feel free to share. This is my first restoration, so I'm learning.
 

Attachments

  • IMG_0886_zps4c963ff0.jpg
    IMG_0886_zps4c963ff0.jpg
    94.9 KB · Views: 392
  • IMG_0887_zps85ca2a70.jpg
    IMG_0887_zps85ca2a70.jpg
    120.3 KB · Views: 254
  • IMG_0888_zpse1fbbe93.jpg
    IMG_0888_zpse1fbbe93.jpg
    112.2 KB · Views: 242
To avoid these ads, REGISTER NOW!

DandDMachine

Well-known member
Joined
Feb 22, 2008
Messages
227
Location
Bloomington, MN
As long as the drawers open and shut properly I would have paid $150 for it. Compare what you got to the thin light duty boxes you would get at Sears for $150.
I have done a couple tool box restorations. It takes way more time then you might think especially if you want it to look really nice. But it is rewarding to see the finished product. Good luck and welcome to the Journal.
 
OP
K

kac0825

Well-known member
Joined
Dec 19, 2013
Messages
89
Location
Ocala
As long as the drawers open and shut properly I would have paid $150 for it. Compare what you got to the thin light duty boxes you would get at Sears for $150.
I have done a couple tool box restorations. It takes way more time then you might think especially if you want it to look really nice. But it is rewarding to see the finished product. Good luck and welcome to the Journal.

Thats actually a big relief. All drawers work fine as do the casters. I think it's a KR-557, but without the stamp I can't tell for sure. With the casters, are two supposed to be swivel and the other 2 fixed?

Thanks though! I look forward to it. This with also be my first time painting with a HVLP, so I'm excited. I can't decide if I want to go back to original snap on red however, or do one of their other colors like a blue or white.
 
Last edited:

mechanic217

ALLIANCE MEMBER
Joined
Jul 30, 2010
Messages
184
Good find, I have 2 KR557s one I bought new the other used, both have one set of swivel casters, one set fixed.
 
OP
K

kac0825

Well-known member
Joined
Dec 19, 2013
Messages
89
Location
Ocala
I'd just leave that as it is. The 2 swivel castors are supposed to be on the same end as the handle.

Okay, so thats fine. You think? I just don't like the textured paint, and i'd like to fill in the two holes in the back.

Just wondering what your reasoning is? Cause it's all new to me.
 

Farmall450

Well-known member
Joined
Dec 23, 2011
Messages
13,371
Location
Marengo, Illinois
Okay, so thats fine. You think? I just don't like the textured paint, and i'd like to fill in the two holes in the back.

Just wondering what your reasoning is? Cause it's all new to me.

Unless it really looks horrid in person, I too would probably leave it as is until I got the time & $$ to do a seriously nice job refinishing it.

Either way, congrats! :rocker:
 
OP
K

kac0825

Well-known member
Joined
Dec 19, 2013
Messages
89
Location
Ocala
Unless it really looks horrid in person, I too would probably leave it as is until I got the time & $$ to do a seriously nice job refinishing it.

Either way, congrats! :rocker:


True, I may do that. Called around for paint prices, now I know why its a grand to paint your car, lol. I'm hoping to use my christmas bonus from work to finish this up.

Thanks though!
 

Lookin4'67Galaxieconv

Well-known member
Joined
Jul 2, 2008
Messages
16,635
Location
Atlanta, GA
You can use Rustoleum spray paint and save yourself a LOT of money in paint costs. Plus, they've improved their spray nozzle quite a bit over the old ones they used. You can get a very nice and professional looking paint job...as long as you've prepped it correctly.

The hacksaw blade will work, or you can contact Snap On. Drawer removal tool is $1.67 I believe. Order several so you have some extras. Once you get the hang of removing the drawers, it's simple.

I've restored several boxes, check out the threads on my signature.
 

cburnscrx

Well-known member
Joined
Jan 15, 2013
Messages
1,751
Location
Indianapolis
You can use Rustoleum spray paint and save yourself a LOT of money in paint costs. Plus, they've improved their spray nozzle quite a bit over the old ones they used. You can get a very nice and professional looking paint job...as long as you've prepped it correctly.

The hacksaw blade will work, or you can contact Snap On. Drawer removal tool is $1.67 I believe. Order several so you have some extras. Once you get the hang of removing the drawers, it's simple.

I've restored several boxes, check out the threads on my signature.

Yea, I second the rattle can thing. You'd be amazed what you can do with a rattle can with the right prep and a little practice. I've painted whole body panels on cars that look better than the factory finish (less orange peel) with rattle cans. Just be sure to buy good paint
 

Aquaticbob

Well-known member
Joined
Dec 3, 2013
Messages
488
Location
Seattle
I actually really like that paint, it does look pretty cool. Though with the texture, I could see it being irritating. If you paint it yourself, I would do some test sprays on another piece of similar material to get the feel for it. Interested to see how the box resto turns out!
 
OP
K

kac0825

Well-known member
Joined
Dec 19, 2013
Messages
89
Location
Ocala
You're threads among the others on this site were what made me want to restore one, lol
I guess I'll just have to play with it a bit more. Or get a slightly thicker hacksaw blade, mine just keeps bending.

After reading some of your comments, I'll stop by the paint place and see what it'll run me to get a can made. One of the reasons I wanted to use the single stage is because I'd never done it before, and I like learning new things.

Thanks, I started stripping it tonight. That aircraft stripper is some nasty stuff. The color is cool, I just don't like the texture. I'll take pictures and post up my progress. I hope to get it stripped and sanded tomorrow, if I can get the dang slides off.
 

Aquaticbob

Well-known member
Joined
Dec 3, 2013
Messages
488
Location
Seattle
Thanks, I started stripping it tonight. That aircraft stripper is some nasty stuff. The color is cool, I just don't like the texture. I'll take pictures and post up my progress. I hope to get it stripped and sanded tomorrow, if I can get the dang slides off.

With aircraft stripper WEAR GLOVES, and then wear some more. Stripped off the paint on a '68 mustang's air cleaner, valve covers, and misc items to paint them with some fresh old ford blue.

I used 3 latex free nitrile powder blue gloves on each hand when using the aircraft stripper and had to reglove a few times. I'm sure there is a better material for the gloves, but it was a pretty cheap option at a cool $5 for 100. That stuff burns like a mofo on the skin

P.S. Go Pats!
 

zkling

Well-known member
Joined
Jan 23, 2007
Messages
16,939
I picked this up for $150.00. It has it's issues, and there was very little on craigslist near by for the same cost. Has new slides on 3 of the drawers, and a new snap on logo. Considered the couple of rust issues at the bottom and the tiny holes in the drawer, did i over pay?

And now the problems, the PO decided it would be a good idea to paint it with Zolatone. The stuff they used to put inside the air stream travel trailers. It's a huge PITA to get off. There are 3 small holes in the back, and two of the drawers have a little rust in the corner which lead to another tiny hole. He used a rust inhibiter, sanded it down, then painted.

So, my plan of action is to remove drawers (The hacksaw thing isn't working for me, so i have to figure another way), sand the entire thing down, weld patches in the holes, bondo, prime, and paint. My question is though, for anyone familiar with Zolatone, he painted over the original stamp. If I strip it and sand the box, will I be able to recover the stamp?

Thanks, and if anyone has advice or criticism please feel free to share. This is my first restoration, so I'm learning.

Welcome to GJ :beer:

Congrats on the new tool box. I think you got a good deal considering paint, new slides, handle and all. Lots of people try to sell their beat up, rusty POS for quite a bit more. :lol:

I wouldn't bother with the paint at all. Zolatone is good stuff and not cheap. Unless the paint is falling off, you are going to end up spending alot of time redoing it. I'd just line the drawers and use as is. I personally like that color finish, it is different for a tool box and reminds me of cookies and cream ice cream. :thumbup:

It does look like a KR557. It will be stamped on the back, one of the corners. You may have to take some paint off to find the stamp, but it will be stamped model and year made as long as the PO didn't sand too deep.

What problem are you having with the drawer removal? Are your hacksaw blade removal tools bent properly?
 
Last edited:
OP
K

kac0825

Well-known member
Joined
Dec 19, 2013
Messages
89
Location
Ocala
If you are hell bent on refinishing it, get a quote for powder coating.

I thought about that, I do powder coating on the hobby level (Eastwood gun/cut out double over). I just can't imagine getting quoted less then $300. My front bumper for my truck got quoted 200-300 from everywhere in town.
 

FJ 432

Well-known member
Joined
Aug 2, 2010
Messages
3,736
Location
Littleton Colorado
Welcome.

It's your box. Make it your own by doing what you want. I can understand why you want to repaint. You will get conflicting opinions on this forum on what to do with a tool box. What you have is a good box that can look better.

The hack saw blade when using to free up the drawer should be able to fit easily in the channel of the slide. This will require you to narrow it to fit within the channel. Once you have it narrowed you want to pull the drawer out and find where in the travel the slide "hits" the stop. One you determine that, close the drawer just enough (about 2") and slide your hacksaw blade into the channel. The blade will act as a blocker to prevent the catch from hitting the tab that stops the drawer from pulling out. Once you do one this will make more sense. Work on one side at a time, one drawer at a time.

Good luck.

If you have problems with the slides let us know.
 

Spudland_Dave

Well-known member
Joined
Mar 12, 2010
Messages
3,025
Location
Maine
WWDD....Refinish it 100% to like new condition one way or another.

Have it Professionally Blasted....either soda or media. And then prime with Epoxy Primer, Paint with a Single Stage Urethane in your choice of color(s). I'd probably take the opportunity to

WHY I suggest refinishing is the rust...Rust is like cancer. Catch it early is usually best...doesn't look like you're in bad shape.

OR you could powder it...the shop I use would charge me much less then you quoted. Especially if I'm not in a rush. I had a 7.5' Fisher Plow completely blasted & coated JD Yellow for $175.00
 

FJ 432

Well-known member
Joined
Aug 2, 2010
Messages
3,736
Location
Littleton Colorado
I used 3 latex free nitrile powder blue gloves on each hand when using the aircraft stripper and had to reglove a few times. I'm sure there is a better material for the gloves, but it was a pretty cheap option at a cool $5 for 100. That stuff burns like a mofo on the skin

P.S. Go Pats!

He speaks the truth. I'm pretty sure that when Hollywood created the creature in the movie Alien they got the idea of acid blood after using chemical stripper.

AND GO Broncos!!!
 

gahrajmahal

Well-known member
Joined
Dec 12, 2008
Messages
2,538
Location
Cincinnati, Ohio
Kac0825, when I was your age all I could afford was worn out stuff too, but I increased my knowledge by repairing this old stuff. For your refinish project I probably would have reached for my heat gun and putty knife. I would not go for that if it had a lot of contours or corners. Next I would try the 3M abrasive wheels. They look like a rough scotchbrite pad but have abrasive grit imbedded in them.
If you check out this thread where I refinished my old Lincoln welder, I figured out the paint scheme for my car paint job. That being said why don't you paint the tool box the same color as your truck. You will gain a lot of first hand knowledge in case you ever need to touch up the truck, plus you will have touch up paint for the truck.


http://www.garagejournal.com/forum/showthread.php?t=93592
 
To avoid these ads, REGISTER NOW!

Spudland_Dave

Well-known member
Joined
Mar 12, 2010
Messages
3,025
Location
Maine
Kac0825, when I was your age all I could afford was worn out stuff too, but I increased my knowledge by repairing this old stuff.

+1 :thumbup:

While its all cool and quite the day when they roll a new SO box off the lift gate at your place, theres an intangible feeling, probably even greater feeling and longer lasting when you put blood, sweat & tears into a project and you can sit back when your all done and admire your work and tell yourself "I Did that myself and damn did I do a good job"

Also agree with Gahrajmahal, If you do it youself, I probably wouldn't go with the traditional SO Red for paint...do it in a color or scheme your into. If you dropped that box off here as a gift to me, I'd probably go JD Green shell with JD Yellow Drawers. Or GM Red & Metallic Silver to match my Camaro...
 
OP
K

kac0825

Well-known member
Joined
Dec 19, 2013
Messages
89
Location
Ocala
Thanks for the all the replies! I have decided i'm going to take it down and repaint. I stripped it today, and I can see where the PO used bondo in a few spots. I'm hoping they were dents and not holes. If they're holes, friend of mine has a MIG, I may practice a bit and try to weld in patches. I'd rather learn and do it right, then just bondo over the hole and paint it. Theres a great thread around here, where a member did just that and you couldn't even tell.

I really like the traditional red, but SO artic silver or Mac's white are really appealing to me. I have a black truck however, and I think black boxes are boring.

I'm looking into just getting a cheap soda blaster from HF, and trying that out to blast it. Figure I may as well try to do it myself before shipping it off. Have any of yall used this before?

EDIT: found out my box is a 557 made in 78. Did SO use block logo then or the script?
 
Last edited:
OP
K

kac0825

Well-known member
Joined
Dec 19, 2013
Messages
89
Location
Ocala
AND GO Broncos!!!


The only reason I can root for the Broncos is because they picked up Wes Welker. One of my favorite receivers in football next to Edelman. Edelman is my favorite though. When you watch a player play offense, defense, and special teams in the same game... Thats talent.


Im hoping Broncos vs. New England for Afc
 
Last edited:

Farmall450

Well-known member
Joined
Dec 23, 2011
Messages
13,371
Location
Marengo, Illinois
Welcome to GJ :beer:

Congrats on the new tool box. I think you got a good deal considering paint, new slides, handle and all. Lots of people try to sell their beat up, rusty POS for quite a bit more. :lol:

I wouldn't bother with the paint at all. Zolatone is good stuff and not cheap. Unless the paint is falling off, you are going to end up spending alot of time redoing it. I'd just line the drawers and use as is. I personally like that color finish, it is different for a tool box and reminds me of cookies and cream ice cream. :thumbup:

It does look like a KR557. It will be stamped on the back, one of the corners. You may have to take some paint off to find the stamp, but it will be stamped model and year made as long as the PO didn't sand too deep.

What problem are you having with the drawer removal? Are your hacksaw blade removal tools bent properly?

I agree, I think it looks good and that stuff won't scratch easily.
 

Spudland_Dave

Well-known member
Joined
Mar 12, 2010
Messages
3,025
Location
Maine
I really like the traditional red, but SO artic silver or Mac's white are really appealing to me. I have a black truck however, and I think black boxes are boring.


From your mouth to god's ear....MAC's White w/Black Trim boxes are some of the sharpest, best looking boxes made today.. Going with a similar color combo on that box of yours would be SHARP!

I've got a black KRL and I agree with you...Boring. Got some green trinkets on order to spruce things up a bit.
 

kams1973

ALLIANCE MEMBER
Joined
Oct 3, 2010
Messages
1,585
Location
Amarillo, TX
"EDIT: found out my box is a 557 made in 78. Did SO use block logo then or the script?"

I have the same box made in '81. It has the older "block" logo.
 

zkling

Well-known member
Joined
Jan 23, 2007
Messages
16,939
EDIT: found out my box is a 557 made in 78. Did SO use block logo then or the script?

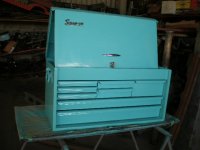
This is what that box should look like from the factory. Yours has a modern badge and side handle. The matching top box is a 12 drawer KR537, they also made a middle box for those vertically gifted users, 3 drawer KR547. :beer:

2vbjzn8.jpg
 
OP
K

kac0825

Well-known member
Joined
Dec 19, 2013
Messages
89
Location
Ocala
Ooh will have to look out for a middle box. If this goes well, I'll definitely get the top. If I can find it of course.

And bummer. Last time I checked eBay had one and it was selling at 30 bucks with 4 days left


Sent from my iPhone using Tapatalk
 
OP
K

kac0825

Well-known member
Joined
Dec 19, 2013
Messages
89
Location
Ocala
Also, are those side trim peices chrome? Or brushed aluminum.
I'm stuck. I love the snap on red color. It's just iconic. But the mac white and black trim looks great.


Sent from my iPhone using Tapatalk
 

Aquaticbob

Well-known member
Joined
Dec 3, 2013
Messages
488
Location
Seattle
Also, are those side trim peices chrome? Or brushed aluminum.
I'm stuck. I love the snap on red color. It's just iconic. But the mac white and black trim looks great.


Sent from my iPhone using Tapatalk

I agree the red is iconic. I think painting it whatever color you want would be the best choice though. Idk about you, but for me, I want to put my personal touch on things. I think the white with the black would look cool
 

zkling

Well-known member
Joined
Jan 23, 2007
Messages
16,939
The sides pieces should be aluminum trim, riveted on.

Just an FYI on the middle box, stacked up the top middle and bottom, the top box ends up being ~70" from the ground. So I hope you are a tall fellow. :thumbup:

As for the color. Since you really want to repaint it, why not something vastly different? Everyone has a red tool box, black yea, brown sure (kennedy), even green these days is becoming super popular. Now this is a personal choice, but one of these days I'm going to repaint a vintage box in a light blue. Something just looks classy about that color. Just throwing it out there. :beer:

Note, those are not my actual boxes, just pics I saved as examples. I think that blue goes really well with the chrome or brushed aluminum trim.
 

Attachments

  • IMG_0194.jpg
    IMG_0194.jpg
    119.7 KB · Views: 44
  • blue vintage snapon2.JPG
    blue vintage snapon2.JPG
    110.4 KB · Views: 46
  • 1000423a.jpg
    1000423a.jpg
    73.7 KB · Views: 61
OP
K

kac0825

Well-known member
Joined
Dec 19, 2013
Messages
89
Location
Ocala
So I managed to get the drawers off, but how do you get the actual slides themselves off from the rails? Are you supposed to reach behind it and do the same thing? And are you able to just push them back on when your finished, or no?


As far as color and welding, borrowing a friends mig to practice on, then I'm going to try to weld patches in the box. I figure worst case, I can always bondo them, but i'd like to try and do it properly first.


I also bought 4 cans of self etching primer, so once I get the inner drawer rails out, I'll wipe down and clean, sand(80, 120, 220), try to fix the holes, resand, wipe down and clean, then prime. We'll see how many cans I end up needed.
 
Last edited:

Lookin4'67Galaxieconv

Well-known member
Joined
Jul 2, 2008
Messages
16,635
Location
Atlanta, GA
So I managed to get the drawers off, but how do you get the actual slides themselves off from the rails? Are you supposed to reach behind it and do the same thing? And are you able to just push them back on when your finished, or no?

Yes, pull the slide out as far as it will go, then push it back in just couple of inches, get your hacksaw blade underneath it, then pull the slide all the way out.

When you put the slides back in the box, you can just push them in until they catch on the stop.
 
OP
K

kac0825

Well-known member
Joined
Dec 19, 2013
Messages
89
Location
Ocala
6a8abygu.jpg


Got the slides out and soaking in some cleaner now. Once I'm off work I'll soak the inside with some aircraft stripper, scrape the paint, and clean it down. Tomorrow comes the sanding and primer.

Is the lock on this just have a retaining ring? It's not a snap on lock. Also is the logo just help on by 2 rivets? I don't want to have to cut them and ruin the logo.
 

zkling

Well-known member
Joined
Jan 23, 2007
Messages
16,939
So I managed to get the drawers off, but how do you get the actual slides themselves off from the rails? Are you supposed to reach behind it and do the same thing? And are you able to just push them back on when your finished, or no?


As far as color and welding, borrowing a friends mig to practice on, then I'm going to try to weld patches in the box. I figure worst case, I can always bondo them, but i'd like to try and do it properly first.


I also bought 4 cans of self etching primer, so once I get the inner drawer rails out, I'll wipe down and clean, sand(80, 120, 220), try to fix the holes, resand, wipe down and clean, then prime. We'll see how many cans I end up needed.

One tip for the welding. Get a piece of copper plate and put it on the back side of the weld, then fill in the hole with weld, overfill a little and grind down flush. The weld won't stick to the copper and you will end up with a flush filled hole without a patch hump, a little practice and you no one will be able to tell it was ever done. May want to practice on a piece of scrap first, minimize heat input to help minimize distoration. If you don't have access to a piece of copper plate, obtain a short piece of ~1.5" or larger dia copper pipe and smash it good via a press, vise, anvil, what ever you have available and use that as your plate. :beer:
 
Last edited:
OP
K

kac0825

Well-known member
Joined
Dec 19, 2013
Messages
89
Location
Ocala
Thanks for the tip! I'm going to be sanding and priming tonight to get it ready for paint. I'll have pics up tonight or tomorrow. Anyone know of a good alternative to single stage urethane box paint? I got quoted 130 for the quart including hardener and activator. Is there a different type of paint that has similar qualities for any cheaper?

Also, I picked up some tools tonight. Friends dad had a few randoms laying around his tool box and said I could have them. Mostly just a few mis-matched sockets. If anyone needs any of them PM me. I'd like to make a set out of the SK's, so the snap on and proto's can go.
Also, the flex head ratchet has no brand or country of origin on it. Is anyone familiar with it?


zkling

Well-known member
Joined
Jan 23, 2007
Messages
16,939
Thanks for the tip! I'm going to be sanding and priming tonight to get it ready for paint. I'll have pics up tonight or tomorrow. Anyone know of a good alternative to single stage urethane box paint? I got quoted 130 for the quart including hardener and activator. Is there a different type of paint that has similar qualities for any cheaper?

Rustoleum sunrise red, thin slightly with acetone and then shoot through a gun. It won't harden as fast as a proper mixed paint, but it is much easier, cheaper and easier to retouch down the road. Lots of guys on here have paint boxes with that.
 
OP
K

kac0825

Well-known member
Joined
Dec 19, 2013
Messages
89
Location
Ocala
A little update. Turns out Zolatone is straight from hell. I'd much rather play in Aircraft stripper... The stuff does not want to come off. I'm going through sheets of sand paper and stripper on it. I'm thinking about buying a harbor freight media blaster (the red one), to get the drawers and the inside of the box. Anyone use these before?

On the brightside, there were two small dents and one big dent on the top of the box. Mixed up some bondo, sanded down and it's smooth as can be. I'm very happy considering it's my first time doing it. I have a few pictures of the box and drawers in various stages of stripping. Once I'm off work tomorrow, I plan to go back and get some more done. Finished all my Christmas shopping, so I'm good there.


Last edited:
To avoid these ads, REGISTER NOW!
Top Bottom