To avoid these ads, REGISTER NOW!

First time homeowner garage

OP
T

tigerxj

Well-known member
Joined
Feb 21, 2013
Messages
210
Location
Clemson, SC God's Country
Love the fridge! I'd put a keg of beer in there with the tap sticking out the side. :) You're a great carpenter. That bed is way sturdier than a store bought one.

Beautiful kids, too.


There may be plans in the future for a kegerator. We envision "college bar" for the basement some day, after student loans are paid off, I'll probably have to pay some college kid to come puke on the floor a few times to get the real ambiance.


Sent using tapatalk
 
To avoid these ads, REGISTER NOW!

Riley

Well-known member
Joined
Feb 18, 2007
Messages
398
Genius status on the play house!

A great use of an otherwise, either ugly or unusable space.

The whole thing looks great! Congrats!!
 

jbmatth

Well-known member
Joined
Jun 3, 2013
Messages
5,682
Location
Northern Ok.
I am sure if you truely wanted a college kid to come puke on your floor all you'd have to do is put a sign in the front yard on game day that said free beer. LOL That playhouse is great and a good way to not take up any valuable yard space.
JB
 
OP
T

tigerxj

Well-known member
Joined
Feb 21, 2013
Messages
210
Location
Clemson, SC God's Country
This is the latest addition in the basement
22fc6979e1294fddf0f18df690d828c9.jpg


Have a few more 3'x6' mirrors from lowes to hang, waiting to buy a barbell probably from rogue, some plates probably local, and a TV/blu ray do my wife can do her vids. We decided to add a doorway behind the spin bike so we don't have to walk through the shop to get to the gym. I may work on that next week.


Sent using tapatalk
 
OP
T

tigerxj

Well-known member
Joined
Feb 21, 2013
Messages
210
Location
Clemson, SC God's Country
It's an unfinished basement, so there plumbing and wiring aren't done until we finish paying off med school debt. The only outlets are in the shop and one by the steps. So I figured i'd rather not cover the joists up just to tear the drywall out later.

This week I was pretty glad I hadn't. My kids were going ape-**** in the tub a few nights ago, splashing water everywhere, and dumped a cup full of water out of the tub onto the tile surround in our bathroom. I found water leaking into my shop about 30 minutes later. Couldn't pin point, and pulled some of the insulation back to find a chronic drip with a 6"x6" spot of mold on the paper backing of the insulation. Apparently they missed about a 6" section of caulk on the tub to tile, and with all the splashing my kids do it was running down under the lip of the tub and to the joists/insulation below. If we had drywall up I may not have found it until a lot more mold was present.

Eventually we will finish the space off nicely, but the gym and shop area probably won't change except for more outlets and a ceiling. We intentionally want that area to be pretty bombproof and low maintenance.


Sent using tapatalk
 

GDPossehl

Well-known member
Joined
Sep 23, 2014
Messages
450
Location
Atlanta, GA
I spent plenty of my youth in an unfinished basement. No rush to get that all prettied up. Having access to plumbing, electrical, HVAC ducting, etc is especially nice.
 
OP
T

tigerxj

Well-known member
Joined
Feb 21, 2013
Messages
210
Location
Clemson, SC God's Country
Right now it is a race track for tricycles and bicycles. It suits us perfectly for now. Although it would be nice to have a basement TV so the kids wouldn't hear it so much. The acoustics in our vaulted ceiling **** too.


Sent using tapatalk
 
OP
T

tigerxj

Well-known member
Joined
Feb 21, 2013
Messages
210
Location
Clemson, SC God's Country
So it has been almost 2 years since an update. Wife is agreeable to some modest updates/organization on the garage, so figured I’d update with an incoming pic dump

First we made a few additions to our home
f27e1a586e6ce6702cab85f57eee8874.jpg
Both of these are new since the last update, born June 2016, and Father’s day this year, and primary reason for no updates to thread or garage!

8a1ca152cf9e3bcbffc8190d692ebd0a.jpg
here’s my entire brood. We’ve taken pics with all 4 as infants inside DV. I have consulted my friendly neighborhood urologist!

More updates coming.


Sent from my iPhone using Tapatalk Pro
 
OP
T

tigerxj

Well-known member
Joined
Feb 21, 2013
Messages
210
Location
Clemson, SC God's Country
26a009a05961e2023352446be254cd2b.jpg
built a dining table, have to get more picks at home. 8/4 ash, top is glued and doweled, breadboard ends with sliding mortise and tenon, and draw-bored with hardwood plugs. The legs are laminated 8/4 ash, mortise and tenon for the supports, and dovetail for the apron, so that I can take it apart for moving, so the table breaks down into 4 pieces. We knocked it off from a pottery barn table, so I bought a welder and welded up the turnbuckles for the bottom, which provides additional support since the apron connecting the legs are loose fit. Need to get more of the build pics up
3d6fda27cff2c4ae8c3300794d1f45ef.jpg


015752e344334f2547f6d4c73e70fea3.jpg

A year after we moved in, I started clearing the back yard, tore out all the ivy, cut the saplings and underbrush, and fenced in the back half acre for the dogs, about 400’ of fence, just post and rail with wire mesh on it.

That lead me to the idea of putting in a firepit in an clearing in the backyard
46128ebf0b5208a43a09ebdeff843738.jpg


Sent from my iPhone using Tapatalk Pro
 
Last edited:
OP
T

tigerxj

Well-known member
Joined
Feb 21, 2013
Messages
210
Location
Clemson, SC God's Country
Non house related, but we watched a pretty cool eclipse from our back yard, local photog got this sweet photo from the stadium
48d2ec69d80c2ed9972ec1e2775c3241.jpg


Then we had a partial lunar eclipse right before the moon set one morning a few months back
fd4199c20f44640d2821ac6e2e0f1c61.jpg

Had a pretty wild Halloween party, with black lights in our unfinished basement. It was nuts
a6ffa705ff098124e157ad9ad5cd4521.jpg

And back to the house, rented one of these (the machine, not the wife), details coming
0f973a8e85c6791539e466dd908bfcb6.jpg


Sent from my iPhone using Tapatalk Pro
 

Attachments

  • fd4199c20f44640d2821ac6e2e0f1c61.jpg
    fd4199c20f44640d2821ac6e2e0f1c61.jpg
    333.8 KB · Views: 0
  • a6ffa705ff098124e157ad9ad5cd4521.jpg
    a6ffa705ff098124e157ad9ad5cd4521.jpg
    505.7 KB · Views: 0
Last edited:
OP
T

tigerxj

Well-known member
Joined
Feb 21, 2013
Messages
210
Location
Clemson, SC God's Country
0dec2158670ef416c6bb03a891ea18b3.jpg

Firepit remains unfinished because all the water from the backside of the house was flooding onto it, so I’m gonna raise it one more course of block.

5b09e29dc3f9eb549c569e2b17198d6b.jpg

Began a dry creek bed to help divert the water, and it will flow into two different “rain gardens” when done to prevent so much water from flowing to the back.

1993d1ff1c04f3bafcf4984021c27d34.jpg
my dad bought a machine since his business is turning out a bunch more houses/townhomes in Asheville. Asked him if he would help me level a pad for a swing set so we could get the kids outside more. 4 yards of gravel and I think 165 blocks weighing 60lbs each, did it in a weekend in january.

6659d1c44e83a4e981941c7951277204.jpg
swingset from lifetime, all metal, powder coated, legit. Put in the post and plank wall above it. It’s not really holding any soil back, but I will put some gravel behind with fabric for drainage.

669ef5bc6141aee8a89dc70571763bd4.jpg
built some steps around the end to a crusher run sidewalk to the firepit
03feb10e58a9b5a0947f2978b44ccd49.jpg


b9e33009f532254ff8d89dd7ec4318ad.jpg


Sent from my iPhone using Tapatalk Pro
 
Last edited:
OP
T

tigerxj

Well-known member
Joined
Feb 21, 2013
Messages
210
Location
Clemson, SC God's Country
Now the real reason for halted progress on the firepit was the swamp we had under the back deck. The back of the house faces north, and we expanded our deck, which created a 100% shade area underneath that did a pour job of draining due to our lovely red clay in the upstate. Wife and I decided to extend the patio but wanted to do it with pavers, which snowballed. This was all fill back here, so pulled a lot of dirt out to prevent settling, compacted, geotextile fabric, then filled with clean 57 stone and compacted in lifts. Have a buddy at lowes, bought the pavers 20% off over Memorial Day weekend. I’ve run them to the first step up the sidewalk, the stopped due to the summer heat arriving and to let the wallet recharge a bit
20ffb8dd70cf206ee3a391005c5c350b.jpg


Of course this necessitated a small retaining wall, and I can never leave it simple, so we decided to use it as a sand pit, which serves the added benefit of draining water easily. Kids love it!
f324a88977451e5d8c0b2eb30f508fe4.jpg


This wasn’t time consuming or expensive enough so in decided to add some landscape lighting while I was at it. Ran the cable under the pavers in the sand layer, have a few hubs to split power, and all LED lights. Transformer is 600watt with multi tap voltage and 2 circuits. I’m using one circuit for the back and deck, and one for the sidewalk and side front yard. Haven’t bought the step lights for deck yet, or the front yard lights. The paver lights are flush into the pavers, used my small hammer drill and core bit to cut them. worked pretty well for a few holes but I wouldn't wanna do a 100 of them that way.
2894fc5c4cea0840070c0c9159c6792a.jpg

638a452082d42f80eee37b3cd21209c3.jpg


Another pic of sandpit
5bd77cec9b6cfc2472c07db59428006a.jpg


We were having a work dinner at my house one night and as our nurse was leaving put the car in drive instead of reverse. Hit so hard she actually made contact with my wife’s suburban inside, no damage to car. Fortunately I have a buddy that runs a local garage door company, and he had it fixed within a few weeks for <$600.
3f6fc16bd354a9475be5dedd26b3b9c5.jpg


Sent from my iPhone using Tapatalk Pro
 
Last edited:
OP
T

tigerxj

Well-known member
Joined
Feb 21, 2013
Messages
210
Location
Clemson, SC God's Country
All of this time/effort/expense explains why the garage has not really been messed with since I originally moved cabinets in. We are still able to park her Suburban and my Jeep inside and close the door. But its getting a little tougher to navigate around inside, because we've got a little more junk in there now, welding cart, metal chopsaw, some of my tools/parts/fluid for the cars, tailgating ****, bikes/stollers, coolers, and shoes - oh man the shoes. I didn't realized we'd need this many shoes with 4 kids but holy ****. This is basically how the garage is currently arranged, but with two cars and more **** in it.


Ive always kind of hated the fridge splitting the cabinets, but it was necessary. We have a chase for the dryer vent coming into the garage and out the side. unfortunately this shorted a 7'6" section of the garage by about 8 inches, and made an offset for the cabinets. Additionally, all the plumbing for the water heater takes up that corner so nothing can sit flush. My jeep fit fine on the side with chase, with the cabinets in front of it, and then we stuck the fridge where it is right in the center, because then we could still pull her suburban in and open the doors.

we are going to try swapping parking locations, move the fridge next to the steps, and slide all the cabinets next to each other next to the fridge. That will leave about 10' between the far wall and the base cabinets. We'll also move all wall cabinets to the back wall. I will be investing in some gearwall panels for between the top and bottom cabinets and in the empty spaces. I love the look and the ability to reconfigure and add stuff over time, so we'll be getting some shelves, bin holders, sports equipt holders, etc. As time and funds allow we may replace one of the base cabinets with a rolling tool box to allow me to open up more space in the cabinets for other junk that takes up space.

At this time, no plans to do anything with the floor, because hopefully there will be a lot more welding projects in the future, and from what I've seen floor coatings don't hold up well. I am thinking about tiles (not plastic) but I haven't seen much about welding on them. We are also thinking about maybe adding a maxjax in the middle for intermittent because Jeep, and storing out of the way for day to day use. Not sure how tile would factor into that. I will have to have my garage door buddy swap our overhead lift to a wall mounted one.
 
OP
T

tigerxj

Well-known member
Joined
Feb 21, 2013
Messages
210
Location
Clemson, SC God's Country
8a89bf69c1591af29cf9b8f97fc80d28.jpg
This corner is the bane of my existence in the garage. The dryer duct chase was not the fault of the builder. The plans were designed with the laundry room with the sink on the exterior wall, then the washer, then the dryer. Only way out was into the garage. In hindsight I should have swapped the dryer and the sink, putting the dryer on the exterior wall with a straight shot outside. Not much i can do with the water heater plumbing but it sure seems like a lot of real estate. Would have liked this in the basement in the center of the house, but no easy exterior vent down there.


Sent from my iPhone using Tapatalk Pro
 

Attachments

  • 8a89bf69c1591af29cf9b8f97fc80d28.jpg
    8a89bf69c1591af29cf9b8f97fc80d28.jpg
    284.1 KB · Views: 0
To avoid these ads, REGISTER NOW!

jbmatth

Well-known member
Joined
Jun 3, 2013
Messages
5,682
Location
Northern Ok.
Congrats on the two new additions to the family. You certainly have done a lot to make your new home more enjoyable for your family and there is no reason to explain why you haven't done more on the garage I'm sure we all understand. It all looks great and the garage and future projects will come in time and now you'll have more helpers to get it done.
Looking forward to more updates,
JB
 
OP
T

tigerxj

Well-known member
Joined
Feb 21, 2013
Messages
210
Location
Clemson, SC God's Country
I bought a monsterrax overhead storage rack, it’s 2x8, holds 400lbs. We have TJI above the garage ceiling for the girls room above it, so not worried about supporting the weight, and it will never have that much weight on it. Likely will add another one next to it. Didn’t go with the deeper racks because I wouldn’t be able to reach anything in the back.
2a460b29a09f93b9a77f6ea7c9b8b34c.jpg


After rearranging the fridge and base cabinets, I moved my gear wall panels to the side wall, and we plan to cover that whole side to about 6’ high. Everything on the floor will be on the wall eventually
d24966823366e37d38640c7bb7e19e9a.jpg


We will extend the geartrack on the far wall
4a7a522119abb4621473b2def48e1338.jpg


My dryer vent chase ended up being perfect for storing my jack stands
48635b560d580ac436e01fa2c69210a4.jpg


I was able to move enough stuff to the rack to eliminate a single base cabinet that was about 12” wide and kind of in the way. Overall look, still able to get the Jeep and the suburban in and open the doors.
60354cf37df82d5fbd8451a712c56eed.jpg


Sent from my iPhone using Tapatalk Pro
 
OP
T

tigerxj

Well-known member
Joined
Feb 21, 2013
Messages
210
Location
Clemson, SC God's Country
Room between to open doors all the way and not hit each vehicle
5e5a3aaba46642b51befd4c63c1da5b9.png

Plenty of room on the side to open doors fully and load 3 kids in the back
599de519b5a3b350e4bede2b6cc99ae2.jpg
Little tight in front of the suburban but I can still walk around.
a9f8cb23446b558bbbb54bb3b538870d.jpg
Plenty of room in front of the Jeep.
6f6048e17944663b52164115e2b703eb.jpg
Widened the steps because the kids always kicks their shoes off and the fell between the wall and steps. Subtle but helpful
6b8bbd0f19a5372638295bbef1b70d8d.jpg


Sent from my iPhone using Tapatalk Pro
 

Attachments

  • 599de519b5a3b350e4bede2b6cc99ae2.jpg
    599de519b5a3b350e4bede2b6cc99ae2.jpg
    467.8 KB · Views: 0
  • a9f8cb23446b558bbbb54bb3b538870d.jpg
    a9f8cb23446b558bbbb54bb3b538870d.jpg
    555.7 KB · Views: 0
  • 6f6048e17944663b52164115e2b703eb.jpg
    6f6048e17944663b52164115e2b703eb.jpg
    567.9 KB · Views: 0
  • 6b8bbd0f19a5372638295bbef1b70d8d.jpg
    6b8bbd0f19a5372638295bbef1b70d8d.jpg
    513.4 KB · Views: 0

kossuth

Well-known member
Joined
Sep 16, 2012
Messages
1,787
I think I forgot to mention one of the reasons we chose this lot is because this is behind us separated by a creek
8920865b1b5d8538b367f3061c557d32.jpg


We started framing today so hopefully more pics this afternoon


Sent from my iPhone using Tapatalk
I could think of a lot of worst things to back up to. Not bad. Not bad at all. Looks like your far enough back to be in any real danger from some of the sluggers over there.
 
OP
T

tigerxj

Well-known member
Joined
Feb 21, 2013
Messages
210
Location
Clemson, SC God's Country
Now for a question. All my tools are in the wall cabinets which is an inefficient use of space. At this point I don’t have the need for a rolling cart, or the space to put it unless I eliminated another base cabinet, which I’m not ruling out completely.

For now my plan is to hang wrenches and sockets on the wall above the bases below the wall cabinets. I have used peg board in the basement wood shop, and it’s ok. The metal hangers kinda ****, and the plastic push-lock ones are spendy. I’m considering 2 options, gearwall panels and their hangers, or doing pegboard again?

admittedly the gladiator hangers are expensive for what they are, but also would match the rest of the garage and lock in really well. The pegboard is cheaper, more work to hang since I have to fur it off the wall but just takes time. However it wouldn’t match the rest of the gladiator products. I’ve seen some of the metal pegboards, but have not used them. They look sweet, but then the price point gets closer to gladiator, and I don’t know if you can get them custom sized, since this space is only about 20” tall and 10’ wide.

Ideas?

This is the space in question
07cc3e58b3b360d03a4ef7e1bcbd0e87.jpg


Sent from my iPhone using Tapatalk Pro
 
Last edited:
OP
T

tigerxj

Well-known member
Joined
Feb 21, 2013
Messages
210
Location
Clemson, SC God's Country
I could think of a lot of worst things to back up to. Not bad. Not bad at all. Looks like your far enough back to be in any real danger from some of the sluggers over there.


We are quite far as the baseball flies. Same angle as that pic but from my deck. I don’t think you could stand at the outfield fence and hit my house with a ball!
3222faa5764c4df08c20ccee9db573d0.jpg


Sent from my iPhone using Tapatalk Pro
 

Attachments

  • 3222faa5764c4df08c20ccee9db573d0.jpg
    3222faa5764c4df08c20ccee9db573d0.jpg
    1.2 MB · Views: 0
OP
T

tigerxj

Well-known member
Joined
Feb 21, 2013
Messages
210
Location
Clemson, SC God's Country
One of the projects in the garage about 18 months ago was converting my 99 Cherokee to 2004 Grand Cherokee brakes and steering. The GC has larger rotors, 2 piston calipers, and a passenger knuckle that has two arms. This allows the user to eliminate the inverted Y steering on the Cherokee, and put in a true draglink and knuckle to knuckle torrid. You can also drill the knuckles out and drop in an insert and convert to over the knuckle steering, to stay out of obstacles on the trail. This also allows the use of chevy 1 ton tie rod ends and heavier tubing. Mine is all 1.5” x 0.25” thick.
f5ab125df5dcffe9ce55d713ae8b450d.jpg
There are a few obstacles like needing spacers on the knuckles to center the ujoint in the knuckle, need the right year hubs, drilling the rotor bolt pattern to match, spacing the caliper correctly, and re-doing the trackbar. The OTK steering interferes with the TB, so I welded on an over-the-axle trackbar Mount, and welded up and installed a new frame side TB mount to try to lower and outboard the mount. Goal here is to get the TB as long as possible and as close to parallel with the draglink to minimize bumpsteer. Got pretty close, I could swap a different pitman arm on but I haven’t had any issues.
b388d0e9bc282fce11c1726320d29278.jpg

Did I say no issues? When I finished the swap, life got busy and I never got around to putting a brace on the trackbar bracket, which ties it to the opposite frame rail. These cherokees are unibody, so the framerails are thin and prone to flex. The additional leverage loosened up the bolts, and one day I had a severe case of death wobble. That sucked, so I decided to fix it for good. So on the jack stands it went
ab8732d6346b448b0c11929ba91d8e91.jpg

And down the rabbit hole we go


Sent from my iPhone using Tapatalk Pro
 

Attachments

  • f5ab125df5dcffe9ce55d713ae8b450d.jpg
    f5ab125df5dcffe9ce55d713ae8b450d.jpg
    408.9 KB · Views: 0
  • b388d0e9bc282fce11c1726320d29278.jpg
    b388d0e9bc282fce11c1726320d29278.jpg
    371 KB · Views: 0
  • ab8732d6346b448b0c11929ba91d8e91.jpg
    ab8732d6346b448b0c11929ba91d8e91.jpg
    317.1 KB · Views: 0
OP
T

tigerxj

Well-known member
Joined
Feb 21, 2013
Messages
210
Location
Clemson, SC God's Country
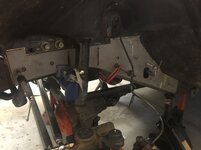
I could simply make the brace, but I knew I wanted to add some frame stiffeners to the stock rails. I already had some on the center portion installed about 10 years ago when I swapped to long arms. So I figured since I had it apart, weld these on
447d4682f0a126b6e2454775a13418be.jpg

To here
216eabbadaa3cf11dbc17750e9af3928.jpg

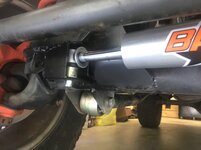
The additional 3/16” thickness causes issues with the trackbar because it spaces out. Fortunately my Tb bracket has slotted holes to accommodate this. But I wanted to install these first before doing the brace, because I didn’t want to slot the brace, I wanted it to be exact fit. So I had to do the frame rails first.

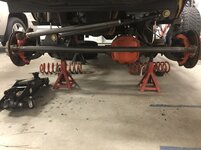
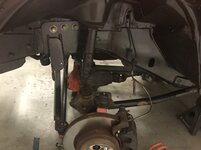
This required me to finish removing the old stock control arm brackets which I had hastily cut off 10 years ago. Bought a cheap spot weld cutter and cut 25 spit welds to remove the last bits so that I could install the stiffeners correctly. To do so, I had to remove the lower control arms, which of course led to cutting one of the bolts that had seized inside the bushing. And of course that bushing is an oddball size, and the manufacturer has since discontinued my particular kit, so I spent a few hours hunting down the right size online. Of course it doesn’t come with the inner sleeve, so I had to hunt those down separately. One of the original flex joints was pretty warn out, and I had already swapped the other to a Johnny joint, so I figured may as well make them match.

Then after some reading, I decided I didn’t want to use flux core and I’ve been meaning to get a bottle of gas for my Hobart. I’ve learned every new project should require a new “tool” in order to justify it to the financial manager, so picked up a bottle of gas and some 0.023” wire and tips from the local welding supply. 125’ bottle filled was $245, I own the bottle, and they will refill for $45. I guess those are decent prices, don’t really know.

I have some days off next week, so I’ll be cleaning up the frame rails (the entire body is galvanized so you have to get to clean metal to avoid the toxic gas when welding galvanized) and then welding next week. Then I can reinstall all of the new parts/refurb bits, and actually start on the entire focus of this venture, which is building the trackbar brace. More pics next week. The End.


Sent from my iPhone using Tapatalk Pro
 

Attachments

  • 447d4682f0a126b6e2454775a13418be.jpg
    447d4682f0a126b6e2454775a13418be.jpg
    338.5 KB · Views: 0
  • 216eabbadaa3cf11dbc17750e9af3928.jpg
    216eabbadaa3cf11dbc17750e9af3928.jpg
    300.8 KB · Views: 0

XJSuperman

Well-known member
Joined
Jan 26, 2018
Messages
3,087
Location
Central Iowa
Came for the new homeowner stuff, pleasantly surprised to find a Jeep.
XJ guy to XJ guy, Ive never heard of anyone ever mention they are galvanized....In fact, Im confident they aren't. But clean metal never hurt a weld, so the end goal is the same.

Monstaliner is great for sure, I did my trailer in it, and will do the Jeep someday. Gotta fix the rust first.
 
OP
T

tigerxj

Well-known member
Joined
Feb 21, 2013
Messages
210
Location
Clemson, SC God's Country
Came for the new homeowner stuff, pleasantly surprised to find a Jeep.
XJ guy to XJ guy, Ive never heard of anyone ever mention they are galvanized....In fact, Im confident they aren't. But clean metal never hurt a weld, so the end goal is the same.

Monstaliner is great for sure, I did my trailer in it, and will do the Jeep someday. Gotta fix the rust first.


Pretty sure from ‘95 up they galvanized everything, at least that’s when they started galvanizing the YJ tubs in addition to the frames that they did before that. I’ve always heard on naxja, jeepforum, Cherokee forum, even pirate that xjs were galvanized. But like you said, stripping to bare metal is what’s required anyways so it doesn’t much matter I guessed


Sent from my iPhone using Tapatalk Pro
 
OP
T

tigerxj

Well-known member
Joined
Feb 21, 2013
Messages
210
Location
Clemson, SC God's Country
37e2351091545577edf393d517bc44d5.jpg

Did the driver side second, so it looks better than the pass side. Steep learning curve but I think I picked it up pretty well


Sent from my iPhone using Tapatalk Pro
 

Attachments

  • 37e2351091545577edf393d517bc44d5.jpg
    37e2351091545577edf393d517bc44d5.jpg
    330.1 KB · Views: 0
OP
T

tigerxj

Well-known member
Joined
Feb 21, 2013
Messages
210
Location
Clemson, SC God's Country
Finally had some time in the garage to finish fabricating the actual trackbar brace, which was the entire point of the project. I cut up an old RE track bar and trackbar brace to get the right curves and lengths I needed, and had some 1/4” thick scrap I pulled out of the metal recycling dumpster on campus. Slugged the two bars together with a 1” bolt and plug welded. Tomorrow I should be able to start bolting it all back together and hopefully back on its own feet.
c861de8b2dbf3f961a6db121028ed36c.jpgddf4a5e90814e57c3c9eb920dda7aef0.jpg


Sent from my iPhone using Tapatalk Pro
 

Attachments

  • ddf4a5e90814e57c3c9eb920dda7aef0.jpg
    ddf4a5e90814e57c3c9eb920dda7aef0.jpg
    336.6 KB · Views: 0
  • c861de8b2dbf3f961a6db121028ed36c.jpg
    c861de8b2dbf3f961a6db121028ed36c.jpg
    366.9 KB · Views: 0
OP
T

tigerxj

Well-known member
Joined
Feb 21, 2013
Messages
210
Location
Clemson, SC God's Country
Got everything done and bolted up and added a steering stabilizer
aa7c3ff80eae91fd593459ff43a10c07.jpg brace bolted up, need to trim the corners but it Clears the tires.

5857b94e73c0f19319ff99a1544cb4fb.jpg it’s close to the pitman arm, but clears by about 3/8”

e278a579d2ff56fd6511f2677c77286f.jpg I had to cut off the old steering stabilizer mount when I did the OTA trackbar Mount, so I repurposed the stock trackbar Mount, added a folded piece of 3/16 steel and drilled a 3/8” hole for a double sheer mount on the axle end, used a left over transfer case drop spacer to space the stabilizer up. Did the same on the tie rod end up welded that one on. Everything clears with an extra 1/2” stroke length at full lock on either end.

0f53bafddad4fc22c067a480eb5cb25f.jpg finished overall shot. Angles aren’t perfect but close with the draglink and trackbar. I think I have a leaking seal in the steering box, so if/when I pull that apart to fix it, I may swap on a different pitman arm to raise the draglink an inch or so, and they should be spot on.

One day I’ll replace my cobbled together homebrew sector shaft stabilizer with one from boostwerks, which will allow me to add a Currie antirock. I’ve been without a sway bar for a few years, and I’m to the point where I think I would appreciate a little less body roll.


Sent from my iPhone using Tapatalk Pro
 

Attachments

  • aa7c3ff80eae91fd593459ff43a10c07.jpg
    aa7c3ff80eae91fd593459ff43a10c07.jpg
    369 KB · Views: 0
  • 5857b94e73c0f19319ff99a1544cb4fb.jpg
    5857b94e73c0f19319ff99a1544cb4fb.jpg
    266.4 KB · Views: 0
  • e278a579d2ff56fd6511f2677c77286f.jpg
    e278a579d2ff56fd6511f2677c77286f.jpg
    315.8 KB · Views: 0
  • 0f53bafddad4fc22c067a480eb5cb25f.jpg
    0f53bafddad4fc22c067a480eb5cb25f.jpg
    335.5 KB · Views: 0

patrickg20

Well-known member
Joined
Oct 4, 2013
Messages
509
I just read through your whole thread. I really like your attention to detail. Great job! I also liked that your wife and kids were helping too. I see I am not the only one with several kids, and lots of projects. Keep up the good work!
 
To avoid these ads, REGISTER NOW!
Top Bottom