To avoid these ads, REGISTER NOW!

First time tiling, have some questions.

NewShockerGuy

Well-known member
Joined
Oct 12, 2010
Messages
2,481
Location
Northern Virginia / DC
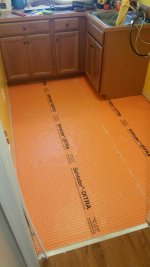
I am planning on tiling our laundry room this weekend. It's not big at all. The tiles I have are about 16" in length and about a foot wide. Total tiles I have are 24 which will be more than enough to do the room. They were given to me because they are extra from a friend that just did his bathrooms and rather than him throwing them out I said I could use them so he gladly gave them to us.

I've never done ceramic/porcelain tiles wanted to ask a couple questions since this is going to prep me for doing our basement which will be over 1,000sq ft of tile in about 5 months.

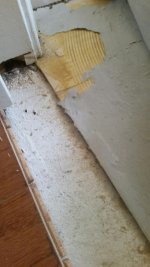
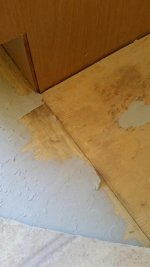
Currently we have crappy laminate in the laundry room. Nothing special, looks like *** and was what the builder used 10 years ago. Around the baseboard is corner molding, same with under the base cabinets. Now when I did the wood flooring on the entire upper floor I took off the baseboards and had the wood go to the walls then put the baseboards back on minus the any edge molding. I like the look without molding because it looks like the floor was planned rather than an after thought. Is there any reason NOT to do this with tile? Especially on the base cabinets I planned on removing the lower trim and getting tile right up against it then putting the trim back on the lower cabinet.

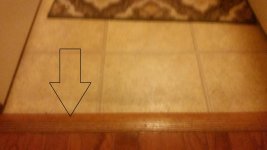
Next there is a wood transition piece from the hardwood flooring to the laminate. (see picture below) How does one remove this piece and once I put tile down wouldn't the tile sit higher than this piece causing it to be out of place? Or do I rip that piece out and then use something completely different to transition from wood flooring in the kitchen to the tile in the laundry room?

I've taken a picture of the tile below. The back looks like a checker board. Is there a specific thinset/grout that is recommended and also what type of notch should be used? I went to the hardware store and noticed the trowels are smooth/flat, square notches, round half circle, triangle...etc. I have no clue what to even use. The heaviest object on the tiles will be our front loading washer/dryer. Normal foot traffic but the room is not big enough to store heavy or large *** objects in it.

I was told wait at least 24 after putting tile down before doing the grout. If this isn't correct please let me know.

For the thin set is there something I should be looking for? Is it like mud for dry wall that you can buy premix/ready or DIY powder...etc. I know from reading on here that people like to double butter and do the floor and tile but is that necessary for a laundry room. I will not have extra tile so I don't want them cracked if someone accidently drops something. In this case would that be better just for sheer peace of mind?

Other than that I think that's all I have for now. I don't suspect this is going to be extremely hard but just a lot of unanswered questions are going through my mind. My friend is letting me borrow his wetsaw so that shouldn't be a problem cutting the tiles for a 100% perfect fit.

Sorry for the crappy quality pics. Had to snap them real quick before coming to work.

Thanks,
-Nigel
 

Attachments

  • 20170921_211316_resized.jpg
    20170921_211316_resized.jpg
    141.5 KB · Views: 91
  • 20170921_211347_resized.jpg
    20170921_211347_resized.jpg
    125.7 KB · Views: 86
  • 20170921_211331_resized.jpg
    20170921_211331_resized.jpg
    128 KB · Views: 91
  • 20170921_211337_resized.jpg
    20170921_211337_resized.jpg
    135.1 KB · Views: 86
  • 20170921_212524_resized.jpg
    20170921_212524_resized.jpg
    134.5 KB · Views: 86
  • 20170921_212540_resized.jpg
    20170921_212540_resized.jpg
    135.5 KB · Views: 80
To avoid these ads, REGISTER NOW!

Kaizen

Well-known member
Joined
Jan 9, 2015
Messages
6,948
Location
New England
sooo much to tell you. first the bigger the tile the harder it is. counterintuitive but true. before you get too far i'd pull the linoleum and see what you have. typically these days you want to install tile board and not lay them on plywood. in your case that would be the tile plus 1/2 inch so the top of that transition strip would most likely be flat with the top of the tile. I prefer to take off all the molding and install on top of the tile. looks better and easier to install as you have 1/2 inch or so at the wall to play with. if you use backer board on the floor and careful removing the wood you shouldn't have to paint anything.
those notched trowels are what you want to use. buy premixed in a bucket for your first job. stiffer then drywall mud but same idea. each of those sides of the trowel are different depth notches. forget but I think you'll use the biggest one. it will say on the mud container. get those rubber spacers. btw they stand up not lie down. I thought they laid at the corners the first time and guess what they are still there.
number one thing about tile is straight lines. measure it all out. use chalk lines. watch some you tube. not mentally hard but hard to get perfect.
 

cgrutt

Well-known member
Joined
Mar 4, 2016
Messages
8,200
Agree with above. They do make backer board in 1/4" if you need to minimize height. I would pull linoleum make sure subfloor is solid and use hardibacker or some other brand. Construction adhesive to subfloor and screw down. Tape joints and skim coat with mortar. Then set tile with porcelain/large format mortar which I believe has a latex modifier added to help with adhesion. You can also buy a gallon of latex additive and mix with that instead of water (you can use additive and water too). Schuster makes a great underlayment that has a number of benefits over backer board that you can use instead. It is waterproof, provides isolation barrier for movement a vapor barrier and is lighter than backer board. You use latex modifier mortar to set the product to subfloor and then unmodified mortar for skim coat and to set tile. Regardless of which underlayment good idea to spray a little water first before setting tile so underlayment doesn't draw moisture out of mortar. You want to be sure that entire tile is covered in mortar one method is to back butter the tile and set onto underlayment. Use notch on trowel recommended by mortar that you use. I'd pull the moldings and tile to wall but be sure to leave at least 1/4" gap to allow for movement of framing etc. With seasonal changes. I'd wait 24 before grouting. Good luck!
 

buildyourown

Well-known member
Joined
Jan 8, 2010
Messages
185
I would not start with a tile that big. I did my shower in 12" x 24" and that was my 4th project. It sucked. We got through it but there are SOOO many tricks. Layout is crucial. Flat surfaces are really important the bigger the tile gets.
 

ripperd

Well-known member
Joined
Jul 2, 2014
Messages
2,044
Location
Twin Cities, MN
If this is your first time, cut and dry fit your entire layout first, spacers and all. You need to adjust your lines so that there is never half or less of a tile at the edge. Then use some blue tape and number all of your cut tiles and draw yourself a little key so that you know where each cut tile goes. Until you have lots of experience this is how you get a great layout.
 

jam022316

Well-known member
Joined
Jul 31, 2008
Messages
971
Location
Indiana
Best of luck to you. Make sure post the final project. I learned something new. I always assumed bigger tile would be easier.
 

hammlm

Well-known member
Joined
Jun 21, 2005
Messages
675
Location
SE PA
I'm in the middle of a 70 square foot tile project. I've done a couple smaller ones, but years ago. Everything everyone said above (except, I'm not sure on the "'premixed" -- i think that's mastic and you should use mortar based thinset for flooring)...

I used the Schluter Ditra Mat. My subfloor is plywood and i know there is movement there, so I went for it to try to reduce chance of cracking. It's essentially a decoupling membrane that allows the wood floor to move independently of the tiles and mortar bed above. Tons of great videos.

I used a self leveler before that to take care of the dips and swales in the floor. Easy and self descriptive.

I will say this. It is SLOW going if you are new to it and/or don't know what you're doing. It is taking me forever. Trying to get the tiles level with each other (ie: no "lipping") takes time. With a large format tile like you contemplate, back-buttering is a must. I saw videos of a wedge based spacer/leveling system, but only after I'm halfway done. I would have used that if I had seen it before.

Use a square notch trowel. for a large tile like that, I think 3/8 or even 1/2 inch.

They make all kinds of transitions. Check into a schluter bar which is pretty slick and available at big box borgs.

Good Luck! I hope you don't get half as frustrated as me with how slow it goes!
 

engineer2

Well-known member
Joined
Dec 13, 2009
Messages
11,795
Location
Chicago burbs
Ditra is a good idea. I have 3 tiled rooms in my house. Two have Ditra and one was done before Ditra existed. Guess which one has cracked tiles?
 

Toomanytools?

Well-known member
Joined
Nov 4, 2010
Messages
855
Location
Washington
Newshockerguy; Looks like the cabinet doesn't have base like the rest just cabinet toekick, anyway remove the base shoe I would pull the base off walls you want tile under about 1/4" from wall. You need a good subfloor 3/4" then a good tilebacker 1/2", you don't want any flex in floor so most floors are 1 1/4" plus for thinset. Doesn't matter what's going in room small dog or small elephant.
Use this for thinset http://www.homedepot.com/p/Custom-Building-Products-Porcelain-Tile-White-50-lb-Fortified-Thinset-Mortar-PMW50/202519208
White is better for light color tiles, the bag will have a chart for what trowel to use, usually 1/4 x3/8 x1/4 square notched for 12"x12" tile, 1/4x1/2x1/4 for a 16x16" tile you could use either one. I would not buy premixed thinset, but if you don't have a drill and mixing paddle you could.
Small room like that do as others mentioned and dry fit, you usually snap lines and start in center with layout, it's nice to have full tiles where you see them the most. So as you walk in at door and in front of cabinet. Pull the transition at door and might need to rework it.
 

b-boy

Well-known member
Joined
Oct 2, 2013
Messages
2,155
Location
Buffalo NY
I just finished tiling my basement bathroom. I've done other tiling jobs, but this one included actually building the sub-structure using sleeper, plywood, etc, It was a bear of a job.

Getting everything flat was the biggest problem for me. Even when I thought I'd done it, I still had some issues. I did a lot of sanding and leveling. Make sure your room is flat.

I use the Schluter Ditra system over cement board. I used unmodified thinset (not pre-mixed) to apply the ditra and the tile. I really like the Ditra system, even though it's a bit expensive.

I used a wedge system to remove lippage. It helped a lot, but it was very expensive as well. Way more $$ that I thought it was worth. However, it did do a good job. I think for larger tiles it would be a good idea.

I put down 12x12 tiles with a 1/8" grout line. I back-buttered using thinset. The key to getting a solid floor is eliminating any gaps under the tile. Back-buttering helps ensure no gaps. Also, the bigger the tile, the bigger the notch you'll need on your trowel. I used 1/4 x 1/4 x 3/8. You'll probably need to go bigger. For 16", I think a 1/2-inch-deep notch would be a good idea.

As far as differences in floor height, you can't really do much about that. Finding good transition pieces is hard too. I usually make my own using a router and saw. I've never been happy with them initially, but after awhile you don't even notice them.

The most important piece of advice I can offer is to get decent knee pads. They can make a world of difference.

Good luck!
 
Last edited:

Shiftless

Well-known member
Joined
Mar 9, 2014
Messages
14,495
Location
East Bay SFO
N.S.G.:
You have received some good advice so far.

I too am an amateur tile setter. I have done a couple of tub surrounds, 2 tile showers, and 4 bathroom floors.
Is it too late to return those tiles and get smaller ones? I would not use 16 inch long tiles on my first job, even if I was positive that the floor was billiard table smooth and flat. Any variation in the thickness of your thinset mortar will result in "tippage" where the edges aren't even with the adjoining tile. This effect is greatly magnified with large format tiles. In a small space like a laundry room something like 8x8 would be way more forgiving. Make sure to use tiles with a cushion edge rather than saw cut perfectly square edges. The rounded over edges with spaces for grout will hide imperfections.

Also, assuming you don't have a pro grade diamond blade wet saw, how are you going to make 16 inch cuts to fit those tiles into your room? Snap cutters are fine but for first timers get ready to ruin a tile or two...
 
Last edited:

Toomanytools?

Well-known member
Joined
Nov 4, 2010
Messages
855
Location
Washington
AAAAA (sound of Buzzer) Most common floor tile is 12x12, so 12x16 isn't that much bigger. Yes if it is your first time can be harder, have your buddy that gave you the tile help you out.
I would not go smaller 8x8, too many grout lines makes the space look smaller.
Take your time use the right notched trowel, proper thinset mix, a level or straight edge I go by feel ,to reduce lippage, and smaller grout joint. The 1/4" grout joint is not used much anymore. Good Luck
Oh you can cut 8" then flip tile for 16", pain yes but for a small job doable.
 
Last edited:
OP
N

NewShockerGuy

Well-known member
Joined
Oct 12, 2010
Messages
2,481
Location
Northern Virginia / DC
Awesome thank you for all the info! Going to be starting this tomorrow or at least moving everything out of the room and ripping up the laminate floor and trim. Have to aerate the yard and seed/fertilize since our neighborhood is renting the aerator.

I'll have to take a picture of the room so you can really see how small it is. Laying the tile out to mock the setup should not be a problem at all actually. I planned on doing that just so that I know 100% that I have enough tile and that I can figure out the layout.

I was thinking of getting 1/4" backerboard:
https://www.lowes.com/pd/James-Hard...dieBacker-Fiber-Cement-Backer-Board/999994576

Use these spacers?
http://www.homedepot.com/p/QEP-1-8-...-Style-Tile-Spacers-250-Pack-10026Q/100133565


I was going to get that size only because the 1/2" size I feel like plus tile is going to be a "step up" situation from the wood floor to the laundry room and I'd love to avoid this at all costs honestly.

Appreciate the thinset linked above. I'm going to HD tomorrow get all the seed/fertilizer so I can pick that up there as well along with the trowel.

Dumb question on thinset mixing... how much does one usually mix at once and what is the life of the product once mixed... IE: Like epoxy you have X amount of time before it's unusable and hard.

The tiles were free so it's one of those things that I could give back to the friend but he will just throw them out and then I'd have to go out and buy tiles.

As far as cutting the tiles my friend is giving me his tile cutting saw tomorrow after he gets off from work. Not sure on the size but when I did a "rough" fit of the titles I noticed that the ones that will need to be cut are going to be cut width wise. The majority of the tiles will be all one piece. The room is like a small rectangle. I think I will have to make less than 10 cuts total honestly. Nothing fancy or hard that I imagine. Nothing like curves or weird angles. Almost like the letter L in shape but upside down.

I'm sure I will be swearing. I know I did the first room I installed hardwood flooring which was a smaller bedroom. But then each room got progressively better/easier to me since I knew what I was doing...lol Had I started with our master bedroom I would have probably burned the house down with the amount of rage that I had.

-Nigel
 

cgrutt

Well-known member
Joined
Mar 4, 2016
Messages
8,200
I've used that backer board before it should be fine. Set it to subfloor with construction adhesive and screw it down with the backer board screws. They're green with a square drive head IIRC. Seems should be taped with fiberglass mesh and put a skim coat of mortar on it before setting tile. Buy a spray bottle (if you don't have one) and be sure to dampen the hardi board before setting tile. It will prevent the backerboard from wicking moisture out of mortar before it cures. The Schulter product is about the same thickness as 1/4 backer board but much better. You would probably only need a small roll for room that size, probably $90 or so. A little more expensive than the backer board but a much better product. Just throwing it out there...

I mix about 1/2 bag of thinset at a time and it lasts a couple hours. You can add some water if it begins to set up before you use it but probably not best way to go about it...
 
OP
N

NewShockerGuy

Well-known member
Joined
Oct 12, 2010
Messages
2,481
Location
Northern Virginia / DC
I've used that backer board before it should be fine. Set it to subfloor with construction adhesive and screw it down with the backer board screws. They're green with a square drive head IIRC. Seems should be taped with fiberglass mesh and put a skim coat of mortar on it before setting tile. Buy a spray bottle (if you don't have one) and be sure to dampen the hardi board before setting tile. It will prevent the backerboard from wicking moisture out of mortar before it cures. The Schulter product is about the same thickness as 1/4 backer board but much better. You would probably only need a small roll for room that size, probably $90 or so. A little more expensive than the backer board but a much better product. Just throwing it out there...

I mix about 1/2 bag of thinset at a time and it lasts a couple hours. You can add some water if it begins to set up before you use it but probably not best way to go about it...


So rather than using backer board use this instead?

https://www.lowes.com/pd/Schluter-S...e-Plastic-Waterproofing-Tile-Membrane/3580144

I found a video online:

Safe to say that's the better way to install it? I don't have an issue at all paying for something that is better. That membrane looks significantly thinner than backerboard as well so it might address my concern with the tiles being too high compared to the wood floor.

I wouldn't need to do anything as far as screwing the membrane down. Looks like he puts a coat of the thinset down and then puts the membrane on the thinset.

I think this will be a better option honestly. Looks easier to cut/form to areas..etc.

Looks like I'll be going to both HD and Lowes since no one seems to carry everything...lol

EDIT1:
So I found videos of using Ditra from the manufacture. They say that you should use a modified (Is this the same thing as fortified?) thin set on plywood to ditra. Then you use unmodified on Diatra and the tile. This means I need to purchase two separate thin sets I guess right?

-Nigel
 
Last edited:

cgrutt

Well-known member
Joined
Mar 4, 2016
Messages
8,200
Yes to all of above. Note Shulter also makes a seam "Tape" for the Ditra that you could use it will make floor completely waterproof. It's an orange fabric in a roll forget what it's called but s/b with the Ditra in store. It gets mortared to seams on top. You could also go around perimeter of room up wall about 2" behind trim to make a basin of sorts. Used primarily in shower and tub enclosures but might make sense in a laundry room in case washer ever leaks. Not necessary just throwing out another option. Fortified and modified are same it has a latex additive that improves adhesion. You can either buy separate mortar or use unmodified for both and add an additive when mixing to set Ditra to the subfloor. The fortified is better for tile but it cures through evaporation. They use unmodified between tile and Ditra because it is waterproof and doesn't allow proper evaporation to set properly. Believe unmodified cures chemically. That's just my understanding not an expert or anything but there are a lot of videos on it. Definitely best way to go. Good luck!
 

rustyjames

Well-known member
Joined
Dec 28, 2008
Messages
1,077
Location
central nj
I've used that backer board before it should be fine. Set it to subfloor with construction adhesive and screw it down with the backer board screws. They're green with a square drive head IIRC. Seems should be taped with fiberglass mesh and put a skim coat of mortar on it before setting tile. Buy a spray bottle (if you don't have one) and be sure to dampen the hardi board before setting tile. It will prevent the backerboard from wicking moisture out of mortar before it cures. The Schulter product is about the same thickness as 1/4 backer board but much better. You would probably only need a small roll for room that size, probably $90 or so. A little more expensive than the backer board but a much better product. Just throwing it out there...

I mix about 1/2 bag of thinset at a time and it lasts a couple hours. You can add some water if it begins to set up before you use it but probably not best way to go about it...

Sorry, but backer board should be set in a bed of thinset, not construction adhesive. And you should never add water to thinset.
 

cgrutt

Well-known member
Joined
Mar 4, 2016
Messages
8,200
Yeah seen it done both ways but believe you're correct. Think main advantage of thinset is it will fill any gaps between backer and subfloor. I know you shouldn't add water sort of a hack complete with disclaimer that's it's not the best thing to do. Lol
 
To avoid these ads, REGISTER NOW!
OP
N

NewShockerGuy

Well-known member
Joined
Oct 12, 2010
Messages
2,481
Location
Northern Virginia / DC
Welp it begins..lol

Took out the washer and dryer. Removed corner molding. Couldn't remove the transition piece without slightly cutting up the door trim and popping it out a little.. no worries. Then removed the baseboards.

Currently in the process of removing the linoleum.

I have a question since I am at this point. Removing the linoleum is leaving behind some of the gray backing under it. Upon closer inspection I see that the builder did in fact use some type of thin wood as he did not apply it directly to the plywood floor.

Should I remove this wood as well? It's not thick at all. No clue how it's attached yet but just wanted to ask first before proceeding. And or replacing or whatever is recommended.

See pictures below of room size (not big) and some of the pictures of the wood on top of the plywood floor.

Thanks,
-Nigel
 

Attachments

  • 20170924_110318_resized.jpg
    20170924_110318_resized.jpg
    133.2 KB · Views: 27
  • 20170924_105955_resized.jpg
    20170924_105955_resized.jpg
    133.7 KB · Views: 28
  • 20170924_105946_resized.jpg
    20170924_105946_resized.jpg
    131.6 KB · Views: 27
  • 20170924_102831_resized.jpg
    20170924_102831_resized.jpg
    131.5 KB · Views: 30
  • 20170924_102820_resized.jpg
    20170924_102820_resized.jpg
    130.9 KB · Views: 33
  • 20170924_102813_resized.jpg
    20170924_102813_resized.jpg
    132.7 KB · Views: 30

the gypsy

Well-known member
Joined
Mar 13, 2013
Messages
1,780
Location
Montreal, Quebec, Canada
All I want to say is to verify your subfloor to see if it is plywood or chipboard or particle board. I would pull up the particle board if that is the case and replace with at least a 3/4 plywood (screwed in every 6 to 8 in.) then continue on as the others mentioned. The base has to be solid otherwise no matter what you put on it whether it is cheap or expensive you will always risk cracks in the tiles. As for the transition between the rooms you can put in a marble or granite sill or even do something like a decorative border with leftover tiles or a smaller tile (which you will have to buy) to make the transition more interesting.. Schlutter also have some transition pieces with a bevel on one side and a lip that goes under the tile on the other side. I personally don't like ending a tile job with a simple tile.
 

Attachments

  • schlutter product.jpg
    schlutter product.jpg
    10.3 KB · Views: 25

the gypsy

Well-known member
Joined
Mar 13, 2013
Messages
1,780
Location
Montreal, Quebec, Canada
Another thing please make sure you do not have any built in appliances under that counter space, because if you do you will have to take that into consideration when your are doing your tiling. Example, if you have a dishwasher and tile in front of it, you will not be able to remove it when you want to change it or service it.
 

PoorOwner

Well-known member
Joined
Feb 10, 2007
Messages
5,032
Location
CA
Yes remove that luan or 1/4 ply. Wipe up any excess drywall texture on the subfloor.
Check flatness and correct best you can.
Put back 1/4" backer board (thinset under it) hardibacker screws down and tile.
 
OP
N

NewShockerGuy

Well-known member
Joined
Oct 12, 2010
Messages
2,481
Location
Northern Virginia / DC
The floor is definitely plywood. I know this is true because when we moved in year ago we had wood flooring put in and when I saw all the carpets ripped up it was plywood. Same with upstairs when I did all the wood flooring.

So I remove the 1/4 wood that is there now. I am going to lowes shortly to pick up Ditra. Is there a need to even put 1/4 backer board or ply wood on of the subfloor since I am using Ditra? I don't mind doing it but though the whole point of using the Ditra was so I can put it right over the plywood subfloor rather than screwing in another layer of wood/backer board then tiles.

IE: Remove layer of wood that linoleum was on top of, then apply thin set and put Ditra ontop. Wait to dry. Then start applying tiles on top of Ditra layer.

The cabinets in there have no appliances at all. Just the sink. So no worries on trying to pull anything out or anything of that nature.

Thanks much!

-Nigel
 

PoorOwner

Well-known member
Joined
Feb 10, 2007
Messages
5,032
Location
CA
If ditra makes more sense then use ditra if a roll fits. I think the smallest is 54 sq feet. It is expensive and the height difference is only 1/8" to 1/4" backer. You need modified thinset, mix it a little more wet and put it down and use a trowel over the top. The potential issue is you need unmodified thinset to set the tile above ditra. Not always easy to find a good one and not as easy to use than modified thinset. If you can try to find ditra set this is sold at tile stores not big box stores . The more experienced pros can tell you more what to do.
 
OP
N

NewShockerGuy

Well-known member
Joined
Oct 12, 2010
Messages
2,481
Location
Northern Virginia / DC
You plan on setting those tiles on a plywood substrate? No mortar bed?? No 1/2" cement backer???

No not at all, look at the advice from previous posts... First plan was to use cement backer board. Then it was recommended to use Ditra which is better and all the reviews and videos I see seem to be a very superior product. If I go with Ditra then I would not need to use a backer board since the ditra would be applied to the plywood subfloor with modified thinset. Then the tiles are applied to the ditra.

-Nigel
 

engineer2

Well-known member
Joined
Dec 13, 2009
Messages
11,795
Location
Chicago burbs
you can put Ditra over plywood. Just make sure the joists are 16" apart and you put a construction screw between each nail into the plywood.
 

Shiftless

Well-known member
Joined
Mar 9, 2014
Messages
14,495
Location
East Bay SFO
It all depends on how much deflection in the plywood. You should refer here John Bridge tile forum.

:+1: to that ^^^^^^^^^^^^^^^^^^^

Even what seems like a small fraction of an inch deflection will result in cracked tiles. That is an excellent reference...John Bridges. I learned a lot and have no more cracks on my tile floors after I followed his guidelines. If you have 2x8s with an 8 foot span (just guessing for an average laundry room) you'll be OK
 
Last edited:

rnscustom

Well-known member
Joined
Mar 20, 2017
Messages
340
Location
Plympton MA
Usually a floor should be 1-1/4" minimum thickness ( old school anyway ) . Also heard of a lot of issues with the box store thinset . Had one myself where the thinset just crumbled . I would purchase that at a tile supplier .
 

ard

Well-known member
Joined
Feb 16, 2015
Messages
4,391
Location
Sierra Foothills... California
No not at all, look at the advice from previous posts... First plan was to use cement backer board. Then it was recommended to use Ditra which is better and all the reviews and videos I see seem to be a very superior product. If I go with Ditra then I would not need to use a backer board since the ditra would be applied to the plywood subfloor with modified thinset. Then the tiles are applied to the ditra.

-Nigel

lol

I did. You are getting some good advice and some bad advice.


You call it a "plan"?

GL
 
OP
N

NewShockerGuy

Well-known member
Joined
Oct 12, 2010
Messages
2,481
Location
Northern Virginia / DC
Welp got the ditra put down. I can say without a doubt I never want to do tile again and I haven't even gotten to the hard part yet. Thin set gets everywhere, it's messy... so annoying honestly. At least when I did the wood flooring there was dust everywhere but that was easy to clean up. This stuff just gets everywhere it seems like no matter where I touch I transfer it to something.

Here I am thinking this would set me up to do our basement but it just confirms that it will be easier and worth my time to just pay someone and have it done in a weekend rather than weeks if I did it.

Tomorrow should be a real treat because I am already frustrated AF just doing this part...lol.

More pics to follow.

-Nigel
 

Attachments

  • 1.jpg
    1.jpg
    143.5 KB · Views: 47

rustyjames

Well-known member
Joined
Dec 28, 2008
Messages
1,077
Location
central nj
I feel the same way about tiling my bathroom, will never entertain the thought of tiling anything again for as long as I live!
 

rharman

Well-known member
Joined
Apr 22, 2012
Messages
8,753
Location
SoCal
I sincerely hope you don't learn the hard way about deflection by not putting in backer board. I fear you'll be back soon posting about popped tiles.
 

ddawg16

Well-known member
Joined
Jul 11, 2008
Messages
21,005
Location
S. California
Late to the party.....

I think the Ditra stuff is highly over rated.

I've done 4 rooms so far. And watched my neighbor use Ditra.

Professionals like Ditra because it's fast. They pass on the high cost to you.

1/4" HardiBacker works just fine on the floor. And I think it's a lot easier. Additionally, because you put thin set between it and the subfloor, it takes out the dips. And...because you are screwing it down, it stiffens up the subfloor a bit. Whereas Ditra? Unless you have a really good bond between the Ditra and subfloor, expect movement.

Large tiles do make lipage more difficult....but patience pays off. Grout can make up for minor lipage issues.
 

rustyjames

Well-known member
Joined
Dec 28, 2008
Messages
1,077
Location
central nj
I sincerely hope you don't learn the hard way about deflection by not putting in backer board. I fear you'll be back soon posting about popped tiles.

Sorry, but backer but backer board doesn't nothing to maybe little for deflection.
 

tapered-pin

Well-known member
Joined
Sep 12, 2017
Messages
277
Location
Alpharetta, GA
assuming your subfloor doesn't move, ditra and thinset are the way to go.

I have always installed the Kerdi system and never had an issue.
 
To avoid these ads, REGISTER NOW!
Top Bottom