To avoid these ads, REGISTER NOW!

First timer build thread: modern workshop / shed

gamp945

Well-known member
Joined
Jun 4, 2014
Messages
1,540
Hi all,

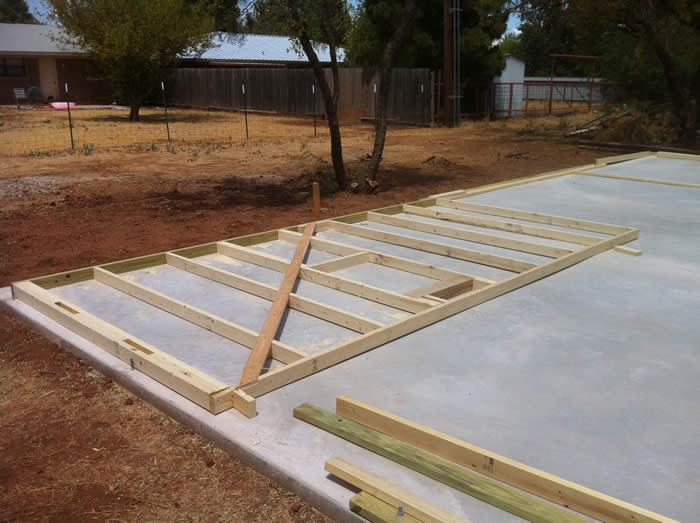
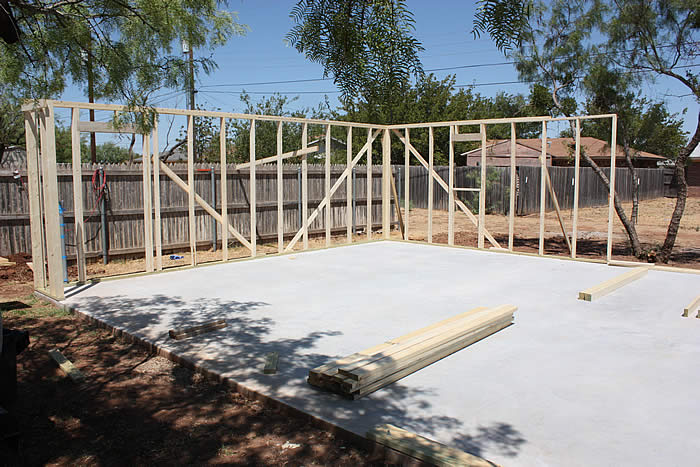
I have never built a framed structure before but would like to start by building a 12x14 shed / workshop in my back yard. I want to do it myself for the thrill of learning the skills.

I'm a DIY-minded homeowner/hobbyist, budding woodworker, and vintage 2-stroke enthusiast. I don't have a garage, so this would function as my workshop and storage shed.

I found a modern design with detailed plans from the latest "Family Handyman" shed build. You can see detailed plans here:

https://ds.jpimedia.com/ads/videos/lpsheds-custom-new/2018-Game-Day-Shed-Plans.pdf

And you can see videos and photos here:

https://gamedayshed.familyhandyman.com

The only changes to the design that I'm planning on right now:
- omit the large garage door and have a solid wall instead with windows just below the roof

I previously posted a thread asking for opinions on the design. I received some great ideas there.

I've started this thread to document my build and hopefully get some help as I go along. Kindly note: I am a total beginner at building a framed structure, so you can safely assume I know very little and I will not be insulted :)

Initial questions:

1. The plans call for a triple-2x12 assembly for each of the three roof beams. Would it be better to use a single engineered beam, such as Glulam?

2. I currently have a 14x12 concrete pad which is the exact size needed for the structure. I am considering having an additional 5x12 section poured for the area beneath the large overhang (as shown in the plans). Can anyone think of advantages/disadvantages of doing that now vs. after the building is finished?

family-handyman-game-day-shed.jpg
 
Last edited:
To avoid these ads, REGISTER NOW!

matt_i

Well-known member
Joined
Mar 14, 2008
Messages
10,722
Location
SE Michigan
I think the triple is to give visual heft to the roof and not for structure.

I would pour it sometime before the siding goes on, its easy for concrete to get splashed around during the hard work of the pour and while that's not the end of the world its time consuming to remove it.
 

malee

Member
Joined
Dec 21, 2015
Messages
5
if you pour one large slab as per the design, how is the mudsill/bottom plate waterproofed? Isn't there a high chance for water to get under the bottom plate
 

Homerr

Well-known member
Joined
Mar 16, 2012
Messages
379
Location
Seattle, WA
Nice design and the plans look good for a first build.

I personally would like the look of a glulam better. If you need a size for the beam post your local snow loading PSF or give me a location (zip code or municipality) and I can look it up.

Have the new 5x12 slab area poured an inch lower than the existing slab if you do do it so that water won't infiltrate the wall at the existing slab.
 

DGersic

Well-known member
Joined
Mar 12, 2017
Messages
6,266
Location
DeKalb, IL
I built my 8x12 shed by myself a few years ago.

A framing gun makes this a lot faster and easier, especially if you’re not accustomed to swinging a hammer all day. Consider renting or buying one. I got a used one off of craigslist, best $50 I spent on the shed project.

Even a cheap mitre saw can cut nice enough 90* angles for framing, and it’s easier and faster than doing it with a circular.

I’m a believer in thinking your way through the whole project before starting. Mental rehearsal. What, exactly, are you going to do, in what order, with which tools?

Build your walls flat, then bring them up in to position. I used clamps and ratchet straps to get everything where I wanted it, squared everything up, then nailed. Having two people would probably have been nice for getting the walls in place. I used a bunch of clamps, adjusted and squared them up, then nailed.

Similarly, I built my roof trusses flat on the garage floor. I laid out a jig, cut everything, laid out each truss in the jig, then nailed. Again, a second person would have been helpful in getting the trusses in position, but I used clamps.

I used T1-11 siding. Sheets are kinda heavy. Can’t hold one in place one handed, so I used 2x4 scraps to position them, then nailed.

Roof sheathing is really heavy. Strongly consider getting at least one other person to help with this step. I didn’t. Yep, more clamps, get it in place, and nail.

Don’t pick the hottest day of the year to do the roof. Stay hydrated. Enjoy the build. Post pictures.


Sent from my iPad using Tapatalk
 

Wolfman6

Well-known member
Joined
Oct 16, 2017
Messages
541
So glad to see you are working from plans. Very smart. Too many people think they know how to build a shed and when they are finished it is apparent they didn't.
 
OP
G

gamp945

Well-known member
Joined
Jun 4, 2014
Messages
1,540
UPDATE:

So I ran into an issue when I tried to get the city to approve the design and then this project got shelved until now. But I now have the plan approved and I'm ready to go!

NOOB QUESTION:

I took a close look at the slab today and laid a 2x4 across the edges to see how flat it is. There is quite a bit of daylight under the 2x4 but I don't think it is a big deal once the sill plate is bolted down. HOWEVER, on one corner there seems to be a noticeable dip - about 1". I've attached photos below that show the corner from both sides.

Is this low corner a concern? I'm thinking this will cause problems with everything ending up level, plumb, and square. Suggestions?

IMG_1427.jpeg


IMG_1428.jpeg


IMG_1429.jpeg


IMG_1430.jpeg
 

joey1320

Well-known member
Joined
Jun 14, 2015
Messages
1,813
Location
NE Ohio
Bolt it down, but each stud will need to be separately measured so it is level at the top.

This ^^^

If you want to spend money on a laser go right ahead. If you want to do it cheap built a water level.


As posted above, a nail/framing gun will make everything easier. I built my 12x16 shed three years ago, NEVER having built anything like this before and it was a great experience. The framing gun made it a lot easier than hammers or screws. I got mine at Harbor Freight and have used it plenty since then with no issues.


If I'm not mistaking you can use the 20% coupon on it too.

https://www.harborfreight.com/21-angle-full-head-framing-air-nailer-69927.html
 
Last edited:
OP
G

gamp945

Well-known member
Joined
Jun 4, 2014
Messages
1,540
I'd use a level, the 2x4 could be warped.

I previously checked the slab for level in the middle of each side and it looked good - I guess I didn't check the corner but I'll do that tomorrow to confirm it is sloped down as the 2x4 suggests.

Bolt it down, but each stud will need to be separately measured so it is level at the top.

This makes sense - thanks. I feel like this kind of thing should come to me intuitively, but is sure didn't. I'm now reading up on the correct way to do this.

This ^^^

If you want to spend money on a laser go right ahead. If you want to do it cheap built a water level.

As posted above, a nail/framing gun will make everything easier. I built my 12x16 shed three years ago, NEVER having built anything like this before and it was a great experience. The framing gun made it a lot easier than hammers or screws. I got mine at Harbor Freight and have used it plenty since then with no issues.

Great tips. I've already purchased a framing nail gun and compressor (thanks HOT DEALS!). The water level looks very useful, although I do have a few lasers that I have little experience using yet. As I mentioned above, I'm now reading up on how to properly frame a wall on a slab that is not level.
 

ConCretin

Well-known member
Joined
Jan 20, 2011
Messages
3,378
Location
Central Maine
Is this low corner a concern? I'm thinking this will cause problems with everything ending up level, plumb, and square. Suggestions?

I'd bolt down a PT plate and shim it level. You can fill the space underneath with non-shrink grout and start with a level foundation. Your sheathing will cover the gap on the outside.
 

CombatNinja

Well-known member
Joined
Aug 24, 2013
Messages
1,456
I second what LLWillysfan said above^^^

I've seen slab-built homes around here that are off by several inches to the point where it is noticeable with the naked eye and they end up just fine in the end. Not saying it is the preferred technique but there are ways to overcome a slab that is not quite true.
 

CraigStu

Well-known member
Joined
May 22, 2014
Messages
4,012
Location
Blacksburg, Va
Be sure to use the correct PT lumber for the bottom plate of the wall. Also, in my area, that PT board has to have a specific type of plastic on the concrete and then the board on top of the plastic. Sheds may not need that but, since you will use it as a workshop, I'd go by regulations (at least some of them) that are required for home construction.
 
OP
G

gamp945

Well-known member
Joined
Jun 4, 2014
Messages
1,540
I'd bolt down a PT plate and shim it level. You can fill the space underneath with non-shrink grout and start with a level foundation. Your sheathing will cover the gap on the outside.

Thanks for this advice. I like the idea of starting with a level foundation. But if I did it this way, I think this means that the door entry would also be built up, i.e., the door threshold would be about 1" or more off the interior floor surface. If this is correct, how would you deal with this? I'm thinking that after the workshop is built I could use self-leveling cement to level the entire interior floor. But if I'm going to do that, should I just use self-leveling cement to level the whole slab to begin with?
 

Vintage Veloce

Well-known member
Joined
Feb 27, 2015
Messages
1,076
Location
San Diego
I'd want a level and flat floor for the building, and and inch drop is WAY too much for me to tolerate. That is more than a little wobble for any chair or table you put in there.
Maybe get a quote from a concrete guy to level the first slab, and then add your overhang area. Also, be sure the overhang area slopes away from the building properly for drainage.
Alternatively, you might be able to skim coat and level tile the inside or something.
But whatever you do, first decide how flat and level you want your floor.
 
Last edited:

ConCretin

Well-known member
Joined
Jan 20, 2011
Messages
3,378
Location
Central Maine
Thanks for this advice. I like the idea of starting with a level foundation. But if I did it this way, I think this means that the door entry would also be built up, i.e., the door threshold would be about 1" or more off the interior floor surface. If this is correct, how would you deal with this? I'm thinking that after the workshop is built I could use self-leveling cement to level the entire interior floor. But if I'm going to do that, should I just use self-leveling cement to level the whole slab to begin with?

Since you'd remove the sill at your door openings, the gap might not be that bad depending on where the doors land relative to the slow spots. Lay out the door locations and check those areas with a level. Based on the pics, the worst of it seems to be in one corner. Maybe you'll get lucky and be able to get by with some shims and sealant.

Another option would be level the low spots using a bagged overlay product such as Ardex. A couple thoughts on this; Self leveling isn't really an accurate description - you'll need some reasonably skilled trowel work to get a level smooth surface. Secondly, pay attention to the thickness limitations of the product you choose. Some can fill deeper sections but are only good to a minimum thickness of 1/4" or so. Others can be feathered out but can't be placed very thick. It might take a couple different products.

You could also place a 2 or 3" concrete topping, which is probably the option I'd take if I couldn't live with whats there. Good luck.
 
Last edited:
OP
G

gamp945

Well-known member
Joined
Jun 4, 2014
Messages
1,540
@LLWillysfan: thanks again. I'm now in the process of considering my options.

On a different note: as a noob, I've been doing a lot of reading and learning. It appears that a lot has changed over the last while in regards to Pressure Treated wood. In particular, I've concluded that there are two major issues right now:

1. Since 2016, "ground contact" PT lumber is required for nearly anything that is anywhere near the ground. This seems to include sill plates in many applications. In my case, where the sill plate is going on a slab just inches above grade, ground contact lumber appears necessary. I assume many will argue that this is NOT required simply because it has not been done this way in the past and "it has never been a problem." If I want this structure to last, I have to ask: why not use ground contact lumber for the sill plates?

2. Beggining in 2004, CCA treated lumber was discontinued and replaced by several other types of treated lumber. These new treatments are more corrosive than CCA, and as a result, have a tendency to eat fasteners. Unfortunately, many builders do not seem to have switched from basic zinc-plated fasteners. This might not be surprising considering that the box stores overwhelmingly stock only simple zinc plated anchor bolts. When I inquired at a local building supplier about the availability of mechanically galvanized anchor bolts, I was told that "nobody uses those." Simpson's website states that treated sill plates may use zinc-plated anchor bolts as long as the bolt is at least 1/2" in diameter, i.e., they recognize that the bolt will be eaten by the PT chemicals, but 1/2" bolts should be large enough to retain their strength for some time. However, this is based on 2009 code which did not consider the use of ground contact lumber for sill plates, and since ground contact PT is much more corrosive than above ground, I have to wonder if this is still good advice.

In short: am I crazy to think that I should use both ground contact PT sill plates as well stainless anchor bolts?
 

Falcon67

Well-known member
Joined
Jun 11, 2009
Messages
18,371
Location
Merkel, TX
You use hot dipped galvanized fasteners on any treated sill plate or lumber for that matter. I think most all of us use treated sills. If it's close to the ground like my old shop was, I used treated sill, a wrap of tar paper and finished with 12" flashing that was set so to cover the sill-to-slab joint by a couple of inches. FWIW.

Also, as above - I would build your wall sections on the ground and cross brace with either let in or some Simpson steel equivalents. I prefer 1x4.

Framing3.jpg


Then stand those up and use some kind of fill to fix your corner issue. IMHO more straight forward than cutting to fit and having to lay a level line to meet at the top plate. I used dual beads of sill caulk under the plates.

Framing5.jpg


>I'd want a level and flat floor for the building, and and inch drop is WAY too much for me to tolerate.

LOL, try a 3" drop in one corner that slopes in from about 12' in either direction because apparently a truck hit the forms. No we didn't fix because of funds and no, you can't tell. You can walking the floor, but not from looking at the building.

A shop or shed is just a big dog house with more lumber in it. :)
 
Last edited:
To avoid these ads, REGISTER NOW!
OP
G

gamp945

Well-known member
Joined
Jun 4, 2014
Messages
1,540
So I used a cross-line laser in the center of the slab (not ideal, but I don't have a rotary laser or builder level) and got a better idea of how out of level the slab is. Here's what I found:

slab_level1.jpg


The 0.000 value in the door entry is the highest spot on the slab. All the other numbers indicate how much lower that point on the slab is. The arrows on the outside indicate the direction of slope from high to low. Fortunately the slope seems to be fairly consistent on each side. The lowest spot is in the top-right corner (1.75" lower than the door entry).

I showed this to a builder friend of mine and he suggested that I cut *long* shims out of PT 2x4s. For example, for the North (top) side, cut a 14' shim that starts at 0.625" thick and ends at 1.75" thick. Then cut another 14' shim for the South (bottom) side which starts at 0.5" thick and ends at 1.125" thick. Now the North and South shims should be approximately level with each other. Then do the same thing for the East and West walls. At this point all the shims should be level and I can build the walls straight, nail on the PT sill plate, nail on the shims and sill sealer, and bolt down.

Any thoughts on this proposed fix?
 

Vintage Veloce

Well-known member
Joined
Feb 27, 2015
Messages
1,076
Location
San Diego
Shimming the walls doesn't make the floor level. Do you care about the floor? If not, just compensate with the length of the studs.
If it is a living or work space, I'd care about the floor
 

Vintage Veloce

Well-known member
Joined
Feb 27, 2015
Messages
1,076
Location
San Diego
Also, test your laser level, don't just trust it. Some cross beams work fine when used perpendicularly to a wall but the beam may rise of fall as it gets further from the device.
 

red

Well-known member
Joined
Feb 20, 2009
Messages
719
Location
Hudson Valley, NY
When I build a shed or a garage I always lay one or two rows of concrete block.

This keeps the moisture and rain away from the structure which always causes rot, either to your sheathing or your studs. Just look around at sheds or garages build directly onto the slab that are more than 10 years old.

On the low spots when laying the block you lay a thicker bed of mud and on really bad pours you can cut down the height of your concrete block for the high spots.
 
OP
G

gamp945

Well-known member
Joined
Jun 4, 2014
Messages
1,540
Update:

I decided on borate treated lumber for the sill plates (AKA blue wood). I ordered double what I needed for the sill plates and cut 12' and 14' treated shims. I did a test layout of the shims on the slab with the sill plates on top and everything is even and level. Now I can build the walls straight.

Now on to starting the actual framing! I was able to score a Paslode cordless XP framing nailer for about $120:

IMG_1512_(Medium).jpeg


I used the nailer and 3-1/4" galvanized nails to frame the two roof panel sections. I'm building these in my driveway and will use a small crew (about 6 guys) to move and hoist them into place. This was a suggestion I read about in the plans and it made good sense to me. My driveway is large enough to build them flat. Today I can install the ceiling panels (LP smartside panels) and paint them on the ground. This means I won't have to try to install and paint the ceiling panels after the roof is installed - which would be made more difficult by the ceiling beam design.

IMG_1511_(Medium).jpeg


Questions:

Thinking ahead a few days - the plan calls for a "band" (2x12) that goes around the front and sides of the building, as pointed out on the photo below:

family-handyman-game-day-shed.jpg


I'm guessing this band is just for aesthetics - and it does look nice, especially with the garage door. I'm not building the garage door. I'm wondering if I should include this band in my build or not. The downside is that the band complicates the design by requiring flashing - which really means the potential for water leaks and product failure.

What would you all do here? Include the band, or just use a 10' siding panel (with no horizontal breaks to fail) all the way to the roof? If it matters, one way I am already departing from the plan is to use zip sheathing under the LP siding panels, which mitigates some of the concern about water intrusion.

band_flashing.jpg
 
OP
G

gamp945

Well-known member
Joined
Jun 4, 2014
Messages
1,540
Opinions welcome:

As already mentioned, I'm not including the massive glass garage door that lets in tons of light. Instead, I'm building a solid wall and I've been planning on having NO WINDOWS anywhere. Bad idea?

My reasons: more secure, less radiant heat, less humid air infiltration, less expense, less complicated for a first-time build (zero chance of window water intrusion due to improper installation), and I've already run UF-B romex to the slab from the house so I can have power.

If this was a larger building (it is only 12x14), then of course windows are necessary. But on a small building like this I'm thinking the lack of windows won't look that bad.

For a bit of natural light, I've considered a glass-front entry door. However, I'm not big on this idea because it is less secure and about 3-4x the cost of the solid entry door I'm considering.

Thoughts?
 

Vintage Veloce

Well-known member
Joined
Feb 27, 2015
Messages
1,076
Location
San Diego
If security is a real concern, it does make sense to eliminate the windows, especially large clear ones. But natural light is So useful. Even a small frosted panel at the top of the door can provide some useful light. I'd put something in... Maybe a skylight?
 

amkluttz

Well-known member
Joined
Sep 8, 2014
Messages
279
Location
Concord, NC
Update:


Questions:

Thinking ahead a few days - the plan calls for a "band" (2x12) that goes around the front and sides of the building, as pointed out on the photo below:

family-handyman-game-day-shed.jpg


I'm guessing this band is just for aesthetics - and it does look nice, especially with the garage door. I'm not building the garage door. I'm wondering if I should include this band in my build or not. The downside is that the band complicates the design by requiring flashing - which really means the potential for water leaks and product failure.

What would you all do here? Include the band, or just use a 10' siding panel (with no horizontal breaks to fail) all the way to the roof? If it matters, one way I am already departing from the plan is to use zip sheathing under the LP siding panels, which mitigates some of the concern about water intrusion.

band_flashing.jpg


Why couldn't you side it as normal and use something like a 1x12, or see if they make a wide board in cement siding, to produce the look of the band without the complexity? It would just be ornamental at that point.


In something that small I would want some type of natural light. When I build I don't plan on putting in windows for security reasons as well. Maybe if you placed some transom windows up high or a skylight. I would consider placing 2 or 3 transom windows above the garage door area in place of the board and batten.

When we took one of the windows out of my master bedroom to reclaim some wall space we replaced it with a very small (12" tall, maybe) fixed pane window that is now above the headboard of our bed. It allows light and there is no way anyone can see in unless they are on a ladder.
 
Last edited:

Vintage Veloce

Well-known member
Joined
Feb 27, 2015
Messages
1,076
Location
San Diego
Depending on how the building is oriented on the property, a big empty wall without the garage door may be fairly ugly. I agree the band is cosmetic, and even with it, without the door I think it will look rather blah.
To answer your question directly, without the door, I would leave out the band.
BUT, if that wall is viewable from the rest of your property, I would find a way to dress it up. Plantings in front of it, vintage signs, art, or something.
And I would get some natural light in there somehow. I have an 18 x 18, and it would be very gloomy without the frosted windows I have on the doors.
 

charmin35

Well-known member
Joined
Mar 13, 2019
Messages
73
Location
North Carolina
Woo, incredible deal on that Paslode nailer!

If you omit windows, they have doors with windows that are higher, not low near the handle where someone could reach in. You can also look at cutting some small window openings between your existing studs that are high and not large enough for someone to fit through.

But really, what is your perspective on security? Are there lots of break ins in your area? Are you going to store very valuable things in there? A thief can pick your lock, or crowbar your door, all kinds of things besides breaking glass.

I would personally recommend having some regular windows and not overthinking it, unless you have a very strong reason to lock this thing down like a tank.
 

Vintage Veloce

Well-known member
Joined
Feb 27, 2015
Messages
1,076
Location
San Diego
To be a bit more clear. I think you want enough light to be able to go in, close the door and pick up something, like a tool from your toolbox, without turning a light on. Or during a power outage, etc. It's just so convenient to have some light like that in the daytime.
 

Stuart in MN

Well-known member
Joined
Sep 8, 2005
Messages
22,996
Location
Minneapolis
If you're going to work in there, having some windows would be nice - at least for me, having natural light is a plus (and sometimes you just need to sit and stare out the window when pondering your next move on a project.)

A row of shallow windows along the top of the high wall in front may be an option, they would be above where anyone could see in and would allow natural light inside. See the part outlined in red below.


attachment.php
 

Attachments

  • family-handyman-game-day-shed.jpg
    family-handyman-game-day-shed.jpg
    83 KB · Views: 881

amkluttz

Well-known member
Joined
Sep 8, 2014
Messages
279
Location
Concord, NC
A row of shallow windows along the top of the high wall in front may be an option, they would be above where anyone could see in and would allow natural light inside. See the part outlined in red below.


attachment.php


This is exactly what I meant in my post. Maybe I didn't convey that. Basically take that top row of glass out of the garage door and move it up and make the rest of the wall solid.


Sent from my iPad using The Garage Journal mobile app
 

wasfast

Well-known member
Joined
Apr 10, 2014
Messages
874
Location
San Diego CA
I'd definitely have a light method, fixed side windows or skylights. I like small fixed windows up high on the "was a garage door" wall as other have mentioned it will be a large blank wall. They sell 13" x 13" fixed, flanged windows and they're inexpensive. I've used these on 2 garages, 3 of them on a 24' wall. They fit between the 16" center studs, not requiring any special framing.

You can use 1 or 2 of either the curb mounted or self flashing skylights. Here's the 2' x 4' version, also available in 2' x 2':

https://www.homedepot.com/p/Gordon-...Self-Flashing-Skylight-2852MFSFWTSD/202533542

They're designed to work with 24" center roof rafters/trusses.

Perhaps the long shim will be ok for the framing but I'd definitely have a full overlay done to get the full slab "level".
 
OP
G

gamp945

Well-known member
Joined
Jun 4, 2014
Messages
1,540
Thanks for all the replies!!!

Why couldn't you side it as normal and use something like a 1x12, or see if they make a wide board in cement siding, to produce the look of the band without the complexity? It would just be ornamental at that point.

I was thinking the same thing: install the zip sheathing, install the LP smartside panel siding, and then install a piece of trim (hopefully 12" wide) to get the same visual effect. My only concern with doing this is that I think a piece of horizontal trim like this is at risk of holding water and rotting out the siding - which is why I think the original plan calls for the complicated-looking flashed design. Any thoughts on this?


I thought about doing windows this way also but thought about two reasons why it might not be a good idea. First, windows in this location would not allow me to use this high interior wall space for storage. This interior wall seems like the perfect place to have wall-mounted shelving from about 6.5' up to the ceiling. Second, this wall is South-facing and gets direct sunlight all day. I'm worried that having windows there will turn the building into an oven. I am hoping to install a small exterior AC unit to help keep the building dehumidified and cool, but I wonder if windows on the south side of the building will add substantially to the cooling load.

I've also thought about doing clerestory windows on the East and West sides (above the entry door and on the opposite side in the same place), but these would be expensive because they would look best if they were custom sized in a trapezoid shape, like this:

b209132de04f193681f0a45caa816633.jpg


I could keep the cost down if I did these windows on just one side of the building. The entry door faces my home so it would make most sense to put the windows there.
 

MattDanger

Member
Joined
Jan 12, 2018
Messages
18
If it were me, I would think hard about keeping the garage door. Being able to move things in and out easily (sheets of plywood, the lawnmower, table saw, work benches, etc) and getting lots of fresh air and light are things that are really important to me.

If security is an issue, get a door that has windows only in the top panel. Keeps people from casually noticing anything of value and makes it easy for people to stay honest. If someone wanted to get in so bad they would break a window, there isn’t much that will stop them.

If you do any painting or solvent cleaning, windows that open will make that much safer.

Finally, the plans you have already have provisions for the door, so its not like there is any additional design work.

Just my 2 cents.
 
OP
G

gamp945

Well-known member
Joined
Jun 4, 2014
Messages
1,540
When I was initially considering the design I thought hard about the door and eventually decided it wouldn't be a benefit for my case. The issue is that the building is not very big - just 12 x 14 - and adding a garage door along the longest, highest wall removes a ton of usable interior space. In my case, I need all the interior room I can get. By building a solid wall, I get 14' of overhead storage as well as 14' of wall storage or bench space. I will definitely have to add some sort of ventilation system if I want to do any painting inside.
 
OP
G

gamp945

Well-known member
Joined
Jun 4, 2014
Messages
1,540
I'd definitely have a light method, fixed side windows or skylights. I like small fixed windows up high on the "was a garage door" wall as other have mentioned it will be a large blank wall. They sell 13" x 13" fixed, flanged windows and they're inexpensive. I've used these on 2 garages, 3 of them on a 24' wall. They fit between the 16" center studs, not requiring any special framing.

Will you please give me some more information on these 13 x 13 fixed windows? A google search doesn't yield anything. If these were cheap enough, it might be worth doing these even if I planned on having storage up high on the front wall, and the small size would let in just a bit of light and not much heat.
 

amkluttz

Well-known member
Joined
Sep 8, 2014
Messages
279
Location
Concord, NC
I was thinking the same thing: install the zip sheathing, install the LP smartside panel siding, and then install a piece of trim (hopefully 12" wide) to get the same visual effect. My only concern with doing this is that I think a piece of horizontal trim like this is at risk of holding water and rotting out the siding - which is why I think the original plan calls for the complicated-looking flashed design. Any thoughts on this?


I had to look up LP Smartside because I thought it was the same as Hardie board/cement board. I'm not really familiar with the Smartside but according to the manufacturer it's an engineered wood product. If this were a cement siding like I originally thought I doubt you would ever have any rot issues. With the roof overhangs I still doubt you would have any issues. I would say put the 12" band board up on top of siding and caulk both top and bottom then paint. With the caulk and layer of paint I bet you'd be fine.
 
To avoid these ads, REGISTER NOW!
Top Bottom