To avoid these ads, REGISTER NOW!

First timer DIY garage builder

gboezio

Well-known member
Joined
Mar 10, 2007
Messages
49
Location
victoriaville,Qc,Canada
This thread is the continuity of http://www.garagejournal.com/forum/showthread.php?t=9685

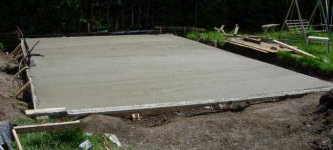
Well, since I poured the concrete myself, I think I'll be even prouder of this garage and may even have money to build some toys inside.
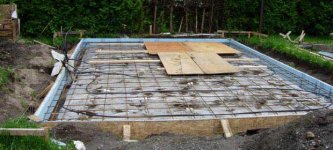
The pour went well, but the forms bent out of shape in the back, but I still can manage to cheat my walls a little since the slab is one inch from the ground, my girlfriend said she will plant tons of flowers to save my **** :lol_hitti
I finished the concrete with a 2X4 and a magnesium float, this was easier than people were telling me.
I took a break for a few well needed partys but I'm back on it this week.
 

Attachments

  • DSCN7599 low res low res.jpg
    DSCN7599 low res low res.jpg
    72.7 KB · Views: 783
  • DSCN7600 low res low res.jpg
    DSCN7600 low res low res.jpg
    75 KB · Views: 714
  • DSCN7606 low res low res.jpg
    DSCN7606 low res low res.jpg
    58.5 KB · Views: 576
  • DSCN7609 low res.jpg
    DSCN7609 low res.jpg
    56.9 KB · Views: 741
  • DSCN7646 low res low res.jpg
    DSCN7646 low res low res.jpg
    72.3 KB · Views: 2,970
  • DSCN7686 low res low res.jpg
    DSCN7686 low res low res.jpg
    58.7 KB · Views: 849
To avoid these ads, REGISTER NOW!

shocksystems

Well-known member
Joined
Mar 17, 2007
Messages
497
Location
Ipswich, MA USA
Great start. Looking good and things are moving along quickly.

Any reason why you started a new thread rather than continue the prior one? just curious.

Cheers!

Jim
 
OP
G

gboezio

Well-known member
Joined
Mar 10, 2007
Messages
49
Location
victoriaville,Qc,Canada
Thanks, it's pretty hot these days here and I'm digging a lot, but I see the light, I'll start the fun part soon.
As for the thread change, it just felt dead and forgotten so I left it behind.
More to come
 
OP
G

gboezio

Well-known member
Joined
Mar 10, 2007
Messages
49
Location
victoriaville,Qc,Canada
Well I think I took the DIY concept pretty far, I did everything and I mean everything by myself, including getting all the roofing material, 4x8's up there. The only thing I had done was mixing the concrete, but I poured it myself and it wasn't too bad. I used a magnesium float. Now I'm taking a break for a few days. I spent about 3000 $ so far.
Here's a few more pics.
 

Attachments

  • DSCN7729 low res.jpg
    DSCN7729 low res.jpg
    58.2 KB · Views: 365
  • DSCN7727 low res.jpg
    DSCN7727 low res.jpg
    60.1 KB · Views: 407
  • DSCN7718 low res.jpg
    DSCN7718 low res.jpg
    65.5 KB · Views: 277
  • DSCN7698 low res.jpg
    DSCN7698 low res.jpg
    75 KB · Views: 334
  • DSCN7695 low res.jpg
    DSCN7695 low res.jpg
    77.4 KB · Views: 313
  • DSCN7693 low res.jpg
    DSCN7693 low res.jpg
    67.8 KB · Views: 343
  • DSCN7690 low res.jpg
    DSCN7690 low res.jpg
    76.5 KB · Views: 361
Last edited:
OP
G

gboezio

Well-known member
Joined
Mar 10, 2007
Messages
49
Location
victoriaville,Qc,Canada
More pics.
 

Attachments

  • DSCN7732 low res.jpg
    DSCN7732 low res.jpg
    63 KB · Views: 278
  • DSCN7748 low res.jpg
    DSCN7748 low res.jpg
    71.9 KB · Views: 360
  • DSCN7792 low res.jpg
    DSCN7792 low res.jpg
    61.9 KB · Views: 366
  • DSCN7801 low res.jpg
    DSCN7801 low res.jpg
    68.3 KB · Views: 261
  • DSCN7804 low res.jpg
    DSCN7804 low res.jpg
    69.9 KB · Views: 307
  • DSCN7806 low res.jpg
    DSCN7806 low res.jpg
    59.8 KB · Views: 472

twostory

Well-known member
Joined
Dec 23, 2005
Messages
554
Location
Duluth, Georgia
gboezio,

It looks good. I do have two observations though...

1) Did you use pressure treated 2x6s for the bottom sill plate? In your pictures, the bottom plates look like normal untreated wood.

2) Your header to hold the vertical stud over the radiant heat tubes, looks iffy. You can easily fix this with a 2x6 header, supported by vertical studs on either side of the radiant heat tubes. Or just nail two trimmer studs to the adjacent full length studs, and make a 30.5 inch wide 2x6 header.

Goodluck...
 
OP
G

gboezio

Well-known member
Joined
Mar 10, 2007
Messages
49
Location
victoriaville,Qc,Canada
Thanks for the comments !!
twostory, good eye, it's untreated wood, there is no drain on the slab since it will be more of a workplace than a real garage. But it would have been a good idea to use treated wood there. I plan on painting both sides and to cover the exterior lower than the slab. I hope that the radiant heat will keep it dry.
I will fix the header, I first figured that the low stud was close enough to the top one, but after I took all the roofing stuff over there I get a pretty good idea of all the weight that rest on the walls, add to that the summer stuff in the storage and a few tons of Canadian snow, it need to be strong.
 
OP
G

gboezio

Well-known member
Joined
Mar 10, 2007
Messages
49
Location
victoriaville,Qc,Canada
That make sense, there is a vapor barrier under most of it but there is none under the footing itself. It measure 20 inches. There is a pink foam under the bottom sill plate, but I don't know how good it is to keep moisture out. Better than nothing I guess.
 
OP
G

gboezio

Well-known member
Joined
Mar 10, 2007
Messages
49
Location
victoriaville,Qc,Canada
I have to add, almost everybody I talked to told me to get trusses, I had a 930$ quote for 13 trusses opened for a storage. The total cost of wood was 980$ including all the OSB, 2x6, 2x8, etc...I took me 2 days by myself to build the roof structure and it would not nave been possible to get the trusses over there by myself without a crane. I just had to recall some mathematics to calculate all the measurements, make a template and copy/paste 30 times.
So for those who are doing smalls projects, I strongly recommend to build the roof the old way, setting the top piece right it the big PITA, specially when you are alone, once it's firmly in place, you just add the prepared 2x6. I used 3 1/2 screws to fasten the trusses on the parts that could see some tension.
 
OP
G

gboezio

Well-known member
Joined
Mar 10, 2007
Messages
49
Location
victoriaville,Qc,Canada
I forgot about this thread, I'm having slow progress, due to financial constraints, newborn daughter, girlfriend in need of a new bathroom, daughter room, lot of work, trackdays :D, etc...
But still I had some progress
For those who wonder, the building code over here don't require wires in tubing for non commercial buildings, it just require that you know where the wires are and that you don't put a sheetrock screw in one :D

DSCN0771.jpg
 
Last edited:

checkthisout

Well-known member
Joined
Sep 5, 2008
Messages
5,232
Any building inspector would have a field day with what you have done so far.

I bet that they would be so pleased with what you have done that they would snap a whole bunch of photographs and then get a tour bus full of trainees out there to look at the structure.
 

kartracer23

Well-known member
Joined
Aug 7, 2008
Messages
1,455
Location
New Castle, IN
Y'know what's funny about this thread? Go to the first post. Mouse over the photos and it will show how many views each thumbnail has had. Concrete, foundation, etc., around 200 each. Picture of girlfriend? 750. Buncha manwhores aren't we? :)
 

Moon63

Member
Joined
Oct 29, 2008
Messages
24
Location
Sweden, Umeå
Y'know what's funny about this thread? Go to the first post. Mouse over the photos and it will show how many views each thumbnail has had. Concrete, foundation, etc., around 200 each. Picture of girlfriend? 750. Buncha manwhores aren't we? :)

Girlfriend? What girlfriend? Is it the picture of the bike you men?
 

RbrtAWhyt

Well-known member
Joined
Aug 25, 2008
Messages
5,154
Location
North East Georgia
Damn, way to rain on a guys parade. He said inspection requirements were lax in his area. Give him a break. I think his garage looks awesome...
 
OP
G

gboezio

Well-known member
Joined
Mar 10, 2007
Messages
49
Location
victoriaville,Qc,Canada
I can build a garage with scrap wood, popscicle sticks, and run naked wires in the walls here and no one would care less over here, I know that in the US you have to run them in pipes, not here.
The permit is 15 $ and the inspector only comes to raise the tax cost and firefighters are there to help to pull me out of the crumbled pile of materials when if falls and burn on me.

That bike is pretty nice, it's been built by Touring creations. Maybe I can get a cleaner pic of the bike without stuff in front.
DSCN7655.jpg
 
Last edited:
To avoid these ads, REGISTER NOW!

tfi racing

Well-known member
Joined
Apr 19, 2008
Messages
2,907
Location
Cedar,BC
Cool,I was going to ask for a pic of the bike!:thumbup:Don't let the nervous nellies get to you,as long as you are happy with your project and nobody gets hurt is all that really matters.That being said,your electrical work does leave a bit to be desired...
 
OP
G

gboezio

Well-known member
Joined
Mar 10, 2007
Messages
49
Location
victoriaville,Qc,Canada
Cool,I was going to ask for a pic of the bike!:thumbup:Don't let the nervous nellies get to you,as long as you are happy with your project and nobody gets hurt is all that really matters.That being said,your electrical work does leave a bit to be desired...
That bike is awesome, not the kind I would buy, but I admire the design and craftmanship
The pics have been taken before I hung the wires between the purlins not to put a screw in them :shocking:
You can see a lot of these here even from contractors.
I still admit that even if we can and it's dirt cheap and fast, its not the best method to run wires in a building, but since there is very little electrical fires, the building authority don't care, specially for detached garages.

Whats with the purlins if you have studs to anchor to? Just wondering. Nice job! -MATT
These are to provide extra insulation from the air gap, and to have room to run the wires.
 
Last edited:

brad d

Well-known member
Joined
Sep 2, 2007
Messages
361
Location
Winnipeg
Where are you located?? The wires will be fine as long as you dont hit them with a dry wall screws.. just look back at your photos when you need to drill a hole or put a nail in the wall.
 
OP
G

gboezio

Well-known member
Joined
Mar 10, 2007
Messages
49
Location
victoriaville,Qc,Canada
Québec Canada, I realized that I did not completely filled my profile, fixed.
I use shorter screws to avoid wrecking the wires.
Beside the wiring, I made a trench and set a 4" PVC tube for the main wire witch is a 6/3 wire all the way to the house, I disable the clothes dryer that we never used and too the power from this circuit since the power box is a 100 A and is loaded, it's going next year and I will upgrade from a 30 A to 50 A breaker. This will be done professionally since the insurance company will refuse to insure the house if not inspected by a master electrician.

I will buy my garage door very soon and build my work bench, as a countertop, I thought of bolting and gluing 2x3 together, then belt sanding and cover with fiberglass resin or leave it bare wood, I bought some white plastic and 3/4 plywood, but working on engines it will turn to a complete mess in no time, I may get some steel sheets, it would be the absolute best, I just don't know how thick to get them, probably 18 to 22 gauge, but these will rust from beer bottles, so the 2x3 counter wins.
Should look like this
DSCN0771-1.jpg


Then I will put some cabinets in the remaining space over the counter, I just wait to score some good deal, if not I'll build them myself.

Progress is slow, but we recover from a few things in life that *****, so the garage took a hike, but all is good now and I'm taking back life where I left it :D
 
Last edited:

idoine in toronto

Well-known member
Joined
Mar 5, 2005
Messages
168
Location
Toronto Ontario Canada
I can attest to the lack of building inspections in the area. I've designed homes in the Laurentiens & Eastern Townships of Quebec and none of them were ever visited by a building inspector during construction. Unfortunately most of the builders I’ve encountered do whatever they want when they know no one is looking over their shoulder.
Keep this in mind the next time an inspector seems to be hassling you or your builder. At least consider them as extra set of eyes on the project.

And good job on the DIY.
 
OP
G

gboezio

Well-known member
Joined
Mar 10, 2007
Messages
49
Location
victoriaville,Qc,Canada
I got some time to work on my asylium, I decided to use false marble vinyl tiles for the countertop, rugged, hard to scratch and dirt cheap.
I searched classified ads for cabinets, they were all **** and expensive so I snapped it and went to buy 8 sheets of regular 3/4 plywood and 4 BC Fir plywood sheets for the doors.
Got the counter and cabinets core done, need to make the drawers, doors counter top and varnish the whole thing.

500 $ invested... but I have it the way I wanted...and NOW !!
DSCN1764.jpg
 

wolfgang_90

New member
Joined
Jan 18, 2009
Messages
3
Where are you located?? The wires will be fine as long as you dont hit them with a dry wall screws.. just look back at your photos when you need to drill a hole or put a nail in the wall.

Being the second owner of a house built like this, you could do what I do. Go get the fire extinguisher, a nail and a hammer... hit nail into the wall where you want it. If it sparks, hit it with the fire extinguisher, pull out the nail, and go reset the breaker...
 
OP
G

gboezio

Well-known member
Joined
Mar 10, 2007
Messages
49
Location
victoriaville,Qc,Canada
I took 3 weeks off for now the government pays 5 weeks to new dadys, will save 2 for this summer, beside changing diapers and wiping milk puke all over my shirts I had some time and ca$h to work on my castle sipping a few beers to make it relaxing, we don't want to feel like working on a day off, don't we ??
My little helpful daughter was smiling along proving that she likes my garage and that they did not mix the babies at the Hospital :D

DSCN1978.jpg

DSCN1979.jpg


I had a few 750 $ quotes for a 8x8 insulated garage door, I went to see my ex boss (I installed quite a few garage doors few years ago) and got a slightly scratched door 3 inches shorter than I wanted, but for lamost half the price I figure I could work a bit and paint the inside(got to add the price of the beer I drink to the total cost of the door)
The wind almost ripped some of the sheeting on the front, got to fix this as well before the next wind storm.


DSCN1976.jpg

DSCN1980.jpg
 
Last edited:

porschedude996TT

Well-known member
Joined
Oct 28, 2007
Messages
2,384
Location
Santa Maria, California
Nice build. I too am working on a DIY build and deviated on pouring the concrete. I was in the hospital and off the job for two months and played catch-up using Green-backs.

Don't you just love those 12 in 12 pitch roofs. I like the ladder over the ridge...

You sure have the cost under control.
 
OP
G

gboezio

Well-known member
Joined
Mar 10, 2007
Messages
49
Location
victoriaville,Qc,Canada
Thanks for the comments.
I had to decide between keeping the crumbling horse shed or find a way to cut on the costs.
For example,
I refused to spend more than 50 $ on the counter top, searched the board could not find anything cheap enough and doing a good job until I took a coffee at the harware store, I came across those self sticking false marble vinyl tiles, cost 38 $ and I have 15 left, add 10 $ for the trim around it.

Don't you just love those 12 in 12 pitch roofs. I like the ladder over the ridge...
I had to figure out a way to do this :D
In fact there was a rope tied to the other side over the top, I moved the ladder around the roof, at least until I tied it sideways, so I could walk without moving the damn thing.
 
Last edited:

autoist

MEMBER EMERITUS
Joined
Aug 20, 2005
Messages
1,107
Location
Gurley, Alabama
Looks great...out of curiosity: why did you leave the space between your upper cabinets & the tall storage box? (the upper cabinets under which that little doll is sitting...

& can we see a photo of the counter tops?
 
OP
G

gboezio

Well-known member
Joined
Mar 10, 2007
Messages
49
Location
victoriaville,Qc,Canada
Thanks,
I measured the space between the tall cabinet and the corner or the counter and I centered the wall cabinets, it left a gap, but I'll fill it with a fire extinguisher or some cool or mabe I'll build another small cabinet (space is going out fast)
I have a shot but that was before the aluminium trim, but you can see it on some of the pics above.

DSCN1843.jpg
 

Dragster Racer

Well-known member
Joined
Feb 9, 2008
Messages
1,891
Location
Morrison, IL
Very nice work on the cabinets. I can't see that they are tounge and groove, which would be a bit stronger. But I doubt that you would have troubles anyhow. Again, very nice!
 
OP
G

gboezio

Well-known member
Joined
Mar 10, 2007
Messages
49
Location
victoriaville,Qc,Canada
Well it's done !!!
At least for now, I'm taking a break and will finish the door trims, attic access and minor details this summer.
I wired my lighting, finished sheetrock, plaster, paint...
Now time for a few toy threads, compressors, turbo'ed vehicle, got an incoming corvette engine for rebuild, two dirtbikes for heavy maintenance, should get busy...
Here's the pics, consider that it cost under 6000 $ and I did everything myself
DSCN1981.jpg

DSCN1982.jpg

DSCN1983.jpg

DSCN1984.jpg

DSCN1994.jpg

DSCN1996.jpg

DSCN1995.jpg

DSCN1997.jpg


Now looking for a TIG welder, some Synchrowave 200 or something similar.
 

sofob0909

Well-known member
Joined
Jan 25, 2009
Messages
81
awesome build. i love the small but functionable garage. Can you get a car in there? the door looks skinny
 

bigdaddycool

Member
Joined
Mar 1, 2009
Messages
5
Location
Trois-Rivières , Québec, Canada
hey salut , quand j'ai vu victoriaville, jme suis inscrit::beer:

beau garage , j'espère débuter la construction du mien d'ici quelques mois ( dla minute quia pu de neige)

jsuis dans la même situation, petit budget, pas bcp d'aide pour construire...

Félicitation et bonne chance dans la finition du tien!

en passant je reste a trois-rivières!

salut:thumbup:
 
To avoid these ads, REGISTER NOW!
Top Bottom