To avoid these ads, REGISTER NOW!

First-timer sub panel rough-in: How did I do? (Photos)

gamp945

Well-known member
Joined
Jun 4, 2014
Messages
1,547
This is my biggest electrical project to date and first time installing a sub panel. Big thanks to many people on the forum that have helped me with my beginner questions on installing this sub panel in my small workshop (especially Terry D and wyliesdiesels).

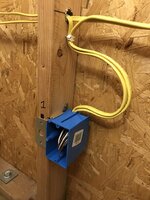
I'm finally almost finished. I'm attaching some photos to this thread in the hopes that anyone can spot any mistakes that I've made.

To clarify: this is a very small workshop/storage shed (12x14) and has just 30A @ 120V service. Just enough for lights, some receptacles, and the smallest heat pump I could find.

A few notes:

The PVC conduit on the outside and coming in from the LB and disconnect is Schedule 80.

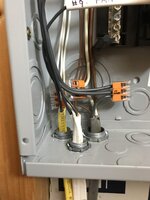
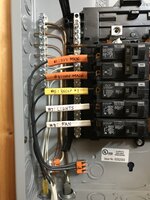
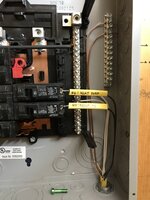
The panel is backfed with a double-pole 30A breaker with a hold-down (the red piece to the right of the breaker). I spliced the incoming #10 UF-B with properly sized Wago connectors so that both sides of the panel would be live. I also removed the green bonding screw and installed two 10-ft ground rods about 12 feet apart.

I installed 3/4" of PolyIso foam board behind the panel to prevent condensation. I'll compensate by building a 3/4" wood frame around the flush panel so that the cover fits correctly.

I installed two 20A receptacle circuits and alternated them along the walls (labelled 1 and 2). I only plan on operating one tool at a time of course, and most of my tools are cordless.

I have not installed the heat pump yet but have installed the disconnect (the disconnect is in the safe/disconnected upside-down position for now).

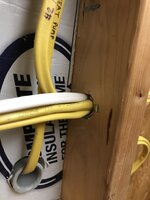
The holes in the 2x4 studs are 1" and "exactly" in the middle of the stud. Technically I don't think I required nail plates, but I used a new product called SmartShield by Southwire that installs inside the 1" hole and protects the romex from both sides.

I plan on installing 1/2" plywood on the walls.

A few questions:

Is the PVC conduit coming into the building code-compliant? There is no bushing on the end but I did use a de-burring tool to smooth/round the edge so that it will not damage the sheathing.

Does the #12 coming into the disconnect need strain relief, or is the strain relief on the panel side sufficient?

The heat pump lists the MOP as 25A. I don't have a 25A breaker on hand so I temporarily installed a 20A as a placeholder. I believe it is OK to install a breaker *smaller* than the listed MOP, and in my case I don't expect the variable-speed heat pump to rarely (if ever) run at full-blast. Do you think a 20A breaker is actually OK?

Thanks for reading!
 

Attachments

  • IMG_3061_(Medium).jpeg
    IMG_3061_(Medium).jpeg
    242.8 KB · Views: 261
  • IMG_3062_(Medium).jpeg
    IMG_3062_(Medium).jpeg
    144.2 KB · Views: 256
  • IMG_3063_(Medium).jpeg
    IMG_3063_(Medium).jpeg
    194.6 KB · Views: 230
  • IMG_3064_(Medium).jpeg
    IMG_3064_(Medium).jpeg
    174.2 KB · Views: 224
  • IMG_3055_(Medium).jpeg
    IMG_3055_(Medium).jpeg
    154.7 KB · Views: 213
  • IMG_3056_(Medium).jpeg
    IMG_3056_(Medium).jpeg
    145.4 KB · Views: 210
  • IMG_3058_(Medium).jpeg
    IMG_3058_(Medium).jpeg
    194 KB · Views: 212
  • IMG_3059_(Medium).jpeg
    IMG_3059_(Medium).jpeg
    212.4 KB · Views: 200
  • IMG_3060_(Medium).jpeg
    IMG_3060_(Medium).jpeg
    208.2 KB · Views: 203
  • IMG_3065_(Medium).jpeg
    IMG_3065_(Medium).jpeg
    252.3 KB · Views: 204
To avoid these ads, REGISTER NOW!

Cruzan80

Well-known member
Joined
Jul 22, 2015
Messages
4,283
Location
Denver, CO
Edit: Misunderstanding. See below.

I would have run #10 to the heat pump, and used a 30A breaker. Otherwise, it may trip the breaker. Wire/breaker relationship is correct, only time will tell how much you can run the heat pump before tripping.

Gotcha, I misunderstood what he meant by MOP. Was thinking FLA (Max overcurrent protection, vs Full Load Amps). Thanks for catching me. In that case, your #12 is fine.
 
Last edited:
OP
G

gamp945

Well-known member
Joined
Jun 4, 2014
Messages
1,547
Two more photos of the disconnect
 

Attachments

  • IMG_3067_(Medium).jpeg
    IMG_3067_(Medium).jpeg
    173.2 KB · Views: 197
  • IMG_3068_(Medium).jpeg
    IMG_3068_(Medium).jpeg
    130.4 KB · Views: 246

Bert_

Well-known member
Joined
Dec 24, 2016
Messages
9,765
Location
NW Iowa
I would have run #10 to the heat pump, and used a 30A breaker. Otherwise, it may trip the breaker. Wire/breaker relationship is correct, only time will tell how much you can run the heat pump before tripping.
No, a 30 is too large for the unit he linked. Wire size is #14 minimum with a maximum 25A breaker.
 

Bert_

Well-known member
Joined
Dec 24, 2016
Messages
9,765
Location
NW Iowa
Only thing I might suggest is get rid of all the slack wire. Your staples need to be 8" or less from those boxes.
 

Cruzan80

Well-known member
Joined
Jul 22, 2015
Messages
4,283
Location
Denver, CO
Gotcha, I misunderstood what he meant by MOP. Was thinking FLA (Max overcurrent protection, vs Full Load Amps). Thanks for catching me. In that case, your #12 is fine.
 

wyliesdiesels

Well-known member
Joined
Aug 14, 2012
Messages
20,061
Location
Modesto, CA
Does the #12 coming into the disconnect need strain relief, or is the strain relief on the panel side sufficient?

The heat pump lists the MOP as 25A. I don't have a 25A breaker on hand so I temporarily installed a 20A as a placeholder. I believe it is OK to install a breaker *smaller* than the listed MOP, and in my case I don't expect the variable-speed heat pump to rarely (if ever) run at full-blast. Do you think a 20A breaker is actually OK?

Thanks for reading!
The NM needs an NM-clamp on the disconnect.

If you dont have a 25a breaker, then get a fusible disconnect, swap it with the non-fusible disconnect you have and put a 25a fuse on the hot conductor side. you will need a dummy fuse for the neutral side since this is 120v and not 240v.
Gotcha, I misunderstood what he meant by MOP. Was thinking FLA (Max overcurrent protection, vs Full Load Amps). Thanks for catching me. In that case, your #12 is fine.
MOP is sometimes abbreviated MOCP but its definitely NOT the FLA rating.... gotta read the spec sheets... in the OP's case, the FLA is 11.4a, which is the reason the MCA- min. circuit amps is 15a and thus #14 NM-b is fine.

Using a 30a OCP is a violation of the manu. instructions and should not be done. either get a 25a breaker or 25a fuse...
 
OP
G

gamp945

Well-known member
Joined
Jun 4, 2014
Messages
1,547
Only thing I might suggest is get rid of all the slack wire. Your staples need to be 8" or less from those boxes.

Would you mind explaining to me why you would get rid of the slack wire? I thought it might be a good idea to leave a bit extra since I might need it if I screw something up.

I think staples need to be 12" or less from the box (not 8"), and slack wire is limited to 18" in the 2020 NEC:


The NM needs an NM-clamp on the disconnect.

If you dont have a 25a breaker, then get a fusible disconnect, swap it with the non-fusible disconnect you have and put a 25a fuse on the hot conductor side. you will need a dummy fuse for the neutral side since this is 120v and not 240v.

Thanks! I'll order the 25A breaker.

Regarding the NM clamp: sorry to be dense, but how does one add a clamp to a PVC male fitting such as I have used?
 

Bert_

Well-known member
Joined
Dec 24, 2016
Messages
9,765
Location
NW Iowa
You don't have to have a 25A breaker. It's just the maximum. Good chance it will run just fine on a 20A
 

Bert_

Well-known member
Joined
Dec 24, 2016
Messages
9,765
Location
NW Iowa
I'll be honest, that's usually how I wire an ac disconnect. Short piece of PVC through the wall. It's too easy for it to leak if you just put a clamp on the back. Really no different than a non metallic box with no clamp
 
To avoid these ads, REGISTER NOW!
OP
G

gamp945

Well-known member
Joined
Jun 4, 2014
Messages
1,547
Bert: that's exactly the reason that I used the PVC conduit - to seal up the disconnect better and also to avoid having bare NM cable in the small gap (1/4"?) between the back of the disconnect box and the wall. And I guess you're right that not having a clamp is similar to the nometallic boxes I used inside - they don't have clamps, just the staple about 10" away. My run of romex from the subpanel's strain relief to the disconnect box is only about 10 - 12".
 

Terry D

Well-known member
Joined
Mar 25, 2015
Messages
2,202
Location
St. Louis, MO.
I'll be honest, that's usually how I wire an ac disconnect. Short piece of PVC through the wall. It's too easy for it to leak if you just put a clamp on the back. Really no different than a non metallic box with no clamp
I do it the same way, stub a piece of 1/2 inch pvc out of the back. I understand about the clamp thing, but you usually can get a staple close.
 

adrenalinejeeper

Well-known member
Joined
Jan 30, 2018
Messages
191
Location
Ventura County, CA
Clean looking work! I'm not an electrician so I can't give you any advice, but I will say that those depth adjustable boxes are awesome! I wish I used those on every box in our new house. We used them where we will have tile backsplash but that is it. It would not have made a substantial difference in cost vs the Super Blue boxes and we have soooo many boxes that aren't flush with the drywall due to 5/8" drywall and a heavy mudding that we didn't plan ahead for.
 
OP
G

gamp945

Well-known member
Joined
Jun 4, 2014
Messages
1,547
@adrenalinejeeper : I recently used the adjustable boxes on a bathroom remodel where I would be installing tile as well as inside the custom vanities. They really work great when the wall depth is unknown, but they are quite a bit more expensive than other boxes: $3.60 adjustable vs. $0.85 for non-adjustable. I am not 100% certain on what my wall material will be (planning on 1/2" plywood), so the extra $60 for adjustable boxes made it good insurance for me. I would rather use the new fiberglass boxes that HD is selling (linked above). They are cheap as heck and the most solid boxes I've come across to date - way better than the blue PVC boxes.
 

mcbane

Well-known member
Joined
Jul 23, 2017
Messages
794
Location
California
This is my biggest electrical project to date and first time installing a sub panel. Big thanks to many people on the forum that have helped me with my beginner questions on installing this sub panel in my small workshop (especially Terry D and wyliesdiesels).

I'm finally almost finished. I'm attaching some photos to this thread in the hopes that anyone can spot any mistakes that I've made.

To clarify: this is a very small workshop/storage shed (12x14) and has just 30A @ 120V service. Just enough for lights, some receptacles, and the smallest heat pump I could find.

A few notes:

The PVC conduit on the outside and coming in from the LB and disconnect is Schedule 80.

The panel is backfed with a double-pole 30A breaker with a hold-down (the red piece to the right of the breaker). I spliced the incoming #10 UF-B with properly sized Wago connectors so that both sides of the panel would be live. I also removed the green bonding screw and installed two 10-ft ground rods about 12 feet apart.

I installed 3/4" of PolyIso foam board behind the panel to prevent condensation. I'll compensate by building a 3/4" wood frame around the flush panel so that the cover fits correctly.

I installed two 20A receptacle circuits and alternated them along the walls (labelled 1 and 2). I only plan on operating one tool at a time of course, and most of my tools are cordless.

I have not installed the heat pump yet but have installed the disconnect (the disconnect is in the safe/disconnected upside-down position for now).

The holes in the 2x4 studs are 1" and "exactly" in the middle of the stud. Technically I don't think I required nail plates, but I used a new product called SmartShield by Southwire that installs inside the 1" hole and protects the romex from both sides.

I plan on installing 1/2" plywood on the walls.

A few questions:

Is the PVC conduit coming into the building code-compliant? There is no bushing on the end but I did use a de-burring tool to smooth/round the edge so that it will not damage the sheathing.

Does the #12 coming into the disconnect need strain relief, or is the strain relief on the panel side sufficient?

The heat pump lists the MOP as 25A. I don't have a 25A breaker on hand so I temporarily installed a 20A as a placeholder. I believe it is OK to install a breaker *smaller* than the listed MOP, and in my case I don't expect the variable-speed heat pump to rarely (if ever) run at full-blast. Do you think a 20A breaker is actually OK?

Thanks for reading!
Do you have a single pole 30 amp breaker upstream of this panel? Otherwise you may get up to 60 amps load on the #10 feeder, since the double pole breaker is acting as two 30 amp single pole breakers in parallel.
 

Terry D

Well-known member
Joined
Mar 25, 2015
Messages
2,202
Location
St. Louis, MO.
Do you have a single pole 30 amp breaker upstream of this panel? Otherwise you may get up to 60 amps load on the #10 feeder, since the double pole breaker is acting as two 30 amp single pole breakers in parallel.
It is fed from a single pole 30 from the house
 

adrenalinejeeper

Well-known member
Joined
Jan 30, 2018
Messages
191
Location
Ventura County, CA
@adrenalinejeeper : I recently used the adjustable boxes on a bathroom remodel where I would be installing tile as well as inside the custom vanities. They really work great when the wall depth is unknown, but they are quite a bit more expensive than other boxes: $3.60 adjustable vs. $0.85 for non-adjustable. I am not 100% certain on what my wall material will be (planning on 1/2" plywood), so the extra $60 for adjustable boxes made it good insurance for me. I would rather use the new fiberglass boxes that HD is selling (linked above). They are cheap as heck and the most solid boxes I've come across to date - way better than the blue PVC boxes.

You are right, it is not an indiscriminate amount, in the grand scheme of an entire build, considering the time and frustration of using spacers/other tricks to bring devices out to the drywall, I would have gladly paid $2-300 more for the ease of the depth adjustable boxes.

We used Carlon "Super Blue" everywhere that didn't get an adjustable box, they look a lot like those fiberglass boxes. They were $1.67 through our local electrical supply shop. I think the adjustables were around $2.80 if I remember right (can't find that invoice in my email at the moment).
 

Bert_

Well-known member
Joined
Dec 24, 2016
Messages
9,765
Location
NW Iowa
You are right, it is not an indiscriminate amount, in the grand scheme of an entire build, considering the time and frustration of using spacers/other tricks to bring devices out to the drywall, I would have gladly paid $2-300 more for the ease of the depth adjustable boxes.

We used Carlon "Super Blue" everywhere that didn't get an adjustable box, they look a lot like those fiberglass boxes. They were $1.67 through our local electrical supply shop. I think the adjustables were around $2.80 if I remember right (can't find that invoice in my email at the moment).
$1.67 for a blue nail on box? Holy ripoff!

Even with covid pricing the last case I bought was $0.54 each. I want to say they used to be about 35 cents a piece.

If I was spending 2.80 I'd probably go 4x4 metal with a mud ring. 5/8 plaster ring on 1/2 rock is perfect everytime.
 

adrenalinejeeper

Well-known member
Joined
Jan 30, 2018
Messages
191
Location
Ventura County, CA
$1.67 for a blue nail on box? Holy ripoff!

Even with covid pricing the last case I bought was $0.54 each. I want to say they used to be about 35 cents a piece.

If I was spending 2.80 I'd probably go 4x4 metal with a mud ring. 5/8 plaster ring on 1/2 rock is perfect everytime.
These are Carlon Super Blue boxes, not standard nailers. But yes, it looks like the price has come down since my build (2017) to the $1.30 range for Super Blues.

The Super Blue is heavier, deeper, and stiffer.
 

Bert_

Well-known member
Joined
Dec 24, 2016
Messages
9,765
Location
NW Iowa
These are Carlon Super Blue boxes, not standard nailers. But yes, it looks like the price has come down since my build (2017) to the $1.30 range for Super Blues.

The Super Blue is heavier, deeper, and stiffer.
Oh the BH boxes. Yeah those are more expensive. I guess I never knew they called them "super blue"
 

Marc Voorhees

Well-known member
Joined
Jun 10, 2021
Messages
127
This is my biggest electrical project to date and first time installing a sub panel. Big thanks to many people on the forum that have helped me with my beginner questions on installing this sub panel in my small workshop (especially Terry D and wyliesdiesels).

I'm finally almost finished. I'm attaching some photos to this thread in the hopes that anyone can spot any mistakes that I've made.

To clarify: this is a very small workshop/storage shed (12x14) and has just 30A @ 120V service. Just enough for lights, some receptacles, and the smallest heat pump I could find.

A few notes:

The PVC conduit on the outside and coming in from the LB and disconnect is Schedule 80.

The panel is backfed with a double-pole 30A breaker with a hold-down (the red piece to the right of the breaker). I spliced the incoming #10 UF-B with properly sized Wago connectors so that both sides of the panel would be live. I also removed the green bonding screw and installed two 10-ft ground rods about 12 feet apart.

I installed 3/4" of PolyIso foam board behind the panel to prevent condensation. I'll compensate by building a 3/4" wood frame around the flush panel so that the cover fits correctly.

I installed two 20A receptacle circuits and alternated them along the walls (labelled 1 and 2). I only plan on operating one tool at a time of course, and most of my tools are cordless.

I have not installed the heat pump yet but have installed the disconnect (the disconnect is in the safe/disconnected upside-down position for now).

The holes in the 2x4 studs are 1" and "exactly" in the middle of the stud. Technically I don't think I required nail plates, but I used a new product called SmartShield by Southwire that installs inside the 1" hole and protects the romex from both sides.

I plan on installing 1/2" plywood on the walls.

A few questions:

Is the PVC conduit coming into the building code-compliant? There is no bushing on the end but I did use a de-burring tool to smooth/round the edge so that it will not damage the sheathing.

Does the #12 coming into the disconnect need strain relief, or is the strain relief on the panel side sufficient?

The heat pump lists the MOP as 25A. I don't have a 25A breaker on hand so I temporarily installed a 20A as a placeholder. I believe it is OK to install a breaker *smaller* than the listed MOP, and in my case I don't expect the variable-speed heat pump to rarely (if ever) run at full-blast. Do you think a 20A breaker is actually OK?

Thanks for reading!
So hey, this looks very nice. I like the idea or using a bit of romex as a wire label. I just wired my own subpanel the other day, and while you and I have different applications, I have to say, yours is quite neat and tidy. Well done!
The Super Blue is heavier, deeper, and stiffer.
1627418708980.png
 
To avoid these ads, REGISTER NOW!
Top Bottom