To avoid these ads, REGISTER NOW!

First timer - TIG welds are gray - tried everything :(

American Locomotive

Well-known member
Joined
Jan 8, 2017
Messages
10,958
Location
Rhode Island
got new tank today from same supplier, there was a lady this time and she gave me green argon tank as compare to blue tank i had before but they didnt look same from area outside the valve, value safety things, whatever its called. you think i got bad argon? or the guy gave me mix? but the sales person said today the sticker on the tank is for pure argon, not sure the tank is not green, she was little spooked but then she said that the guy who gave your tank first time working for 7 years, not sure what went wrong and what has been corrected now
Different bottle suppliers have different colors. In my area, my local supplier paints 75/25 bottles blue, and 100% argon bottles brown. But ultimately the color, shape and size of the bottle doesn't matter.

What matters is what the sticker says. If it says C25 or 75/25, you got MIG mix gas, not pure argon.
 
To avoid these ads, REGISTER NOW!

MoonRise

Well-known member
Joined
Nov 5, 2010
Messages
4,028
Location
NJ
->but why am I getting blue tungston rod right away , :( 
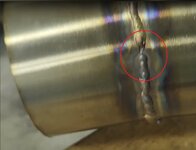
I keep cleaning it but it turns blue right after i finish the pass.
all these practice was done at 10cfh and preflow was 1.5 seconds and post flow was at 2 seconds.
Tungsten turning colors after the arc stops is typically because your post-flow time is WAAAAAAAAAAAAAAAAAAAAAAAAAY too short.

And your shielding gas flow rate is too low as well. Set the flow rate to 20 cfh WITH THE GAS FLOWING. (I don't remember if you said you have a flow regulator or an actual floating-ball flow gauge.)

Rule-of-thumb is ~1 second of post-flow time for every 10 amps of welding current. Longer post-flow time doesn't hurt the weld or tungsten but may hurt your wallet if you set is longer than is actually needed. With the post-flow time set too short you also hurt your wallet from tungsten consumption and having to grind out poor or contaminated (by oxygen) welds. 2 seconds of post-flow is way too short. Try 10-15 seconds and see how that goes. If the tungsten still turns colors then increase the post-flow time a little more (or look for gas flow issues like a breeze or fan or something blowing the shielding gas away, or for a leak or poor connection in the gas hoses or connections that is aspirating air into the shielding gas).

summary: set your shielding gas flowrate to 20 cfh (with the gas flowing!) and set your post-flow time to 15 seconds and try that. No filler, no torch travel motion, just start an arc and make a puddle on plain mild steel and then stop the arc AND HOLD THE TORCH STILL until the post-flow gas stops flowing. Do NOT pull the torch away from the welding position, hold it STILL. Check the color and condition of the weld puddle/bead and the tungsten. If everything is good, repeat. Multiple times for practice.

If things are not 'good', figure out why. Is there a breeze blowing away your shielding gas? Are you too far away from the workpiece? Do you have too much electrode/tungsten stick-out? Is your shielding gas flowrate still too low? is your purge time too short or your post-flow time too short? Etc.

You're making progress though.
 
OP
H

handyman2020

Well-known member
Joined
Sep 22, 2019
Messages
222
Location
Toronto
Tungsten turning colors after the arc stops is typically because your post-flow time is WAAAAAAAAAAAAAAAAAAAAAAAAAY too short.

And your shielding gas flow rate is too low as well. Set the flow rate to 20 cfh WITH THE GAS FLOWING. (I don't remember if you said you have a flow regulator or an actual floating-ball flow gauge.)

Rule-of-thumb is ~1 second of post-flow time for every 10 amps of welding current. Longer post-flow time doesn't hurt the weld or tungsten but may hurt your wallet if you set is longer than is actually needed. With the post-flow time set too short you also hurt your wallet from tungsten consumption and having to grind out poor or contaminated (by oxygen) welds. 2 seconds of post-flow is way too short. Try 10-15 seconds and see how that goes. If the tungsten still turns colors then increase the post-flow time a little more (or look for gas flow issues like a breeze or fan or something blowing the shielding gas away, or for a leak or poor connection in the gas hoses or connections that is aspirating air into the shielding gas).

summary: set your shielding gas flowrate to 20 cfh (with the gas flowing!) and set your post-flow time to 15 seconds and try that. No filler, no torch travel motion, just start an arc and make a puddle on plain mild steel and then stop the arc AND HOLD THE TORCH STILL until the post-flow gas stops flowing. Do NOT pull the torch away from the welding position, hold it STILL. Check the color and condition of the weld puddle/bead and the tungsten. If everything is good, repeat. Multiple times for practice.

If things are not 'good', figure out why. Is there a breeze blowing away your shielding gas? Are you too far away from the workpiece? Do you have too much electrode/tungsten stick-out? Is your shielding gas flowrate still too low? is your purge time too short or your post-flow time too short? Etc.

You're making progress though.

Hi Moonrise, i appreciate your inputs :) please check my answers in bold below;


Rule-of-thumb is ~1 second of post-flow time for every 10 amps of welding current. Longer post-flow time doesn't hurt the weld or tungsten but may hurt your wallet if you set is longer than is actually needed. I have floating ball flow gauge, I am using 25Amps so 1 second of post flow so that makes 2.5seconds, i will try with 3 seconds

With the post-flow time set too short you also hurt your wallet from tungsten consumption and having to grind out poor or contaminated (by oxygen) welds. 2 seconds of post-flow is way too short. Try 10-15 seconds and see how that goes. this is a lot of post flow, 15seconds@20cfh, its going to empty tank in no time, I dont mind sacrificing tungston rod over gas

If the tungsten still turns colors then increase the post-flow time a little more (or look for gas flow issues like a breeze or fan or something blowing the shielding gas away, or for a leak or poor connection in the gas hoses or connections that is aspirating air into the shielding gas).
 

sqznby

Well-known member
Joined
Oct 26, 2013
Messages
982
Location
Coastal NC
3 seconds is way too short of a time for post flow, start with at least 10 seconds and go from there.

Depending on the environment you are in and the size of cup you are using will justify the amount you will set your argon to. Your flow rate will be between 15 & 25 depending on the cup size. And possibly more depending on the environment.

You will see a pretty good improvement with 10 seconds compared to 2 or 3. It's a starting point and you will adjust accordingly with experience. Keep your cup pointed at the work until the post flow has stopped and if you like bump the pedal/trigger to set it again if you need more post flow time.

Your tungsten will change colors with short post flow times regardless, you need to increase that dramatically and you will see a difference.
If you are in an open environment, find a way to shield your work from the wind/fans. I'll use a curtain or cardboard or sheets of aluminum.

Before you start welding, bump the pedal or trigger to get your gas through the lines.
 

rlitman

Well-known member
Joined
Oct 18, 2010
Messages
24,602
Location
Long Island
...I dont mind sacrificing tungston rod over gas...
You're sacrificing the weld quality. Both because you cannot get a good weld with an oxidized tungsten, so at an absolute minimum, you MUST provide enough post-flow to protect the tungsten, and also because you need enough post-flow to continue to cool the weld. Stainless is particularly sensitive to oxidation, long after it's stopped glowing.
 

MoonRise

Well-known member
Joined
Nov 5, 2010
Messages
4,028
Location
NJ
Post-flow time affects not only the tungsten, but also the still hot weld bead and the HAZ next to the weld bead.

And at a flow rate of 20 cfh (that's cubic feet per HOUR), a 15 second post flow time when you terminate a weld bead amounts to 0.08333 ft3 of shielding gas for the post flow gas. Which is a small amount of gas which is being used, but the gas post-flow is CRITICAL for the weld and the tungsten.

3 seconds of post flow time is NOT long enough.

A flow rate of 20 cfh with an 80 ft3 cylinder gives you ~ 4 HOURS of gas flow time.

Purge flow time and Pre-flow time and actual welding time and Post-flow time are ALL necessary times when the shielding gas must flow. Properly (not too much flow rate and not too little flow rate) and for the proper times in order to achieve quality welds.

And I always purge the gas line when I first set up for a weld after the machine has been shut down (with the gas line 'emptied') after it was last used. A few seconds worth of gas before I start welding is totally worth it in order to START with adequate shielding gas actually flowing through the gas lines and getting to the welding zone.

Set your shielding gas flow to 20 cfh and your post-flow time to 15 seconds.

If (make that IF) your weld and the tungsten condition are both good with that flow rate and post-flow time, then and ONLY then can you play with possibly reducing the flow rate and/or the post-flow time SLIGHTLY.

You're burning through a tungsten electrode every time you make or try to make ONE weld bead or dot? That is going to use up a LOT of tungsten electrodes $$$ and TIME. Once the end of the tungsten is oxidized/burnt, you pretty much have to snap off that part of the tungsten and then regrind a new point on the end. If the remaining section of the tungsten in the collet is even still good.
 

welder4956

Well-known member
Joined
Apr 8, 2010
Messages
3,070
Location
Birmingham, AL USA
I just ordered the 71 piece kit because I only got Furick cups and no cullet etc. so I couldnt fit them, but do you think my comment made sense about argon gas tank running out/low and immediately i saw improvements? perhaps i had bad argon to start with?
all these practice i did with welder #6 cup
Thanks
Sorry I didn't see your post sooner. In my experience, bad argon is not a common occurrence. It is possible that they gave you a bottle of mixed gas, such as 75% argon/25% CO2 and that definitely would cause a problem with gray welds. The color of the gas cylinder has no meaning and is not standardized. Read the label near the top of the tank to verify you have the correct shielding gas.

U417P-Argon-1.jpg

The more common issue with shielding gas is a leaking connection on the hose or torch or flow rate too low. The standard collet body can be a problem when combined with low gas flow rate, but I have to say that I have made and seen thousands of x-ray accepted stainless steel welds in thin wall and heavy wall pipe in nuclear and fossil power plants that were made with a standard collet body. The gas lens does provide much better shielding, especially at low flow rates and is recommended for stainless steel.

As others have mentioned, the Furick cups will eat a lot of shielding gas quickly. I don't own any and don't see a need to have them for your application as a beginner.
 
OP
H

handyman2020

Well-known member
Joined
Sep 22, 2019
Messages
222
Location
Toronto
@Firebrick43
@cvairwerks
@PCustoms
@dogdog
@welder4956
@slowtwitch73
@Donnie O
@OccupantRJ
@rlitman
@Dakotadadv8
@steel 35
@American Locomotive
@manwithtools
@cosmokenney
@MOS3522
@MoonRise
@sqznby
hello, is this acceptable?

0d384c3d-0f9a-4e4f-9ff5-a184c8c11fec-1-jpeg


I am running into another issue here, when I just do passes with torch on metal and no filler rods at all, I am getting rainbow colors looks really really nice but as soon as I introduce the filler rod Blue Demon ER309L X .045 X 36" , I am getting such welds attached photo.

i tried 20 to 30 amps spot DC, I tried 10cfh to 20cfh, 2 second pre flow and up to 5 seconds post flow,

i am using #10 furick ceramic cup, I am getting grayish kind of color in the middle of welds not at start or end, is it the tungsten rod not clean? I wire brush and acetone clean the tube prior to practice weld.

red tungston rod 1.6mm is being used after grinding to needle tip and cleaning with acetone.

if I go 20amps it doesnt melt the filler rod at all and I start getting beads of filler rods, my amps are 25 to 30 amps, upper limit maximum is 35amps spot DC

watched couple videos online, they saying to use #12 cup( ? ) , I do not have foot pedal, I just have a switch on torch handle, not sure if that matters or not, all youtube videos have foot pedal though.
 
Last edited:

sqznby

Well-known member
Joined
Oct 26, 2013
Messages
982
Location
Coastal NC
Absolutely that's acceptable, it looks great.
Next time turn up the heat (40-50amps) just a bit and do shorter runs maybe an inch long. Try this without filler, then try again with filler.
When you use larger filler rod you need to adjust your heat to accommodate that filler.
The amps you are running are more for 030 or 1/16 filler rod.
Is your switch a momentary switch (on/off button) or is it a dial so you can control your heat? Dials are a little more difficult to get used to for someone just getting into tig welding. It just takes practice, lots and lots of practice.
 
OP
H

handyman2020

Well-known member
Joined
Sep 22, 2019
Messages
222
Location
Toronto
Absolutely that's acceptable, it looks great.
Next time turn up the heat (40-50amps) just a bit and do shorter runs maybe an inch long. Try this without filler, then try again with filler.
if I go 40-50 amps the tube gets really red hot and screws up everything but I havent tried 1 inch pass without filler at 40amps, I will do it today.

When you use larger filler rod you need to adjust your heat to accommodate that filler.
I had large filler weeks ago and it was wrong type of metal so from other members I was recommended to use the rod I have, I just ordered it after member recommended those rods

The amps you are running are more for 030 or 1/16 filler rod. okay so I need higher amps?

Is your switch a momentary switch (on/off button) or is it a dial so you can control your heat? Dials are a little more difficult to get used to for someone just getting into tig welding. It just takes practice, lots and lots of practice.
I have a click on off switch on torch, thats it. no dial etc.
 

Jswain

Well-known member
Joined
Apr 26, 2013
Messages
2,460
Location
Calgary, AB
#1. Stop running out and buying new **** with every recommendation on here

#2 practise

It's all related. Bigger filler metal will take more amps to melt, but you can push more in to cool the puddle. More amps set on the machine you can start the puddle faster, move faster etc. Bigger cup on the torch = more gas flow required.

You could ask 100 different welders and get 100 different answers on what cup, filler, amps, etc. to use. But each of those 100 got used to whatever they currently use, and somewhat have mastered it.

I know I definitely wouldn't be using a giant cup just for practise.....why waste all that gas? If you keep reading on the internet you will keep learning of all the things you "need". What you actually "need" is trigger time.

Get that trigger time as cheaply as possible, then when your welds are acceptable, change to what you want to use for the headers. Small amount of more practise to find your settings, then weld your project.
 
Last edited:

welder4956

Well-known member
Joined
Apr 8, 2010
Messages
3,070
Location
Birmingham, AL USA
Argon flow rate for a #10 cup should be 30-40 cfh. That's why it eats through gas so fast. If you have a #5 or #6 gas lens in the kit you bought, try that with 10-20 cfh. Also, if your torch travel speed is too fast, you can outrun the shielding gas coverage so that the hot weld metal is exposed to air. Try slowing down slightly and see if that helps.

Keep practicing, welds are looking better.
 

sqznby

Well-known member
Joined
Oct 26, 2013
Messages
982
Location
Coastal NC
#1. Stop running out and buying new **** with every recommendation on here

#2 practise

It's all related. Bigger filler metal will take more amps to melt, but you can push more in to cool the puddle. More amps set on the machine you can start the puddle faster, move faster etc. Bigger cup on the torch = more gas flow required.

You could ask 100 different welders and get 100 different answers on what cup, filler, amps, etc. to use. But each of those 100 got used to whatever they currently use, and somewhat have mastered it.

I know I definitely wouldn't be using a giant cup just for practise.....why waste all that gas. If you keep reading on the internet you will keep learning of all the things you "need". What you actually "need" is trigger time.

Get that trigger time as cheaply as possible, then when your welds are acceptable, change to what you want to use for the headers, small amount of more practise to find your settings, then weld your project.
@handyman2020
This ^^^^. Basically, you need to just sit down and practice.
I think the 100 welders and 100 different answers is what's going on here :). Stop asking start practicing.
You're certainly moving in the right direction though.
It takes time and practice to achieve what you are striving for.
I'd be happy to send you some filler to help you accomplish this but for the love of g-d stop buying stuff.
Practice
 
OP
H

handyman2020

Well-known member
Joined
Sep 22, 2019
Messages
222
Location
Toronto
Argon flow rate for a #10 cup should be 30-40 cfh. That's why it eats through gas so fast. If you have a #5 or #6 gas lens in the kit you bought, try that with 10-20 cfh. Also, if your torch travel speed is too fast, you can outrun the shielding gas coverage so that the hot weld metal is exposed to air. Try slowing down slightly and see if that helps.

Keep practicing, welds are looking better.
oh I am doing this all 15-20cfh with #10 cup, i see, I was afraid to try 30cfh as I thought gas flow is good but I will try with 30cfh. yes, I will try with generic pink #6 cup as well.
thanks so much
 
OP
H

handyman2020

Well-known member
Joined
Sep 22, 2019
Messages
222
Location
Toronto
@handyman2020
Are these the collet bodies you are using?
yes, but I am using #10 furcik cup not the pink ones, I dont have that size in pink one, I only either glass pyrex or furcik, but I had better results with furick than pyrex, not sure why.

I want to know please, do i need to reduce amps when the working tube gets very hot to touch? I find that very frustrating, because if I start working with 30A on very cold tube @room temp and I start practicing and after 20 minutes that tube gets really hot and then I cant even touch it but I am still using same amps?

does it make any difference or amps must be reduced once the tube gets really hot while you are doing practice welds or client jobs?

Thanks
 

sqznby

Well-known member
Joined
Oct 26, 2013
Messages
982
Location
Coastal NC
yes, but I am using #10 furcik cup not the pink ones, I dont have that size in pink one, I only either glass pyrex or furcik, but I had better results with furick than pyrex, not sure why.

I want to know please, do i need to reduce amps when the working tube gets very hot to touch? I find that very frustrating, because if I start working with 30A on very cold tube @room temp and I start practicing and after 20 minutes that tube gets really hot and then I cant even touch it but I am still using same amps?

does it make any difference or amps must be reduced once the tube gets really hot while you are doing practice welds or client jobs?

Thanks
So, you have his Jazzy 10? That's a great cup. If you don't have an 8 send me a message with your info and I'll send you a care package with everything you'd need including what is pictured.

Don't worry about the heat. You're welding, its going to get hot. Get a good pair of gloves, tig finger, some scrap fiberglass or use some pliers to move the practice piece around.
This is all practice to gain experience. Instead of welding the length of the tubing, weld the diameter.
You are never going to be welding tubing like that to begin with so why practice that way.
 

welder4956

Well-known member
Joined
Apr 8, 2010
Messages
3,070
Location
Birmingham, AL USA
yes, but I am using #10 furcik cup not the pink ones, I dont have that size in pink one, I only either glass pyrex or furcik, but I had better results with furick than pyrex, not sure why.

I want to know please, do i need to reduce amps when the working tube gets very hot to touch? I find that very frustrating, because if I start working with 30A on very cold tube @room temp and I start practicing and after 20 minutes that tube gets really hot and then I cant even touch it but I am still using same amps?

does it make any difference or amps must be reduced once the tube gets really hot while you are doing practice welds or client jobs?

Thanks
If it gets so hot that the welds are sinking in or starting to blow holes, it is time to take a break and let it cool down. The recommended maximum interpass temperature for stainless steel is 350 F in order to preserve corrosion resistance. This is measured after completing a weld bead and should be allowed to cool below 350 F before starting the next bead. Generally this is not an issue unless you are running a lot of beads near each other, such as your practice piece. The temp can be checked with a temperature indicating crayon or infrared thermometer, or just let it cool to where you can barely touch it. The 300 series austenitic stainless steels can be cooled with water in a spray bottle or wet rag without damaging the metal, but you may see some metal distortion when it is cooled too fast.
 
To avoid these ads, REGISTER NOW!
OP
H

handyman2020

Well-known member
Joined
Sep 22, 2019
Messages
222
Location
Toronto
If it gets so hot that the welds are sinking in or starting to blow holes, it is time to take a break and let it cool down. The recommended maximum interpass temperature for stainless steel is 350 F in order to preserve corrosion resistance. This is measured after completing a weld bead and should be allowed to cool below 350 F before starting the next bead. Generally this is not an issue unless you are running a lot of beads near each other, such as your practice piece. The temp can be checked with a temperature indicating crayon or infrared thermometer, or just let it cool to where you can barely touch it. The 300 series austenitic stainless steels can be cooled with water in a spray bottle or wet rag without damaging the metal, but you may see some metal distortion when it is cooled too fast.
aha, now I see, the steel piece is getting too hot and I didnt let it cool down and kept welding and welding until I ran out of practice space.
 
OP
H

handyman2020

Well-known member
Joined
Sep 22, 2019
Messages
222
Location
Toronto
@Firebrick43
@cvairwerks
@PCustoms
@dogdog
@welder4956
@slowtwitch73
@Donnie O
@OccupantRJ
@rlitman
@Dakotadadv8
@steel 35
@American Locomotive
@manwithtools
@cosmokenney
@MOS3522
@MoonRise
@sqznby

hello All,
Please can you see this 50 second video and tell me if looks good, I know not the perfect run, but this is the first time I ran a backpurge in this tube as well, it was 2.5inch tube I cut and then welded it again. I did this by taking 4 stops at 28A, is it acceptable for exhaust? the joint didnt have any gap at all.

my friend just told me a surface weld :( and will fall off, i told him you dont see filler material inside because its was way too tight fit between the joint,


Attachments

  • fit.jpg
    fit.jpg
    145.8 KB · Views: 11
Last edited:

Jswain

Well-known member
Joined
Apr 26, 2013
Messages
2,460
Location
Calgary, AB
@Firebrick43
@cvairwerks
@PCustoms
@dogdog
@welder4956
@slowtwitch73
@Donnie O
@OccupantRJ
@rlitman
@Dakotadadv8
@steel 35
@American Locomotive
@manwithtools
@cosmokenney
@MOS3522
@MoonRise
@sqznby

hello All,
Please can you see this 50 second video and tell me if looks good, I know not the perfect run, but this is the first time I ran a backpurge in this tube as well, it was 2.5inch tube I cut and then welded it again. I did this by taking 4 stops at 28A, is it acceptable for exhaust? the joint didnt have any gap at all.

my friend just told me a surface weld :( and will fall off.


Looks like hardly any penetration and I would have to agree with your friend.
 
OP
H

handyman2020

Well-known member
Joined
Sep 22, 2019
Messages
222
Location
Toronto
This.

Stop with all the fancy back purge, lenses, stainless etc.

Plain steel, basic set-up. Repeated until you have muscle memory and repeatable, consistent beads.


100% practice. Get some welding coupons. Try various positions. Practice until you can't screw it up. This from the guy that bought all the fancy cups, lenses, torches, accessories, etc first as well. ;)


Turn up the amperage until it just starts to blow through, then either move faster or turn the amperage down slightly.

But practising trying to join 2 pieces before you can run a solid bead on flat metal is silly.


0d384c3d-0f9a-4e4f-9ff5-a184c8c11fec-1-jpeg


I did practice here and thought to give a try on a joint.
 

sqznby

Well-known member
Joined
Oct 26, 2013
Messages
982
Location
Coastal NC
There is no penetration at all.
I agree, you need practice but, I don't think it would be bad to practice on ss tubing.
A good way to practice is with a metronome, just to get your timing all situated.
Try this with NO filler and no purge and turn up the heat for an inch at a time, just make sure your tunk is sharp.


Jswain

Well-known member
Joined
Apr 26, 2013
Messages
2,460
Location
Calgary, AB
0d384c3d-0f9a-4e4f-9ff5-a184c8c11fec-1-jpeg


I did practice here and thought to give a try on a joint.
You are probably at least a full tank of argon away from even trying to join 2 pieces of metal. Then maybe many full tanks away from welding a set of headers. It's not a bad thing, it's a necessity of learning how to TIG weld.

It's like learning to drive a stick. Most people learn on something cheap and easy. Sure you could buy an "insert expensive car here". But it's going to be an expensive training lesson, and it might make it so hard that you don't learn anything.

I'm not trying to be a ****, but sometimes it's the things you don't want to hear that help. Your welds look a lot better then when you started, but still a long ways to go before you weld a header that won't fail.
 
Last edited:

dogdog

Well-known member
Joined
Nov 15, 2011
Messages
12,711
@Firebrick43
@cvairwerks
@PCustoms
@dogdog
@welder4956
@slowtwitch73
@Donnie O
@OccupantRJ
@rlitman
@Dakotadadv8
@steel 35
@American Locomotive
@manwithtools
@cosmokenney
@MOS3522
@MoonRise
@sqznby

hello All,
Please can you see this 50 second video and tell me if looks good, I know not the perfect run, but this is the first time I ran a backpurge in this tube as well, it was 2.5inch tube I cut and then welded it again. I did this by taking 4 stops at 28A, is it acceptable for exhaust? the joint didnt have any gap at all.

my friend just told me a surface weld :( and will fall off, i told him you dont see filler material inside because its was way too tight fit between the joint,


What others say looks like you just melt the rod onto the metal. Either you didn’t aim the electrode to the base metal or you just melt the tig rod on top. Color looks good though at least it looks like you have enough gas coverage.

Few years ago, when I was welding my exhaust with 409 stainless tubes similar thickness on the one in your pic. I think my setting was 90 amp or 110 amp on the miller dynasty 200dx. I asked a similar question on the Miller weld forum about why my 1/2” thick stainless flange was wrapping, was told more heat and move faster.
 

Jswain

Well-known member
Joined
Apr 26, 2013
Messages
2,460
Location
Calgary, AB
What others say looks like you just melt the rod onto the metal. Either you didn’t aim the electrode to the base metal or you just melt the tig rod on top. Color looks good though at least it looks like you have enough gas coverage.

Few years ago, when I was welding my exhaust with 409 stainless tubes similar thickness on the one in your pic. I think my setting was 90 amp or 110 amp on the miller dynasty 200dx. I asked a similar question on the Miller weld forum about why my 1/2” thick stainless flange was wrapping, was told more heat and move faster.
Exactly. And on that topic:


A very good video on controlling heat, and why setting your amperage lower doesn't necessarily = less heat.
 

welder4956

Well-known member
Joined
Apr 8, 2010
Messages
3,070
Location
Birmingham, AL USA
What others say looks like you just melt the rod onto the metal. Either you didn’t aim the electrode to the base metal or you just melt the tig rod on top. Color looks good though at least it looks like you have enough gas coverage.

Few years ago, when I was welding my exhaust with 409 stainless tubes similar thickness on the one in your pic. I think my setting was 90 amp or 110 amp on the miller dynasty 200dx. I asked a similar question on the Miller weld forum about why my 1/2” thick stainless flange was wrapping, was told more heat and move faster.
You need more penetration. Try increasing the amps by 5 amps, then weld a section 1" long, check penetration inside the tube and allow to cool till you can pick it up with your bare hand. Keep following the same steps increasing 5 amps each time till you start seeing penetration inside the tube. The weld bead should start to flatten out too as the amps increase and not be so humped up.

I wish you were closer to my area so I could watch as you practice and suggest changes. Internet troubleshooting is very difficult, at least for me. Keep practicing, you will get there. I see progress.
 

dogdog

Well-known member
Joined
Nov 15, 2011
Messages
12,711
You need more penetration. Try increasing the amps by 5 amps, then weld a section 1" long, check penetration inside the tube and allow to cool till you can pick it up with your bare hand. Keep following the same steps increasing 5 amps each time till you start seeing penetration inside the tube. The weld bead should start to flatten out too as the amps increase and not be so humped up.

I wish you were closer to my area so I could watch as you practice and suggest changes. Internet troubleshooting is very difficult, at least for me. Keep practicing, you will get there. I see progress.
Yea I think you mean that offer for @handyman2020


As for the op

Also dip the filler rod into the puddle not into the electrode.

The other thing I remember is the torch is about 15 deg from metal … maybe search on what is the optimal tig torch angle is. I remember seeing a few YouTube video about it.

Also maybe try to practice on two piece of metal **** fitted and no filler rod, let the two piece of metal’s base metal fuse. That was how i practiced when I first tig with only dvd as guided.

****Also Also... Alternate your welds if you don't want it to wrap on tubes.. that is tack it sturdy. Weld a section on one side like about an inch then do the weld on the complete opposite if you can. and alternate till you got the tube completely welded. I think that was the explanation... if not some one can come and correct it to more properly explain it. In other word, don't go straight 0 to 360 continuous weld on tubings.
 
Last edited:

Zengineer

Well-known member
Joined
Apr 10, 2010
Messages
781
Location
British Columbia, Canada
One other thing I found really useful - I had a buddy who is a accomplished TIG welder come over and lay some beads with my (new at the time) machine to help me debug. He was able to lay perfect beads in steel and aluminum. Proof that the machine was good and the operator wasn't, in my case.

Took all those questions out of my mind about the machine, and helped me focus on where the biggest improvements could be made. :)
 
Last edited:

rlitman

Well-known member
Joined
Oct 18, 2010
Messages
24,602
Location
Long Island
so what to do as the gap was too tight?
Turn up the amperage until it just starts to blow through, then either move faster or turn the amperage down slightly.

But practising trying to join 2 pieces before you can run a solid bead on flat metal is silly.
Turning up the amperage until it just starts to blow through is one option, though when I do that, I usually end up melting the sides way back or dripping through. My problem with this tactic is it's really just forming the gap using the torch. Yes, it can be done, but it's a lot easier to form the gap first with a grinder, and then fill it.

If you're joining pieces like this, take the time and bevel the ends first.
 
OP
H

handyman2020

Well-known member
Joined
Sep 22, 2019
Messages
222
Location
Toronto
@sqznby Thanks, I bought the foot pedal few weeks ago but it didnt fit, the connector at the welder box is female and the connector of foot pedal swtich was also female, so I returned it

I put amps to 50+ and here is the result,

I just dont understand, why at the start i am getting gray like 90% of the time, but in the middle it looks good, also when I finish it looks good,

at the start I tried staying more or staying less but didnt help, not sure whats going on, but at the same time, if I do not use filler rod, the start area does not look gray, this is not making sense to me :( , why at the start with filler rod i am getting but not all the way


45 second video of the 2.5inch tube i practiced today at 50A and 30cfh
 
To avoid these ads, REGISTER NOW!
Top Bottom