To avoid these ads, REGISTER NOW!

First timer - TIG welds are gray - tried everything :(

sqznby

Well-known member
Joined
Oct 26, 2013
Messages
982
Location
Coastal NC
@sqznby Thanks, I bought the foot pedal few weeks ago but it didnt fit, the connector at the welder box is female and the connector of foot pedal swtich was also female, so I returned it

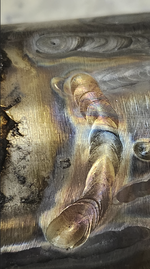
I put amps to 50+ and here is the result,

I just dont understand, why at the start i am getting gray like 90% of the time, but in the middle it looks good, also when I finish it looks good,

at the start I tried staying more or staying less but didnt help, not sure whats going on, but at the same time, if I do not use filler rod, the start area does not look gray, this is not making sense to me :( , why at the start with filler rod i am getting but not all the way


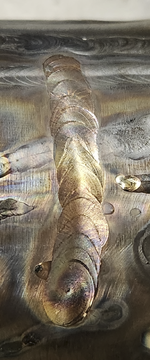
45 second video of the 2.5inch tube i practiced today at 50A and 30cfh
Oh I gotcha, have you been able to find another or have you just put it off?

Lookin good my friend.

I believe I had mentioned it about pre-flow and bumping your trigger to get the gas flowing before you start. This will help greatly but you have to remember to do it haha. It will basically get your post flow started so your lines are full, then you can start to weld. If that makes sense.

I think you are definitely improving and moving in the right direction. If you have enough tubing, try cutting it and tacking at 4 equal points and fusing (autogenous) each joint.
 
To avoid these ads, REGISTER NOW!
OP
H

handyman2020

Well-known member
Joined
Sep 22, 2019
Messages
222
Location
Toronto
Oh I gotcha, have you been able to find another or have you just put it off?

Lookin good my friend.

I believe I had mentioned it about pre-flow and bumping your trigger to get the gas flowing before you start. This will help greatly but you have to remember to do it haha. It will basically get your post flow started so your lines are full, then you can start to weld. If that makes sense.

I think you are definitely improving and moving in the right direction. If you have enough tubing, try cutting it and tacking at 4 equal points and fusing (autogenous) each joint.
i cant find any foot pedal for this specific model/welding machine, I will start gas before welding this time. yes, i will cut the tube and practice again.
 

no704

Well-known member
Joined
Apr 27, 2016
Messages
5,217
Should be able to get the correct fitting/pins to connect to your welder. Look at your welder plug, it will have some numbers on it. Google that and you should be able to find a mating connector. Usually 4 contacts, a momentary switch and a reiostat
 
OP
H

handyman2020

Well-known member
Joined
Sep 22, 2019
Messages
222
Location
Toronto
OP
H

handyman2020

Well-known member
Joined
Sep 22, 2019
Messages
222
Location
Toronto
I got #12, #16 and #24 cup today, I did below with #16 cup @50A 25 CFH

1-png.2175819


2-png.2175820


3-png.2175821


4-png.2175822


5-png.2175823


7-png.2175824
 

Attachments

  • 1.png
    1.png
    6.4 MB · Views: 198
  • 2.png
    2.png
    3.8 MB · Views: 230
  • 3.png
    3.png
    3.2 MB · Views: 203
  • 4.png
    4.png
    4.7 MB · Views: 205
  • 5.png
    5.png
    2.2 MB · Views: 199
  • 7.png
    7.png
    3.3 MB · Views: 201
OP
H

handyman2020

Well-known member
Joined
Sep 22, 2019
Messages
222
Location
Toronto
1727573016223.png

can someone please tell me how to handle this situation?

approximately how many amps with number 12 cup to use to weld that flange and elbow?

flange thickness is 8mm and elbow is 1.5mm

I dont have any spare flange to practice upon thats why I am asking
 
OP
H

handyman2020

Well-known member
Joined
Sep 22, 2019
Messages
222
Location
Toronto
I tried @100 amps on steel plate i got for practice and put spare elbow on top of the plate to replicate flange above, but its putting hole/burning/melting elbow :(
can someone suggest how many amps should I try to weld above two different thickness together and not put hole/melt elbow?
 
To avoid these ads, REGISTER NOW!

welder4956

Well-known member
Joined
Apr 8, 2010
Messages
3,070
Location
Birmingham, AL USA
75-80 amps if you are using a foot pedal. Start the arc on the flange always and feed the wire between the arc and the tube, but focus the puddle more on the flange and less on the tube.
 
OP
H

handyman2020

Well-known member
Joined
Sep 22, 2019
Messages
222
Location
Toronto
75-80 amps if you are using a foot pedal. Start the arc on the flange always and feed the wire between the arc and the tube, but focus the puddle more on the flange and less on the tube.
yes, I am using pedal and with Pedal I was doing 95 to 120 amps and didnt work out, i will try 75-80amps :)
 

MoonRise

Well-known member
Joined
Nov 5, 2010
Messages
4,028
Location
NJ
When welding thick to thin stuff, you generally have the arc and weld puddle on the thicker part and then you briefly 'wash' the arc and puddle onto the thinner part just enough to fuse/melt into the thinner part and not blow a hole right through it.

Not all that easy sometimes. So practice on scrap pieces.

Work your way up the difficulty ladder one step at a time and don't jump right into the more difficult aspects to start with.

You seem to be determined to bypass all the practice one simpler things and jumping right into more difficult aspects of welding. Like TIG welding thin curved stainless steel tubing and now welding that thin curved stainless steel tubing to a thicker flange.

You've made some progress, so that's good. You've practiced some, so that's good too.

I'd suggest practicing on some thick-to-thin stuff. Plain steel. Do lap joints and not T joints to start your practice. And have the thick to thin thickness difference not be as extreme as 8mm to 1.5mm to start your practice. Maybe start some practice on 8mm to 4mm, and when you get ok with that then maybe 8mm to 2mm. Than do some T joint practice, again working through some different thickness variations.

Practice, practice, practice. Like someone above mentioned, 100 hours of practice and then you should see some progress (if you are good). If you are hitting a troublesome aspect, sometimes an hour or two of practice with someone more experienced can help you get better.

:beer:
 

welder4956

Well-known member
Joined
Apr 8, 2010
Messages
3,070
Location
Birmingham, AL USA
I saw your latest video on YouTube, You may already realize this, but the gap between the tube and the flange will need to be zero or as close to zero as possible. Also, focus the puddle on the thicker material to melt the filler wire and use the torch to wash it over to the tube without focusing the heat on the tube (as suggested above). If the flange is bored enough to slide the tube inside and weld the end of the tube to the inside of the flange, that would be easier than a fillet weld on the outside of the tube.
 
OP
H

handyman2020

Well-known member
Joined
Sep 22, 2019
Messages
222
Location
Toronto
I saw your latest video on YouTube, You may already realize this, but the gap between the tube and the flange will need to be zero or as close to zero as possible. Also, focus the puddle on the thicker material to melt the filler wire and use the torch to wash it over to the tube without focusing the heat on the tube (as suggested above). If the flange is bored enough to slide the tube inside and weld the end of the tube to the inside of the flange, that would be easier than a fillet weld on the outside of the tube.
alright, i put 90amps with 4t pulse and it seems to be working and not putting holes in elbow and at the same time i can control the heat better, its making elbow red hot but not putting hot.1727922788941.png
 
OP
H

handyman2020

Well-known member
Joined
Sep 22, 2019
Messages
222
Location
Toronto

After I put 150+ hours of work in last 2 months, learnt cad designing, designed my flange in CAD i was able to make everything fit and work, definitely not pro level but it works and no leaks and everything fits. needs a lot of cosmetic work + heat shields etc.


please rate my work and provide improvement suggestions
 

partsguy5768

Well-known member
Joined
Dec 12, 2024
Messages
347
hi,
I am practicing TIG welds for first time so i can do welding on my custom headers, welder is running at 120V


The settings I used are with 100% argon
tried DC TIG + 4T + NO PULSE + 0.3seconds pre flow + 3 to 4 seconds post flow + cup 5 pink + 1.6mm red Tungsten Electrode Red - 2% Thoriated
tried DC TIG + 4T + PULSE + 0.3seconds pre flow + 3 to 4 seconds post flow + cup 5 pink + 1.6mm Tungsten Electrode Red - 2% Thoriated
tried DC TIG + 2T + PULSE + 0.3seconds pre flow + 3 to 4 seconds post flow + cup 5 pink + 1.6mm Tungsten Electrode Red - 2% Thoriated
tried DC TIG + 2T + NO PULSE + 0.3seconds pre flow + 3 to 4 seconds post flow + cup 5 pink + 1.6mm Tungsten Electrode Red - 2% Thoriated

Tried changing argon flow from 10to 22
there are no leaks in torch for argon, the ball stays down unless i start welding


Material is Stainless Steel, first, I buffed surface with 80grit sanding wheel and then acetone and then tried welding

I tried with and without TIG filler rod to rule out one more factor, i.e. I ran the torch on surface of steel and just moved it without putting filler rod.

Torch;
tried bigger and smaller arc length as well like holding torch close enough to surface and far enough.
tried sanding TIG rod pointy angle at different angles, 30 and 60
tried extending and reducing tig rod length out of cup
tried holding torch and certain degrees as well.

I see that the metal gets red hot while doing welds, but when I reduce amps to 25, the filler rod wont melt/flow


tried 20A, 35A, 45A, 65A, all way to 120A with above settings

I do not have foot pedal for this welder and there is a simple switch on torch handle to turn on/off

there is no air coming in the room from anywhere, the garage is not ventilated unless I open door.

or what is wrong or going on here? why cant i get clean weld or the welds I did below are acceptable?

what is that I needed to buy to have some improvements in the welds?

Thankyou and Happy Weekend.
Need a large cup with gas lens and less heat.
 

BoostAddiction

Well-known member
Joined
Jan 23, 2006
Messages
885
Location
Western North Carolina
I started TIG welding in the late 60s. So I've been doing it for a while.

A few years back I was suddenly getting the same results as the OP. Settings were right, and I reground the electrode many times, but the problem persisted, no matter what I did. I was stumped, so called in an expert

He fired up his portable electrode sharpener, used one of my new electrodes and he and I were able to weld perfectly...

Turns out I was sharpening the tungsten on a grinding wheel which was contaminated, and so was transferring that junk to every tungsten I sharpened there. Once I started using a dedicated sharpener like my local expert, all was well.
 
To avoid these ads, REGISTER NOW!
Top Bottom