

gahrajmahal
Well-known member
Bad things come in threes they say, and that is how I recently replaced three (3) flapper valves on three different toilets. I am not a plumber and I know that most GJ members are familiar with the workings of a toilet, but I am going to try and explain this so a complete novice can attempt this repair, so a little humor please…

Most homeowners have been tortured by this bit of toilet plumbery. The valve has two jobs.
One: to keep the tank of water in the tank until ready to flush.
Two: To release the tank of water into the bowl to flush away the contents.
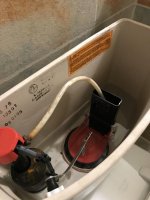
It’s location? Inside the tank, clearly visible in the bottom of the tank once you take the off the lid. It is attached to the “Flush handle” by a chain typically. The flush handle is how the flapper valve is opened to release the water from the tank to the bowl.
The story starts off with an email from my elderly but spry friends. On their long list of broken things at their great 60’s mid-century modern home was a broken chain that lifts the flapper valve. Peggy, former engineer from Cincinnati Milacron, told me “I used sewing thread to repair it, because it was what I had easily at hand”. This was in a relatively new Kohler one piece, comfort height toilet I installed four years ago. What I found when I removed the lid was a 3” diameter flapper valve with a ball chain loop from the middle of the valve to the front edge and a foam float. I had a long length of ball chain from my garage stock and I replaced the “sewn together repair” (which was doing the job great!) with a new length of chain. Should have fixed it right? Well, no. I could not get the foam float to keep the flap open and “floating” while the tank water rushed down the open flush valve opening.

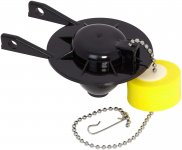
Problem: You must hold down the lever for a complete flush, or the flapper valve would slam shut resulting in a partial flush.
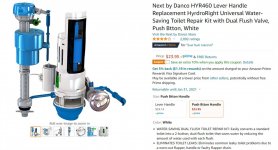
Looking online I saw that there are exact replacement parts and also re-designed universal parts. Back at home looking in my own toilet tanks I saw the float-less flapper design being used. The next day on my way back over to complete other repairs I picked up one of the universal no-foam-float designed flapper valves.


So here are some steps to completing the REPLACEMENT. First thing, find the toilet water-inlet shut-off valve. You may have some problems here if your toilet has never been replaced or serviced. Here in Ohio where I live we have very hard water, full of minerals, so faucets, shower controls, shut off valves all “harden up” or start leaking over a short period of time, 5-10 years. It will be difficult to turn off (clockwise) and you will probably need to use some pliers or a wrench to turn the valve off. If it is too difficult to turn off, STOP. Unless you want to replace the toilet shut off valve as part of this quick repair. If you can’t turn the toilet valve off easily, find the house main shut-off valve and turn off the water to the whole house. Not as convenient, but It will allow you to replace the flapper valve. This main shut-off valve is larger and more robust, so even if you need to use a wrench, you shouldn’t break it.
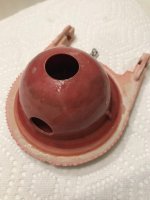
Using finger pressure, the old flapper valve will “snap” off of the horizontal pivot pins on the side of the overflow tube and flush valve assembly. I usually run my finger around the rim of the flush valve to make sure it doesn’t have a nick in it, which would allow it to have a slow leak. If so, then you need to replace the whole assembly and not just the flapper.
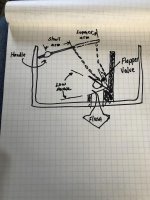
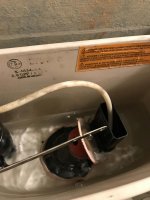
Snap the new flapper valve onto the horizontal pivot pins and you are almost home. Now comes the part where I received a “hands on education”. After replacing the flapper valve and connecting the provided chain to the outer most hole in the flush handle, I found the handle arm to be very short so that when in the open/flush position the flapper only opened to about a 45 degree angle. This results in the rushing water pulling the flapper back down immediately upon releasing the handle. This was the situation I was trying to resolve by replacing the float style flapper. My best version of completing a full flush, I adjusted the chain to have minimal slack and we resolved this to be as good of a fix as possible. It flushed well, but could have been better if the flapper angle could be increased. See my diagram:
Most homeowners have been tortured by this bit of toilet plumbery. The valve has two jobs.
One: to keep the tank of water in the tank until ready to flush.
Two: To release the tank of water into the bowl to flush away the contents.
It’s location? Inside the tank, clearly visible in the bottom of the tank once you take the off the lid. It is attached to the “Flush handle” by a chain typically. The flush handle is how the flapper valve is opened to release the water from the tank to the bowl.
The story starts off with an email from my elderly but spry friends. On their long list of broken things at their great 60’s mid-century modern home was a broken chain that lifts the flapper valve. Peggy, former engineer from Cincinnati Milacron, told me “I used sewing thread to repair it, because it was what I had easily at hand”. This was in a relatively new Kohler one piece, comfort height toilet I installed four years ago. What I found when I removed the lid was a 3” diameter flapper valve with a ball chain loop from the middle of the valve to the front edge and a foam float. I had a long length of ball chain from my garage stock and I replaced the “sewn together repair” (which was doing the job great!) with a new length of chain. Should have fixed it right? Well, no. I could not get the foam float to keep the flap open and “floating” while the tank water rushed down the open flush valve opening.
Problem: You must hold down the lever for a complete flush, or the flapper valve would slam shut resulting in a partial flush.
Looking online I saw that there are exact replacement parts and also re-designed universal parts. Back at home looking in my own toilet tanks I saw the float-less flapper design being used. The next day on my way back over to complete other repairs I picked up one of the universal no-foam-float designed flapper valves.
So here are some steps to completing the REPLACEMENT. First thing, find the toilet water-inlet shut-off valve. You may have some problems here if your toilet has never been replaced or serviced. Here in Ohio where I live we have very hard water, full of minerals, so faucets, shower controls, shut off valves all “harden up” or start leaking over a short period of time, 5-10 years. It will be difficult to turn off (clockwise) and you will probably need to use some pliers or a wrench to turn the valve off. If it is too difficult to turn off, STOP. Unless you want to replace the toilet shut off valve as part of this quick repair. If you can’t turn the toilet valve off easily, find the house main shut-off valve and turn off the water to the whole house. Not as convenient, but It will allow you to replace the flapper valve. This main shut-off valve is larger and more robust, so even if you need to use a wrench, you shouldn’t break it.
Using finger pressure, the old flapper valve will “snap” off of the horizontal pivot pins on the side of the overflow tube and flush valve assembly. I usually run my finger around the rim of the flush valve to make sure it doesn’t have a nick in it, which would allow it to have a slow leak. If so, then you need to replace the whole assembly and not just the flapper.
Snap the new flapper valve onto the horizontal pivot pins and you are almost home. Now comes the part where I received a “hands on education”. After replacing the flapper valve and connecting the provided chain to the outer most hole in the flush handle, I found the handle arm to be very short so that when in the open/flush position the flapper only opened to about a 45 degree angle. This results in the rushing water pulling the flapper back down immediately upon releasing the handle. This was the situation I was trying to resolve by replacing the float style flapper. My best version of completing a full flush, I adjusted the chain to have minimal slack and we resolved this to be as good of a fix as possible. It flushed well, but could have been better if the flapper angle could be increased. See my diagram:


 the article you've dropped off doesn't always make it out to the main. Then the next time you get done with your grunting and groaning that article gets hung up on the remains of it's predecessor and after a while you're calling rotorooter. My toilets are dual flush, #1 and I flush as usual, #2 and I stand there and hold the handle down till the tank's empty. Last person that tried to shame me into some "water conservation" nonsense got thoroughly embarrassed when they couldn't explain how I'd manage to flush the Great Lakes aquifer dry. Hell with the water levels right now that gowk should have been encouraging me because I rather doubt they knew how a septic system works either.