Hi, this looks brilliant! Doyou have any dimensions/ plans you could share? I’m looking to build a similar thing from wood. My house has straw (Stramit) walls - don’t ask!- so I’m looking to build a fold down work table that still has support on the front edge, rather than putting all the weight through the brackets/walls.I built this, I think this is exactly what you're looking for?


You are using an out of date browser. It may not display this or other websites correctly.
You should upgrade or use an alternative browser.
You should upgrade or use an alternative browser.
Fold UP (not DOWN) workbench ideas, please.
- Thread starter mad german
- Start date
Hi, this looks brilliant! Doyou have any dimensions/ plans you could share? I’m looking to build a similar thing from wood. My house has straw (Stramit) walls - don’t ask!- so I’m looking to build a fold down work table that still has support on the front edge, rather than putting all the weight through the brackets/walls.
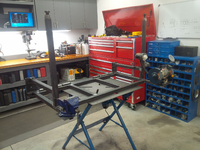
Top is 24" deep by 48" wide. The back bar that's lagged into the wall is a bit wider so I could pick up 4 full studs (16" on center). Tube is all 1.5" 0.100 and the slip ins are 1.25" 0.100 tubing. Legs use 1" bolts for feet. Hinge is 0.5" and 3/8" or 0.75" and 1/2" (can't remember) tube and solid rod. The rest of the dimensions are fairly simple to figure out during assembly, basically I just assembled in place...so did the hinge while the table was upside down with a rough half inch spacing between the wall bar and the top frame, or where the legs bolt in when folded out, I just welded those in place with the legs folded out and wherever they ended up.
I basically just figured it out as I went once I had the stack up of things so it could fold properly sorted out in my mind. Some during assembly pics for reference:



jabberwoki
Well-known member
I used the fold up bed frame out of a big rig works like a charm.
Pm me if you want pics
Pm me if you want pics
Greenlawnracing
Well-known member
Can you tell me how far it protrudes from the wall when folded up, as well as the thickness of the brackets, benchtop, and backer board? (assuming backer board or some version of that term is the way you reference the board on the wall) Trying to see if I can fit it in my garage, only nine inches to play with (scary) between my truck and the wall when parked in my builder spec garage. BUT, rarely does it park in that configuration.Desktop is 42" x 42"
Brackets are 24" and good for 500Lb. Not that I would test it...
I'm using it as a WFH desk, nothing heavy. If I do want to put weight on it, I'll add a support leg of some sort.
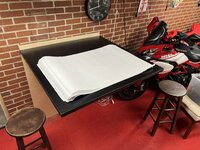
These are full size 24" x 36" prints:
Trapps
ALLIANCE MEMBER
Mounting board is just a piece of 3/4" plywood (2 tapcons into the brick). This was added to insure a smooth, flat, level mounting surface for the brackets which would not sit perfectly aligned on the brick face.
Desktop is 1 3/16" thick
Brackets are 2 7/8" thick and 1 3/4" wide (4 tapcons per bracket through the plywood and into the brick)
Overall distance to wall when folded is 4 5/8"
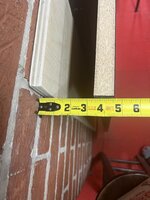


Desktop is 1 3/16" thick
Brackets are 2 7/8" thick and 1 3/4" wide (4 tapcons per bracket through the plywood and into the brick)
Overall distance to wall when folded is 4 5/8"
Last edited:
Greenlawnracing
Well-known member
VERY helpful. Thank you!!!!Mounting board is just a piece of 3/4" plywood (2 tapcons into the brick). This was added to insure a smooth, flat, level mounting surface for the brackets which would not sit perfectly aligned on the brick face.
Desktop is 1 3/16" thick
Brackets are 2 7/8" thick and 1 3/4" wide (4 tapcons per bracket through the plywood and into the brick)
Overall distance to wall when folded is 4 5/8"
Greenlawnracing
Well-known member
So I finally got around to duplicating your work....sorta.Mounting board is just a piece of 3/4" plywood (2 tapcons into the brick). This was added to insure a smooth, flat, level mounting surface for the brackets which would not sit perfectly aligned on the brick face.
Desktop is 1 3/16" thick
Brackets are 2 7/8" thick and 1 3/4" wide (4 tapcons per bracket through the plywood and into the brick)
Overall distance to wall when folded is 4 5/8"
Can't believe it too me so long to do this. I presume that having this space next to my toolbox will be perfect for woodworking assembly assembly, a place to set bicycle tools during maintenance, etc.
However not all is good. The brackets don't collapse all the way once I put the top on. I presume it is because they are mediocre?
I ordered yours last night, they'll be here this weekend.
What did you use to attach your top? I used 3/4 course screws.
Open to other suggestions as I play with sizes, etc. I'll use 1X4s instead of 2X4s as backers when I replace the brackets to preserve space.
Attachments


Trapps
ALLIANCE MEMBER
Mine does collapse to flat:So I finally got around to duplicating your work....sorta.
Can't believe it too me so long to do this. I presume that having this space next to my toolbox will be perfect for woodworking assembly assembly, a place to set bicycle tools during maintenance, etc.
However not all is good. The brackets don't collapse all the way once I put the top on. I presume it is because they are mediocre?
I ordered yours last night, they'll be here this weekend.
What did you use to attach your top? I used 3/4 course screws.
Open to other suggestions as I play with sizes, etc. I'll use 1X4s instead of 2X4s as backers when I replace the brackets to preserve space.

I can get a better picture tonight.
but not flush against the wall:
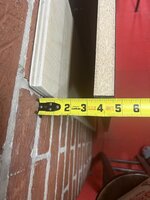
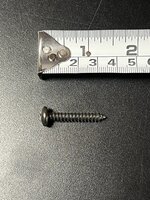
I can't recall exactly which screws I used, but I'll confirm tonight when I get home.
Greenlawnracing
Well-known member
Mine collapsed to flat before I "loaded" it, not sure what is causing the issues. Perhaps the brackets can't handle the weight?Mine does collapse to flat:
I can get a better picture tonight.
but not flush against the wall:
I can't recall exactly which screws I used, but I'll confirm tonight when I get home.
Or am I misunderstanding you, and the brackets are not designed to completely collapse?
Monza Harry
Well-known member
Another name for Nemo's bench is "Gate leg table" should bring in more internet hits for idea's/plans. An idea for the triple/quad "Rockler" brackets is to replace the top pin with a rod connecting all 3-4 if constructed tight and strong enough lifting the rod from one end should disengage all 4. This will be a challenge to execute properly. Harry
Trapps
ALLIANCE MEMBER
Screws used in top:

Tapcons through the brackets and into the brick.
Based upon your picture, it looks like the brackets should collapse all the way (the notch over the 'support arm' pivot). Perhaps something isn't aligned or is within the bracket frame...
Tapcons through the brackets and into the brick.
Based upon your picture, it looks like the brackets should collapse all the way (the notch over the 'support arm' pivot). Perhaps something isn't aligned or is within the bracket frame...
Greenlawnracing
Well-known member
Ok, now I think I know what happened. The brackets aren't that firm, they have waay too much play in them while I was moving them up and down unloaded. I'm sure they got "permanently" misaligned once I mounted the top.Screws used in top:
Based upon your picture, it looks like the brackets should collapse all the way (the notch over the 'support arm' pivot). Perhaps something isn't aligned or is within the bracket frame...
Should have ordered your brackets in the beginning. As they say, you get what you pay for..........
Greenlawnracing
Well-known member
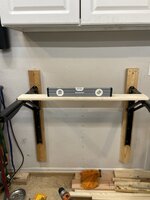
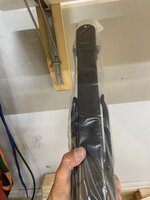
New brackets installed tonight, man what a difference it makes! The original ones were so cheap and flimsy that once I had the weight of the top, they got all bound up. Man, I wish I had thought of this five years ago. I will have to play with Sizes, placement, etc. but I have at least a temporary set up. I wanted to use one by fours, but needed something with more meat to attach the brackets to. In order to get less depth, I might eventually go to a plywood backer as suggested.
In this tiny garage, these things are basically necessities.
In this tiny garage, these things are basically necessities.
Attachments
-
 6F37E6AD-CC50-49CD-879A-12833D06F4C0.jpeg489.1 KB · Views: 11
 -
 6F829252-195B-4B7F-BB95-53B45BCEC843.jpeg761.7 KB · Views: 11
 -
 B3F1F405-11B2-4BC0-B3FD-3E3593AF2B01.jpeg575.1 KB · Views: 12
 -
 A7A635C9-4072-41AB-ACC1-B9E7C99A7151.jpeg465.4 KB · Views: 13
 -
 812753CF-7472-4907-AC93-2A2C6B2BCD64.jpeg626 KB · Views: 14