To avoid these ads, REGISTER NOW!

FyrMe's Tool Restoration Thread

jakemac

Well-known member
Joined
May 21, 2013
Messages
9,035
Location
New England
Re: FyrMe's Tool Restoration and Projects Thread

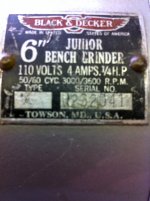
Thanks nine. I had to go on to vintage machinery to find the only other grinder of its kind known to the web, in order to get some of the words off the tag, since mine is in such bad shape. Unless I can have one of my kids make out the serial number that's stamped in the old tag, I'm gonna have to make one up. The original is very un-legible. Man that makes me sound like my parents with their eye sight. I'm getting old I guess.

Sometimes it helps to use a magnifying glass and a small flashlight held at odd angles to decipher the numbers. Move the flashlight around slowly to catch the stampings at different angles. Change the flashlight if you have to. Incandescent, fluorescent, LED. They all give off different light, and one may be better than another to catch the numbers. I once spent 4 hours doing this to read a s/n.
 
Last edited:
To avoid these ads, REGISTER NOW!

CwazyWabbit

Well-known member
Joined
Jan 9, 2015
Messages
1,189
Location
Surrey, UK
This might not work at all but when trying to read markings off of integrated circuits (chips) I find putting a drop of isopropyl alcohol on and watching it evaporate reveals markings momentarily. Might be worth a try.
 
OP
F

Fyrme

Well-known member
Joined
Nov 28, 2012
Messages
2,231
Location
Green country, Oklahoma
Fryme, I have one of those grinders, it's tagged Junior


No tool rest or bell covers, it was a mess, but for $10.00, I couldn't let it go.


I'll try to get a close up of the tag for you if your interested- probably around noon. I hope it will help, wish I could get mine looking like yours! Tag wise I mean, and those bell covers were made from two 6 inch cake pans?


That looks good Ben! I'd give you $20 just for the top handle. Mine is missing and obviously not easy to find. I plan on coming up with a era correct solution, just don't know what that is yet. And as for the Junior model, I really don't think there is a difference, beside the name. Both grinders are identical. I have seen more of the juniors than the H.U. However. Lucky me I guess. I've got all the lettering done, all that is left is the serial number that gets stamped into the aluminum plate.

Sometimes it helps to use a magnifying glass and a small flashlight held at odd angles to decipher the numbers. Move the flashlight around slowly to catch the stampings at different angles. Change the flashlight if you have to. Incandescent, fluorescent, LED. They all give off different light, and one may be better than another to catch the numbers. I once spent 4 hours doing this to read a s/n.


Thanks jake. The flash light trick was the first one I tried. Another useful trick is a camera with a good macro lens on it. Take a few pics from different angles. Unfortunately, neither worked due to the excessive damage to the tag. I'll figure something out though.

This might not work at all but when trying to read markings off of integrated circuits (chips) I find putting a drop of isopropyl alcohol on and watching it evaporate reveals markings momentarily. Might be worth a try.


Wabbit, that's one I've not heard of. I'll give it a shot. Thanks.
 

Stuart in MN

Well-known member
Joined
Sep 8, 2005
Messages
23,052
Location
Minneapolis
Your tag looks good, but to match the original tag you should use a sans serif text for the smaller text lines.

To decipher the serial number, try adjusting the photo parameters - sometimes if you darken it or change the contrast (or even flip to negative) the numbers will be easier to see. Also, try taking the photo with and without a flash to see which one provides a better image.
 

Ben Buck

Well-known member
Joined
Dec 30, 2010
Messages
7,255
Location
S. W. Ohio
Fryme, here are the pictures plus the serial number.

First box is Type Mine says A, Second the serial number 292041

I don't know on the serial number if it's like second shift, made september 20, 1941 ?

I'm going to keep the handle, beats an electric box tho!

I hope this might help, cell phone pictures.
 

Attachments

  • IMG_1664.jpg
    IMG_1664.jpg
    139.6 KB · Views: 55
  • IMG_1663.jpg
    IMG_1663.jpg
    139.9 KB · Views: 57
  • IMG_1662.jpg
    IMG_1662.jpg
    144.5 KB · Views: 53

nine4gmc

Well-known member
Joined
Mar 24, 2012
Messages
14,357
Location
Dallas
Re: FyrMe's Tool Restoration and Projects Thread

If the serial number is stamped, you can sometimes see the numbers from the back of the label if the front is messed up.
 

cbacres

Well-known member
Joined
May 28, 2010
Messages
5,998
Location
SW Florida
Fryme, need parts from this one?
imagejpg1-36.jpg
 
OP
F

Fyrme

Well-known member
Joined
Nov 28, 2012
Messages
2,231
Location
Green country, Oklahoma
This thing is shaping up. I got the wheel shrouds trued up in between runs at the fire house today. I lucked out and found some 5lb weight plates that fit perfectly inside the housing. I had some pretty good before and after shots of this, but, well, you know the story:mad:
 
Last edited:
OP
F

Fyrme

Well-known member
Joined
Nov 28, 2012
Messages
2,231
Location
Green country, Oklahoma
WOW! it's been over a year since I've posted here, and a crazy one at that. I am finally starting to pick up on my restorations again. I also am gearing up to start building furniture again too. I even created a FB page for all the stuff I am selling. But since I'm here, I guess I should pick up where I left off here, on the little B&D.

A year ago I had this thing all cleaned up and I painted it hammered silver and at that point it was put in a storage tote and put on a shelf. After dragging it back out and blowing off the dust, I decided I didn't like the color. So I sanded it back down and went with hammered Black. Which it is currently drying.

In the meantime, I tackled the pitifully beat up center band. The original was just a piece of high carbon sheet metal, but I figured I'd step it up a notch and compliment the hammered black with a satin polished stainless steel band.

I have several sheets of food grade stainless, so I used one to cut the band out of.
26446378800_f0d7f09df8_c.jpg

26446374570_a642102b58_c.jpg


I was also able to get a blank cut out from a expired license plate I had, which I will use for the new name plate. I'll get you some assembled pics of the grinder as soon as I feel its cured enough.
 
Last edited:
OP
F

Fyrme

Well-known member
Joined
Nov 28, 2012
Messages
2,231
Location
Green country, Oklahoma
BTW, I am searching for a 1/2" arbor flange if anyone has an extra they are willing to sell, or even a pair of them. My grinder only came with one and it is the solid steel type, not the stamped steel.
 

jakemac

Well-known member
Joined
May 21, 2013
Messages
9,035
Location
New England
I have one that was in a box of misc. bits that I picked up a while ago. If this is what you're looking for, PM me.

Front
 

Attachments

  • image.jpg
    image.jpg
    14.1 KB · Views: 54

nine4gmc

Well-known member
Joined
Mar 24, 2012
Messages
14,357
Location
Dallas
Re: FyrMe's Tool Restoration and Projects Thread

That band is nice, reminds me I need to cut a headband for my Craftsman 100 from a piece of stainless I have put away for that very reason. I have been procrastinating over it because I wanted to do engine turning on it to look factory but I've watched a few you tubes on engine turning in a drill press with roloc discs and have gained my confidence now.

Can't wait to see that thing finished!


Sent from my iThingy using Tapatalk
 
OP
F

Fyrme

Well-known member
Joined
Nov 28, 2012
Messages
2,231
Location
Green country, Oklahoma
Re: FyrMe's Tool Restoration and Projects Thread

Thanks nine. I was actually going to do an engine turn on this one, but once I started sanding it directional I really liked the satin brushed finish, so I stopped there.
From my research, the best ways to do engine turning is with Cratex sticks or a small wire end brush held together with a O-ring. Guess that's how the gun smiths do it.
 

Outlawmws

Well-known member
Joined
Aug 9, 2011
Messages
39,156
Location
The Badlands
Re: FyrMe's Tool Restoration and Projects Thread

Thanks nine. I was actually going to do an engine turn on this one, but once I started sanding it directional I really liked the satin brushed finish, so I stopped there.
From my research, the best ways to do engine turning is with Cratex sticks or a small wire end brush held together with a O-ring. Guess that's how the gun smiths do it.

This is how I've done it on small parts/guns. I've see large panels (like race car fire walls) done with 2" sanding disks. I think the wire brush needs one that is very flat/square.
 
OP
F

Fyrme

Well-known member
Joined
Nov 28, 2012
Messages
2,231
Location
Green country, Oklahoma
Re: FyrMe's Tool Restoration and Projects Thread

So I threw the grinder together real quick before heading out for a hunting/fishing/camping trip with my two boys. I almost posted the pic, but didn't want to ruin the final reveal, so I changed it to b&w. I didn't want to be premature and ruin the climax right!?!
66dd7dd77f15f9584fcca5e080633039.jpg

I've still got to get the label done, install a cord and throw on some new wheels, then I'll make the full reveal.
 

laser3kw

Well-known member
Joined
Nov 17, 2012
Messages
7,276
Location
northen IL
This might not work at all but when trying to read markings off of integrated circuits (chips) I find putting a drop of isopropyl alcohol on and watching it evaporate reveals markings momentarily. Might be worth a try.
your sh!t'n me - really? :wtf:
never heard of that method. I have to give it a whirl some time. :thumbup:
 

bonneyman

Well-known member
Joined
Apr 22, 2010
Messages
8,779
Location
Desert SW
Re: FyrMe's Tool Restoration and Projects Thread

So I threw the grinder together real quick before heading out for a hunting/fishing/camping trip with my two boys. I almost posted the pic, but didn't want to ruin the final reveal, so I changed it to b&w. I didn't want to be premature and ruin the climax right!?!
66dd7dd77f15f9584fcca5e080633039.jpg

I've still got to get the label done, install a cord and throw on some new wheels, then I'll make the full reveal.

Dang, that thing looks nice even in B&W!:rocker:
 
To avoid these ads, REGISTER NOW!
OP
F

Fyrme

Well-known member
Joined
Nov 28, 2012
Messages
2,231
Location
Green country, Oklahoma
Got it finished up. Well, other than a couple touch ups to make.
25659011985_0e9872f714_c.jpg
26219151613_de256fd8db_c.jpg
26551113240_95918980b8_c.jpg
26551112470_5496c1408b_c.jpg
26823706305_3a8f1dea1b_c.jpg

I haven't decided what the next project will be just yet, but I have lots to choose from. Hmm, maybe my little Craftsman mini lathe........
 
OP
F

Fyrme

Well-known member
Joined
Nov 28, 2012
Messages
2,231
Location
Green country, Oklahoma
Thanks fella's. Rivenn, I was lucky enough to find the handle and tool rests from cbacres. He saw my thread and happen to have a grinder he was willing to part out, see post 247. I'm glad I was able to do it justice.
 
OP
F

Fyrme

Well-known member
Joined
Nov 28, 2012
Messages
2,231
Location
Green country, Oklahoma
Re: FyrMe's Tool Restoration and Projects Thread

It's about that time to get started on my next project. Since I had the mini lathe out to assist in straightening the rotor shaft on the B&D grinder, I figured I may as well keep it out and get to work on it.
f96c3974f1cb8f0d0fdc716bd4f99105.jpg

44e2f7e15fd457f97f5c8f60889cf4c7.jpg

21d8cd6d14e85ae86081423b49c30561.jpg

cc67c20d6686aba2e79f6bffa1f4c261.jpg

1eb6de9e58c24726a4077296f6ab167d.jpg

19eb553e2562e82b6dbdb74a6227dae1.jpg

fa83aecc59ac5777087c8f60a5ce67c0.jpg


This project will likely require some input from you lathe users since I've never used one and have only seen them being used in videos.

First of all, anyone familiar with these little Craftsman's, is the feed screw supposed to be able to spin by hand? Mine seems to be locked when in the free spin position and will only feed with the spin of the chuck when locked in.
 
OP
F

Fyrme

Well-known member
Joined
Nov 28, 2012
Messages
2,231
Location
Green country, Oklahoma
Re: FyrMe's Tool Restoration and Projects Thread

Wow, you blew the dust off this thread lol. To be honest, I haven't restored any tools in over a year. I've been banging away at other projects, that have consumed me for now. If you want to check out any of my non tool projects, take a look at my Multi Purpose Shop thread in my sig. I hope to get back to tools before the end of summer though, so per your request, the lathe will be the first up on the bench.

Sent from my SAMSUNG-SM-G891A using Tapatalk
 
Last edited:

Eric Brown

ALLIANCE MEMBER
Joined
Jun 14, 2024
Messages
672
Resurrecting this thread. As some of you know, I like to nickel plate some of my old tools. Thought I would do a few posts about the process. It starts with de-rusting. I use a variety of techniques depending on the shape of the tool and where the rust is. I always try to keep in mind not destroying any identification markings and keeping flat surfaces flat. I also try to smooth out surfaces that might normally be touched.

For this post I am showing a Taylor pattern brace. It has no markings except for the number 3 in several places. I took the top pad off. It was held by a peened over shaft and washer. I will replace the peened over area with a left handed nut and some loctite. Also disassembled the bit retaining lever and spring.

So The rust wasn't heavy and the metal had some roughness to it. So I started by sanding and using a Dremel with wire brushes. Once that was done I moved over to the fine wire wheel. I use fine as it leaves a frosted like surface. I then look it over and sand some more. I'm not after a perfect surface. There will be some dings and other signs of use. Once I'm happy with the frosted surface I will polish.

Todays pictures show it taken apart but not sanded. The next picture shows it sanded and fine wire wheeled. Will work on polishing tomorrow.

Taylor Apart 1.JPG

Taylor sanded 1.JPG
 

Eric Brown

ALLIANCE MEMBER
Joined
Jun 14, 2024
Messages
672
Here it is after first polish. When it's at this stage I am looking for how consistent the surface texture is. As you can see both the arms are a little rougher along with the top pad. So, more sanding and then another polish.

Taylor 1st polish.JPG
 

Eric Brown

ALLIANCE MEMBER
Joined
Jun 14, 2024
Messages
672
Ok, just got done with second polish. It's almost where I want it. Probably one more polish before plating and final polish and re-assembly.

Taylor 2nd polish.JPG
 

Eric Brown

ALLIANCE MEMBER
Joined
Jun 14, 2024
Messages
672
Just did 3rd polish. This is good enough for now. Need to thread the end (left-handed 5/15-24) but waiting on die and nut to arrive. It's a hex nut and I'm not sure I will use it or make one out of brass. I will first try the nut. I will cut a slot across the nut for a split nut driver. Should work. Also need to look at the wear on the bronze lower bearing. Might need to remake it or add some washers to tighten up.
Here is what it currently looks like with the pieces slid together.

Taylor 3rd polish.JPG

Taylor 3rd polish top.JPG
 

Leviton

Well-known member
Joined
Feb 25, 2019
Messages
898
Location
Oregon
Here it is after first polish. When it's at this stage I am looking for how consistent the surface texture is. As you can see both the arms are a little rougher along with the top pad. So, more sanding and then another polish.
What is your polishing process?
 

Eric Brown

ALLIANCE MEMBER
Joined
Jun 14, 2024
Messages
672
What is your polishing process?
Basically I sand everything smooth. Eliminate any rust. Remove any sharp edges. Fix mechanicals. Then I use a 6" fine wire wheel. I'm after an even finish. For the polishing I use a 6" diameter 1/2" wide spiral wound cotton wheel with green buffing compound. I usually get my compound from McMaster-Carr in a 3lb block. I use cotton rags to clean up. After this polishing is done well enough for plating then it goes into the degreasing tank at 200F for about 20 minutes by hanging on a copper wire. Then a wash with distilled water being careful to not touch the part, only the wire. Then it goes into the plating tank. The DC current is set to .07 amps per square inch. I normally calculate each part and write it down on a list. There are times when I can plate multiple parts at same time. The plating solution is running about 110F and there is a circulation pump at the bottom. When hanging the parts it's important to hang so there are no air pockets. Depending on the part usually about on hour will give a nice plate. Then the part is rinsed off again, dried, and then one last polish.

Something to keep in mind is that plating is different than painting in that painting can smooth a part by filling in voids. Plating is opposite that. When plating the current draws the nickel particles to the part where it is bonded. The nickel is attracted to the path of least resistance. That means it will bond to the top surface before going to the bottom. So any scratches become magnified. Stamped names become clearer. If a part has a joint, the nickel will not fill the joint. If plating, say a cube, there will be a slight buildup on all the edges. Threaded parts can be plated but need to make sure there is clearance.

If a part is too long to be plated, you can plate one end. Then rinse it off and wipe down with a re-activator (an acid) and then plate the other end. Where the two platings overlap it can usually be buffed out. There other tricks for very long parts.

There are a lot of things to consider for what seems a simple process. The bulk of time is in the prep.
 

Eric Brown

ALLIANCE MEMBER
Joined
Jun 14, 2024
Messages
672
Something I haven't really talked about yet is my polisher setup. Guess I take it for granted? Anyway, it reminds me of a quote that says find someone you admire, and then don't follow in their footsteps, but instead seek what they sought. So, the polisher I'm using isn't that important. However, it is a L'Hommedieu #8 which has a shaft 9" above the bottom. It has a 1/2" shaft. It holds the wheels about 15" apart. It is mounted to a board with the motor behind it. The motor is a 1/3 hp 1750 rpm with an adjustable pully. The buffer has a three step pulley. I use the center pulley which is close to the one on the motor resulting in about a 1750 rpm at the wheels. I use a link belt to reduce vibrations. I sit the setup on the edge of my table saw extension table overhanging with a fiber trach container under it. The left side has the wire wheel and the right the buffing wheels. The height of the buffer shaft is about armpit high. I have a led 4' light above the buffer.
I wear a full face shield and a shop apron. Several goals I'm trying to meet. Comfort and safety. The height puts the part closer to my eyesight. The buffer overhang puts buffing debris mostly into the waste bin. I use several tools to make working with small parts easier. Several sizes of coupling nuts with long screws. I thread screws into these just a few threads deep and then run the long screws in until it locks the screw being worked on turning it into a holder. (Hint: Hold in left hand so the wheel rotation is trying to tighten the assembly.). Also handy are hand vices. I mostly use two. One is a large size with gripping jaws. The other is a bronze smooth jaw in a medium size. I will also use pin punches to hold washers, nuts, springs and other small parts.

Before polishing I try to clean up rust using a variety of methods. Sometimes I will use a bead blaster using glass beads. Sometimes chemicals such as Evapo-rust, vinegar. Probably could use electrolysis but I don't. Dremel tool with a variety of wire brushes and some buffing felts for getting into tight spaces. An Exacto knife for scraping. Sand paper on holders or laying on a surface plate. Sometimes a roll of Emory for using the shoe shine technique. The grits I use are usually 80 to 220. If I'm after more of a mirror finish I will use 600 or higher.

I don't try to get everything to the same texture or finish. Good example would be a metal hand plane. Polishing the insides to mirror would take a long time. Getting the sides or lever cap shiny is doable. Mirror finish isn't usually needed. Shiny for me is the goal. The tool can still have signs of use.
 
To avoid these ads, REGISTER NOW!
Top Bottom