
You are using an out of date browser. It may not display this or other websites correctly.
You should upgrade or use an alternative browser.
You should upgrade or use an alternative browser.
Garage 2.0 - Building a Triple
- Thread starter bonecrrusher
- Start date
CodeRedZ
Well-known member
When you talk to Racedeck ask for the garage journal discount. Mine was 2.99 per sq/ft tile and free shipping.
Not sure if Craig got a better deal at Sema.
Not sure if Craig got a better deal at Sema.
OP
bonecrrusher
Well-known member
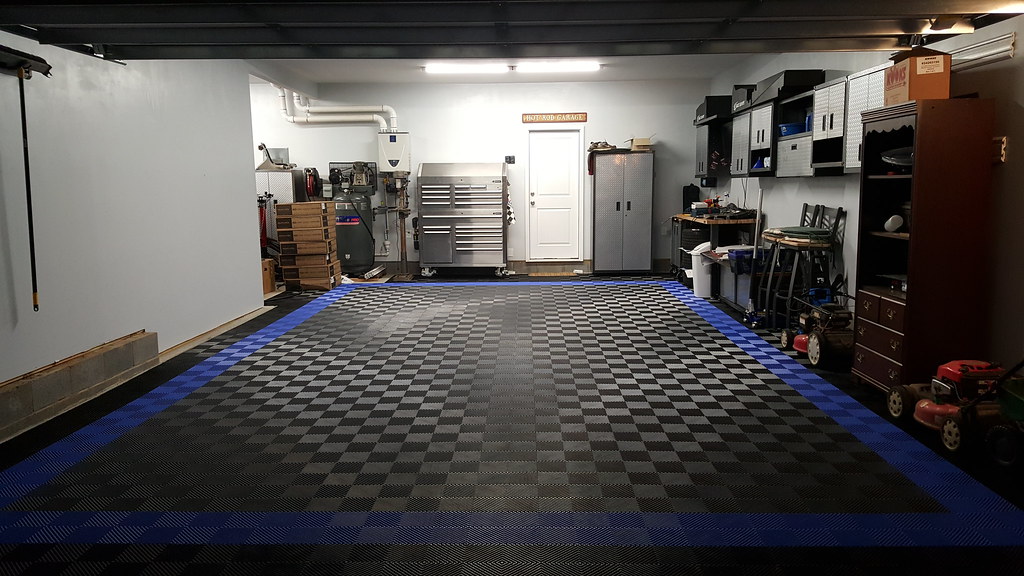
So I moved all my **** out of the way - and got the rest of the main bay done. I still need to trim around the edges - but I am going to finish up the third bay before I start that. I want to make sure I don't run out of tiles before I start cutting them up.
My fuel lines for the Corvette came in today - so I hopefully will finish up that fuel pump swap soon.

 [
[
My fuel lines for the Corvette came in today - so I hopefully will finish up that fuel pump swap soon.
MichaelBikel
Well-known member
Good stuff mirogi!
CodeRedZ
Well-known member
nice man
HotRod68Camaro
Well-known member
I really like the color combo you picked for the tiles. Nice job
OP
bonecrrusher
Well-known member
Thanks everyone!
So I had some free time today - so I decided to finally modify my Trans Jack - I might use it to get the gas tank back into the Vette.
This started off as the Torin 1K Lb transmission jack that I got from Northern Tool.
I cut the bottom of the stand off - and drilled the three holds for the leg mounts - and finished up this project.
Some pics:


Youtube overview that I created:
So I had some free time today - so I decided to finally modify my Trans Jack - I might use it to get the gas tank back into the Vette.
This started off as the Torin 1K Lb transmission jack that I got from Northern Tool.
I cut the bottom of the stand off - and drilled the three holds for the leg mounts - and finished up this project.
Some pics:
Youtube overview that I created:
GDPossehl
Well-known member
That should make clutch swaps a breeze. Wanna swap out my pilot bearing that I neglected to change while installing a clutch at 2am on a Sunday?
CodeRedZ
Well-known member
So you just made it a lower jack?
OP
bonecrrusher
Well-known member
Yeah - cut a foot out of it so that it would fit under the car for the MaxJax. I've had that jack for over a year - and just now cut it, lol.
CodeRedZ
Well-known member
ah gotcha, that makes sense.
OP
bonecrrusher
Well-known member
Hope everyone had a good holiday!
So I did a little bit of Black Friday shopping and picked up 2 more Gladiator cabinets from Sears. I got 2 more of the 30x30 unites - put up some more track - and got the cabinets mounted.

So I did a little bit of Black Friday shopping and picked up 2 more Gladiator cabinets from Sears. I got 2 more of the 30x30 unites - put up some more track - and got the cabinets mounted.
OP
bonecrrusher
Well-known member
So while I am waiting on parts for my fuel system rebuild - I decided to get started on the third bay flooring. I initially had only planned on doing along the back wall just so that I could get some extra boxes out of the way - but I ended up doing the whole bay.
I just lifted the Vette up in the air - and worked underneath it. I started trimming the black tiles along the back - and have a whole bunch more to do. I'll get to the rest later.
I fought my Liftmaster with the garage door closing on the very edge of the ramp tiles that lead up to the floor. I had to adjust both the close height - and the force used to open and close the door. After an hour or so - I got the garage door closing with no issue and finished trimming out around the lift.
Now for some pics:
CodeRedZ
Well-known member
sweet man!!
OP
bonecrrusher
Well-known member
Thanks Geeds!
I get to start some big projects pretty soon - my fuel system upgrade has turned into a full replacement - and that involves dropping the drivetrain - so an LS7 clutch upgrade as well!
I get to start some big projects pretty soon - my fuel system upgrade has turned into a full replacement - and that involves dropping the drivetrain - so an LS7 clutch upgrade as well!
Denwood
Well-known member
Wow...what a ton of work in just eight months!
The floor looks amazing. I didn't realize until now that you had the lift bay "dogleg" in your shop. It's a very unique layout..very cool. Speaking of cool, that Vette is about as good as it gets.
Is there any way you could alter the right side hoist wall to allow walking around the right column? That would allow you to walk around without going under. It looks like an outside load bearing wall, but my guess is that a header and supports would allow you to do it. Looking at your framing pics, it looks like that wall provides lateral stability to a load bearing post..but takes no load itself. I'm going to guess it was built like that to your liking..so forgive the suggestion. Just walking out one side and around works pretty well too I suspect.
I've always had a strange affinity to pull-down staircases like your setup. I need to build an attic space just to put a stairway in")
The floor looks amazing. I didn't realize until now that you had the lift bay "dogleg" in your shop. It's a very unique layout..very cool. Speaking of cool, that Vette is about as good as it gets.
Is there any way you could alter the right side hoist wall to allow walking around the right column? That would allow you to walk around without going under. It looks like an outside load bearing wall, but my guess is that a header and supports would allow you to do it. Looking at your framing pics, it looks like that wall provides lateral stability to a load bearing post..but takes no load itself. I'm going to guess it was built like that to your liking..so forgive the suggestion. Just walking out one side and around works pretty well too I suspect.
I've always had a strange affinity to pull-down staircases like your setup. I need to build an attic space just to put a stairway in
Last edited:
OP
bonecrrusher
Well-known member
Wow...what a ton of work in just eight months!
The floor looks amazing. I didn't realize until now that you had the lift bay "dogleg" in your shop. It's a very unique layout..very cool. Speaking of cool, that Vette is about as good as it gets.
Is there any way you could alter the right side hoist wall to allow walking around the right column? That would allow you to walk around without going under. It looks like an outside load bearing wall, but my guess is that a header and supports would allow you to do it. Looking at your framing pics, it looks like that wall provides lateral stability to a load bearing post..but takes no load itself. I'm going to guess it was built like that to your liking..so forgive the suggestion. Just walking out one side and around works pretty well too I suspect.
I've always had a strange affinity to pull-down staircases like your setup. I need to build an attic space just to put a stairway in
Dennis - if you look at this shot below - you can see that short wall. To be honest - I never wanted that wall in there the first place!

After installing the lift - especially with a bigger car - it is a real pain in the a## to either have to have both garage doors up - and walk around - or hunch over and crawl under the car. I have considered taking a Sawzall to the wall - and make my own opening! LOL!
That is a down the road project - I need to get the Corvette back together - install the blower - and get it tuned.
I also want to get a shed - and put all of the lawn equipment in, etc.
I just have a bunch of projects stacked up in front of it - plus I would probably want to get an engineer in there to find out all what I would need - and thats more $$.
You are right - this has been a ton of work - I was without a garage for 10 months/all of my cars - and I had projects stacking up. I have spent many nights and weekends getting this place up to snuff - I am fairly happy how it turned out. Now - I just need to get started on the Vette, then down the road install long tubes and the LSA blower on the SS.
As for the pulll down stairs - it is nice to have the extra space - but with a car out of commission right under it - kind of makes it worthless since I can't get up there, lol!
Bob Heine
ALLIANCE MEMBER
I'm not an engineer so my opinion is worthless. However, this picture from one of your earlier posts seems to show trusses resting on that wall, making it load-bearing. The picture also shows how the garage door opening is constructed so you could mimic that in the third bay wall.

I also don't know anything about building codes in your location but I think you're right about having an engineer or architect give you advice before you tear into it.
HemiRamOn22s
Well-known member
Do you have a better picture of the trusses on the short wall that runs over to the column? I'm a civil engineer. If you did anything you would have to build a 2x10 header to carry the over the opening. I don't think the whole wall can come down.
Denwood
Well-known member
There are small trusses bearing on that wall, but it's a small roof section. Very easy to cut out out a section of the short wall, build up a header like Bob has suggested to mimic your door header (or purchase 12" LVL and laminate) and jack studs. You have to leave a column at both ends as a beam crosses the large section and is supported at the corner... but the studs in between are not supporting much weight.

That's an afternoon project If you have a local truss manufacturer, they should be able to run the engineering numbers and both spec and supply the LVL beams for you. Likely under $600 for everything you need, delivered. The difference in terms of how spacious it will feel would be a nice benefit too. The fact that the cement "curbing" stops at the door to your single section is about perfect.
I would just take the extra step to bolt the interior pillar (that would be exposed) to your floor using a steel collar so an accidental impact could not cause a bigger problem If you go this route, make sure you run a temp beam while cutting your opening!
Working from a 16x24, I would be happy as a pig in mud to have a shop with your dimensions. It's a great setup.
That's an afternoon project
If you have a local truss manufacturer, they should be able to run the engineering numbers and both spec and supply the LVL beams for you. Likely under $600 for everything you need, delivered. The difference in terms of how spacious it will feel would be a nice benefit too. The fact that the cement "curbing" stops at the door to your single section is about perfect.I would just take the extra step to bolt the interior pillar (that would be exposed) to your floor using a steel collar so an accidental impact could not cause a bigger problem
If you go this route, make sure you run a temp beam while cutting your opening!Working from a 16x24, I would be happy as a pig in mud to have a shop with your dimensions. It's a great setup.
Last edited:
OP
bonecrrusher
Well-known member
Thanks for the input guys - I'll reference back to this when I decide to go ahead with that project.
I trimmed out more of Racedeck - and filled in one of the gaps along the wall that was still there. I still have a 2" gap along the wall of the 3rd bay - and along the rest of this wall. I'll get to those down the road as well.
Now for some pics:


I trimmed out more of Racedeck - and filled in one of the gaps along the wall that was still there. I still have a 2" gap along the wall of the 3rd bay - and along the rest of this wall. I'll get to those down the road as well.
Now for some pics:
Denwood
Well-known member
I suspect you're going to love the floor. I'm guessing you folks see snow rarely, but it sure is nice on the feet vs concrete.
OP
bonecrrusher
Well-known member
Thanks Dennis - love it so far.
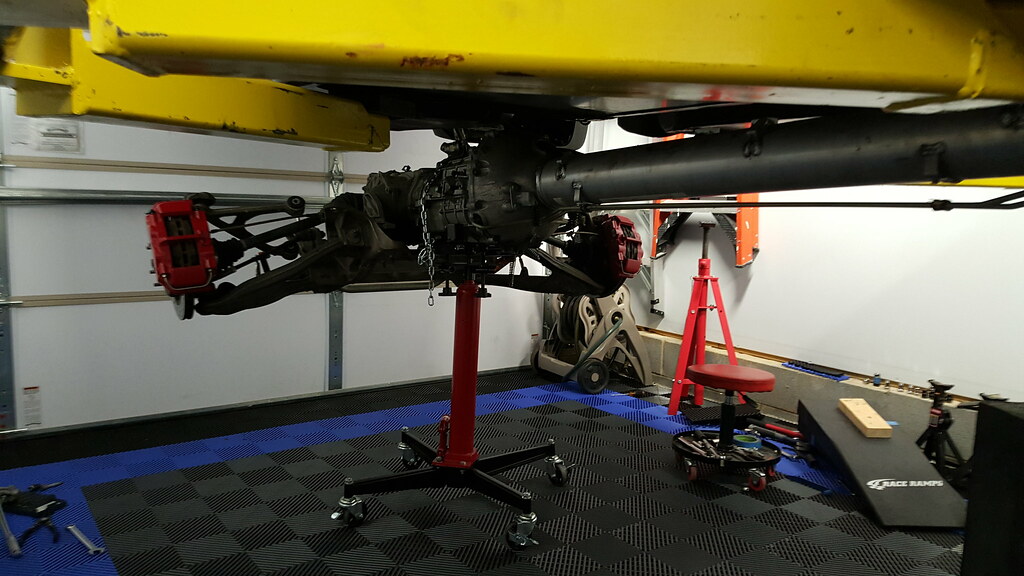
I started tearing into the Corvette tonight to repair the fuel system - and install my new clutch.
When I finished up - I lowered the car down - and put the arms on jack stands like I always do.
I used some scrap Racedeck pieces and put them under the stands to protect the tiles under it.

I started tearing into the Corvette tonight to repair the fuel system - and install my new clutch.
When I finished up - I lowered the car down - and put the arms on jack stands like I always do.
I used some scrap Racedeck pieces and put them under the stands to protect the tiles under it.
55cadillacking
Well-known member
Clever.
OP
bonecrrusher
Well-known member
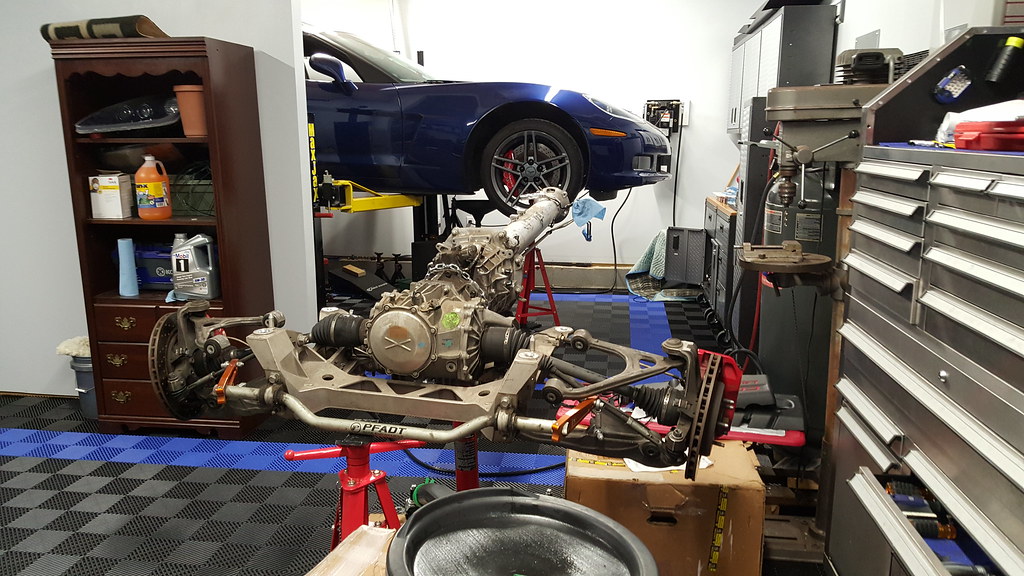
So I started off with the Vette sitting on the ground this morning - and well I got a lot done today.
I got the rear coilovers out, then disconnected the rear upper control arms.
I had to take out the drivers side long tube header to get access to the bolt holding the slave cylinder to the bell housing.
I then got the slave cylinder disconnected, the brake lines disconnected, and the wiring harness that runs down the trans tunnel disconnected.
I then setup the trans jack - zipped off the rear subframe bolts - and got started on the torque tube bolts.
I struggled with one of the torque tube bolts into the bell housing because that wire harness was in the way.
After getting that off - I got the torque tube out and the drive train dropped out of the way.
I plugged the brake lines with plugs from my Brembo kit - and a closet wire shelf end cap - saw that suggestion online -and it worked like a charm - no brake leaks here!
I am glad we added the extra 10 feet to the main bay - I was able to drop the drivetrain out of the Vette - and push it into the other bay - and still fit 2 cars in there with no problem!
Hot Chop shop
Well-known member
Garage looks great! Love the floor.
dubber
Well-known member
That RaceDeck FreeFlow completes your new garage perfectly. I'm sure you agree it was a great decision 
OP
bonecrrusher
Well-known member
Thanks everyone!
Norb - that is the modified trans jack from Northern Tool - its holding up the C6 transaxle and torque tube with no issue!
Norb - that is the modified trans jack from Northern Tool - its holding up the C6 transaxle and torque tube with no issue!
GDPossehl
Well-known member
Haha, I have nearly the same shelf cabinet that you have shown in your last picture in my garage.
OP
bonecrrusher
Well-known member
Haha, I have nearly the same shelf cabinet that you have shown in your last picture in my garage.
That came from Broyhill furniture when they closed there corporate office - got it for $25. I have a similar one up in my office. Not sure who made them.
OP
bonecrrusher
Well-known member
So I ran into a situation that involved a ladder. I couldn't reach a bolt on the bell housing and I had to take my long tube header out. I ended up grabbing my ladder - opening the hood - and taking out the dipstick, header bolts, and spark plugs from the top of the car on top of the lift.
I got the header loosened up - and I pulled it out the bottom of the car.
Just thought this made for an interesting pic:

I got the header loosened up - and I pulled it out the bottom of the car.
Just thought this made for an interesting pic:
OP
bonecrrusher
Well-known member
Quick update - I got the Liftmaster 855LM Homelink repeater for Christmas - and it works great!
I tried to program my doors to the Homelink systems in all 4 of our vehicles - and none of them worked.
Come to find out I had the Liftmaster 8500's installed in our garage - and it didn't even occur to me that Homelink and Liftmaster updated there security technologies. I had installed the Liftmaster 3800 in my old shop and the Homelinks programmed with no issue. So after failing to program any of them - I found out that I needed the adapter.
I plugged the adapter in - programmed the cars - and the doors finally work with Homelink openers!
OP
bonecrrusher
Well-known member
Long time no updates.
I finished the fuel system/clutch install on the Corvette - then I tore the front end of the car apart and replaced all the gaskets on the front end of the motor.
I had to take this apart to pin the crank for the E-Force install - so while I was in there I put in all new gaskets, replaced the crank bolt with an ARP bolt - and drilled the crank with my HF Air Angle drill.
As I mentioned earlier - I had to buy the Homelink adapter for my door openers to work with all of my cars. What I didn't mention was - that when I installed the adapter - I had to unplug the main bay's Liftmaster light that turns on when you open the door.
I had no other plugs in the area - so I got a 6 to 2 plug adapter and plugged/screwed that in tonight. It seems to work fine.

Also - after 5 years my HF Air Hose finally broke. I looked into buying a new hose, buying a new reel - then I found this - a brass fitting that slides over the end of the hose and tightens down like an AN fitting. It was about 6 bucks on Ebay - and was very easy to install. I've had it up to 150 PSI - with no issue.


]

Here is a quick YouTube video that I put together with the pics from above:
I finished the fuel system/clutch install on the Corvette - then I tore the front end of the car apart and replaced all the gaskets on the front end of the motor.
I had to take this apart to pin the crank for the E-Force install - so while I was in there I put in all new gaskets, replaced the crank bolt with an ARP bolt - and drilled the crank with my HF Air Angle drill.
As I mentioned earlier - I had to buy the Homelink adapter for my door openers to work with all of my cars. What I didn't mention was - that when I installed the adapter - I had to unplug the main bay's Liftmaster light that turns on when you open the door.
I had no other plugs in the area - so I got a 6 to 2 plug adapter and plugged/screwed that in tonight. It seems to work fine.
Also - after 5 years my HF Air Hose finally broke. I looked into buying a new hose, buying a new reel - then I found this - a brass fitting that slides over the end of the hose and tightens down like an AN fitting. It was about 6 bucks on Ebay - and was very easy to install. I've had it up to 150 PSI - with no issue.
]
Here is a quick YouTube video that I put together with the pics from above:
Bob Heine
ALLIANCE MEMBER
That hose fix is great. I have quite a few hoses that could use those (not a fan of worm clamps on the air hose ends).
Just an FYI, I replaced the 3/8-inch air line on my HF hose reel with a 1/2-inch 50-foot Legacy Flexzilla hose. I do have to be a little more careful feeding the hose back on the reel but it does fit:

Just an FYI, I replaced the 3/8-inch air line on my HF hose reel with a 1/2-inch 50-foot Legacy Flexzilla hose. I do have to be a little more careful feeding the hose back on the reel but it does fit:
OP
bonecrrusher
Well-known member
Norb - the upper control arms are attached to the frame - there are 4 bolts holding the subframe to the frame - and the 2 engine mounts are attached to the front subframe.
Thanks.
Thanks.
OP
bonecrrusher
Well-known member
Bob - that is a lot of air guns/hoses!