To avoid these ads, REGISTER NOW!

Garage Cabinet Build - Advice Needed

sharp21

Active member
Joined
Dec 6, 2012
Messages
33
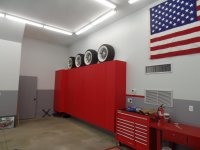
I’d like to build cabinets along 2 walls of my new garage and could use some recommendations on what materials and construction method would be the most economical.

I’m pretty handy but have never built cabinets.

I’d thinking to mount them on the wall using French cleats so that they sit 4” off the floor and I’d like to keep the costs to a max of $25/ft. Probably use white melamine for the doors to avoid painting.

Suggestions and pictures appreciated!


Enviado desde mi iPhone utilizando Tapatalk
 
To avoid these ads, REGISTER NOW!

ddawg16

Well-known member
Joined
Jul 11, 2008
Messages
21,005
Location
S. California
I made my cabinets using gray melamine. But for doors, I got some solid oak doors from the in-laws when they re-did their kitchen. I made my faces frames to match them.

If you don't have any in-laws to steal cabinet doors from, consider making a trip by your local Habitat for Humanity store....or watch Craigs list.

For mounting....run a 2-3" tall board along the inside top at the back. You should also have another board about 3/4" to 1" tall at the bottom under the bottom shelf. This board carries most of the weight...the top board keeps the cabinet from pulling away from the wall.

Have a look at my garage thread...towards the end....you will see how I built mine.
 

glentre

Well-known member
Joined
May 21, 2016
Messages
909
Location
Gloucester, Virginia
Melamine is a good choice but understand the edges will chip if you use a standard table saw. When the pros cut it, they use a saw with an undercut blade which is a small wheel blade located under the table that scores the melamine before it gets to the larger saw blade. Most of the newer pro shops now use a cnc router to cut all the parts and there is no chipping with that machine.

If you have one or can set up one with a hand router, a router table can be used to get rid of the chipping. Just cut your material 1/32" or so larger in all dimensions and then set your router to cut off the same thickness.

For maximum protection from abuse in a garage environment, also suggest you use 3 mm thick pvc edge banding. It can be applied using contact glue and a rubber mallet. Of course, your part sizes would need to be cut figuring in what thickness banding you will use. The banding is available from a number of on-line suppliers to match almost any melamine color you are using. They also have hand held banding trimmers under 20 bucks.

As an alternate, you might want to contact a local mechanized cabinet shop which will have the ability to cut and machine all your parts including drilling shelf and hinge holes. All you would have to do is pick up the parts and assemble them. For these shops, nothing is standard. They just take the cabinet shapes and sizes you want, enter them into their computer and download the info to the machines in the shop.

Good luck with your project..........have fun.

Glen
 

albaran

Well-known member
Joined
Jun 20, 2011
Messages
211
Location
Stratford, Ct.
An economical and no work solution could be cabinets from Ikea. They actually are more sturdy then some of those flimsy steel ones.
 

Attachments

  • shop7.jpg
    shop7.jpg
    148.7 KB · Views: 342

isb cornbinder

Well-known member
Joined
Nov 3, 2010
Messages
7,073
Location
Pacific South West, BC, Canada
Here in the Lower Mainland of BC, we have a HABITAT store where used cabinet are often available at reasonable prices. Craigslist can be another source of good wall mounted cabinets at very reasonable prices. CL FREE often has a good selection of cabinets.
A friend asked the demolition crew at one of the local houses if he could take the kitchen cabinets and he got a good set for free.
For that person with classier demands, there are shop cabinet companies that can supply the stuff of dreams.
 
OP
S

sharp21

Active member
Joined
Dec 6, 2012
Messages
33
An economical and no work solution could be cabinets from Ikea. They actually are more sturdy then some of those flimsy steel ones.


You mean like these? That’s what I’ve got now and that’s where my price cap of $25/ft comes in. If I can’t do it for that price I’ll just get some more of those.

But I’d like to build because it’s a project I’d like to have under my belt, and so I can have the space on top covered for a cleaner look.


Enviado desde mi iPhone utilizando Tapatalk
 
OP
S

sharp21

Active member
Joined
Dec 6, 2012
Messages
33
You mean like these? That’s what I’ve got now and that’s where my price cap of $25/ft comes in. If I can’t do it for that price I’ll just get some more of those.

But I’d like to build because it’s a project I’d like to have under my belt, and so I can have the space on top covered for a cleaner look.


Enviado desde mi iPhone utilizando Tapatalk


IMG_7357.JPG

Now with picture!


Enviado desde mi iPhone utilizando Tapatalk
 
OP
S

sharp21

Active member
Joined
Dec 6, 2012
Messages
33
I made my cabinets using gray melamine. But for doors, I got some solid oak doors from the in-laws when they re-did their kitchen. I made my faces frames to match them.

If you don't have any in-laws to steal cabinet doors from, consider making a trip by your local Habitat for Humanity store....or watch Craigs list.

For mounting....run a 2-3" tall board along the inside top at the back. You should also have another board about 3/4" to 1" tall at the bottom under the bottom shelf. This board carries most of the weight...the top board keeps the cabinet from pulling away from the wall.

Have a look at my garage thread...towards the end....you will see how I built mine.


Great tip on having the weight supporting rail along the bottom.

As for doors I’m looking at big storage cabinets rather than kitchen sized ones. I’m just planning to do them out of a single sheet.


Enviado desde mi iPhone utilizando Tapatalk
 

tarmy

Well-known member
Joined
May 28, 2014
Messages
4,671
Location
Nor Cal
1236B97B-0843-4369-A7E8-BF561D724065.jpg

88E05261-18DB-4D96-A4DB-E74618833326.jpg

3D86FCCC-3B7E-4952-A562-F88FB0AB0AEC.jpg

Like these...

3/4” plywood, cabinet grade. Glued and screwed together. Get get good door hardware too.

Doors are foil coated with white plastic...essentially. You can order them on line.
 

zoepop

Well-known member
Joined
Dec 9, 2013
Messages
129
Get a Kregg joiner.. They have them at the box stores. It's a jig to drill and fasten pocket screws. Makes it easy to build square boxes out of plywood. Usually use prefinished 3/4 then apply a face frame to paint or stain
 

glentre

Well-known member
Joined
May 21, 2016
Messages
909
Location
Gloucester, Virginia
These are my cabinets. Machined by a local shop and assembled on site. Will cost more than your budget but if you build them yourself, you could save some money. But, even building them yourself, I think $25/ft for tall cabinets is somewhat unrealistic for a quality project.

Glen
 

Attachments

  • SAM_2436.jpg
    SAM_2436.jpg
    97.1 KB · Views: 234
  • SAM_2346.jpg
    SAM_2346.jpg
    75.8 KB · Views: 177

Slednut

Well-known member
Joined
Dec 20, 2012
Messages
2,550
Location
Washington state
I built these, 3/4 inch ply boxes, 1/2 inch ply shelving and melamine doors. On some I used the melamine for face frames but I would not recommend it.

I now use 3/4 ply and paint it but still use melamine doors. I never saw much chipping of the melamine and when I painted the sides it filled the chips so they are no big problem. Kreg pocket hole jig is great.
 

Attachments

  • P82A0493.jpg
    P82A0493.jpg
    92.9 KB · Views: 175
  • P82A0334.jpg
    P82A0334.jpg
    110.2 KB · Views: 192
  • Garage Bench 4.JPG
    Garage Bench 4.JPG
    32.6 KB · Views: 215
  • P82A0677.jpg
    P82A0677.jpg
    111.7 KB · Views: 218
  • P82A0688.jpg
    P82A0688.jpg
    83.7 KB · Views: 160

GrayFlattop

Well-known member
Joined
Jan 18, 2018
Messages
1,039
Location
Chicago
You might want to invest some time reading a few mega-threads here by lilscorpion. Both the tooling organization thread https://www.garagejournal.com/forum/showthread.php?t=174553as well as the tooling (re) organization thread https://www.garagejournal.com/forum/showthread.php?t=381487have a ton of information on cabinet building details as well as some insanely detailed OCD tool storage ideas. Allocate several hours if you wish to read every post.

Life in a garage can be tough on cabinets, but there is no "one size fits all" solution. Have fun
 

jetnow1

Well-known member
Joined
Jun 27, 2016
Messages
511
Location
CT.
I took some old cabinets from a house I redid the kitchen in, took off the face frames which were in good shape, threw away the boxes(particle board) which were falling apart
and made new boxes out of 3/4 plywood. Easy to do, allowed me to make depth to fit my needs, and when I painted them they looked fine. I even mounted one face upside down
to hang on the wall up high, this put the drawers within reach.
 

8mpg

Well-known member
Joined
Jul 9, 2012
Messages
350
I agree with the Ikea route. They are fairly cheap and over lots of versatility.
 
OP
S

sharp21

Active member
Joined
Dec 6, 2012
Messages
33
I built these, 3/4 inch ply boxes, 1/2 inch ply shelving and melamine doors. On some I used the melamine for face frames but I would not recommend it.


I now use 3/4 ply and paint it but still use melamine doors. I never saw much chipping of the melamine and when I painted the sides it filled the chips so they are no big problem. Kreg pocket hole jig is great.


Those look great! Exactly what I’m thinking of doing.

Any shots of the inside?


Enviado desde mi iPhone utilizando Tapatalk
 
To avoid these ads, REGISTER NOW!

Vruck

Member
Joined
Jan 22, 2015
Messages
8
Location
Kirkland Wa.
Thanks Slednut for posting the pics with the layout, not to complicated, and nice looking. I now have some ideas, for a cabinet wall of my own.
 

Slednut

Well-known member
Joined
Dec 20, 2012
Messages
2,550
Location
Washington state
Those look great! Exactly what I’m thinking of doing.

Any shots of the inside?

This is all I have for inside, they are dado joints, glued and screwed from the outside. I also use a Kreg pocket hole jig. To make the dados I made a jig for my router that clamps in place. I use router bits that make the dado for 1/2, 3/4 inch ply wood in one pass, they are from Rockler.

This cabinet has melamine face frames that like I said earlier don't recommend.
 

Attachments

  • IMG_0555.jpg
    IMG_0555.jpg
    85.7 KB · Views: 103

Jakemedic

Well-known member
Joined
Jul 26, 2013
Messages
722
Location
Cornfields of SE Iowa
Built these last summer with my pocket hole jig and some 3/4” plywood. Cost me about 450.00 to build. Used clear poly to finish them. Have pins inside to be able to adjust the shelves. Hinges from eBay for next to nothing. Had built cabinets befor, but not for a real long time. I use Build Your Own Kitchen Cabinets Book by Danny Proulx. Easy and simple to follow.
 

Attachments

  • 2467CBB1-9905-4D60-8F05-C4B850353882.jpg
    2467CBB1-9905-4D60-8F05-C4B850353882.jpg
    126.4 KB · Views: 104
  • 1705E107-94A8-42E3-8E34-808E6DA18AA5.jpg
    1705E107-94A8-42E3-8E34-808E6DA18AA5.jpg
    77.7 KB · Views: 103
  • 3A62A10D-E96E-4D07-93DC-90102D471CE1.jpg
    3A62A10D-E96E-4D07-93DC-90102D471CE1.jpg
    132.4 KB · Views: 99
  • 792CF3B0-7AB5-4989-808A-F42329D62A04.jpg
    792CF3B0-7AB5-4989-808A-F42329D62A04.jpg
    84.9 KB · Views: 115
OP
S

sharp21

Active member
Joined
Dec 6, 2012
Messages
33
This is all I have for inside, they are dado joints, glued and screwed from the outside. I also use a Kreg pocket hole jig. To make the dados I made a jig for my router that clamps in place. I use router bits that make the dado for 1/2, 3/4 inch ply wood in one pass, they are from Rockler.


This cabinet has melamine face frames that like I said earlier don't recommend.


That’s great, thanks. I’m going to go with internal hinges and no face frames.


Enviado desde mi iPhone utilizando Tapatalk
 
OP
S

sharp21

Active member
Joined
Dec 6, 2012
Messages
33
Built these last summer with my pocket hole jig and some 3/4” plywood. Cost me about 450.00 to build. Used clear poly to finish them. Have pins inside to be able to adjust the shelves. Hinges from eBay for next to nothing. Had built cabinets befor, but not for a real long time. I use Build Your Own Kitchen Cabinets Book by Danny Proulx. Easy and simple to follow.


Those look great! I’ll check that book out


Enviado desde mi iPhone utilizando Tapatalk
 

driftpin

Well-known member
Joined
Dec 22, 2016
Messages
11,227
Location
Miami-Dade/Broward Co. Florida
If you decide to do the fabrication yourself and choose the Kreg system of joinery, I suggest buying the set that has the lever-action clamp, it will speed-up your hole drilling immensely, and they will be more accurately-positioned. I did some cabinets from knock-down kits, using Kreg pocket screws and the cabinets went-together easily, being glued-and-screwed, they are very strong.

http://www.rockler.com/kreg-k4-with...MIsPbWkviH3AIV07fACh2C3wFAEAQYASABEgJybfD_BwE
 

kbs2244

Well-known member
Joined
Nov 11, 2006
Messages
14,065
I am not a finish carpenter.
And have no desire to become one.

Therefor I like the salvage the face frames of old kitchen cabinets idea.

You can build shop sturdy cabinets for behind them.
(I do not trust kitchen cabinet strength in a shop.)

Paint them to match your choice.
Paint can blend different styles and woods.
 
OP
S

sharp21

Active member
Joined
Dec 6, 2012
Messages
33
I’m going to do wood boxes with melamine doors. Recycling kitchen cabinets doesn’t work for me as I’m looking for large storage units


Enviado desde mi iPhone utilizando Tapatalk
 

larry4406

Well-known member
Joined
Jan 27, 2006
Messages
19,157
Location
Northern Virginia
No expert here at all, so YMMV.

I searched on here and other sources. YouTube has good tutorials on using Sketchup for design of cabinets so I studied those and am self taught. I would rate myself at C student right now.

I'm using 3/4" Sande plywood from Home Depot.

I made a concept model of my garage. Then I started detailing the first main cabinet (adjacent side door) and between the fume hood.

The Sketchup tutorials I watched were consistent on using different colors for the various parts and then making copies of them to then layout on 4x8 sheets for efficient cutting. So I began.

I used a French Cleat at the top to hold the cabinet on the wall. Once the face frames are built, crown mold will hide the cleat engagement drop. Bottom of the cabinet uses a full width cleat for screwing to studs as well. I weigh 230 lbs and the unit fully supports me on the wall.

I incorporated bins at the bottom for the Harbor Freight storage bins. The shelf slots are such that it could be 5 columns of 4 bin rows, or I can use the double size bins.

Still very much a work in progress and am ashamed as to how long it has taken to get this far. My brother laughs and says lets just go cut plywood, we would be done by now!
 

Attachments

  • French Cleat.jpg
    French Cleat.jpg
    55.2 KB · Views: 37
  • Uprights with Shelf Standards.jpg
    Uprights with Shelf Standards.jpg
    83.9 KB · Views: 40
  • Pocket Holes.jpg
    Pocket Holes.jpg
    94.7 KB · Views: 43
  • Parts Bin Hand Access.jpg
    Parts Bin Hand Access.jpg
    77.5 KB · Views: 44
  • Router Template for Parts Bin.jpg
    Router Template for Parts Bin.jpg
    77.6 KB · Views: 38
  • Garage Main Cabinet Sketchup Model.jpg
    Garage Main Cabinet Sketchup Model.jpg
    134.1 KB · Views: 38
  • Garage Concept Plan.jpg
    Garage Concept Plan.jpg
    141.4 KB · Views: 48
Last edited:
OP
S

sharp21

Active member
Joined
Dec 6, 2012
Messages
33
Thanks for sharing. I love the harbor freight storage idea!

I’m planning on mounting mine the same way


Enviado desde mi iPhone utilizando Tapatalk
 

larry4406

Well-known member
Joined
Jan 27, 2006
Messages
19,157
Location
Northern Virginia
Thanks for sharing. I love the harbor freight storage idea!

I’m planning on mounting mine the same way


Enviado desde mi iPhone utilizando Tapatalk

I liked the HF storage bin threads here and adapted some of the ideas into my cabinet build. I will be using 1/8” temper board as the bin dividers and will route the hand contour using the jig I made.
 
To avoid these ads, REGISTER NOW!
Top Bottom