To avoid these ads, REGISTER NOW!

Garage Door Repairs and Adjustments

garageflunkie

Member
Joined
Aug 21, 2023
Messages
16
Hello. I am looking for advice.

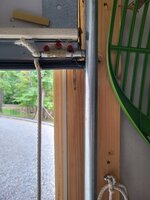
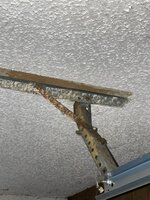
I noticed that the garage door opener arm is attached to the pin that goes through the garage door bracket on the outside, and not centered. Can I remove the bracket on the garage door, fill the holes, and realign it? I noticed that if the center rail would have been centered on that piece of wood above the torsion spring, everything would have lined up.

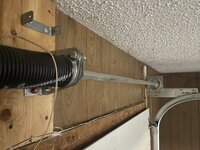
I also was told I should get a center bearing for my single torsion spring, above my single garage door. The broken one above the garage door currently has a nylon bushing. When is a center bearing necessary?

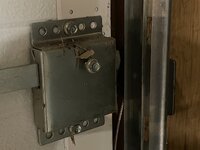
I noticed the slide bar mechanism to lock the door doesn’t line up with a track slot to be able to physically lock the garage door. Should I just remove the mechanism, fill the holes, and remount the slide bar mechanism higher to be able to use it?

The black, plastic wheel I have circled in one of the pictures is damaged that the chain goes around in the center rail. Is that a part that comes with a new garage door opener? If so, great, because I will be installing a new garage door opener.

Thanks in advance.
 

Attachments

  • IMG_4775.jpeg
    IMG_4775.jpeg
    741.8 KB · Views: 116
  • IMG_4774.jpeg
    IMG_4774.jpeg
    497.6 KB · Views: 108
  • IMG_4773.jpeg
    IMG_4773.jpeg
    626.3 KB · Views: 108
  • IMG_4772.jpeg
    IMG_4772.jpeg
    574.3 KB · Views: 104
To avoid these ads, REGISTER NOW!

firebirdparts

Well-known member
Joined
Jun 8, 2016
Messages
10,754
Location
Kingsport, TN
Can I remove the bracket on the garage door, fill the holes, and realign it?
Yes, but moving the opener might be less trouble, especially considering you're planning to replace it anyway.

I also was told I should get a center bearing for my single torsion spring, above my single garage door. The broken one above the garage door currently has a nylon bushing. When is a center bearing necessary?
Never, I would say
Should I just remove the mechanism, fill the holes, and remount the slide bar mechanism higher to be able to use it?
Yes. No need to fill the holes, but no harm either.
Is that a part that comes with a new garage door opener?
Definitely yes.
 

jstroede

Well-known member
Joined
Oct 28, 2010
Messages
1,085
Location
Kansas City
Just to expand on the part about the lock. Most certainly the door was originally installed with no opener. The lock was installed how the door originally sat with no opener and with the springs attached. The door will not sit as flat on the ground sprung without an opener. Most likely it will align when those two things occur. Otherwise, you can enlarge the hole in the track to accept the current location of the lock as well.

John
 

Jakemedic

Well-known member
Joined
Jul 26, 2013
Messages
722
Location
Cornfields of SE Iowa
Personally, I would remove that lock. My reasoning is if someone accidentally attempts to open the garage door with the opener while the lock is locked, there will be damage of some kind. I have at least one of those slide locks floating around. I don’t put openers in before ensuring the door operates correctly. I have only installed 3 doors in my life, but saved a ton of money that I throw to a better garage door. The opener typically comes 1-3 months later, or in case of my woodworking shop, 3 years later. Which reminds be, I need to go get an opener for the shop.
 
OP
G

garageflunkie

Member
Joined
Aug 21, 2023
Messages
16
Yes, but moving the opener might be less trouble, especially considering you're planning to replace it anyway.


Never, I would say

Yes. No need to fill the holes, but no harm either.

Definitely yes.
Thanks. The center rail comes with the opener, too? I notice that bracket is not level, and is tilted. I guess if I adjust the center rail over, that the chain or belt runs through, and that bracket on the garage door itself is a little tilted still, it can still make the connection and not cause any problems? Do I need to replace the piece of wood the garage door opener center rail is mounted to, so I don’t put holes next to the old holes and risk stripping?

Thanks about the manual slide bar mechanism comments. I just wanted to use that until I got the torsion spring replaced, or if I went on vacation as security. I guess I could just leave it where it is until I get my torsion spring replaced.

The reason I asked about a center bearing was because it was recommended by a garage door company, and I read online that it was good to have if you have a longer spring life torsion spring. Maybe not? Is it worth getting a longer life torsion spring than 10000 cycles?
 

jstroede

Well-known member
Joined
Oct 28, 2010
Messages
1,085
Location
Kansas City
Thanks. The center rail comes with the opener, too? I notice that bracket is not level, and is tilted. I guess if I adjust the center rail over, that the chain or belt runs through, and that bracket on the garage door itself is a little tilted still, it can still make the connection and not cause any problems? Do I need to replace the piece of wood the garage door opener center rail is mounted to, so I don’t put holes next to the old holes and risk stripping?

Thanks about the manual slide bar mechanism comments. I just wanted to use that until I got the torsion spring replaced, or if I went on vacation as security. I guess I could just leave it where it is until I get my torsion spring replaced.

The reason I asked about a center bearing was because it was recommended by a garage door company, and I read online that it was good to have if you have a longer spring life torsion spring. Maybe not? Is it worth getting a longer life torsion spring than 10000 cycles?
New opener will come with a new rail. They are all different. As to whether you need to replace the piece of wood, probably not. I don't even know if that bracket is in the correct place.

Plastic bushing or bearing is fine. Bearing is only a couple bucks if it makes you feel better, and the spring is being replaced anyway.

Cycle life depends on how much you use the door. We use our garage door as the entry to our house. I have a 25k cycle spring. It doesn't cost a lot more really in most cases.
 

Innovate1

Well-known member
Joined
Jul 28, 2014
Messages
4,324
Location
Illinois near St. Louis, Missouri
Seems like you are overthinking some of these details. As far as the bracket on the door being slightly off center and crooked - there is a lot of slop in those connections. Best if it is centered and straight but probably not hurting anything being an inch off center.

If it's a door that is going to be used often the longer life springs are probably worth it. I have a door that gets used almost every day and after about 18 years the spring broke. the longer life (more cycles) springs were only something like $30 more so I went with higher cycle springs for replacement. I may not be here but the time they break but the difference in cost was low.
 
OP
G

garageflunkie

Member
Joined
Aug 21, 2023
Messages
16
New opener will come with a new rail. They are all different. As to whether you need to replace the piece of wood, probably not. I don't even know if that bracket is in the correct place.

Plastic bushing or bearing is fine. Bearing is only a couple bucks if it makes you feel better, and the spring is being replaced anyway.

Cycle life depends on how much you use the door. We use our garage door as the entry to our house. I have a 25k cycle spring. It doesn't cost a lot more really in most cases.
Thanks to both of you.

You don’t know if which bracket is in the right place? Where should it be?

I wasn’t concerned about bushing price. I just was wondering if I should upgrade to a metal center bearing if I went with a higher spring life? You guys have the nylon bushing with a higher cycle spring? I was basically told the nylon bushing might wear out before a longer life spring by a tech, and didn’t know if people here had that experience or not. Does the spring not fail if the nylon bushing fails? I don’t want the spring to fail prematurely, if that’s a thing.
 
Last edited:

jstroede

Well-known member
Joined
Oct 28, 2010
Messages
1,085
Location
Kansas City
Thanks to both of you.

You don’t know if which bracket is in the right place? Where should it be?

I wasn’t concerned about bushing price. I just was wondering if I should upgrade to a metal center bearing if I went with a higher spring life? You guys have the nylon bushing with a higher cycle spring? I was basically told the nylon bushing might wear out before a longer life spring by a tech, and didn’t know if people here had that experience or not. Does the spring not fail if the nylon bushing fails? I don’t want the spring to fail prematurely, if that’s a thing.
Usually the only time the plastic bushing will fail is if it is not in line with the end bearings. The metal bearings will fail in that case too. They are not precision bearings by any means.

No a failing bushing will not cause the spring to fail. If replacing the spring, I probably put a new one in it regardless, whether it is plastic or metal.

The bracket I was talking about was the bracket at the header for the opener. Openers get installed incorrectly all the time.

John
 

CraigStu

Well-known member
Joined
May 22, 2014
Messages
4,086
Location
Blacksburg, Va
My concern with moving either the latch or the piece that the drop link attaches to is how is the door constructed? Some of them you are running a self drilling screw through a layer or two of the embossed sheet aluminum and that's it. So moving something 3/4 inch puts the old holes near the new holes. I am with innovate1 on the usual slop in those links. You could probably move the bottom end into between the tabs like it should be, and it will still work fine. The latch, I'd remove and throw out. On a couple of houses I simply drilled a hole in the side of the track so I could run a bolt through just above one of the rollers. Got a full threaded 3/8 bolt about 2 inches long, ran it through the track and finger tightened a plain nut on it. This house I haven't done that. I have a pair of vise grips like these.
I turn the opener off and clamp these on just above a roller.
 

duneslider

Well-known member
Joined
Jan 20, 2013
Messages
2,299
Location
Riverton, Utah
My concern with moving either the latch or the piece that the drop link attaches to is how is the door constructed? Some of them you are running a self drilling screw through a layer or two of the embossed sheet aluminum and that's it. So moving something 3/4 inch puts the old holes near the new holes. I am with innovate1 on the usual slop in those links. You could probably move the bottom end into between the tabs like it should be, and it will still work fine. The latch, I'd remove and throw out. On a couple of houses I simply drilled a hole in the side of the track so I could run a bolt through just above one of the rollers. Got a full threaded 3/8 bolt about 2 inches long, ran it through the track and finger tightened a plain nut on it. This house I haven't done that. I have a pair of vise grips like these.
I turn the opener off and clamp these on just above a roller.
We had an offsite storage garage and drilled holes and put padlocks through the tracks.
 
OP
G

garageflunkie

Member
Joined
Aug 21, 2023
Messages
16
Usually the only time the plastic bushing will fail is if it is not in line with the end bearings. The metal bearings will fail in that case too. They are not precision bearings by any means.

No a failing bushing will not cause the spring to fail. If replacing the spring, I probably put a new one in it regardless, whether it is plastic or metal.

The bracket I was talking about was the bracket at the header for the opener. Openers get installed incorrectly all the time.

John
Thanks for all the info, everyone.

How will I know the right area for that garage door opener rail, if you don’t know, either? Does it explain it in the manual for my new garage door opener?

What are the common mistakes people make when installing a new garage door opener, and what do those mistakes cause?

Thanks. Good info on the slide lock mechanism.
 

jstroede

Well-known member
Joined
Oct 28, 2010
Messages
1,085
Location
Kansas City
Yes it will tell you the proper way to mount your new opener. IF you were to have an issue, you could always add a new section of board over the affected area, or some other similar repair. I see nothing concerning in the picture though.

Just follow the instructions. It is pretty straight forward.
 
OP
G

garageflunkie

Member
Joined
Aug 21, 2023
Messages
16
Alright. Great info.

What do you guys think about gaps inbetween panels, or inbetween door and home framing?

I can see light inbetween 2 garage door panels. I was told it was typical for the joint below the top panel, and above the bottom panel, by a garage door tech.

There is also some light coming through new the bottom of one of the garage doors near where it meets house, about a foot or twos worth above the floor. He said if it was tighter, it wouldn’t close. What about this product?


I would just think light coming in would be really bad in winter for heat loss.

If there are some adjustments to try, I’m all for that, as well.
 

paredown

Well-known member
Joined
Jan 12, 2012
Messages
546
Location
Pomona, NY
Alright. Great info.

What do you guys think about gaps inbetween panels, or inbetween door and home framing?

I can see light inbetween 2 garage door panels. I was told it was typical for the joint below the top panel, and above the bottom panel, by a garage door tech.

There is also some light coming through new the bottom of one of the garage doors near where it meets house, about a foot or twos worth above the floor. He said if it was tighter, it wouldn’t close. What about this product?


I would just think light coming in would be really bad in winter for heat loss.

If there are some adjustments to try, I’m all for that, as well.
I'm by no means an expert, but with a proper install, they will set the bottom panel level (I like to put the weather strip on the bottom after it is installed). Then they will stack the panels one at a time on top, and add the hinge brackets and tighten as they go. The weight and profile of the panels will naturally limit the gap. The hinge brackets have a small amount of play though, so when the weight is on the door from opening, the slack is pulled out of the hinge and you have a small gap created between panels. Then the threshold weatherstrip seals the bottom when the door is closed, taking up minor variations in floor level.

I can imagine that with a door that has been in service for a long time that hinge wear, and/or slight movement on the face screws holding or loose screws on the brackets could cause the gaps to open up.

Side gaps seem to be part of the relatively imprecise nature of garage doors. Spec sheets will show what they consider to be framing that is close enough to fit the door you are installing, so check that. (Worst case they may have to pad out the sides.) The rest of the side gaps are addressed by proper external garage door weather stripping that sits against the outside face of the door.

There are lots of install vids on YouTube where you can see installers at work.

A good installer should leave you with a door that is plumb, level, sealing at the sides with the outside weatherstrip, sealing at the bottom with the bottom strip, with even gaps between the panels-- and opens and closes properly.
 
OP
G

garageflunkie

Member
Joined
Aug 21, 2023
Messages
16
Thanks.

I noticed this, too. The garage door needs to be pulled over about an inch to the left. I have two single doors, and this is the only side where I can see the garage door frame, with the door closed. You can also see the weatherstripping between the frame and door, from the inside.

Can I make adjustments to the hinges and rollers to pull the door over about 1/2 inch, assuming I also adjusted the center rail on the ceiling to compensate for it?

I’m guessing the garage door frame is not in the same plane as the door was installed, because if I adjusted the door over enough to line the door edge up with the frame edge, the other side of the garage door would have the issue. Does that sound correct?
 
Last edited:
To avoid these ads, REGISTER NOW!

CraigStu

Well-known member
Joined
May 22, 2014
Messages
4,086
Location
Blacksburg, Va
Typically the garage door is wider than the opening. This is mine. The other side is similar, so door is maybe 2" wider than the opening. this allows for framing that is slightly less than perfect. Note also that the seal is >1" wide so a further guard against imperfection.
20230827_095025.jpg
From the outside you can see the door seal.
20230827_095050.jpg
As the door goes up it moves away from the seal so it isn't dragging. To get rid of that light coming through yours I think you have a couple of options.
1- most tracks have slots for the mounting screws like these.
20230827_100302.jpg
loosen the screws a bit and slide the track to move the door sideways. Note these are generally a pretty sloppy fit and they need some slop so they don't bind somewhere in their travel.
2- You could add a piece of PVC trim board on the outside, maybe a 1x6 or a 1/2x6 to narrow the opening. Some boards come w/ one side smooth and one side a wood grain surface so you have a choice depending on what the existing boards look like. If I were going to do that on mine, I'd remove the seal (usually attached w/ small nails so slip a scraper behind the seal next to every nail and pull a bit at a time), nail on my pvc, and reattach or replace the seal. When ready to do the seal, close the door all the way. Hold the seal so it bends slightly against the door and start nailing. You may see the door move back toward the inside some when you push the seal against it. That is normal as the rollers and track are sloppy low tech pieces. The slight bend of the seal is what gives you an airtight seal at both sides and across the top. The seal on the bottom of the door seals against the floor so you should end up airtight all the way around.
 
OP
G

garageflunkie

Member
Joined
Aug 21, 2023
Messages
16
Typically the garage door is wider than the opening. This is mine. The other side is similar, so door is maybe 2" wider than the opening. this allows for framing that is slightly less than perfect. Note also that the seal is >1" wide so a further guard against imperfection.
20230827_095025.jpg
From the outside you can see the door seal.
20230827_095050.jpg
As the door goes up it moves away from the seal so it isn't dragging. To get rid of that light coming through yours I think you have a couple of options.
1- most tracks have slots for the mounting screws like these.
20230827_100302.jpg
loosen the screws a bit and slide the track to move the door sideways. Note these are generally a pretty sloppy fit and they need some slop so they don't bind somewhere in their travel.
2- You could add a piece of PVC trim board on the outside, maybe a 1x6 or a 1/2x6 to narrow the opening. Some boards come w/ one side smooth and one side a wood grain surface so you have a choice depending on what the existing boards look like. If I were going to do that on mine, I'd remove the seal (usually attached w/ small nails so slip a scraper behind the seal next to every nail and pull a bit at a time), nail on my pvc, and reattach or replace the seal. When ready to do the seal, close the door all the way. Hold the seal so it bends slightly against the door and start nailing. You may see the door move back toward the inside some when you push the seal against it. That is normal as the rollers and track are sloppy low tech pieces. The slight bend of the seal is what gives you an airtight seal at both sides and across the top. The seal on the bottom of the door seals against the floor so you should end up airtight all the way around.
Awesome info. All makes sense.

That plate between the track and the rod above that holds the tension spring doesn’t have the adjustable slots on it, on mine, like yours does. I do have the adjustable brackets, though.

I’m not sure how much adjusting I’m going to be able to do without having the adjustable plate, like you have in your picture.

Should I replace that plate, so I can move the door over more?

What is it called?
 

CraigStu

Well-known member
Joined
May 22, 2014
Messages
4,086
Location
Blacksburg, Va
I am not sure which plate you are referring to. But would it be possible to file, or cut w/ a jigsaw, the holes in your plate into slots? You can get a few fender washers to be sure your bolts don't slip through the slot if it isn't perfect. You could also drill new holes for the lag screws into the stud but you need to move them probably 1/2" or or 5/8". Or I have had luck filling holes w/ wood putty or plastic wood.
 
OP
G

garageflunkie

Member
Joined
Aug 21, 2023
Messages
16
I am not sure which plate you are referring to. But would it be possible to file, or cut w/ a jigsaw, the holes in your plate into slots? You can get a few fender washers to be sure your bolts don't slip through the slot if it isn't perfect. You could also drill new holes for the lag screws into the stud but you need to move them probably 1/2" or or 5/8". Or I have had luck filling holes w/ wood putty or plastic wood.
Thanks.

I’m referring to the plate that is in your 3rd picture that is attached to the side of your roller track. I’m not sure of the name of that part.

I have attached a picture of mine.

That, or it is adjustable, and that bolt is just so large that I can’t see the small slot under it.
 

Attachments

  • IMG_4809.jpeg
    IMG_4809.jpeg
    790.3 KB · Views: 59
Last edited:

CraigStu

Well-known member
Joined
May 22, 2014
Messages
4,086
Location
Blacksburg, Va
From your description of seeing light on one side of the door I 'think' it needs to move just one way. Just because we both happened to take pics of the right side (looking out) of our doors, let's discuss this as if the door needs to move to the left. On mine you could move the entire track somewhat to the left. On yours, you don't seem to have slots at that top plate. So you could move the track below that plate w/ existing slots right? Now to move the top portion, see those nuts and bolts holding the track to that big plate in the top left of your pic? How about loosen them and slip washers between the plate and the track. If you moved the lower brackets 1/4" then you need two 1/4" stacks of washers. I would use large diameter fender washers. Don't forget that the track at the end of the horizontal run towards the center of the garage will need to move also.
 
OP
G

garageflunkie

Member
Joined
Aug 21, 2023
Messages
16
Thanks. I guess my next question is…

Is this what the angle iron is supposed to look like? All the iron that holds the tracks looks like it is bent forward? Here are all three pictures.

Also, I am installing my garage door opener, and the instructions are telling me to put the garage door opener bracket for the center rail 2 1/2 inches above the highest point that my door opens to. That will make my new garage door opener bracket that holds the center rail touch against the torsion spring bracket. ignore the old garage door opener bracket that I haven’t taken out yet.

I don’t see how that would work well. Why are they telling me to put it at that height? You can see that I can’t lower my torsion spring bracket. What gives?
 

Attachments

  • IMG_4842.jpeg
    IMG_4842.jpeg
    688.3 KB · Views: 42
  • IMG_4841.jpeg
    IMG_4841.jpeg
    666.5 KB · Views: 36
  • IMG_4840.jpeg
    IMG_4840.jpeg
    764.7 KB · Views: 37
  • IMG_4843.jpeg
    IMG_4843.jpeg
    719.2 KB · Views: 45

firebirdparts

Well-known member
Joined
Jun 8, 2016
Messages
10,754
Location
Kingsport, TN
Mostly what matters is that things don’t hit each other. I think you are reasonably safe copying the elevation of the old one.
 

CraigStu

Well-known member
Joined
May 22, 2014
Messages
4,086
Location
Blacksburg, Va
Well those angle pieces are sure bent, and kind of old and ugly. Looks like a hack job by a previous owner. Maybe at one point a somewhat shorter than original track was installed and they just bent the brackets until they fit. But looks to me like they still work. Any 'along the track' load is taken where the track bolts to the wall at the door. All those brackets do is locate the track end up/down and left/right so You should be good to go.
 

no704

Well-known member
Joined
Apr 27, 2016
Messages
5,266
It’s a ga urge door not the entrance to a class4 clean room!
 
OP
G

garageflunkie

Member
Joined
Aug 21, 2023
Messages
16
Well those angle pieces are sure bent, and kind of old and ugly. Looks like a hack job by a previous owner. Maybe at one point a somewhat shorter than original track was installed and they just bent the brackets until they fit. But looks to me like they still work. Any 'along the track' load is taken where the track bolts to the wall at the door. All those brackets do is locate the track end up/down and left/right so You should be good to go.
Thanks. That’s what I figured. That makes sense.

If I decided to put new angle iron in where it holds the end of the track, would I need to attach them to a different part of the joist, so it is straight up and down from the ceiling, instead of bent forward to meet the track?
 

CraigStu

Well-known member
Joined
May 22, 2014
Messages
4,086
Location
Blacksburg, Va
I would probably move the attachment to the joist if I could. I don't like to reuse holes in typical soft 2x4 wood if I can avoid it and it will look nicer.
 
OP
G

garageflunkie

Member
Joined
Aug 21, 2023
Messages
16
I would probably move the attachment to the joist if I could. I don't like to reuse holes in typical soft 2x4 wood if I can avoid it and it will look nicer.
Ended up having to move the angle iron to hold the garage door opener, anyway. The old spot was too far from the garage door. My old garage door opener had a longer rail and the opener head, itself, was longer.

My next question is…

My old opener rail had the wiring ran along the top of the rail.

This new opener is saying to run it along the ceiling.

Can I get some sort of fancy command hooks to run it along the top of the rail?

I’m assuming it’s bad to run wire through the holes in angle iron, as it could shred it?
 

jstroede

Well-known member
Joined
Oct 28, 2010
Messages
1,085
Location
Kansas City
LiftMaster 197LM wire channel can be used to run it along the top of the T rail if you are using that type of opener.

If you run wire through the angle, I would suggest a grommet.

John
 

CraigStu

Well-known member
Joined
May 22, 2014
Messages
4,086
Location
Blacksburg, Va

nadogail

Well-known member
Joined
Jan 23, 2009
Messages
32,269
Location
Coronado, CA
Ended up having to move the angle iron to hold the garage door opener, anyway. The old spot was too far from the garage door. My old garage door opener had a longer rail and the opener head, itself, was longer.

My next question is…

My old opener rail had the wiring ran along the top of the rail.

This new opener is saying to run it along the ceiling.

Can I get some sort of fancy command hooks to run it along the top of the rail?

I’m assuming it’s bad to run wire through the holes in angle iron, as it could shred it?
I would not trust Command Hooks for any electrical installation. Electrical wires need to be protected from physical damage.
 
OP
G

garageflunkie

Member
Joined
Aug 21, 2023
Messages
16
Thanks for the info.

I know you are supposed to level the center rail on a garage door opener along its length. What about along it’s width? My header rail bracket is level, but I noticed the ceiling above the garage door opener is not very level at all. Therefore, the center rail on the garage door opener is tilted. Is this an issue?

What is the best way to level it along its width? Can I shim somehow between the angle iron and ceiling?
 
To avoid these ads, REGISTER NOW!
Top Bottom