To avoid these ads, REGISTER NOW!

Garage Makeover

OccupantRJ

Well-known member
Joined
May 15, 2009
Messages
11,149
Location
Eastern North Carolina
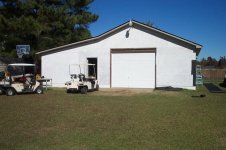
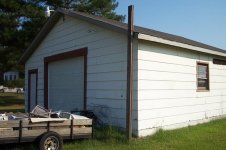
After moving into this house 2 years ago, I was somewhat thankful that I now had acquired a detached garage, dilapidated as it was, since after the flood, and in following my wife's advancing career, it had been years since I had a workshop. It was 26 X 26, and was obviously built by rank amateurs, as it had masonite lap siding, with absolutely no bracing whatsoever, including having no sheathing in any form.

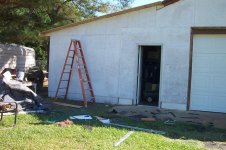
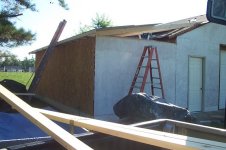
After getting settled in, I began the task of seeing if I could make something out of this old building. It could be swayed by pushing on an upper corner of the roof, from a stepladder. First order of business was to tear off the old rotting masonite siding, then using a cable tugger, rack the building back to square, doing one side at a time. OSB was added to each wall as it was done, until the building was back into solid condition.

When I went to square the front wall, I found that the building had a curve in the upper left wall, and the building was an inch wider at the top than at the bottom. This was remedied by sectioning the front wall top plates, cutting loose the first six trusses on the left side, then using the tugger to pull the wall in at the top. This also straightened the crooked left wall. Hurricane clips were added to all the trusses at this point.

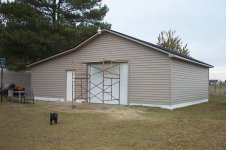
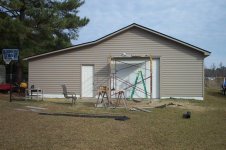
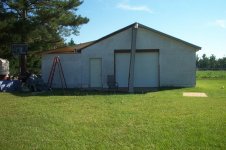
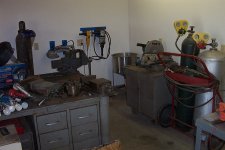
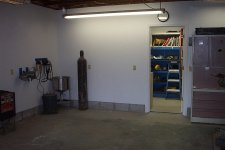
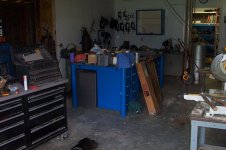
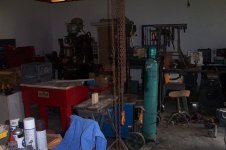
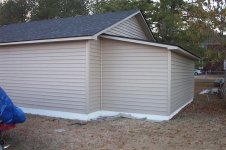
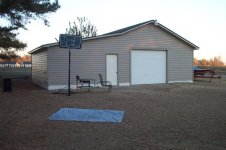
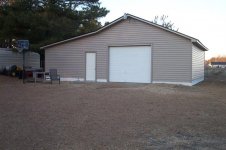
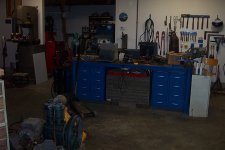
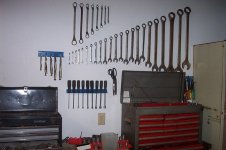
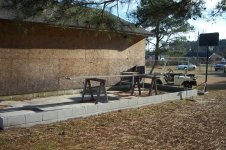
After the building was straightened and braced, I added an 8 foot by 20 foot tool and compressor room to the rear, using a simple shed roof style. This was all the rear lot room I had left. A 10 foot by 26 foot expansion was added to the left side of the building to allow room for my machining equipment. The roof was completely redone with architectural shingles and black drip edge to match the house. The tool room is walled with drywall, and the rest of the shop is walled in 1/2" BC plywood, sanded in place, then primed and painted.

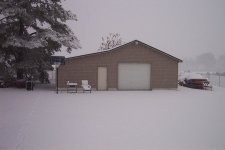
I still have ceiling to do, but wanted to get the vinyl siding on before winter set in here. Just got through with that, so thought I'd share some progress pics of the outside. Interior pics will be added as things progress more inside. When ddawg16 was here in NC, he took time from his hectic work schedule to come by one Sunday to hang out, drink beer, and hang a wall of interior plywood with me, and he brought the beer! How's that for a GJ friend?
 

Attachments

  • Shop 1.jpg
    Shop 1.jpg
    71.2 KB · Views: 200
  • Shop 2.jpg
    Shop 2.jpg
    135.4 KB · Views: 180
  • Shop 3.jpg
    Shop 3.jpg
    69.7 KB · Views: 181
  • Shop 4.jpg
    Shop 4.jpg
    130.5 KB · Views: 182
  • Shop 5.jpg
    Shop 5.jpg
    80.5 KB · Views: 196
  • Shop 6.jpg
    Shop 6.jpg
    73.4 KB · Views: 188
Last edited:
To avoid these ads, REGISTER NOW!
OP
O

OccupantRJ

Well-known member
Joined
May 15, 2009
Messages
11,149
Location
Eastern North Carolina
More pics of the workshop.
 

Attachments

  • Shop 11.jpg
    Shop 11.jpg
    86.6 KB · Views: 240
  • Shop 10.jpg
    Shop 10.jpg
    89.3 KB · Views: 167
  • Shop 9.jpg
    Shop 9.jpg
    81.4 KB · Views: 146
  • Shop 8.jpg
    Shop 8.jpg
    97.5 KB · Views: 144
  • Shop 7.jpg
    Shop 7.jpg
    87.4 KB · Views: 157
OP
O

OccupantRJ

Well-known member
Joined
May 15, 2009
Messages
11,149
Location
Eastern North Carolina
Great job on saving the old building and looks like a great space, what kind of projects will be inside?

Before I got flooded out at my old shop, see

http://www.garagejournal.com/forum/showthread.php?t=50169

I was into motorcycles and street rods. Since then, we have been flipping houses, and my project has consisted of just getting back into a shop once again. I still have plenty of restoration to do on my equipment. What I will get into along the way is anyone's guess, but I'm slowly getting there. It's been a long, hard road.
 
OP
O

OccupantRJ

Well-known member
Joined
May 15, 2009
Messages
11,149
Location
Eastern North Carolina
Looks really nice. That is going to be a nice shop. I can't wait to see pics of the inside.

LOL, the inside's not so nice right now. Organization has taken a back seat to construction. All the work was done with this stuff still inside. Here's a few pics over the last few months. Did manage to paint my welding table and put it into place so I could somewhat use it. Note the water marks on the doors of the grey cabinet with the chop saw on it. I still have 2 blast cabinets, a metal lathe, hydraulic motorcycle/mower lift, and another 20 inch bandsaw to bring from my storage trailer at my son's house. That was the need for the expansion.

Edit: Moving in has been accomplished. See the following link.

http://www.garagejournal.com/forum/showthread.php?t=61583
 

Attachments

  • 8-13-10 002.jpg
    8-13-10 002.jpg
    142.4 KB · Views: 226
  • Hardware 011.jpg
    Hardware 011.jpg
    121.6 KB · Views: 244
  • welder 010.jpg
    welder 010.jpg
    142.7 KB · Views: 253
  • weld corner1.jpg
    weld corner1.jpg
    126.4 KB · Views: 255
  • 9-1-10 026.jpg
    9-1-10 026.jpg
    71.8 KB · Views: 239
  • 9-1-10 028.jpg
    9-1-10 028.jpg
    71.7 KB · Views: 227
  • 9-1-10 029.jpg
    9-1-10 029.jpg
    65.4 KB · Views: 202
Last edited:
OP
O

OccupantRJ

Well-known member
Joined
May 15, 2009
Messages
11,149
Location
Eastern North Carolina
Here's a few more exterior pics of the workshop. A friend who I had done a favor for a few years back, gave me the 2.5 ton Goodman package heat pump. It has been used only 6 months. He had bought a larger one.
 

Attachments

  • Right rear.jpg
    Right rear.jpg
    98.4 KB · Views: 118
  • Left rear.jpg
    Left rear.jpg
    84.5 KB · Views: 126
  • Front left.jpg
    Front left.jpg
    76.9 KB · Views: 107
  • Front.jpg
    Front.jpg
    79 KB · Views: 102
OP
O

OccupantRJ

Well-known member
Joined
May 15, 2009
Messages
11,149
Location
Eastern North Carolina
I finally was able to shuffle things around in the shop enough to get a car in to work on it. In fact, I worked on three in there yesterday, and have a mower and golf cart to work on in a few minutes. Everything is not in it's final place, but just being able to get back inside a shop of my own to work on stuff is nice. I gave my BIL two sets of bolt drawers and a Craftsman workbench with drawers to make some more room, since he is my on-call brick mason, and always undercharges me. Lots of work to go on ceiling, lights and AC system, but at least I can use it now.
 

Attachments

  • shop open1.jpg
    shop open1.jpg
    63.9 KB · Views: 129
  • car in shop3.jpg
    car in shop3.jpg
    73.5 KB · Views: 126
  • Car in shop1.jpg
    Car in shop1.jpg
    73.2 KB · Views: 102
OP
O

OccupantRJ

Well-known member
Joined
May 15, 2009
Messages
11,149
Location
Eastern North Carolina
Sold my last rental house a few weeks ago, so now I have some well deserved personal time on my hands. I got into the shop and have been spending time digging things out of boxes and cabinets to be able to get the shop set up properly again. It has been hell finding something you KNOW that you have, but just can't put your hands on it. That issue is getting taken care of a little at a time, but it will definetly be a work in progress.

For the last couple of days, I have been sorting stuff and trying to get it where I can find it to use it. I made a rack for some nut drivers, aviation snips, and one for some vise grips. I also hung a set of combo wrenches on the wall, that range in size of 1/4" to 2-3/8". Above them, I hung a set of double box offset wrenches. These items will be soaked in vinegar to derust as time allows. The toolboxes have been placed along the wall where I feel they will work out best for auto repair, being near the front end of a car when one is in the shop.

If you look at these pics vs the earlier ones, a few things have appeared on the walls along the way. The lighting is not the greatest, as I still have the ceiling to do, and am using a minimal amount of fixtures to get by for now. A fire extinguisher was added to the side of one of the metal cabinets to assist in any engine or welding fires that may occur.
 

Attachments

  • Shop walls 008.jpg
    Shop walls 008.jpg
    124.2 KB · Views: 122
  • Shop walls 007.jpg
    Shop walls 007.jpg
    143.9 KB · Views: 133
  • Shop walls 006.jpg
    Shop walls 006.jpg
    139.5 KB · Views: 144
  • Shop walls 005.jpg
    Shop walls 005.jpg
    68.5 KB · Views: 140
  • Shop walls 004.jpg
    Shop walls 004.jpg
    62.9 KB · Views: 140
  • Shop walls 003.jpg
    Shop walls 003.jpg
    136.9 KB · Views: 145
  • Shop walls 001.jpg
    Shop walls 001.jpg
    68.4 KB · Views: 183
Last edited:
OP
O

OccupantRJ

Well-known member
Joined
May 15, 2009
Messages
11,149
Location
Eastern North Carolina
It has been 12 years, so time to kick in a few more pictures of how the shop stands at the present.
There are 3 rooms in the shop which are the main bay, a machining and fabrication shop, and a combined compressor, hardware, and tool room. Main shop area.IMG_1702.jpegIMG_1700.jpegIMG_1699.jpegIMG_1704.jpegIMG_1705.jpeg
 
To avoid these ads, REGISTER NOW!

zanyad

ALLIANCE MEMBER
Joined
Apr 26, 2018
Messages
2,798
Location
NE Ohio
IMG_1700.jpeg
I'm curious about that beige cabinet with a tool chest in the middle. Did you make that, or find pieces that fit well together?
 
OP
O

OccupantRJ

Well-known member
Joined
May 15, 2009
Messages
11,149
Location
Eastern North Carolina
IMG_1700.jpeg
I'm curious about that beige cabinet with a tool chest in the middle. Did you make that, or find pieces that fit well together?
Those beige cabinets are metal drop front hutches that I bought used locally for $50 each. The drop front works great as a desk for working on tedious detail items and for cruising GJ on my older Ipad, ordering parts, or doing research. I bought 3 cheap tool chests off marketplace for various workstation storage around the shop. The drawers in the hutch are a Craftsman 14 drawer chest with the top removed and 3/4” cut off the top tray area to closely fit into the hutch cavity. This is storage of tools for finer sit down detail work at the drop front desk. It has proven to be a great enhancement to the shop. I will provide pics of the other drawer units that I fitted for you.
 
OP
O

OccupantRJ

Well-known member
Joined
May 15, 2009
Messages
11,149
Location
Eastern North Carolina
@zanyad, here is another use of an under table box In this link.

 
OP
O

OccupantRJ

Well-known member
Joined
May 15, 2009
Messages
11,149
Location
Eastern North Carolina
@zanyad, another under table drawer set. This one is also Craftsman. I got this one and the 14 drawer in the hutch for $15 off marketplace.


And this.
 
OP
O

OccupantRJ

Well-known member
Joined
May 15, 2009
Messages
11,149
Location
Eastern North Carolina
You be welcome! It is a cheap easy way to get drawer storage under an existing bench right where you need it. I bolted a piece of 3/4” square tubing inside along the lip on top after cutting the box down to provide additional support for the front. There are usually boxes for cheap with dented lids on marketplace and craigslist because who wants a dented lid, right? Me!😉
 
To avoid these ads, REGISTER NOW!
Top Bottom