jeffmoss26
Well-known member
Re: Garage Refurb
Feel free to, anytime!!
Feel free to, anytime!!


I started thinking that I oughta try dump and reload the old computer and leave it out here in the garage. I'd probably buy a new monitor for it, like a flat screen, but could be a winter project.
I wired it into the first jack, and right to the next. I twisted the wires together to make a good connection and used the screws on the back off the jacks. The second jack would work but not the first. It was like the data would go right past the first jack.
Beats the heck out of me.


An honest mistake by someone trying to do something new. I'm sure we've all been there when working out of our depth. I'm glad you were able to figure it out.
I take it you only ran a single wire from the house to the garage? If so, yeah, you'd need a switch on the garage end if you wanted to have multiple outlets live. Another option would have been to hook up a wireless access point off of a single Ethernet port in the garage. That would certainly cover the entire garage adequately. If it was me, I'd probably get a wireless router for the garage. Configured properly, that would give you the switch functionality for multiple live ethernet ports, and you could use the wireless on it to extend your wireless network footprint into the garage for trouble free WiFi.


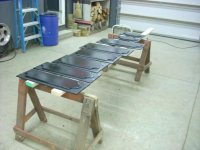
Once that was done, I added a couple of pieces of poplar to the edge. This should keep the plywood from splitting. I broke out the sander, cleaned the top off and rounded the edges and corners off.

Only needing 1 layer of plywood allowed a bigger top. The bigger top allowed me to space the cabinets farther apart. Spacing the cabinets farther apart allowed the shop vac to reside under the cabinets in the center.

Having the plan in mind was great but being able to adjust the plan was even better. Sometimes, you have to think on the go and make changes in progress.
I still need to get the doors scuffed and painted, along with the hinges. I picked up some round wooden knobs that will get some black paint to match.
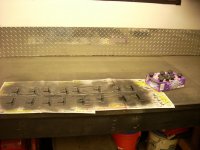
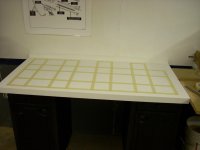
The dilemma I now have is how to paint the top. I can leave it natural so it somewhat matches the RAS table. I can paint it black like the rest of the work bench tops. Or I can take the time and lay out some more black & white checkers.
On a counter top I made for my house that I had already put the trim ends on it I laid the Formica on it and used a router to put a small 45% edge on it.
They look like they found a good home where they are.


Man you sure had a hill to climb with that house and shop.....you did it too!!! Great job. Suppose you may be looking for some station signs, pumps and the like one of these days.


Howdy Eric, Well after going threw your thread i need a beer to celebrate your hard work, you are kicking **** on this build mate. Your workmanship is topnotch and it shows in the build, i can't wait for more now i no about this thread. cheers Lee


I was just about to say your knobs don't match ! LOL

 However I think the checkerboard is classic. Good score on those cabinets too.
Things are looking awesome out in your shop, NUTT. Great job on that checkerboard pattern. It kinda reminds me when I wanted to do something like that on my floor when I did the epoxy. I'm glad I didn't because I freaked just getting it down with no pattern


Oh that white knob is killing me !!
Oh that white knob is killing me !!
 Looking good.