To avoid these ads, REGISTER NOW!

Above 1200 Sq/FT Garage Refurb®

Wokspaces above 1200 squarefeet.

slimpickins

Well-known member
Joined
Mar 27, 2011
Messages
2,404
Location
Canada
Re: garage refurb

This is the other side.

garage004.jpg

Nice pinup in the corner! :eyecrazy: Have you posted a closeup of that in the "Pinups" thread?

http://www.garagejournal.com/forum/showthread.php?t=54468
 
To avoid these ads, REGISTER NOW!

Rag Roc

ALLIANCE MEMBER
Joined
Mar 11, 2011
Messages
297
Location
Central Florida
Re: garage refurb

Nice transformation.

I saw the old soda extinguishers in your shop. I've seen them used as ceiling lights with the bottoms cut off and hung from chains.
 
OP
N

NUTTSGT

Super Moderator
Staff member
Joined
Sep 14, 2009
Messages
50,882
Location
Northern Central Ohio
Re: garage refurb

Terrible thing to say to a fireman with a wood burning stove, OSB and pvc airlines in his garage. :lol:

Life is a calculated risk. You just have to take the right recautions and use common sense when doing anything. Even though you may take all the precautions you can, make everything as safe as possible, Mr Murphy will jump up and kick somebody in the nuts ocassionally. ;)
 
OP
N

NUTTSGT

Super Moderator
Staff member
Joined
Sep 14, 2009
Messages
50,882
Location
Northern Central Ohio
Re: garage refurb

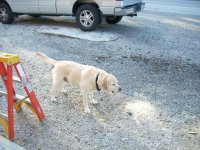
I did a couple of small things outside, not much as it keeps raining here.

I threw some stone down along side the sidewalk we poured last year.

06232011019.jpg


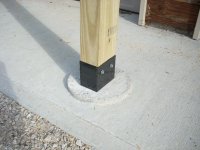
Then I wnated to put an end on the apron poured last fall. I felt the need to enclose part of the column in the apron and to help divert rain water coming down the driveway. This should help push it into the yard.

Here is what it looked llike prior.
06232011018.jpg


I dug it out and threw in some rebar, it's not below the frost level. I'm hoping that the rebar going in the column (4' deep) and garage foundation will keep it in place. If it doesn't oh well.

06232011020.jpg


I used a metal can to get the curve. I cut 2 pieces of plywood but it kept breaking so I said forget that.
06232011021.jpg


Once I removed the can, it did break a small piece of concrete out, oops, no biggie. Here is what the finished product looks like.

06232011022.jpg

06232011023.jpg


Now I just need to back fill a little dirt and stone, get some grass seed. For those wondering, I did mix that concrete up myself in a wheelbarrow, portlans cement, stone and sand.
 

Attachments

  • GR174.jpg
    GR174.jpg
    138.5 KB · Views: 31
  • GR175.jpg
    GR175.jpg
    136.8 KB · Views: 14
  • GR176.jpg
    GR176.jpg
    146.4 KB · Views: 15
  • GR177.jpg
    GR177.jpg
    55.7 KB · Views: 14
  • GR178.jpg
    GR178.jpg
    136.2 KB · Views: 13
  • GR179.jpg
    GR179.jpg
    139.7 KB · Views: 12
Last edited:

Motown 454

Well-known member
Joined
Sep 25, 2008
Messages
1,359
Re: garage refurb

It looks great. Boy I don't miss mixing in a wheel barrow, got many a back ache from doing that.
 
OP
N

NUTTSGT

Super Moderator
Staff member
Joined
Sep 14, 2009
Messages
50,882
Location
Northern Central Ohio
Re: garage refurb

It looks great. Boy I don't miss mixing in a wheel barrow, got many a back ache from doing that.

It wasn't bad, I had a system going so i wasn't constantly mixing.

Throw in the stone, wheel to the back patio, throw in the sand.
Wheel back out front, mix them up, pour the portland cement in to a bucket. Slush the concrete down in the form, dump the portland in the wheelbarrow, mix, add water and final mix. Dump in form and repeat. :thumbup:
 
OP
N

NUTTSGT

Super Moderator
Staff member
Joined
Sep 14, 2009
Messages
50,882
Location
Northern Central Ohio
Re: garage refurb

Any updates on this cool refurb?

Sorry no, there's no updates. Just trying to save some money to work on the outside in addition to getting some other things in order.

Trust me, when there's updates, I'll be sure to post them up. :thumbup:
 

grim

Active member
Joined
May 7, 2007
Messages
37
Location
Kansas City, Missouri
Re: garage refurb

Very cool find on that house and garage buddy. Shame you couldn't keep the paw prints :D.

Dogs always have a way with timing... We have one that loves to wonder into pictures, at the last second, and wink :p.
 
OP
N

NUTTSGT

Super Moderator
Staff member
Joined
Sep 14, 2009
Messages
50,882
Location
Northern Central Ohio
Re: garage refurb

Well, I guess it's been long enough. I'm not sure how much I will get done on this round. Hopefully things will work out and I'll finish the progress on the outside.

This is what I started with this morning. A stack of wood, which I didn't touch by the way, lol. I basically had a plan in my head, like always, figured out what I needed for the front.
08232011outsidegarage005.jpg

A view of what it looked like on the outside.

08232011outsidegarage003.jpg
 

Attachments

  • GR180.jpg
    GR180.jpg
    70 KB · Views: 18
  • GR181.jpg
    GR181.jpg
    130.7 KB · Views: 18
Last edited:
OP
N

NUTTSGT

Super Moderator
Staff member
Joined
Sep 14, 2009
Messages
50,882
Location
Northern Central Ohio
Re: garage refurb

I started to get the ball rolling after a trip to town to do a few errands. Doors up and the ladders out.
08232011outsidegarage004.jpg

Then at the end of the day, doors shut. I ripped off oll the old T111 siding of the front where the porch/overhang will be. This also included taking off the roof over the windows. The new roof will encompass the window section that sticks out and a short bit on the other side.
08232011outsidegarage006.jpg

Here's a view from the other side, the shadow of the old roof is quite visible. The roof line will basically follow that roof line but won't be curved the the former.
08232011outsidegarage007.jpg
 

Attachments

  • GR184.jpg
    GR184.jpg
    109.4 KB · Views: 21
  • GR183.jpg
    GR183.jpg
    144.7 KB · Views: 21
  • GR182.jpg
    GR182.jpg
    132.3 KB · Views: 21
Last edited:
OP
N

NUTTSGT

Super Moderator
Staff member
Joined
Sep 14, 2009
Messages
50,882
Location
Northern Central Ohio
Re: garage refurb

Always cover an open roof. I awoke to a clap of thunder this morning at 5:55 am. About 2 seconds later, I realized it was raining. The last time I looked at the weather, a few days ago, it was supposed to be nice. Well, a storm rolled through early morning and the roof was open, luckily the ceiling is OSB and that did help.

If you look in the background, you can see the shelf/bench. This is an older picture and there wasn't plastic covering my "track" box or chainsaw tool box.
070510-2001.jpg


In addition to the tool boxes, there was a stack of instruction booklets that got wet. Then I had a serious "oh ****" moment, when I noticed my crankshaft box sitting there getting wet. Luckily, it was only the box.


Lesson learned, always cover in open roof. :shocking:
 

Attachments

  • GR185.jpg
    GR185.jpg
    91.1 KB · Views: 18
Last edited:

Foxxtrot

Well-known member
Joined
May 23, 2011
Messages
100
Location
Huntersville, NC
Re: garage refurb

That is a sickening feeling.....been there, done that.
Love what you have done so far. I'm looking forward to seeing the new front elevation!:thumbup:
 
To avoid these ads, REGISTER NOW!

synik

Well-known member
Joined
Jan 5, 2010
Messages
192
Re: garage refurb

Wow, great work! Keep us updated, very entertaining to watch the progress.
I would literally have a couch in the corner somewhere to take a nap, as much work thats involved. LOL.

:thumbup:
 
OP
N

NUTTSGT

Super Moderator
Staff member
Joined
Sep 14, 2009
Messages
50,882
Location
Northern Central Ohio
Re: garage refurb

Sorry, I didn't get any updates yesterday. I took off a half day from work and had to go back to work last night. I did get some plastic hung to cover it, since it did storm again last night. I put a tarp over the exposed roof area too.

As far as progress, I did remove some of the siding and got almost all the ledger boards up for the roof. I still need to put them up around the windows. I also chaulked a few areas to help seal up the older bldg.

I will get some pics of the progress today.
 
OP
N

NUTTSGT

Super Moderator
Staff member
Joined
Sep 14, 2009
Messages
50,882
Location
Northern Central Ohio
Re: garage refurb

Yesterday, the goal was to get all the ledger boards nailed up. Before I did that, I had to pry off some of the old yellow pine siding. I had most of them up and this is what I had accomplished yesterday.

08252011garageexterior001.jpg


Actually after looking at the picture above, I didn't have the ledger boards up around the windows. That was where I started today and what it looked like.
08252011garageexterior002.jpg
I still enjoy looking at the old roof shadow, after I cover it up, it will still be there for the future.
 

Attachments

  • GR186.jpg
    GR186.jpg
    137.6 KB · Views: 18
  • GR187.jpg
    GR187.jpg
    86.1 KB · Views: 14
Last edited:
OP
N

NUTTSGT

Super Moderator
Staff member
Joined
Sep 14, 2009
Messages
50,882
Location
Northern Central Ohio
Re: garage refurb

After I had the ledger boards finished, I replaced some of the old siding that was somewhat rotted. I merely popped out the nails of some of the old siding and reused it. It was better to reuse it than to scrap it out.
Once, the siding was replaced, it was on to get the posts erected. Getting the three 4x6 posts up today was my goal. If I had another body helping me, things would move quicker but I almost prefer to work alone. The wife did come out and help put a 2x6 in place. I think she freaked when she had to go up the ladder, up 3 rungs. . . .:lol:
08252011garageexterior003.jpg
2 up and the third ready to go.

The last post up and about time to quit for the day. Tommorow, the goal is to have most of the roof framed up. I guess we will see what the morning brings.
08252011garageexterior004.jpg
 

Attachments

  • GR188.jpg
    GR188.jpg
    140.8 KB · Views: 12
  • GR189.jpg
    GR189.jpg
    117.1 KB · Views: 15
Last edited:

Jkaz

Well-known member
Joined
Aug 11, 2011
Messages
53
Location
Minneapolis, MN
Re: garage refurb

Any 14 page thread that I can read in one sitting is definitely worth subscribing too. Awesome build man! Your drive and ethic is completely inspirational man! Keep up the good work!
 
OP
N

NUTTSGT

Super Moderator
Staff member
Joined
Sep 14, 2009
Messages
50,882
Location
Northern Central Ohio
Re: garage refurb

Thanks guys, I appreciate it. I had to make a trip to town this morning for a 2x6x14'. I didn't know where the 12 footers would fall when they were actually put up. I guess that's just one of those things you don't know till the time comes.
I thought I would make better progress than I did. I was hoping to have the roof mostly framed up, things just seemed to take forever today.

Here's the 14' I had to go get.
08262011garagepics001.jpg

I have a 2x6 holding the corner up for now. Once everything is in place, I shouldn't need it. I'm going to run an angle brace from the inside corner post of the garage along the rafter. I'll also put some small rafter over the windows to help carry the weight of the roof.
 

Attachments

  • GR190.jpg
    GR190.jpg
    108.6 KB · Views: 15
Last edited:
OP
N

NUTTSGT

Super Moderator
Staff member
Joined
Sep 14, 2009
Messages
50,882
Location
Northern Central Ohio
Re: garage refurb

As I was nearing the end and putting the bracing in near the windows, I came to the conclusion, that I needed a few angle joist hangers. So I tried to finish the last two small ones above the front most window. I ran out of 16d nails in my pouch and went back in the garage to look under the bench for the 25lb box. Ummm, there wasn't one. Damn, now I need nails too. :willy_nil

Here's a few pictures of the progress from today.
08262011garagepics002.jpg

08262011garagepics004.jpg


Then a final view from the spot I've been trying to take a "progress pic" from everyday.
08262011garagepics003.jpg


As I was almost done, I brought out the supervisor.
08262011garagepics006.jpg


typical supervisor, sitting on his ***. :lol:
08262011garagepics005.jpg


First thing in the morning will be a trip to HD to grab a few things I need. This also includes a stop at Dunkin Donuts for a coffee for the wife and a frosted coffee roll for me. :thumbup:
 

Attachments

  • GR191.jpg
    GR191.jpg
    88.7 KB · Views: 13
  • GR192.jpg
    GR192.jpg
    73.9 KB · Views: 12
  • GR193.jpg
    GR193.jpg
    145.7 KB · Views: 14
  • GR194.jpg
    GR194.jpg
    151.6 KB · Views: 11
  • GR195.jpg
    GR195.jpg
    85.6 KB · Views: 13
Last edited:

colt zantop

Well-known member
Joined
Apr 20, 2006
Messages
5,422
Location
michigan
Re: garage refurb

wow....looking good! I remember when you replaced the garage doors and I really liked the vintage ones better but now its all coming togther and looks great!! nice work :)
 
OP
N

NUTTSGT

Super Moderator
Staff member
Joined
Sep 14, 2009
Messages
50,882
Location
Northern Central Ohio
Re: garage refurb

Thank you Colt.

Saturday I finished up the rafters and didn't get a chance to take some pictures.
This is where is was this morning at the start of the day.
08292011garage003.jpg


And the view from the standard vantage point .
08292011garage001.jpg
 

Attachments

  • GR196.jpg
    GR196.jpg
    118.5 KB · Views: 14
  • GR197.jpg
    GR197.jpg
    132.4 KB · Views: 16
Last edited:
OP
N

NUTTSGT

Super Moderator
Staff member
Joined
Sep 14, 2009
Messages
50,882
Location
Northern Central Ohio
Re: garage refurb

I had a list of things to get done today, but like my typical plans, they got changed. The neighbor walked over and talked for about 40 minutes, After he left, Ifinished up nailing the sheeting up behind the trusses. I know it will never be seen but I wanted to cover the old yellow pine siding. Then I ate lunch, took Bode to the vet and by the time I got back on it, it was 3:30 and quit about 5:30 after hearing some bad news about one of my co-workers granddaughter.
I'm putting vented soffit under the porch roof. I want to try and vent it into the attic and out through some gable vents. Hopefully it'll move some air and help keep the garage cooler in the summer.
First I cut a hole in the outside and pushed the insulation up inside the wall. Then I cut through the interior OSB wall. This leads right into the attic.
08292011garage005.jpg


I nailed some 2x4s around the hole to frame it in.
08292011garage006.jpg


Then I screwed on some screened soffit vents.
08292011garage007.jpg

and after they were installed.
08292011garage008.jpg
 

Attachments

  • GR201.jpg
    GR201.jpg
    82.4 KB · Views: 6
  • GR200.jpg
    GR200.jpg
    108.3 KB · Views: 6
  • GR199.jpg
    GR199.jpg
    71.5 KB · Views: 6
  • GR198.jpg
    GR198.jpg
    75.9 KB · Views: 8
Last edited:
OP
N

NUTTSGT

Super Moderator
Staff member
Joined
Sep 14, 2009
Messages
50,882
Location
Northern Central Ohio
Re: garage refurb

Thanks Rick, I just wish it would progress along a little faster. My other neighbor, to my east, not the one who comes over, has been keeping an eye on progress as he goes by. His parents owned it many many years ago. He's always had good things to say as I've worked on the place. I'm not sure what his reaction is this time as I did rip off some of the character of the old roof.
 

rickairmedic

Well-known member
Joined
May 31, 2005
Messages
4,165
Location
louisville ,Ky
Re: garage refurb

LOL I think we all wish our garages would progress quicker but theres only so many hours in a day and most of us still have to work full time and then some in order to " pay to play " :D.


Rick
 
OP
N

NUTTSGT

Super Moderator
Staff member
Joined
Sep 14, 2009
Messages
50,882
Location
Northern Central Ohio
Re: garage refurb

One of things I've forgot to mention is how the posts are fastened. I looked at buying some Simpson bases for the 4x6 posts. I wasn't to impressed with the price at $15 each. I decided to make my own. I bought some 1/8 steel and some 3/4" sq tubing. I wish I would have taken some pics as I making them. Total cost for the steel was 10 bucks, saved 35 and got to practice welding.
There's two pieces of square tubing inside the post sits on and allows for any drainage of the weather. Of course therer's an anchor in the concrete holding it down. I gave them two coats of black POR 15, inside and out.
08302011garagepics004.jpg


08302011garagepics006.jpg
 

Attachments

  • GR202.jpg
    GR202.jpg
    102.4 KB · Views: 13
  • GR203.jpg
    GR203.jpg
    135.7 KB · Views: 14
Last edited:
OP
N

NUTTSGT

Super Moderator
Staff member
Joined
Sep 14, 2009
Messages
50,882
Location
Northern Central Ohio
Re: garage refurb

I cut all the rafter tails and hung the front fascia board yesterday. As I was ripping the 2x6 boards for the fascia, I suffered a casualty. Well, not me personally, but I burned up the motor on my Craftsman table saw. It was never a high dollar piece of equipment but it did serve it's purpose till yesterday. Now I have to find a replacement. I really don't want to buy new and get another POS, so I'm going to try to find something older I think.

Here's the view of the end of the day progress.
08302011garagepics003.jpg


Since there's not a post on the west end of the roof, I was concerend about the roof sagging over time. I tried to add some bracing to the rafters on that end, including an extra rafter to help carry the weight. I basically tried to replicate a truss, adding a brace that runs back to a ledger board against the front of the garage.
08302011garagepics001.jpg


Then I added a couple of pieces of blocking to help brace it a little more. Will it work, I don't know but I don't think it'll hurt any.
08302011garagepics002.jpg


Hopefully, the rain will hold off today and I can add some sheeting over the siding above the roof. The biggest problem is that I have to remove the plastic to accomplish this task. But, if it rains, I want the plastic on it, might be in a holding pattern this morning. Once that is done, I'll work on the roof. I cut the starter strips last night so that is one less thing that needs to be done today.
 

Attachments

  • GR204.jpg
    GR204.jpg
    144.2 KB · Views: 17
  • GR205.jpg
    GR205.jpg
    100.3 KB · Views: 15
  • GR206.jpg
    GR206.jpg
    88.8 KB · Views: 30
Last edited:
To avoid these ads, REGISTER NOW!
Top Bottom