To avoid these ads, REGISTER NOW!

Above 1200 Sq/FT Garage Refurb®

Wokspaces above 1200 squarefeet.

Gearbanger

Well-known member
Joined
May 26, 2008
Messages
96
Location
Arlington, TN
Re: garage refurb

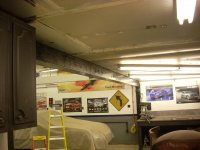
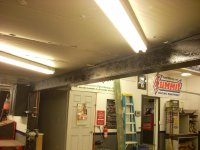
I finished up the boxing inthe beam last night. This is the east side of the beam partially done.
02192013beampics007-1.jpg

Eric, I want that flaming Mustang banner! I keep an eye out for them on Ebay. I've got the poster that is about the size of your Mach 1 poster. Interested in any trades for that banner?
 
To avoid these ads, REGISTER NOW!
OP
N

NUTTSGT

Super Moderator
Staff member
Joined
Sep 14, 2009
Messages
50,891
Location
Northern Central Ohio
Re: garage refurb

Sorry, my friend, it stays on my wall. I picked that up at a FFW race in Cordova several years ago. I asked one of the FFW guys (his home track was Norwalk, like mine) if he could get me a Ford banner. He came by the pit on Sunday with both of them.

There's a Ford swapmeet coming up (Columbus, Ohio) around Easter, If I can find one there, I can try to hook you up with one. I need to look for another poster for another member if I can.
 
OP
N

NUTTSGT

Super Moderator
Staff member
Joined
Sep 14, 2009
Messages
50,891
Location
Northern Central Ohio
Re: garage refurb

Eric, how did you mount the vice to that wall?

Here are some pics of the bench grinder, if that's what you were wondering about.

02212013beampics008-1-1.jpg


02212013beampics006-1.jpg


It's a small 5" grinder.
 

Attachments

  • GR679.jpg
    GR679.jpg
    73 KB · Views: 4
  • GR680.jpg
    GR680.jpg
    65.9 KB · Views: 5
Last edited:
OP
N

NUTTSGT

Super Moderator
Staff member
Joined
Sep 14, 2009
Messages
50,891
Location
Northern Central Ohio
Re: garage refurb

A few pics of the boxed in beam with a coat of black paint.

02212013beampics009-1.jpg


02212013beampics010-1.jpg
 

Attachments

  • GR681.jpg
    GR681.jpg
    82.2 KB · Views: 8
  • GR682.jpg
    GR682.jpg
    89 KB · Views: 8
Last edited:

jlylec

Well-known member
Joined
Jul 20, 2012
Messages
185
Location
Charlottesville, VA
Re: garage refurb

This is an awesome space, Eric. I love the old service station and you guys did an amazing job on that beautiful house too! I should have thought to check for a thread of yours before questioning you on the 351w size! I see you're a big Ford guy too. My first project in my new garage is going to be to rebuild the 302 I'm pulling out of my Bronco for the 351w swap. I've always want to build an engine and now I've got one handy. I'm going to take my time and see how much power I can squeeze out of it with some trick modern tech. Then I'll probably drop it in something "go fast" instead of something "go anywhere". Have you ever built an engine? Sorry I didn't read ALL your pages here! ;)
-Lyle
 
OP
N

NUTTSGT

Super Moderator
Staff member
Joined
Sep 14, 2009
Messages
50,891
Location
Northern Central Ohio
Re: garage refurb

This is an awesome space, Eric. I love the old service station and you guys did an amazing job on that beautiful house too! I should have thought to check for a thread of yours before questioning you on the 351w size! I see you're a big Ford guy too. My first project in my new garage is going to be to rebuild the 302 I'm pulling out of my Bronco for the 351w swap. I've always want to build an engine and now I've got one handy. I'm going to take my time and see how much power I can squeeze out of it with some trick modern tech. Then I'll probably drop it in something "go fast" instead of something "go anywhere". Have you ever built an engine? Sorry I didn't read ALL your pages here! ;)
-Lyle

Thank you for the compliments. I'm a Ford guy but I don't know everything but I try to keep learning as I have a few guys I can go to when I need help.

One piece of advice I can give you with the roller 302 is not get too greedy, try to keep the rpm under 6500 (preferably around 6k) and not to push it much over 500 hp. If you do, it'll have the tendency to split the block down the center.

I've put a few together, like I said I'm no expert but a SBF is rather easy to assemble. I've broke a couple of things too.

For your entertainment:

http://forums.corral.net/forums/gen...-my-carnage-we-all-love-split-block-pics.html


Sorry, it's easier to post that link than find a picture of PB right now
 

jlylec

Well-known member
Joined
Jul 20, 2012
Messages
185
Location
Charlottesville, VA
Thank you for the compliments. I'm a Ford guy but I don't know everything but I try to keep learning as I have a few guys I can go to when I need help.

One piece of advice I can give you with the roller 302 is not get too greedy, try to keep the rpm under 6500 (preferably around 6k) and not to push it much over 500 hp. If you do, it'll have the tendency to split the block down the center.

I've put a few together, like I said I'm no expert but a SBF is rather easy to assemble. I've broke a couple of things too.

For your entertainment:

http://forums.corral.net/forums/gen...-my-carnage-we-all-love-split-block-pics.html


Sorry, it's easier to post that link than find a picture of PB right now

Damn that's crazy man. I'll definitely take your advice and not get too greedy!
 
OP
N

NUTTSGT

Super Moderator
Staff member
Joined
Sep 14, 2009
Messages
50,891
Location
Northern Central Ohio
Re: garage refurb

A little proof work does happen in my garage.

02272013f150leveling005-1-1.jpg


Some new garage art.
02272013f150leveling001-1-1.jpg


The other night I primed part of the back room/compressor room. I only did what was easy to get to. The rest will get done later as I buy more primer adn paint. I believe I will put a coat of white paint over the primer tomorrow.
02272013f150leveling002-1-1.jpg
 

Attachments

  • GR683.jpg
    GR683.jpg
    60.3 KB · Views: 5
Last edited:
OP
N

NUTTSGT

Super Moderator
Staff member
Joined
Sep 14, 2009
Messages
50,891
Location
Northern Central Ohio
OP
N

NUTTSGT

Super Moderator
Staff member
Joined
Sep 14, 2009
Messages
50,891
Location
Northern Central Ohio
Re: garage refurb

Since I had a few things out of the room, I figured no reason to half *** it. I drug everything out.
Stacked stuff on the work bench
03032013compressorroom001-1.jpg


More stuff. . .
03032013compressorroom002-1.jpg

Hard to believe all this **** fits in a 5'x9' room.

Primed and painted all white. I figured leaving it all white would brighten it up. I did make the shelf tops black so they would hid the dirt.
03032013compressorroom003-1.jpg


Appraently, the blue background of the dart board gave the walls a bluish tint. :dunno:
 

Attachments

  • GR686.jpg
    GR686.jpg
    61 KB · Views: 7
  • GR685.jpg
    GR685.jpg
    76.6 KB · Views: 8
  • GR684.jpg
    GR684.jpg
    92.6 KB · Views: 8
Last edited:
OP
N

NUTTSGT

Super Moderator
Staff member
Joined
Sep 14, 2009
Messages
50,891
Location
Northern Central Ohio
Re: garage refurb

As I sat at my work table Wednesday drawing up some plans, my mind began to wonder. When I built the work table top, somewhere in the process, it got a twist in it and I never corrected or caught the problem. It's never been a big issue but as I do some things on it, it's not a level surface but does need corrected. If I lost you concerning the work table, it's the checker boarded top table occassionally seen in my pictures.

So it began, a refurb of my work table. . . .

First thing up was removing the old top, which ruined the plywood. As you can see, the base started out as two kitchen base cabinets.

03062013worktable004-1.jpg


I had built a small frame for it to sit on with 2 casters on one end. The casters make it possible to lift one end up, allowing it to roll around and easily being moved about the garage.
03062013worktable007-1.jpg
 

Attachments

  • GR687.jpg
    GR687.jpg
    72.8 KB · Views: 4
  • GR688.jpg
    GR688.jpg
    62.2 KB · Views: 4
Last edited:

IONH

Well-known member
Joined
Feb 12, 2010
Messages
2,043
Location
Central Massachusetts
Re: garage refurb

Eric, interesting idea with those casters. Do you just push on the (pictured) left and it will push down on the casters and roll? If not, how do you lift the left to pull? Or is that a temporary platform and not what the cabinet will be ultimately mounted on.
 
OP
N

NUTTSGT

Super Moderator
Staff member
Joined
Sep 14, 2009
Messages
50,891
Location
Northern Central Ohio
Re: garage refurb

Once I had the top off, I made the plans (in my mind) and made a trip to pick up some material based on the old top construction.
03062013worktable005-1.jpg


It wasn't going to be wider than 4' but it would be a tad bit longer. I cut the 2x6 to length. Once that was done, I put rabbets on the ends, followed by dado'ing the edges for the plywood to be recessed into.
03062013worktable006-1.jpg


Then I reconsidered my design before I went farther and changed up the inside bracing. This meant cutting a few more dados for the cross bracing. Then some layout before assembling.
03062013worktable008-1.jpg
 

Attachments

  • GR691.jpg
    GR691.jpg
    69.4 KB · Views: 3
  • GR690.jpg
    GR690.jpg
    76.3 KB · Views: 2
  • GR689.jpg
    GR689.jpg
    75.4 KB · Views: 2
Last edited:
To avoid these ads, REGISTER NOW!
OP
N

NUTTSGT

Super Moderator
Staff member
Joined
Sep 14, 2009
Messages
50,891
Location
Northern Central Ohio
Re: garage refurb

Eric, interesting idea with those casters. Do you just push on the (pictured) left and it will push down on the casters and roll? If not, how do you lift the left to pull? Or is that a temporary platform and not what the cabinet will be ultimately mounted on.

The back edge of the frame between the casters was planed down to round it off for clearance. When you lift up on the opposite side (from the casters) of the table top, it puts the weight of the table on the casters and it can roll about. If the table weighs 100 lbs, you're only lifting half of the weight and moves about quite easily. Basically, the design is similar to a wheel barrow other than the caster are off the floor rather than table resting on them.
 
OP
N

NUTTSGT

Super Moderator
Staff member
Joined
Sep 14, 2009
Messages
50,891
Location
Northern Central Ohio
Re: garage refurb

I glued and screwed the frame for the top. As I set it in place, I was hoping to didn't get cockeyed. My luck held out.

03092013worktable001-1-1.jpg


I laid some 2x4s horizontally to attach the frame to the cabinets. They line up one the edge of the cabinets to help carry the weight downward and one on the center. I screwed the 2x4s into the corner bracing of the cabinets and then screwed through the 2x6s into the 2x4s.
03092013worktable002-1-1.jpg
 

Attachments

  • GR692.jpg
    GR692.jpg
    65.4 KB · Views: 3
  • GR693.jpg
    GR693.jpg
    66.9 KB · Views: 3
Last edited:
OP
N

NUTTSGT

Super Moderator
Staff member
Joined
Sep 14, 2009
Messages
50,891
Location
Northern Central Ohio
Re: garage refurb

I added some 2x6s in the end sections for some extra support since these were hang out. Then I went back to the center and put in some 2x4 bracing.
03092013worktable003-1-1.jpg

03092013worktable004-1-1.jpg


Since I generally work at the edges and not the middle of the table, I laid the 2x4s on edge, which also made it easier to screw them into place. This is a simple worktable and I'm not building a house here, so the 2x4s laying flat wil be ok. It also kept me from having to rip them down.

Once all the bracing was in, it was time for the top, glued and screwed in place. After I took this picture, I caulked the edge as I did have some small gaps. Today, I will sand all the rough edges and put a coat of primer on the top.
03092013worktable005-1.jpg


After the primer is on, I'll go back to filling in some of the expansion joints in the concrete florr.
 

Attachments

  • GR696.jpg
    GR696.jpg
    72.3 KB · Views: 4
  • GR695.jpg
    GR695.jpg
    75.1 KB · Views: 4
  • GR694.jpg
    GR694.jpg
    83.6 KB · Views: 3
Last edited:

RickO1

Member
Joined
Dec 14, 2012
Messages
5
Location
Baton Rouge, LA (for now)
Re: garage refurb

Eric,

I'm new to this forum, but hooked already. I read through your whole post and first of all, I want to say thank you for your service to our country and your community. You set a great example.

Secondly, what an awesome garage. What you've done with your house and this garage are fantastic! Way to go. Thank you for your dedication in posting all of your progress with a ton of pictures. I love all of your "little" projects too.

I will continue to follow your progress.

I hope to be building my own garage in a few years after we move, but your dedication and ingenuity are fantastic. Thanks.

Rick
 
OP
N

NUTTSGT

Super Moderator
Staff member
Joined
Sep 14, 2009
Messages
50,891
Location
Northern Central Ohio
Re: garage refurb

Rick, thanks for the compliments. If it wasn't for an awesome site like this or great members following along, I wouldn't have a 1/4 of the pictures that I have now.
 

Buffalot

Well-known member
Joined
May 25, 2011
Messages
45
Location
Mahopac, NY
Re: garage refurb

Hope you remembered to change your clock, since you apparently can't flip your calendar. lol, j/k. The new worktable looks as strong as a tank! Nice job.
 
OP
N

NUTTSGT

Super Moderator
Staff member
Joined
Sep 14, 2009
Messages
50,891
Location
Northern Central Ohio
Re: garage refurb

Now I not sure if it is or ain't. But is the top a little over kill for the base now ? lol


Nah, it's basically the same, just 6" longer. . . 66" vs 60" and I think the top is set better on the base than before.

I like the workbench! Reminds me of the tables we had in shop class!

Same here Jeff, we had a butcher block top with the lockers underneath, I always liked those benches.
 
OP
N

NUTTSGT

Super Moderator
Staff member
Joined
Sep 14, 2009
Messages
50,891
Location
Northern Central Ohio
Re: garage refurb

Hope you remembered to change your clock, since you apparently can't flip your calendar. lol, j/k. The new worktable looks as strong as a tank! Nice job.

Yep, we went out with some friends last night, I set the clock foward before we went out.

The framed calendar is our ladder truck, it's permanently set. :D
 

pitterpat

Well-known member
Joined
Jun 30, 2011
Messages
686
Location
Indianapolis
Re: garage refurb

No problem. The gauge I happened to buy was made this way as the one I replaced, the fitting was in the back. Since my bench grinder is mounted below this airline plumbing, I didn't want it sticking out more than necessary. I knew it would be a matter of time till I smacked my head on it, not if I hit it.

I didn't realize you were a "girl" most won't admit it on a predominatly male board. It's all good, stick around and enjoy the thread.

Yeah, it is one of those things that you don't see on most "male" oriented forums. But I also get funny looks from people when they see me working on my cars and I have niltrile rubber gloves on, I tell them that they wouldn't think I was very clean if they met me and I stuck my had out to shake theirs and my finger nails were dirty.

"Girl" I guess you could say that...I'm probably old enough to be your big sister or mom (not sure how old you are).....And no offense taken since I called myself that and I look as age as just a number.

Keep up the good work!
 
OP
N

NUTTSGT

Super Moderator
Staff member
Joined
Sep 14, 2009
Messages
50,891
Location
Northern Central Ohio
Re: garage refurb

Yeah, it is one of those things that you don't see on most "male" oriented forums. But I also get funny looks from people when they see me working on my cars and I have niltrile rubber gloves on, I tell them that they wouldn't think I was very clean if they met me and I stuck my had out to shake theirs and my finger nails were dirty.

"Girl" I guess you could say that...I'm probably old enough to be your big sister or mom (not sure how old you are).....And no offense taken since I called myself that and I look as age as just a number.

Keep up the good work!

Age, I'm old enough to have a granddaughter but most people are surprised to hear that. So, maybe I'm older than you think.

BTW, I was at Menard's about a week ago, they had 3-4 guages avavilable. I'm not sure which way they mounted but I happened to walk by them and see them.
 
OP
N

NUTTSGT

Super Moderator
Staff member
Joined
Sep 14, 2009
Messages
50,891
Location
Northern Central Ohio
Re: garage refurb

Good news, one of the guys at work was making a trip to HD and asked if anybody needed anything. "ah yeah, I do." 4 gallons of gas at $3.50/gal, I believe I owe him lunch next duty day.

Back on topic.

The table top in primer. I don't believe I used primer on the last top but since I had some Kilz Oil based leftover, I felt like trying it.
03122013sophieworktable003-1.jpg


Then I started to mark lines and laying out the tape for the checker board top. This is going to take alot of tape.
03122013sophieworktable004-1.jpg
 

Attachments

  • GR697.jpg
    GR697.jpg
    60 KB · Views: 3
  • GR698.jpg
    GR698.jpg
    45.9 KB · Views: 2
Last edited:

IONH

Well-known member
Joined
Feb 12, 2010
Messages
2,043
Location
Central Massachusetts
Re: garage refurb

Age, I'm old enough to have a granddaughter but most people are surprised to hear that. So, maybe I'm older than you think.

In some parts of the country, that's just 28-32 years old. Hmm, didn't think I was older than you... :shocking:

What's with the checkerboard?
 
OP
N

NUTTSGT

Super Moderator
Staff member
Joined
Sep 14, 2009
Messages
50,891
Location
Northern Central Ohio
Re: garage refurb

I was right, this is taking alot of tape. I killed one roll but was prepared for that. I bought a few rolls when I bought the lumber. I had all the checkers marked out and a two rows of tape around the edges, I got ready to paint. I thought about it for a second and decided to mask off the center before getting a drop of paint where I didn't want it.
03122013sophieworktable005-1.jpg

I used some blue painters tape which was getting old. It didn't want to stick too good so I knew it would be good to use it up. Then I painted the black checkers and the edges.
03122013sophieworktable006-1.jpg


Today, I will mask over the black and paint the white. I know it sounds bassackwards but the black is oil based and the white will be latex. I'm not sure how well the oil based would stick to the latex if I made a mistake while painting.

The last top, I put a coat of varnish, not sure what (don't remember) though and it turned the white yellowish. Hopefully it won't happen again. :dunno:
 

Attachments

  • GR699.jpg
    GR699.jpg
    57 KB · Views: 3
  • GR700.jpg
    GR700.jpg
    58 KB · Views: 8
Last edited:
OP
N

NUTTSGT

Super Moderator
Staff member
Joined
Sep 14, 2009
Messages
50,891
Location
Northern Central Ohio
Re: garage refurb

In some parts of the country, that's just 28-32 years old. Hmm, didn't think I was older than you... :shocking:

What's with the checkerboard?

29-32, I wish. I'm 43 and been married for 20 plus years. :beer:


Why checkerboard ? When I did the original top, I wanted to try my hand at laying it out and masking it out to see if I could make it look right. Since it's in the garage, I felt it would look good.

Once I had the top done and used 6"x6" squares, I realized it came in handy when I would lay things out. It would be a quick way to measure or check length as it was marked every 6 inches. It also had right angles to line stuff up. :thumbup:
 
To avoid these ads, REGISTER NOW!
Top Bottom