vonhef
Well-known member
Re: Garage Refurb
A great read NUTTS... thanks for sharing.
A great read NUTTS... thanks for sharing.


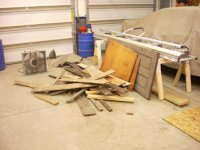
The biggest issue I'm going to have is getting the OSB up here as the attic access is limiting the size. I'm going to have to rip the sheets down to get them in.

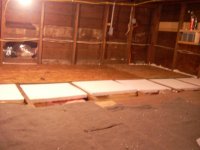
You need a pretty large access hole to get a full 4'x8' sheet up there but if your access hole is still the one in the picture below, you may have to cut the sheets into pretty narrow strips.


 As you can see, in low light, the camera doesn't take the best pictures.


Fantastic story Eric. Thanks for sharing that with us.

Amazing work. I love following this thread!
Ditto from me, Eric. Inspiring!
Nice work, Eric! You're really transforming that space!
I don't agree with the 1/6th done, though.
With me, getting started is 1/2 the battle.
Shawn


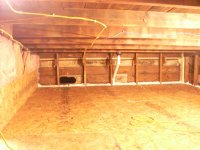
It will be interesting to see how much differance you will notice in the comfort of your space with the added insulation.
Hey every degree counts.. especially if we get into another winter like last year.. ps. Have you seen the Mopar Mill on here yet? You'll need to check it out.. talk about a sweet repurposed building. Well it will be..
Thank you for your excellent pictorial progress posting. (Just as hard to type as it is to say!). It's been a week long read, and most enjoyable. Love the refurb threads rather than the no bucks held back mega builds. With tongue in cheek I say you really should spend some more time with your wife! I don't know how you accomplish so much, but I guess with most of two days off in between working, substantial progress could be made.
Thanks again for documenting your projects so well!

That church is in pretty bad shape.. Roof was leaking. . Allowing moisture in the stone, causing it to freeze and crumble the mortar joints.. literally destroying the church from the inside out. So they're disassembling it piece by piece.. to rebuild it.. that's the word on the street.I'll have to check that out. Thanks for the heads up.
BTW, what's the deal with the steeple getting taken off of that church over there ?
Thanks for the compliments. I do spend time with the wife. . . sometimes.
Serioulsy though, my work schedule does allow me to get stuff done. Yet, there are times that being called for OT (working another 24 hr shift) or getting paged in for a emergency has halted progress or made it difficult. She understands, it's my job (shes was dispatcher for 10 years before becoming the Admin Asst for the Sheriff) and she understands that things change, it's a 24/7 job. Whether I'm working in the garage or at work, she can either come out to see me or come to the firehouse and eat supper.
[emoji481]
That church is in pretty bad shape.. Roof was leaking. . Allowing moisture in the stone, causing it to freeze and crumble the mortar joints.. literally destroying the church from the inside out. So they're disassembling it piece by piece.. to rebuild it.. that's the word on the street.
Nutts - Great job on everything I've seen in/on your garage! I wish I had that much space - some day!
I had to do the same thing with the OSB in my attic space -rip it down to 2'x8' to get it through the attic hatch.
After reading your thread and LLWilly's Concrete Underground, I really need to re-live the building of my garage and get all my pics posted up.
One question though -- why the PVC pipe for the blast cabinet exhaust and not ABS? PVC can deteriorate over time in the sunlight.


Eric,
Your space is looking really great. You should be commended. Keep up the good work and keep us entertained.
Is there any structural/building code issue with welding directly to that beam?
Nice job
It takes 2 hours to read the post
This struck me as very funny somehow, but one doesn't usually think about things as stressing a beam or such when you hang from it, just because it's there.
Eric
Just stopped by to let you know that I have enjoyed watching you transform your old garage into a great work place.
Thank you for sharing and for your visits to my thread
Have a happy new year
Don
I just made your old stove picture a screen saver and I swear it made the room 10* warmer. Everybody should try it!!!!
Spent a few minutes catching up on this redo job of your wonderful old service station garage. I have read some of the more recent posts but nit wit me never realized it is what it is.
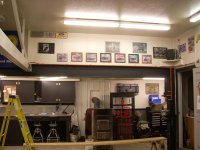
Gotta say too that yours garage is one of the most comfortable looking (and warmest) garages I've visited on the forum. Not to small, not to big...jus right.
Subscribed now!!!