To avoid these ads, REGISTER NOW!

Above 1200 Sq/FT Garage Refurb®

Wokspaces above 1200 squarefeet.
OP
N

NUTTSGT

Super Moderator
Staff member
Joined
Sep 14, 2009
Messages
50,898
Location
Northern Central Ohio
Looks good and those will be there forever, so you definitely commemorated it.

Your pour looks nice, and the story is a wonderful way to start my day.

Thanks guys. The pour went pretty good. My neighbor who floated the footer is 70, my friend that helped is 63 and they work like they are my age. I'm 51.


Going to pop the forms off today, move some dirt and layout for the block.
 
To avoid these ads, REGISTER NOW!
OP
N

NUTTSGT

Super Moderator
Staff member
Joined
Sep 14, 2009
Messages
50,898
Location
Northern Central Ohio
What is it with women??? My misses and I go around on a fairly regular basis over things like this... lol

Nice job on the 'crete... and the paw prints are just right...

...D


I think she knows it was a good purchase. Generally she knows when I buy a tool, I need it, I'm getting a good deal and have done all the leg work to research everything.

After 28 years, she just likes to bust my balls. After all, she is making double dump trailer payments. We'll be looking at new Broncos after the first of the year for her.
 
OP
N

NUTTSGT

Super Moderator
Staff member
Joined
Sep 14, 2009
Messages
50,898
Location
Northern Central Ohio
I didn't get any pics as my day ended short with picking up the granddaughter from school and coming in to work at 1700.

I did get the forms popped off, some dirt down around the trailer pad extension. I also put down about 3 lbs of grass seed, on that fresh dirt including the filled in ruts from the concrete truck.

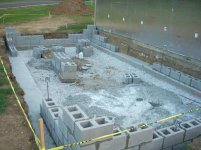
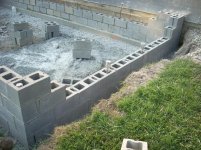
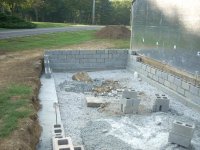
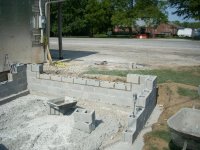
Then I started to lay out the lines for the block. I'm trying to lay out a straight line along the garage wall. The problem is, there was an addition put on many years so it's got a stepped foundation. I'm trying to make it clean full width of block, yet keep it close to the wall.

You know how that goes. Well, I think I might have done did screw up measuring when I laid out for the footer forms. Instead of adding 3" for the step out, I might have subtracted it, putting my footer not out far enough.

Granted, I measured diagonally and got them within an 1/8" but but :dunno:


Tomorrow when I get back at it when I'm not pressed for time, I'll find out for sure. :wtf:
 

Strouty

Well-known member
Joined
Mar 21, 2010
Messages
38,215
Location
Southern Maine
Well, I think I might have done did screw up measuring when I laid out for the footer forms. Instead of adding 3" for the step out, I might have subtracted it, putting my footer not out far enough.

At our house, someone did an addition that was a similar size to your layout, when I went to do some upgrades I was having a hell of a time figuring out why everything was so out of whack. Turns out that when they measured one end of the slab they went to the outside of where the framing was, on the other end, they did the inside, so over 20' it is off by 5 1/2" (2x6 construction). I am sure you will be able to figure out a fix.
 
OP
N

NUTTSGT

Super Moderator
Staff member
Joined
Sep 14, 2009
Messages
50,898
Location
Northern Central Ohio
A quick picture I took last night with my phone.

Not much progress happening. Had a fire Thursday morning at 0530 while on shift and was beat after that. By the time we got back, I did my report and uploaded pictures to the system it was time to go home. I hopped in the shower and left the station at 1430. Took a nap when I got home with my dog on the couch. I did get the back hoe off, mower deck back on and yard mowed.

Yesterday was payday so some running around, started the layout making sure I could make things work. Then had to pick up the granddaughter from school and tried to get back on it.


Using the rotary laser, I started to build the leads for the corners. Before I knew it, it was 7 pm and supper was ready. I'm at work today and tomorrow will probably somewhat of a wash. Go to Menards in the morning with wife and SIL. She needs a new fridge and the wife wants some mums for out front. Then it'll be calling hours for one of the retired guy's mother. His son in law is one of my guys on shift and the matriarch was my guidance counselor in high school. Good lady.


attachment.php
 

Attachments

  • KIMG0475.jpg
    KIMG0475.jpg
    102.5 KB · Views: 258
Last edited:

rixtrix1

Well-known member
Joined
Aug 25, 2013
Messages
3,010
Location
Chandler, AZ (from west NE)
Just caught up after a bit, Eric. Good to hear the wife is OK and the new project is moving along despite the hangups with the weather and work. You always get things done right, in time. We are so dry here in the Phoenix area; only 2 small rainstorms at our home all year for 1.3" total, with a 5 month long summer with temps over 110 most of the time. Around 20 days over 115! Gotta keep moving along!
 
OP
N

NUTTSGT

Super Moderator
Staff member
Joined
Sep 14, 2009
Messages
50,898
Location
Northern Central Ohio
I’ve had those days after I leave the station after a LONG shift. Just want to go home and sleep. And it takes a couple of days to recover. They seem to occur more often as I mature.

Yeah, I'm no spring chicken either and have noticed it after fires. I love fighting fire but it can kick your ***.
 
OP
N

NUTTSGT

Super Moderator
Staff member
Joined
Sep 14, 2009
Messages
50,898
Location
Northern Central Ohio
Just caught up after a bit, Eric. Good to hear the wife is OK and the new project is moving along despite the hangups with the weather and work. You always get things done right, in time. We are so dry here in the Phoenix area; only 2 small rainstorms at our home all year for 1.3" total, with a 5 month long summer with temps over 110 most of the time. Around 20 days over 115! Gotta keep moving along!

Thanks for the compliment. I wanted to start earlier this year but we got hit with heat in the 90s and no rain. I wasn't going to try to work in those conditions.
 
OP
N

NUTTSGT

Super Moderator
Staff member
Joined
Sep 14, 2009
Messages
50,898
Location
Northern Central Ohio
UGH ! I had a post typed up and hit a "F" key and lost my post.

So this is where I finished up tonight. I need to figure out the O/H door and lay those block tomorrow. It should only be in the fourth course of block, which is as high as the block will go. Unless of course I need another course. I really haven't done the math since it all depends on the matching of the other floor.

attachment.php


It's slowly taking shape. I work slow as I've never laid this much block at one time for a single project. Sure, a few here and there but not this many. . . and that will be seen.

attachment.php


Checking out the HD website, they have mason mix back in stock. I think I'm going to make a trip over to HD in the morning after I take the granddaughter to school.


Shopping list

mason mix
36" LH in swing door
lock set with dead bolt (maybe 2)
foundation coating

I know I don't need to but I think I'm going to coat the foundation since it's only about $35/bucket.
 

Attachments

  • DSCN3826.jpg
    DSCN3826.jpg
    155.1 KB · Views: 166
  • DSCN3825.jpg
    DSCN3825.jpg
    152.4 KB · Views: 166
Last edited:
OP
N

NUTTSGT

Super Moderator
Staff member
Joined
Sep 14, 2009
Messages
50,898
Location
Northern Central Ohio
Looks professional from here. Nice job.

Looking good!

Thanks guys.

The plan for today is finish up the back wall.

Finish the first course on the abutting wall

Check layout for the O/H door on the front wall. I may need to remove a block for the proper layout.

I've been staying clear of the long outside wall. This gives me an area to get in and out of the hole.
 
OP
N

NUTTSGT

Super Moderator
Staff member
Joined
Sep 14, 2009
Messages
50,898
Location
Northern Central Ohio
Thanks guys.

The plan for today is finish up the back wall.

Finish the first course on the abutting wall

Check layout for the O/H door on the front wall. I may need to remove a block for the proper layout.

I've been staying clear of the long outside wall. This gives me an area to get in and out of the hole.

By the time I finished up it was getting dark.


Back wall done,

Abutting wall, first course done and second course.

Marked out for the O/H door. Yep, had to cut that one block out. I didn't break it and chipped the mortar off, it can be reused. I cut some block to fill the door opening after I set the floor height.

Outside wall, didn't touch but did mark floor height with rotary laser. I also did a count on block on hand and what I need. I need about 62 more and I think there is 75 in a cube. I will be going to get another cube of block here this morning.

I still need to pull some of the interior wall off to figure out where the man door will be. There will be a section of the abutting wall that can't be finished until I do.

I dread this latter, I need to pull wiring/conduit for my welder, a few posters off the wall and I hope there is no romex in the wall right there. I also have stuff like kitchen cabinets stacked along this wall.
 
To avoid these ads, REGISTER NOW!

captain14

Well-known member
Joined
Dec 19, 2012
Messages
7,031
Location
Near College Park Maryland 20740
Eric

Thanks for posting the daily progress. I hate it now since it’s cooler outside to work yet the darkness comes earlier. We’ve had a cool snap the post few days and you can certainly feel the temperature difference after 1600 hours when still dressed in my standard summer uniform- shorts and tee shirt.

It’s a little late in your job for this but you may pick up a tip or two from Mike Haduck’s Youtube training channel. He has a seven part series on block laying. Lots of other related masonry areas too. He does it the “Old School way”. I always watch his videos as they are released.

 
OP
N

NUTTSGT

Super Moderator
Staff member
Joined
Sep 14, 2009
Messages
50,898
Location
Northern Central Ohio
Cap, I think I have seen a few of his videos. I'd have to double check them for sure but watched several youtube videos on construction.
 
OP
N

NUTTSGT

Super Moderator
Staff member
Joined
Sep 14, 2009
Messages
50,898
Location
Northern Central Ohio
Before I get to work this morning.

These block will be under the O/H door after being cut down.

attachment.php


Garage door opening in progress, missing the unfortunate block.

attachment.php


uSSvE6z.jpg
 

Attachments

  • DSCN3829.jpg
    DSCN3829.jpg
    159.6 KB · Views: 159
  • DSCN3828.jpg
    DSCN3828.jpg
    162.1 KB · Views: 159
Last edited:
OP
N

NUTTSGT

Super Moderator
Staff member
Joined
Sep 14, 2009
Messages
50,898
Location
Northern Central Ohio
Abutting wall. Near the right most rebar, notice my unapproved OSHA rebar protection, is approximate location for man door.
attachment.php


Completed back wall.


attachment.php


Straight enough for me. No string line used. There is a bit of whack where I put in the cut block about 3/4 way down the wall.
attachment.php
 

Attachments

  • DSCN3830.jpg
    DSCN3830.jpg
    154.7 KB · Views: 159
  • DSCN3831.jpg
    DSCN3831.jpg
    154.8 KB · Views: 159
  • DSCN3832.jpg
    DSCN3832.jpg
    152.6 KB · Views: 160
Last edited:
OP
N

NUTTSGT

Super Moderator
Staff member
Joined
Sep 14, 2009
Messages
50,898
Location
Northern Central Ohio
Unapproved OSHA safety device? Frank Branigan would call that vernacular construction..atype of construction technique.

A slight wall event? Perfect place to mount something to the wall.

Yeah, I put Gatorade bottles on the rebar. I'm not to worried about falling on them but poking myself in the eye.
 
OP
N

NUTTSGT

Super Moderator
Staff member
Joined
Sep 14, 2009
Messages
50,898
Location
Northern Central Ohio
I got the O/H door opening done. I had to cut a few more block and recut one of them when I cut the wrong end of the block off.

attachment.php
 

Attachments

  • DSCN3834.jpg
    DSCN3834.jpg
    155.2 KB · Views: 158
Last edited:
OP
N

NUTTSGT

Super Moderator
Staff member
Joined
Sep 14, 2009
Messages
50,898
Location
Northern Central Ohio
Out of block till tomorrow.

attachment.php


Left a gap for the man door. I'm not sure where it's going to fall so I large enough space.


attachment.php


Then I started on the outside wall. I was going to lay the block by the chalk line but leads in the corners didn't look right. It appeared that both end 4 blocks out had started to work inboard. Well, I'm glad I put the string on this wall.

Whoa! It was way off. Thankfully, I caught it and got it where it needed to be. The best part is, it's going to be buried and nobody will see it. This is where I ran out of block.


attachment.php


I put everything away for the night and made out a shopping list. Hopefully, I have everything on it for this week and next week.
 

Attachments

  • DSCN3836.jpg
    DSCN3836.jpg
    152.2 KB · Views: 160
  • DSCN3837.jpg
    DSCN3837.jpg
    137.9 KB · Views: 158
  • DSCN3835.jpg
    DSCN3835.jpg
    153.5 KB · Views: 159
Last edited:

captain14

Well-known member
Joined
Dec 19, 2012
Messages
7,031
Location
Near College Park Maryland 20740
From a couple of shots of the addition, I can see you are almost on top of the road. I think it was a wise decision not to place an exterior door on the side Bravo of the building.

What would cause the block to move like that in the corners? Mortar didn’t dry quick enough and the weight on top shifted it?
 

bugnut

ALLIANCE MEMBER
Joined
Jul 14, 2012
Messages
3,864
Location
Central Ohio
Eric/Garageman, you mentioned the weather it has been about 10 days without rain and really pleasant to be outside working. In centarlish Ohio that is unheard of as we get rain every third day if not sooner. Some may come on Sunday. I spread top soil to fill in spots in the yard, added seed and straw. Finally time enough to do it before it got rained on! Heck I may have to turn on the sprinkler!

Eric If this keeps up might you be done before the first frost!
 
OP
N

NUTTSGT

Super Moderator
Staff member
Joined
Sep 14, 2009
Messages
50,898
Location
Northern Central Ohio
You are making great progress, keep it up and you will be under roof in no time.

JB


Thanks, I've been trying to speed along but I'm not a mason by any means of the word.

From a couple of shots of the addition, I can see you are almost on top of the road. I think it was a wise decision not to place an exterior door on the side Bravo of the building.

What would cause the block to move like that in the corners? Mortar didn’t dry quick enough and the weight on top shifted it?


They curved inward. My blue chalk lines didn't show up the best so the block started to drift in. Blue chalk doesn't show up well on concrete when it's low on chalk and I could have used some help snapping the line.

It's fixed, it's done and it'll be alright.

:beer:
 
OP
N

NUTTSGT

Super Moderator
Staff member
Joined
Sep 14, 2009
Messages
50,898
Location
Northern Central Ohio
Eric/Garageman, you mentioned the weather it has been about 10 days without rain and really pleasant to be outside working. In centarlish Ohio that is unheard of as we get rain every third day if not sooner. Some may come on Sunday. I spread top soil to fill in spots in the yard, added seed and straw. Finally time enough to do it before it got rained on! Heck I may have to turn on the sprinkler!

Eric If this keeps up might you be done before the first frost!

Looks like the rain got pushed back from Sunday till Monday afternoon. I go back into work on Monday at 1700. So hopefully, I can get some stuff done tomorrow.

Today was the granddaughter's soccer game and the wife's cheat day for her diet. We were hankering for some Five Guys but the line was at the door. Only one group inside and sitting outside had their food. We walked over to the Chick-fil-a food truck, had out food and were half way done eating when I noticed a couple come outside with their food. They were sitting at a table after ordering when we walked in.

Then we made a second trip to Menard's. This morning, I went, took back the extra block, to HD and returned the extra bags of Mason Mix then to the quarry for Saturday cash sales shut down. So not much progress today.
 
OP
N

NUTTSGT

Super Moderator
Staff member
Joined
Sep 14, 2009
Messages
50,898
Location
Northern Central Ohio
With the server updates, I didn't get to upload what I did last the last couple of days.

Back in post 2630, I left off with the a large gap for the man door. Well, I'm glad I did. I was off on thinking where the door would be. Not really where the former window was but how it would lay out.

I pulled off the correct sheet of OSB to uncover the old window.

attachment.php


Pulled the insulation out and tried to measure to see how the door would fall. Since the addition was set back, it messed up my plans. Considering everything has been in my head with nothing on paper. I've only made a few measurements. See the Dewalt drill hanging there ? I drilled a hole to see where that stud landed on the outside.

attachment.php
 

Attachments

  • DSCN3838.jpg
    DSCN3838.jpg
    117.5 KB · Views: 161
  • DSCN3840.jpg
    DSCN3840.jpg
    121 KB · Views: 160
Last edited:
OP
N

NUTTSGT

Super Moderator
Staff member
Joined
Sep 14, 2009
Messages
50,898
Location
Northern Central Ohio
When it didn't work out, I had to remove a shorter section of wall OSB to reveal another stud cavity. I also found romex where I was hoping it wouldn't be. Deep down, I was sure I'd have to move wiring.

There was also a section above that had to get removed. I ended up moving the door down farther about 6" than I had planned. Still the end result, I had to cut out two block at the corner that I had already mudded in.

attachment.php


While I know it may look odd with the horizontally flat 2x4, It's ok. The garage is basically balloon framed. The original wood structure under that board is a 1x4 that is notched in the wall studs to prevent racking and spacing blocks.

Since wiring was in the way, the panel got opened, a few strands pulled out and replaced once the doorway was completed.


attachment.php

Once I get the abutting wall framed up, I can opening this passageway and install the door in the addition wall.


I also need to renail the sheathing to the new wall studs. I forgot about that.
:wtf:
 

Attachments

  • DSCN3842.jpg
    DSCN3842.jpg
    149.1 KB · Views: 160
  • DSCN3843.jpg
    DSCN3843.jpg
    139.9 KB · Views: 159
Last edited:
OP
N

NUTTSGT

Super Moderator
Staff member
Joined
Sep 14, 2009
Messages
50,898
Location
Northern Central Ohio
The finished opening in the foundation.

attachment.php


Compared to this picture,


attachment.php


You can see where the block work changed. Not a big deal. Except one issue I ad. In the process of cutting block for this opening, I dropped my HF 7" grinder. It survived but the segmented diamond blade bent. UGH. So I had to revert back to the little 4.5" grinder making smaller and shallower cuts.

One thing I learned after moving the door and seeing how it laid out, I have to move my subpanel. it's going to be on the front wall between the O/H door and corner. I had planned on it being behind the door but there's not enough room. It'll be ok.

One more picture of the foundation, all the block done.


attachment.php

Tomorrow will be filling the cores with rebar and those that have J-Bolts.
 

Attachments

  • DSCN3844.jpg
    DSCN3844.jpg
    155.4 KB · Views: 161
  • DSCN3837.jpg
    DSCN3837.jpg
    137.9 KB · Views: 160
  • DSCN3845.jpg
    DSCN3845.jpg
    154 KB · Views: 160
Last edited:
OP
N

NUTTSGT

Super Moderator
Staff member
Joined
Sep 14, 2009
Messages
50,898
Location
Northern Central Ohio
Started yesterday morning with this stack of Quikrete. 20 80lb bags.

attachment.php


Then I had to make a run to HD for 15 more bags.

I ended up with all my J-bolts in, corners core filled, rebar holes filled and the door opening filled up to the last 5-6 inches.

attachment.php
 

Attachments

  • DSCN3847.jpg
    DSCN3847.jpg
    147.6 KB · Views: 161
  • DSCN3848.jpg
    DSCN3848.jpg
    152.3 KB · Views: 161
Last edited:
To avoid these ads, REGISTER NOW!
Top Bottom