To avoid these ads, REGISTER NOW!

Above 1200 Sq/FT Garage Refurb®

Wokspaces above 1200 squarefeet.
OP
N

NUTTSGT

Super Moderator
Staff member
Joined
Sep 14, 2009
Messages
50,891
Location
Northern Central Ohio
After it rained the other night, I tried to catch up with what I wanted to get done. I started framing the front wall inside the garage. I figured if I could get it measured out, I could build the short sides in the garage and carry them out.

I've never really used the panoramic effect but thought it might work for these.

attachment.php


attachment.php


As you can tell, the garage is getting full. Imagine what it would look like with my JD sitting in there as well.
 

Attachments

  • KIMG0572.jpg
    KIMG0572.jpg
    67.2 KB · Views: 616
  • KIMG0573.jpg
    KIMG0573.jpg
    68.1 KB · Views: 620
Last edited:
To avoid these ads, REGISTER NOW!
OP
N

NUTTSGT

Super Moderator
Staff member
Joined
Sep 14, 2009
Messages
50,891
Location
Northern Central Ohio
I believe this was Friday before the pour as I was trying to get things ready. Sorry the past week has been a blur. It's before the front wall and header was in.


attachment.php


The only real concrete shot I got.
attachment.php
 

Attachments

  • KIMG0574.jpg
    KIMG0574.jpg
    89.4 KB · Views: 618
  • KIMG0576.jpg
    KIMG0576.jpg
    81.2 KB · Views: 616
Last edited:
OP
N

NUTTSGT

Super Moderator
Staff member
Joined
Sep 14, 2009
Messages
50,891
Location
Northern Central Ohio
I mentioned this earlier today, my broken O/H door. When you get tired and have had a long days, you screw stuff up.

I put half dozen screws in it, trying to pull it back together.


attachment.php


What the interior looks like.

attachment.php


Where's that thread. . . Ever do something so stupid. . .. ?


I'll be going tomorrow to order a new door for the addition and a bottom panel for this door.
 

Attachments

  • KIMG0579.jpg
    KIMG0579.jpg
    93 KB · Views: 604
  • KIMG0578.jpg
    KIMG0578.jpg
    82 KB · Views: 609
Last edited:
OP
N

NUTTSGT

Super Moderator
Staff member
Joined
Sep 14, 2009
Messages
50,891
Location
Northern Central Ohio
The finished floor. It's not perfect and I'm not going to try to tell you it has no imperfections. After the issue with hitting the soft (wet) spot with the power trowel, it just made it hard to correct.
My FIL was running the power trowel and he's retired with COPD and I think his eyesight isn't the best. Checking the floor near the door, it was ready to get on it. As he made his way towards the back, it just went soft and dug in. We tried to get a handle on it but just couldn't. My BIL Jim isn't as good as my other BIl Pat was, but Pat had way more experience than Jim, who is learning. Pat is the one that passed away last year from colon cancer.

attachment.php


Here's the doorway, or where it will be. I'm happy how it turned out. . . well until I try to put the door in.
attachment.php


Concrete driver bumped my door header. I had my back to it when it happened and I was afraid to turn around. Just a scratch and I don't think it knocked anything out of whack.

attachment.php


All in all, the floor is not like glass, it has a few low spots but nothing hateful. To be honest, it's a nice looking floor. I have seen some concrete floors here that other have paid decent money for and got screwed. I'm fortunate to have family that works in the construction and can help me out for a few things, mainly concrete. The truck was supposed to be there at 0730-0800. We were putting in the grade stakes and it rolled up at 0725. Holy cow, an early concrete truck !

We got it all down and started to finish it. FIL showed up and give some pointers and "supervise." It was actually nice to get the guys all together for the day. My FIL, BIL and his two boys. His oldest started with J&F Construction a few months ago. He will be third generation working for the company.
 

Attachments

  • KIMG0580.jpg
    KIMG0580.jpg
    42 KB · Views: 608
  • KIMG0582.jpg
    KIMG0582.jpg
    66 KB · Views: 607
  • KIMG0581.jpg
    KIMG0581.jpg
    44.6 KB · Views: 603
Last edited:
OP
N

NUTTSGT

Super Moderator
Staff member
Joined
Sep 14, 2009
Messages
50,891
Location
Northern Central Ohio
Eric,

I have been following your thread for a long time, but just finished going back and looking at the pics from the beginning of the thread. I am terrible about just looking at the pics and not reading all the text. You have a very neat place and have completed a lot of great projects. Sorry to hear about the setbacks on your new addition. I am anxious to see a pic of the completed concrete. Do you think you will get the addition weather tight before bad weather becomes the norm? Will the addition also be heated by your wood stove?

Concrete pics are now posted. We cut it today but didn't get to seal it as it started raining. It was almost comical using the squeegee to most of the water out and then the leaf blower for a final dry to snap chalk lines.

I've don a ton of projects and over 20 years of being here, it looks alot different, for the better.

I'm planning on getting it dried in and closed up before it gets too bad, I hope. I was planning on making my own rafters but with lumber prices, I filled out the online form for Menard's to see what building a mono-truss will cost. Not only cost but lead time to get built. When I take the power trowel back to Sunbelt tomorrow, I'm going to another fairly local places that specializes in pole barns, build their own trusses and roll their own metal. I'm going to see what their cost will be as well. This is the pace my parents got their building from.

Yes, once it's insulated, the plan is to duct some heat from the wood stove over to this side. It's part of the reason I went with 2x6 walls, insulation around the foundation inside & out. If we buy my parents house in the future, I'll need to put up a building. This addition was going to serve as some testing to see how my thoughts on things were going to work out. I wanted to use some foil faced OSB like I did on the outside of the rest of the garage before I vinyl sided it. Unfortunately, nobody has it in stock and I didn't want to wait on it. I wanted to see what it would do for Summer temps.
 

jbmatth

Well-known member
Joined
Jun 3, 2013
Messages
5,681
Location
Northern Ok.
Wow, thanks for all of the comments on the air vs electric nailer, I'll discuss on my thread and keep yours to you. The three things that I know about your concrete, it'll get hard, it'll get hairline or bigger cracks, and no one will steal it from you. I'm wishing you the best to get it dried in.

JB
 
OP
N

NUTTSGT

Super Moderator
Staff member
Joined
Sep 14, 2009
Messages
50,891
Location
Northern Central Ohio
Great progress!

Thanks. ;)

Wow, thanks for all of the comments on the air vs electric nailer, I'll discuss on my thread and keep yours to you. The three things that I know about your concrete, it'll get hard, it'll get hairline or bigger cracks, and no one will steal it from you. I'm wishing you the best to get it dried in.

JB

It shouldn't get big cracks, maybe small ones. It's cut at the 7' marks, 3 cuts. I decided not to to run one down the middle as it's only 12 1/2' wide.

It's getting hard right now, cool weather and getting rained on should allow it to cure slowly. I hope.


I priced getting trusses today instead of making my own rafters. Menards was just under $1K. another place was about $1400. I checked a third place and their lead time like everybody else is 4 weeks out.

The garage door is ordered and should be in the last week of November. :sad:
 
Last edited:

madison069

Well-known member
Joined
Nov 5, 2010
Messages
4,144
Location
Monroeville, PA
A lot of construction sites are waiting on garage door due to Covid. One site has been waiting for 3 months for their doors. So a month of wait time isn't too bad!

Addition looks great!
 
OP
N

NUTTSGT

Super Moderator
Staff member
Joined
Sep 14, 2009
Messages
50,891
Location
Northern Central Ohio
A lot of construction sites are waiting on garage door due to Covid. One site has been waiting for 3 months for their doors. So a month of wait time isn't too bad!

Addition looks great!

The dealer I went to, just got my parent's door in. They said they have been getting orders in missing panels. They said, when they get orders to ship at the factory, they have nobody to load them.


They are having to count panels before scheduling installs.
 

larry4406

Well-known member
Joined
Jan 27, 2006
Messages
19,089
Location
Northern Virginia
A lot of construction sites are waiting on garage door due to Covid. One site has been waiting for 3 months for their doors. So a month of wait time isn't too bad!

Addition looks great!

At work we had this same problem! Had 3 townhouse units with VA loans and the loan inspector would not sign off as the units were missing the garage doors. No sign off, no settlement. Well office installed temp doors to get bank signoff and when proper doors came in 2 weeks later swapped them out so I have a nice brand new 8x8 insulated door for my barn!

Sorry for the hi-jack
 
OP
N

NUTTSGT

Super Moderator
Staff member
Joined
Sep 14, 2009
Messages
50,891
Location
Northern Central Ohio
Hmmmm.....got these piles of lumber and its raining outside. What to do, what to do ?


attachment.php


attachment.php
 

Attachments

  • KIMG0587.jpg
    KIMG0587.jpg
    70.9 KB · Views: 453
  • KIMG0586.jpg
    KIMG0586.jpg
    70.7 KB · Views: 458
Last edited:
OP
N

NUTTSGT

Super Moderator
Staff member
Joined
Sep 14, 2009
Messages
50,891
Location
Northern Central Ohio
Since I got a quote from Menard's, they set me a copy of the truss layout. Not wanting to wait 4 weeks for trusses, I decided to build my own. I enlarged the pictures and figured out what all the measurements were and set up a jig.

attachment.php


It consists of two sheets of OSB and some blocks screwed in the right places to mark stuff out. Since the roof is 3/12, most of the cuts are based on 15°.

attachment.php


This was the second to last truss I made but the first end truss. I figured if I could make the other trusses with webbing in them, these end ones would be easy to do.
 

Attachments

  • KIMG0591.jpg
    KIMG0591.jpg
    75.1 KB · Views: 944
  • KIMG0592.jpg
    KIMG0592.jpg
    73.3 KB · Views: 949
Last edited:
OP
N

NUTTSGT

Super Moderator
Staff member
Joined
Sep 14, 2009
Messages
50,891
Location
Northern Central Ohio
The first end truss completed.

attachment.php


The next truss was the one I was waiting for, the last one.

Since I actually was running out of room in the garage, I stacked all the completed trusses in the house garage. Also sitting in there is the John Deere. My truck has sat outside the last two nights.

attachment.php


I used Simpson nailing plates and their nails. To avoid splitting the wood, I predrilled the holes with a smaller bit. You don't want to know how may nails I pounded in the last day and a half. It took about 45-60 to make a truss after everything was already cut.

Even with a master copy, some of the 15 degree cuts on the bottom chord weren't perfect and I had to plane them down for a nicer fit.
 

Attachments

  • KIMG0593.jpg
    KIMG0593.jpg
    78.8 KB · Views: 415
  • KIMG0594.jpg
    KIMG0594.jpg
    69.1 KB · Views: 412
Last edited:

captain14

Well-known member
Joined
Dec 19, 2012
Messages
7,028
Location
Near College Park Maryland 20740
Eric

I don’t know how many bay doors were clipped at work either backing in or pulling into a drive thru bay. I know how you feel.

The trusses look good from here

What was the material Cost for the trusses and how many hours were spent building them?
Plus you didn’t waste a rainy day doing something else.

I Don’t remember seeing any roofing material in the trailer or truck bed. What are your plans for the 3/12 roof. If doing shingles, do you add extra courses to keep it water tight?

Thanks
 

krcoomer

Well-known member
Joined
Jul 22, 2016
Messages
379
Location
Bluegrass region
The addition is coming along just fine Eric. I am impressed with your trusses.

I know you are striving for perfection, but the day will come when you look at your FIL's "signature" and have a tear and a smile about the help he gave you on the floor and your other projects over the years
 
OP
N

NUTTSGT

Super Moderator
Staff member
Joined
Sep 14, 2009
Messages
50,891
Location
Northern Central Ohio
Eric

I don’t know how many bay doors were clipped at work either backing in or pulling into a drive thru bay. I know how you feel.

The trusses look good from here

What was the material Cost for the trusses and how many hours were spent building them?
Plus you didn’t waste a rainy day doing something else.

I Don’t remember seeing any roofing material in the trailer or truck bed. What are your plans for the 3/12 roof. If doing shingles, do you add extra courses to keep it water tight?

Thanks

Thanks for the compliment.

I will doing shingles on the roof. I still need to get them and thy starter course. I already 30lb felt for the roof.

The roof is going to be a 3/12 pitch, I wanted 4/12 but just don't have room with ten foot wall. The porch roof on the house is 3/12 and we have no issue with pitch/shingles.

Material cost was about the same as truss cost at Menards. However, I didn't have to wait four weeks to get them. It took about an hour for each one, give or take a few.

15 trusses, planning, layout, sorting lumber at Menards and building them, probably 20 hours total.
 
To avoid these ads, REGISTER NOW!
OP
N

NUTTSGT

Super Moderator
Staff member
Joined
Sep 14, 2009
Messages
50,891
Location
Northern Central Ohio
The addition is coming along just fine Eric. I am impressed with your trusses.

I know you are striving for perfection, but the day will come when you look at your FIL's "signature" and have a tear and a smile about the help he gave you on the floor and your other projects over the years

I think he was happy to help and it got him off the couch. Hes got COPD due to smoking, so he couldn't work too hard but he was there.
 
OP
N

NUTTSGT

Super Moderator
Staff member
Joined
Sep 14, 2009
Messages
50,891
Location
Northern Central Ohio
I finished putting the sheathing up on the front. After I had the first sheet up, I realized a made an mathematical error but it'll be fine. I wanted the sheathing to go up higher to help attach the trusses to the rest of the structure.

attachment.php


I measured off the sill plate but forgot about the overhang to I needed on the block. Oops. It'll work out. Having a 2x6 double top plate and a 2x4 bottom chord on the truss, I can nail a full length 2x4 flat on the inside of the bottom chord.

I moved to get all the wall bracing in for now. I will probably add another row 48 inches up from these rows.

attachment.php


You might notice the different heights of the bracing from the back and left side as compared to the right. The left/back sides, I placed lower as the over hang for the sheathing on the outside puts the break on the sheathing at 41.5" The right side has no "exterior" sheathing as it's an interior wall. Once I sheath the interior wall, later this winter, it's placed at the 48" mark to break those future plywood/OSB sheets.

With the price of lumber, I wanted to wait till all the walls were up and use up some scraps from the build to cut the blocking from rather than full length boards. The rights side is also 2x4 blocking. This will allow me to leave a full piece in the cavity with the gap between the old/new walls.
 

Attachments

  • KIMG0598.jpg
    KIMG0598.jpg
    134.6 KB · Views: 475
  • KIMG0597.jpg
    KIMG0597.jpg
    144.6 KB · Views: 474
Last edited:
OP
N

NUTTSGT

Super Moderator
Staff member
Joined
Sep 14, 2009
Messages
50,891
Location
Northern Central Ohio
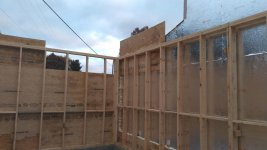
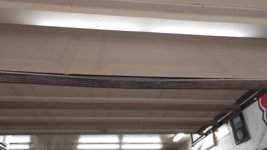
The wind was a little too gusty for my liking the other day. I stuffed the back wall in between the back roof line and new wall. As I was putting it in place a gust caught the sheet and caught me off guard. For about half a second, I thought I was going head first into the new addition head first.

attachment.php


I wanted this piece in so once the trusses are up, I can go in and place the step flashing under the shingles. Hopefully, I can get them pulled up enough and seal them with a little blackjack. The vertical edge of the step flashing will get nailed, maybe some clear RTV and or covered with ZIP tape.


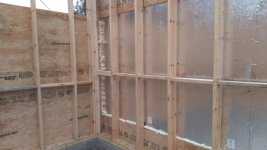
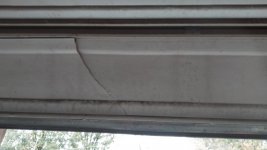
You'll also notice the spray foam. Since the two sections, new addition/old garage are freestanding apart, I needed to close the gap up a bit. The corners, due to the old not being perfectly plumb, I had a small gap. That got spray foamed and will be covered with vinyl siding. Yes, the sheathing covers it for the most part but it still had a slight gap. The foam merely prevent air infiltration.


attachment.php


You can also see the lower foamed area. This is due to the foundation between the original part of the garage (1937), the back addition from the sixties. If you remember when I dug out for my new footer, there was a difference between them. To prevent any moisture or air infiltration between the two walls, I foamed this area as well. I still need to get another can or two and finish around where the man door will be and a few small spots that I missed.

After the garage is closed in, before fiberglass batts are put in, I'll go back along and check for air leaks and add another layer of spray foam. More than likely, I'll do this with a candle and watch for the flame to flicker.
 

Attachments

  • KIMG0599.jpg
    KIMG0599.jpg
    120.9 KB · Views: 485
  • KIMG0600.jpg
    KIMG0600.jpg
    129.7 KB · Views: 474
Last edited:

captain14

Well-known member
Joined
Dec 19, 2012
Messages
7,028
Location
Near College Park Maryland 20740
GM Eric,

Good weather to work today in your area?

I just spent almost 27 hours stripping about 80 years of old paint and 2 coats of new coats of paint to my single garage bay door yesterday. I still have some small repairs to do and undecided whether I can save the simple door trim. The wood door is still better than the new ones available now. The project seemed To grow for everything I did

I patched one elongated hole with a 1” diameter dowel where the hinge bolt sheared off. The garb handles still need to be cleaned up and spray painted black.
 
OP
N

NUTTSGT

Super Moderator
Staff member
Joined
Sep 14, 2009
Messages
50,891
Location
Northern Central Ohio
Looks like you have been really busy. I bet you can’t wait to have the roof on. ;)

I'd love to have the roof on right now and wish yesterday would have been a productive day.

We held a physical agility test to establish an eligibility list for the fire department yesterday. 43° with a nice wind blowing at 0800 when we started setting up. We finished about noon. Went home, ate lunch, took the dog out and by the time I got done with leaves, it was about 3:30 that afternoon.

Being outside all day, I was done. Watched a little TV then dozed for a bit on the living room floor with the dog. Woke up, made supper (breakfast-bacon,eggs and pancakes) for the wife, dog and me. I was in the shower by 7 pm. Made a drink, took a few ibuprofen and relaxed for the night.

At work today and will get started on the trusses tomorrow morning.
 
OP
N

NUTTSGT

Super Moderator
Staff member
Joined
Sep 14, 2009
Messages
50,891
Location
Northern Central Ohio
GM Eric,

Good weather to work today in your area?

I just spent almost 27 hours stripping about 80 years of old paint and 2 coats of new coats of paint to my single garage bay door yesterday. I still have some small repairs to do and undecided whether I can save the simple door trim. The wood door is still better than the new ones available now. The project seemed To grow for everything I did

I patched one elongated hole with a 1” diameter dowel where the hinge bolt sheared off. The garb handles still need to be cleaned up and spray painted black.

NO work, yesterday, I was replying to Strouty as you posted. At the station today and hoping for a quiet Sunday. Not sure it's going to happen, we're up on structure fires for the year. So we're all expecting another one to happen in the near future. . . . maybe Halloween with the blue moon.


Don't all projects grow ? This started as a 12x18, then increased to 12x18 with a covered back area for firewood. Then that back 10' changed to enclosed to an 8' wall height. Then in changed to a 10' wall height like the rest. The plan sat as a 12x28 w/ 10' walls for a few months till I realized I was going to lose almost a foot and a half with the block foundation. So it again morphed to the current 14x28 with 10' walls.

That's when I figured I better get started it it was going to be 2 story. :lol:

EDIT:. . . . Well I was just joking about the 2nd story, but damn, that is a thought. If I stop now and add floor joists . . .

yeah, the wife would kick my ***. . .
 

thatphatphuck

Member
Joined
Jul 24, 2020
Messages
15
Location
usa
Looking at it from the back side and the middle of the road.
attachment.php


Going to be a couple of days before the next update, we have some stuff going on. So hang tight and I hope the rain passes by on Thursday.

That looks very tight to the road. You sure you're not building in the right-of-way, correct?
 
OP
N

NUTTSGT

Super Moderator
Staff member
Joined
Sep 14, 2009
Messages
50,891
Location
Northern Central Ohio
That looks very tight to the road. You sure you're not building in the right-of-way, correct?

It's farther than it looks as there is a maybe 30" drop in height from the road to that corner.

However, putting a 10' trailer pad (for the dump trailer) would be way too close to the road. We're in a rural area and not a metropolitan, no zoning or inspectors, so I have no worry. To get the project started, didn't even need a building permit for the listed reason above. It's considered a notification permit. Basically so it can get assessed on your property taxes.
 

thatphatphuck

Member
Joined
Jul 24, 2020
Messages
15
Location
usa
It's farther than it looks as there is a maybe 30" drop in height from the road to that corner.

However, putting a 10' trailer pad (for the dump trailer) would be way too close to the road. We're in a rural area and not a metropolitan, no zoning or inspectors, so I have no worry. To get the project started, didn't even need a building permit for the listed reason above. It's considered a notification permit. Basically so it can get assessed on your property taxes.


Ok I'm glad you're confident. I just saw this pole and the proximity to the road and thought uh oh.

KIMG0574.jpg

I am in land development and typically even though your road cut is only 30' with shoulders or so your ROW or easement width is 60-80' if it's a public ROW. That gives them room for the franchise utilities and power etc. Also, overhead power is typically secured in easements from the centerline of the wire (typ. 10-15' on center) If your building corner is less than 30-40' from the centerline of that road I'd double check before going any further. Without rustling too many feathers with the county that is... :)

But you probably know better than I for your particular area. Respect the hustle on these project man. Good job.
 

xtremek

Well-known member
Joined
Apr 13, 2012
Messages
11,603
Location
St. Johns, Mi
That is one of the beautiful things about rural America, the public officials don't need to add constraints on things like buildings. And I get why they have to in the city.
 
To avoid these ads, REGISTER NOW!
Top Bottom