To avoid these ads, REGISTER NOW!

Gardner Denver ADD-1011 compressor

tom fleming

Member
Joined
Nov 5, 2012
Messages
7
Location
Pennsylvania
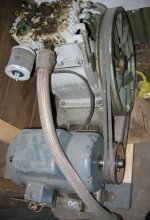
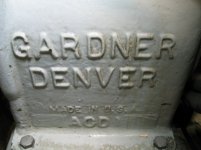
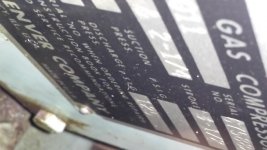
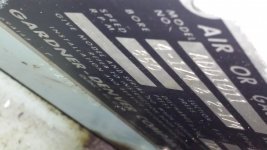
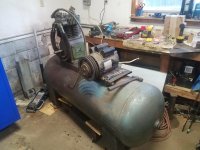
Hi guys, I just picked up a working Gardner Denver ADD-1011 compressor in pretty good working shape. I have been trying to find what the CFM rating is on it, and so far, have come up empty.

The primary bore is 4.5" and the secondary bore is 2.25". Stroke is 3.5", and is rated at 200 PSI at 870 RPM's with 5 HP motor.

I know there should a specs sheet of what CFM this puppy will put out, but I haven't found anything yet on the net. Anyone know what this will produce from a CFM perspective? I would like to run a small sand blaster and be the primary air for the shop.

I would guess this is a decent unit, and Gardner Denver still produces rebuild kits for it, with rings, seals, valves, etc. Anyone know anything about these?
 
To avoid these ads, REGISTER NOW!

DeltaWye

Well-known member
Joined
Sep 26, 2016
Messages
114
Location
Toronto, Canada
I guess these things aren't very common. I bought one last year and I'm only now about to get it set up. At least it says ADD on the nameplate, the casting says ACD. What has me wondering is that the nameplate on mine shows a speed of 550 RPM and a pressure of 350 PSI! Would anyone know if there's a difference in the actual unit and whether I should run it at a higher RPM if I only need a <200 PSI pressure? Here's some pictures
 

Attachments

  • Overview.JPG
    Overview.JPG
    134.4 KB · Views: 200
  • Nameplate.JPG
    Nameplate.JPG
    135 KB · Views: 189
  • ACD.JPG
    ACD.JPG
    83 KB · Views: 140
OP
T

tom fleming

Member
Joined
Nov 5, 2012
Messages
7
Location
Pennsylvania
Mine shows an rpm of 830 I believe, and a working PSI of 200. I only plan to run mine at 150 PSI, so I should be good to go. Just getting ready to put it all back together after the paint job on the tank and compressor head.
 

DeltaWye

Well-known member
Joined
Sep 26, 2016
Messages
114
Location
Toronto, Canada
Mine shows an rpm of 830 I believe, and a working PSI of 200. I only plan to run mine at 150 PSI, so I should be good to go. Just getting ready to put it all back together after the paint job on the tank and compressor head.

Thanks for the reply, I'm glad you're still around. Do you know what the original colour was on these? I'm thinking it's the green that you see on the flywheel in my first picture, like this:

http://www.normanmachinetool.com/products/01_26_12_gardner-denver air compressor_2.jpg

I can see by the nameplate that mine was repainted and it's going to need a paint job anyway.

Any insight on stripping it down and checking the internal condition would be appreciated, I've never worked on an air compressor or anything similar. I have run it with no load and it seems ok but I'm thinking I should hook it up to a tank and run it up to around 125 PSI and check it doesn't make any horrible noises before I order a head rebuild kit and get the proper pulley for the motor. I just got off the phone with a very helpful gentleman at Airflo Inc. where I found the rebuild kit and he's supposed to be emailing me some documents. I did buy a parts/service manual off ebay last year and it has an exploded parts diagram and parts list but not much else that's useful.
 

DeltaWye

Well-known member
Joined
Sep 26, 2016
Messages
114
Location
Toronto, Canada
Okay, so I have a PDF of the ADD series manual (it covers ADD1000, ADD1001, ADD1003, ADD1010, ADD1011, ADD1002, ADD1004, ADD1012, ADD1013 and ADD1014 models. If anyone needs it, let me know. It doesn't have any performance specifications but the diagrams are helpful.

The part number for the crankcase for every one of these models is ACD1, so that explains the casting. I can just make out the '1' now that I look at it.

The CFM can be roughly calculated using the bore, stroke and RPM.

4.25 x 4.25 = 18.0625 square inches
18.0625 x .7854 = 14.186 square inches
14.186 x 3.5 = 49.65 cubic inches
49.65 cubic inches / 1728 = 0.02873 cubic feet
0.02873 cubic feet x 550 RPM = 15.8 CFM

Minus inefficiency maybe about 14 CFM? So I'll definitely be running mine at around 750-800 RPM which should give me at least 20 CFM. No big deal, I need to buy a new sheave anyway but I'm glad I found your post or I would have run it at 550 without even thinking.
 

pyttam

New member
Joined
Oct 17, 2016
Messages
1
Okay, so I have a PDF of the ADD series manual (it covers ADD1000, ADD1001, ADD1003, ADD1010, ADD1011, ADD1002, ADD1004, ADD1012, ADD1013 and ADD1014 models. If anyone needs it, let me know. It doesn't have any performance specifications but the diagrams are helpful.

The part number for the crankcase for every one of these models is ACD1, so that explains the casting. I can just make out the '1' now that I look at it.

The CFM can be roughly calculated using the bore, stroke and RPM.

4.25 x 4.25 = 18.0625 square inches
18.0625 x .7854 = 14.186 square inches
14.186 x 3.5 = 49.65 cubic inches
49.65 cubic inches / 1728 = 0.02873 cubic feet
0.02873 cubic feet x 550 RPM = 15.8 CFM

Minus inefficiency maybe about 14 CFM? So I'll definitely be running mine at around 750-800 RPM which should give me at least 20 CFM. No big deal, I need to buy a new sheave anyway but I'm glad I found your post or I would have run it at 550 without even thinking.

Could you post that PDF if possible. I just picked one up and i think i am missing a few parts.
 

DeltaWye

Well-known member
Joined
Sep 26, 2016
Messages
114
Location
Toronto, Canada
Could you post that PDF if possible. I just picked one up and i think i am missing a few parts.

Post it where? :dunno:

If you send me a PM with your email address I'll send it to you directly. It would be nice if other people who own these models of pump would take pictures and add information to this thread to help out me and others who will read this thread in the future, since there's so little information on them.

I haven't had a chance to get to my compressor yet because a simple car repair turned into a disaster and it's only a 1-car garage. I'm hoping to get to it this week and I will take pictures as I go.
 

HerculesEngine

New member
Joined
Oct 12, 2007
Messages
1
I apologize for resurrecting this thread as I know it is a couple of months old. It is interesting to see that there are others out there with the same pump. Here are a couple of (marginal) shots of my GD ADD1011 driven via a 5hp motor and sitting atop a code 80 gallon horizontal receiver. Interestingly this unit is two stage though the tag on the pump specifies a discharge pressure of 125psi and pump speed of 850rpm; 125psi kind of defeats the purpose of 2 stage I would say. This unit originally served as backup to a rotary screw (and had little run time) which I believe explains the low discharge pressure rating; with the code tank it shouldn't be a concern to increase the cut in and cut out pressures (pending on relief settings as well) though will have to see how the motor likes spinning it at full load. I haven't put this one back into service yet and it still remains a project for a later day as I have a 2hp Hydrovane to get me by for now. Does anyone know the quality of these pumps in particular? Thanks.
 

Attachments

  • 20151230_090533.jpg
    20151230_090533.jpg
    138.9 KB · Views: 122
  • 20151230_091420.jpg
    20151230_091420.jpg
    126.2 KB · Views: 94
  • 20151230_091359.jpg
    20151230_091359.jpg
    127.2 KB · Views: 88
Last edited:

DeltaWye

Well-known member
Joined
Sep 26, 2016
Messages
114
Location
Toronto, Canada
Hi HerculesEngine, I just sent you the PDF. Every bit of info people posts helps. Now I am pretty sure that the green in your picture and in my post #4 is the original colour. I'll have to repaint mine at some point but I still haven't gotten into it and probably won't until the weather warms up.

Does yours have a three-belt sheave (pulley) like mine? The idiot who I bought mine from didn't take the old one off the motor before he sold/scrapped it and every triple sheave I find has much more spacing between the belts than the compressor pulley, I guess because they're not designed only for A-belts. The guy I bought the motor from threw in a two-belt sheave so I could get it running but I don't want to leave it like that long term.
 

wholub88

New member
Joined
Oct 2, 2017
Messages
1
Location
Cleveland ohio
Hey fellas! New to the forum and I know this is an older thread but i just acquired a Gardner-Denver Model ADD 1011. Trying to find any info i can about it, I'm not sure if it works but will be finding out shortly, i do know i need to redo the drain plus on the bottom of the tank as it leaks. wondering if i might be able to get the pdf of the manual? I'll post some pictures if i can figure out how to!
 

Big D

New member
Joined
Aug 20, 2008
Messages
1
Hey guys, could someone please send me a copy of the manual or give me a hint on the oil change procedure? The drain is pretty obvious but I'm not sure where and how far to fill it. There's a fill-like looking plug on the top right of the crank case behind the muffler but I have a hard time believing that's the oil level, unless there's a dipstick inside (I'll have to unbolt the muffler to see, thought I'd ask first). Also what kind of oil should be used on these? I was thinking synthetic ISO100.

I am absolutely in love with it though. So quiet and runs so well. I only need 100-120psi out of it and it pumps up the tank so quickly it's unbelievable. It's my first "real" compressor, I had stopped using air tools because I couldn't take the psychological assault of the noise of the direct drive compressors I'd used up to this point.


WAVrF2O.jpg
 
Last edited:

psgpicker

New member
Joined
Sep 11, 2016
Messages
1
Real old post but I too have one of these dinosaurs and am not sure what the oil level is supposed to be. The original dipstick is missing.
 

DeltaWye

Well-known member
Joined
Sep 26, 2016
Messages
114
Location
Toronto, Canada
Real old post but I too have one of these dinosaurs and am not sure what the oil level is supposed to be. The original dipstick is missing.

Hey, I just saw your PM but you never included an email address. No idea about the oil level, sorry, I still haven't got to this thing. :sad:
 

Jaydoege

New member
Joined
Dec 27, 2019
Messages
1
Location
My back yard
Hello,
I was hoping by chance you had the PDF for the Gardner Denver compressor still. Could you please email it to me?

Thank you
Jay
 

DeltaWye

Well-known member
Joined
Sep 26, 2016
Messages
114
Location
Toronto, Canada
I'm back.

I don't come here often anymore but I did subscribe to this thread so that I would get an email notification if anyone replied. I'm happy to email people copies of the manual when they request them and in return I ask that they update this thread with things like pictures or information on how their efforts went so we can all learn. If I ever get to mine, I will try to take the time to document it and post pictures.
 

Orion904

New member
Joined
May 1, 2020
Messages
1
Location
Bethel,pa
Hi DeltaWye,
just jointed the Garage Journal and seen you have a pdf for the Gardner Denver ADD 1 compressor. I also have one of these dinasaurs, wondering if you could send me the pdf, be nice ti see what I'm getting into before I take the head off.
Thank you
 

1932Conny

New member
Joined
Sep 22, 2020
Messages
1
Location
Arlington Washington
I have been running a Gardner Denver in my shop for a number of years now. I have no specs on it so am wondering what oil I actually should be using in it (instead of guessing). Also, I did see that some folks were asking questions about the dip stick. I can measure mine if that info is still needed.
 
To avoid these ads, REGISTER NOW!

Tantik

New member
Joined
Oct 13, 2020
Messages
1
Location
Edmonton,Ab
I have just acquired one of these pumps and I know nothing about it I was reading that DeltaWye was saying that he had a manual so anyone that does have I would greatly appreciate it if they could share it with me
 

Holeshot121

Member
Joined
Jul 18, 2011
Messages
21
If anyone is still around that has it, I could also use that PDF manual. I inherited one of these when I got my grandfather's house and garage. It fills the tank VERY slowly, so I can only assume it needs a rebuild. I also found that the piston on the 2nd stage has a bunch of tiny dents like some shrapnel made its way into the chamber.

There's a 5hp 2 stage 80 gallon IR compressor for sale locally for $600. I'm probably better off just buying that, but I can't help myself when I see an opportunity to take something apart. :p

I'll measure the dip stick depth and post the length next time I'm out in the garage.
 

Attachments

  • 20201024_064912.jpg
    20201024_064912.jpg
    86 KB · Views: 60
  • 20201024_060431.jpg
    20201024_060431.jpg
    98.2 KB · Views: 58
  • 20201024_060424.jpg
    20201024_060424.jpg
    149.7 KB · Views: 57
  • 20201024_060418.jpg
    20201024_060418.jpg
    150.2 KB · Views: 61
  • 20201023_173623.jpg
    20201023_173623.jpg
    149.4 KB · Views: 64
Last edited:

Holeshot121

Member
Joined
Jul 18, 2011
Messages
21
I measured the dip stick, which has 2 indicators. I think it's safe to assume in between the indicators is the operating range.

The lower indicator sits at 7 15/16" from top of the crankcase. The upper indicator sits at 7 9/16".
 

Holeshot121

Member
Joined
Jul 18, 2011
Messages
21
I purchased the "tune up kit" from Airflo Inc mentioned earlier in the thread. Before ordering, I contacted them via the form on their website. "Ken" responded and was very helpful. He sent me PDFs of the parts schematic and the service manual.

He also mentioned that you can tell if the piston rings have life left in them by looking at the faces. They are tapered rings and must be coated black. He said if you can still see some black, they have some life left in them. If they are fully shiny, then it's time for replacement.

I'll update when I have more progress.
 

Roberts210

Well-known member
Joined
Dec 21, 2015
Messages
3,177
Location
Missouri
I love it when old threads get resurrected over and over.
OP posted in 2016.
2017, it came back to life.
2018, it came back to life.
2019, ditto.
And here we are in 2020, and it's still kickin'.
 

Holeshot121

Member
Joined
Jul 18, 2011
Messages
21
Not sure if you're serious or sarcastic.. lol.

But it's the first result if you Google the brand and model number. So might as well keep all the info in one place.
 

DeltaWye

Well-known member
Joined
Sep 26, 2016
Messages
114
Location
Toronto, Canada
I purchased the "tune up kit" from Airflo Inc mentioned earlier in the thread. Before ordering, I contacted them via the form on their website. "Ken" responded and was very helpful. He sent me PDFs of the parts schematic and the service manual.

He also mentioned that you can tell if the piston rings have life left in them by looking at the faces. They are tapered rings and must be coated black. He said if you can still see some black, they have some life left in them. If they are fully shiny, then it's time for replacement.

I'll update when I have more progress.

Thanks for updating the thread and especially for posting the pictures. The last person to send me a PM with their email address was sbush in April. Everyone since then posted in the thread asking me to send them what I had but with no way to do so. :eyecrazy:

I still haven't gotten around to running this thing. :sad: I did almost finish the control circuit for it though. I think I will try to cobble up a connection to a tank soon and see if it is basically working and then order a kit from AirFlo.

https://www.airfloinc.com/item/1959

This "head overhaul" kit has the valves and gaskets. So from memory the "tune up" kit you got came with piston rings as well?

Does your pump have a 3-groove pulley like mine? I notice the motor only has 2.
 
Last edited:

in-graved

New member
Joined
Oct 25, 2020
Messages
1
Location
home
I just acquired one of these big *******, but can't seem to wire up the motor. Some time it it's previous life the info tag fell off the motor.
Anyone have an idea how to wire this thing?
 

weedy64

Member
Joined
Nov 5, 2020
Messages
5
Location
FT Langley BC
New member to this forum
Im in for a pdf manual as well

My unit just says ADD as the model. 200psi it was originally silver color.
4.25" x 2.25" x 3.5" 870rpm
It has a ~19" double A belt flywheel, I run a 5HP 240V motor with pump turning at 700rpm, because that's the motor sheave I had.

It had been sitting for 15years and 1952 tank doesn't match. I filled the tank 90% with water and pressurized it to +180psi so Im satisfied its still good for running up to 140 in daily use.

My only issue is the valves were removed and sitting in oil, I may not have them in the right holes, or one of the inter-cooler tubes is plugged with critters as my LP blow-off valve is chugging. If I remove the blow-off and plug the hole it pumps up the tank, thoughts?

I'm going to independently test the LP blow-off later today.

in-graved: These compressors are so old, they may no longer be original so you have to identify the motor. Mine is a simple single phase 240V with built in overload so I can just plug into a welding plug and let the new pressure switch control it. A three phase will need a motor starter with properly sized heaters etc. Post a pic of wires in motor for a better answer.
 
Last edited:

Holeshot121

Member
Joined
Jul 18, 2011
Messages
21
Thanks for updating the thread and especially for posting the pictures. The last person to send me a PM with their email address was sbush in April. Everyone since then posted in the thread asking me to send them what I had but with no way to do so. :eyecrazy:

I still haven't gotten around to running this thing. :sad: I did almost finish the control circuit for it though. I think I will try to cobble up a connection to a tank soon and see if it is basically working and then order a kit from AirFlo.

https://www.airfloinc.com/item/1959

This "head overhaul" kit has the valves and gaskets. So from memory the "tune up" kit you got came with piston rings as well?

Does your pump have a 3-groove pulley like mine? I notice the motor only has 2.

I've been emailing back and forth with Ken from Airflo Inc, and I can't recommend him high enough. He's very knowledgeable and happy to help. Their "tune up kit" comes with everything from the head overhaul kit plus other items like the piston rings. Ken also sent me the parts diagrams and the service manual, so I now have them also if anyone needs them.

I would have had mine back together a while ago, but I decided to paint everything while it was apart/accessible. That was a mistake - this thing has been leaking oil for probably 20 years. I painted it, but I doubt I got enough oil out of the pores and everything for the paint to last. All I have to do yet is get the cylinder back on the crankcase and get the head on.

If you're replacing piston rings, be VERY careful with the 2nd stage oil ring. It is not very flexible at all and mine actually snapped before I could spread it open enough to get it installed. Ken was able to source another ring for me without buying a whole new kit. 2nd time around I put the piston in the freezer and the ring in the oven, which worked perfectly. :lol:

I noticed my tank has a name plate on it. Made by Beaird in 1960. It's actually a 121 gallon tank :scared: 
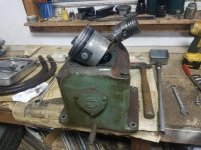
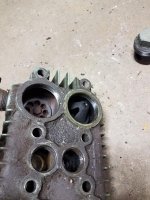
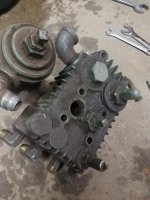
No wonder it takes so long to fill. Although I did find the piston rings to be mostly worn out and a broken valve spring in the head, so keeping my fingers crossed.

Yes, my motor/pulley are using a 2-belt system. From what I'm told, this compressor came out of some factory years ago and was fitted with a 3 phase motor, which was then changed to single phase for home use.

I'll snap some pics when I get it buttoned up.
 

Holeshot121

Member
Joined
Jul 18, 2011
Messages
21
New member to this forum
Im in for a pdf manual as well

My unit just says ADD as the model. 200psi it was originally silver color.
4.25" x 2.25" x 3.5" 870rpm
It has a ~19" double A belt flywheel, I run a 5HP 240V motor with pump turning at 700rpm, because that's the motor sheave I had.

It had been sitting for 15years and 1952 tank doesn't match. I filled the tank 90% with water and pressurized it to +180psi so Im satisfied its still good for running up to 140 in daily use.

My only issue is the valves were removed and sitting in oil, I may not have them in the right holes, or one of the inter-cooler tubes is plugged with critters as my LP blow-off valve is chugging. If I remove the blow-off and plug the hole it pumps up the tank, thoughts?

I'm going to independently test the LP blow-off later today.

in-graved: These compressors are so old, they may no longer be original so you have to identify the motor. Mine is a simple single phase 240V with built in overload so I can just plug into a welding plug and let the new pressure switch control it. A three phase will need a motor starter with properly sized heaters etc. Post a pic of wires in motor for a better answer.

Send a PM to me or Delta with your email address and we'll get those manuals sent over to you. The parts manual will show you the valves so you can see if you put them in the correct locations.

Let me check my pictures I have so far and see if anything I have might help you. I **** at remembering to take pics during a project though.
 

Holeshot121

Member
Joined
Jul 18, 2011
Messages
21
Here are some pictures I took. In the first pic, the left valve is the LP intake and right valve is LP discharge of course.

3rd pic shows them with the caps removed. The discharge valve has that "cone" that sits on top of the valve.

The last pic shows all the LP stuff and kind of how it sits.

You can also check yourself if you don't mind taking it back apart. The LP and HP discharge valves are both pushed down by spring pressure in their natural state, and you can push them up from the underside of the head with a small punch or screw driver.

The inlet valves are just the opposite. They're naturally in the up position and you can push them down towards the pistons with a screwdriver.
 

Attachments

  • 20201025_070701.jpg
    20201025_070701.jpg
    119 KB · Views: 49
  • 20201025_065156.jpg
    20201025_065156.jpg
    120.7 KB · Views: 45
  • 20201025_065135.jpg
    20201025_065135.jpg
    110.2 KB · Views: 45
  • 20201024_064912.jpg
    20201024_064912.jpg
    86 KB · Views: 43
  • 20201024_064905.jpg
    20201024_064905.jpg
    98.8 KB · Views: 46

Holeshot121

Member
Joined
Jul 18, 2011
Messages
21
Well this thing has been giving me more headaches. I bolted everything back in place where it was (marked before disassembly) then thought maybe I should check pulley alignment. WOW, it was so bad - I wish I would have taken a picture. It's amazing this thing ran without throwing belts off constantly.

So I marked some new mounting holes and lifted this heavy SOB back off the tank. Drilled and tapped the holes, then got the pump mounted again. Turned it over a few times by hand, and noticed an air leak from one of the flare fittings on the side of the head. Loosened that and found that the flare partially broke away from the tubing. I probably overtightened it. So I cut the flare off and tried to flare it again, which didn't work. The cooling fins are too close to the flare nut, so I couldn't get the nut far enough away from the joint to get the flare tool in there.

Ended up having to remove an inch or so of the cooling fins and sanding down the tube to get clearance for the nut. By some miracle, I actually remembered to put the fitting on the tube BEFORE flaring (I'm notorious for this). Seems to have sealed up the leak.

Final issue before firing it up is the oil level. The service manual calls for something like 6 quarts of oil. I put 5.5 in and checked the dipstick. The full line on the dipstick is maybe 1/2" to 3/4" up from the bottom. My oil level is around 4" from the bottom. So either this isn't the correct dipstick, or the manual is way off. I have an email in to Ken to see if he has a recommendation.

Anyway, here are some pics of the finished product.
 

Attachments

  • 20201128_064202.jpg
    20201128_064202.jpg
    150.3 KB · Views: 57
  • 20201128_064036.jpg
    20201128_064036.jpg
    150.2 KB · Views: 53
  • 20201128_064022.jpg
    20201128_064022.jpg
    148.8 KB · Views: 62

weedy64

Member
Joined
Nov 5, 2020
Messages
5
Location
FT Langley BC
The dog-eared paper P.L. & Service Manual I have for an ADD says approx. 3 pints of oil to fill crankcase of an ADD. In practice about an 1-1/4" deep oil in the crankcase.

4" deep would be way above the lip of the inspection plate and likely leak profusely. the crank would be pulverising the oil, just the dippers need to fling the oil.

Nice paint though !!
 

Holeshot121

Member
Joined
Jul 18, 2011
Messages
21
The dog-eared paper P.L. & Service Manual I have for an ADD says approx. 3 pints of oil to fill crankcase of an ADD. In practice about an 1-1/4" deep oil in the crankcase.

4" deep would be way above the lip of the inspection plate and likely leak profusely. the crank would be pulverising the oil, just the dippers need to fling the oil.

Nice paint though !!

Yep, you're correct. I forgot to update this post - turns out the manual I was sent was actually incorrect. Turns out it covered a plethora of compressors, but the ADD wasn't one of them.

And yes, it was leaking oil like crazy without even trying to run it. I drained it down to the correct level and it's been running like a top.
 

weedy64

Member
Joined
Nov 5, 2020
Messages
5
Location
FT Langley BC
Yep, bad HP suction valve and all rings are done too. If I can resize the rods and crank to my satisfaction I will rebuild it and paint it JD green.

Parts are awfully dear for this thing. I just rebuilt an IR 242 with new bearings, pistons, rods, rings and valves I'm done under $350. The GD pistons are $$$$ albeit steel not alum. for reference, offensive!! Nothing special, just old in my estimation, I could turn new ones on the lathe if I had to.
 

steelbuilding

New member
Joined
Oct 16, 2016
Messages
1
I just acquired a Gardner Denver ADK 1001. Does anyone have any manuals for this model?
It is air or gas.
Its 4 3/4 and 2 1/2 x 4
870 RPM
200 PSI
 
Last edited:

adefreit

New member
Joined
Mar 3, 2021
Messages
1
Location
New Hampshire
Yep, bad HP suction valve and all rings are done too. If I can resize the rods and crank to my satisfaction I will rebuild it and paint it JD green.

Parts are awfully dear for this thing. I just rebuilt an IR 242 with new bearings, pistons, rods, rings and valves I'm done under $350. The GD pistons are $$$$ albeit steel not alum. for reference, offensive!! Nothing special, just old in my estimation, I could turn new ones on the lathe if I had to.

Hi,

Were you able to get the Gardner Denver compressor up and running? I have a Model ATDRDA and I am trying to find parts as they are dear, and was wondering if you found a solution.

Thank you.
 
To avoid these ads, REGISTER NOW!
Top Bottom