To avoid these ads, REGISTER NOW!

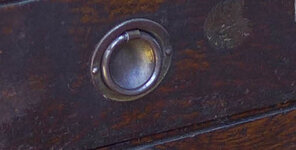
Guys, how would you replicate this ring pull?

Davefr

Well-known member
Joined
Jan 7, 2010
Messages
11,851
Location
OR
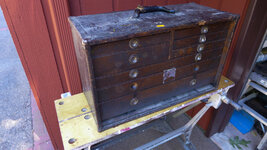
It's from a really old wooden Union machinist tool box and original ring pulls are unobtainium. New replacements aren't even close. The ring part will be easy but I'd like to form the round steel concave piece and have it look like it was machine stamped. Any suggestions using common shop tools? TIA P1090468.jpgringpull.jpg?
 
To avoid these ads, REGISTER NOW!

LXCam

ALLIANCE MEMBER
Joined
Apr 23, 2013
Messages
19,215
Location
AZ
Piece of heavy wall DOM tubing and a ball bearing the same diameter as the recess portion. Radius the ID of the tube just so the sheet metal doesn't hang up, insert in press and have at it.
 

gearhead1

Well-known member
Joined
Oct 14, 2013
Messages
1,935
Location
NC
Consider looking at a cup plug (freeze plug) as a part to start with.

Another idea, drill a big hole in a solid block, then lay the sheet metal on it, and press a solid steel ball into the hole. Now you have the hemisphere.
 

rsanter

Well-known member
Joined
Dec 22, 2007
Messages
18,530
Location
visalia ca
Best idea I can think of is start with the ball bearing idea.
Then drill the right size hole in a piece of steel.
Then you will get another piece of steel with the same size hole.
Put the sheet metal between the two pieces and clamp but not too tight. You actually want the sheet metal to slip inwards a bit to give a little more metal when needed but still keep the rim flat
Then in the press it goes
 

steaks&anvils

Well-known member
Joined
Oct 15, 2016
Messages
2,470
Location
Colorado
Hydraulic press. They do it all the time for jewelry making.

I swiped these instructions from the web. Lots of information on the web for making dies/plattens etc
 

Attachments

  • Handout - Hydraulic Press Workshop.pdf
    1.8 MB · Views: 34

steaks&anvils

Well-known member
Joined
Oct 15, 2016
Messages
2,470
Location
Colorado
Bam.....there it is!
nope.

largest dome is too deep. you can't use it and still keep the flange. there are plenty of larger dapping blocks, they just cost a lot more. and larger dapping punches too...

metal you use will need constant annealing to keep it from creasing or cracking. or you could do it in two pieces, make a dome, then solder it to the flange.

it might work as a die in a press, maybe.

you could carve a appropriate size/depth opening in a piece of wood (end grain), then use the dapping punches to make the dome. again, lots of annealing. this would allow you to keep the flange and dome as one piece. flange might get a bit wavy though, again lots of annealing.
 

Muckin_Slusher

Well-known member
Joined
Apr 1, 2017
Messages
465
Location
Abitibi
Hydraulic form the part using grease gun for pressure.

On youtube search: making motorcycle headlights with a grease gun.
 
To avoid these ads, REGISTER NOW!
OP
D

Davefr

Well-known member
Joined
Jan 7, 2010
Messages
11,851
Location
OR
Guys, thanks for the ideas and the links. I'll just have to experiment. Forming the dimple should be straight forward but keeping the mounting flange flat/smooth/concentric could be a challenge.
 

LXCam

ALLIANCE MEMBER
Joined
Apr 23, 2013
Messages
19,215
Location
AZ
If you’re going with the tubing/bearing idear. Use another piece of tubing to go over the bearing and press it flat. You might have to chamfer the two pieces of tubing to compensate for spring back.. maybe. I’m certain I remember you having a lathe and if so do a rough trim on the flange then chuck up that entire last assembly in the lathe using a live center for the outside piece. Turn the lathe as slow as possible and use a grinder/flap disc to dial it in.
 

steaks&anvils

Well-known member
Joined
Oct 15, 2016
Messages
2,470
Location
Colorado
Guys, thanks for the ideas and the links. I'll just have to experiment. Forming the dimple should be straight forward but keeping the mounting flange flat/smooth/concentric could be a challenge.
Page 7 of the PDF I posted, looks like what would be a good option for you. The PDF lists lots of different press techniques. Also plenty of information on the web to get you going in the right direction.

1627219821642.png
 

Walkers

Well-known member
Joined
May 17, 2021
Messages
3,912
Location
Cave Creek Az
That is a Union tool chest. Plenty of them around, usually missing pulls. Keep an eye on eBay for pulls or a crappy box that only has a few pulls.

You might try sending this guy an email, he has restored several. https://terrystoolboxes.com/
 
Last edited:
OP
D

Davefr

Well-known member
Joined
Jan 7, 2010
Messages
11,851
Location
OR
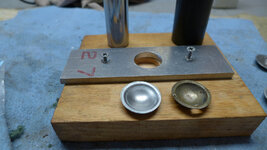
Well here's what I came up with. I can replicate the concave portion but I can't get that crisp 90 degree bend from flat to concave like the original. (not that it really matter that much). I suppose it would take precision dies and a factory stamping machine to be 100%. Here's a rough prototype that needs more work. The steel is .028" to match the original.

P1090555.jpgP1090558.jpg
 

cmandp

Well-known member
Joined
Dec 22, 2011
Messages
1,290
Location
New Jersey
You're almost there. I'd probably take your part and work on the back with punches by hand to sharpen the corner. I think you'd have to use the hydroforming or press and rubber forming method to get a crisper edge.
 

rlitman

Well-known member
Joined
Oct 18, 2010
Messages
24,688
Location
Long Island
I would take a 1/4" steel rod, and file a 90 degree V notch into the end using a square file. Then use that with a small hammer to sharpen up the corner with the piece sitting in the doming block as I work my way around the circumference.

Pay attention to the file's angle, because if you twist it, you'll end up with a more obtuse angle than 90. But don't worry about rocking it in an arc, because a radius on the end is a good thing here.
 

LXCam

ALLIANCE MEMBER
Joined
Apr 23, 2013
Messages
19,215
Location
AZ
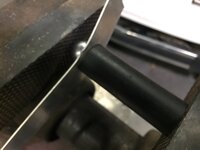
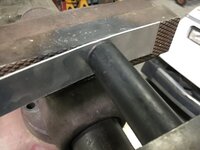
This is a down n dirty proof of concept post. Basically I didn’t feel like adjusting the press table. 😉

62853CC8-24D1-43E8-938E-0346BFEF1E34.jpegD1347F10-59EF-40BE-8C7C-CCE30C2F3674.jpeg153FBF05-76F2-4433-A2B1-3D072DFEF497.jpeg1AFC4B61-E0E4-46D5-A8C2-B81F3A7FB838.jpeg

Nor did I make any effort finding the right size of anything.

But rest assured no vises were hurt in the making, nor hammers used. 😁
 

Attachments

  • 6787568D-1844-485D-B023-2A137EF3745F.jpeg
    6787568D-1844-485D-B023-2A137EF3745F.jpeg
    286.9 KB · Views: 10
Last edited:
OP
D

Davefr

Well-known member
Joined
Jan 7, 2010
Messages
11,851
Location
OR
I think I have a process that worked. I used a socket a little less then the hole I.D. minus a little more then 2X the metal wall thickness. I used the press to just slightly push the socket/pull into block. That caused the lip to raise up. Then I flattened it with a larger socket. It look two gradual passes but I think I have a couple keepers. Thanks for all the great advise.

P1090559.jpg
 
To avoid these ads, REGISTER NOW!
Top Bottom