
You are using an out of date browser. It may not display this or other websites correctly.
You should upgrade or use an alternative browser.
You should upgrade or use an alternative browser.
Hammer time!
- Thread starter Outlawmws
- Start date
Eric Brown
ALLIANCE MEMBER
- Joined
- Jun 14, 2024
- Messages
- 688
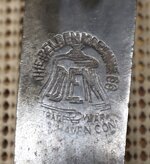
Here is my grandfathers slate hammer. Made by Belden in New Haven Conn. This one has an unusual name stamp. It was double struck, giving the impression that it is ringing. Pretty sure that was a production mistake and was sold as a factory second. Those grandparents had five kids and lived in Fort Wayne Indiana They certainly were not rich. According to some sources, these hammers were made between 1900 and 1930. Thats the right time frame for my grandfather. He was mostly a jack-of-all-trades and did not do roofing for long. Looking on E-Bay I noticed most of the Belden slate hammers use a longer name stamp rotated 90 degrees from this one.
Attachments


the first hammer is made by picard but under its "Stirrup" brand for sale in overseas markets (ie outside of germany, the logo is a stirrup as used in horse riding. Made by Joh. Hermann Picard GmbH & Co. KG., Wuppertal, GermanyMy first chasing hammer. Can't figure out the maker's mark. Any ideas?
Figured I'd post this planishing hammer as I got it from the same estate sale. The one above came out of the house and cost $3. The one below came out of a shed and was just part of the pile.
Are the 4 dots just part of the forging process or are they maker's marks? It's hard to tell, but it has a grey/blue hammered paint finish, which I don't want to wire brush off. I'm also hesitant on dropping it into the evaporust as I'm not sure what it will do to end grain of the handle. Thoughts on knocking off the rust?


Hammer made by FE Lindström. I had no idea they also made hammers, but apparently they did. I found an ad from 1933 where they list them. They only made one model hammer in four sizes. Available with ash or hickory handles, where the hickory was remarkably more expensive. What's more interesting is that this one is also stamped with Öbergs logo, and on the other side it says "USE ÖBERG FILES". Must have been made as some sort of promotional item i presume?
Decided to give it a good refurbish.


Decided to give it a good refurbish.
Patrickm82
Well-known member
That’s a beauty!!
Eric Brown
ALLIANCE MEMBER
- Joined
- Jun 14, 2024
- Messages
- 688
Very nicely done.Hammer made by FE Lindström. I had no idea they also made hammers, but apparently they did. I found an ad from 1933 where they list them. They only made one model hammer in four sizes. Available with ash or hickory handles, where the hickory was remarkably more expensive. What's more interesting is that this one is also stamped with Öbergs logo, and on the other side it says "USE ÖBERG FILES". Must have been made as some sort of promotional item i presume?
Decided to give it a good refurbish.
anything from Lindstrom is quality quality qualityHammer made by FE Lindström. I had no idea they also made hammers, but apparently they did. I found an ad from 1933 where they list them. They only made one model hammer in four sizes. Available with ash or hickory handles, where the hickory was remarkably more expensive. What's more interesting is that this one is also stamped with Öbergs logo, and on the other side it says "USE ÖBERG FILES". Must have been made as some sort of promotional item i presume?
Decided to give it a good refurbish.
Beerhippie
Well-known member
Just a basic Chinesium 2 lb drilling hammer:

but I didn't have a drilling hammer, so it was worth it for a buck.
but I didn't have a drilling hammer, so it was worth it for a buck.
Patrickm82
Well-known member
Picked up these baby heads this weekend at the flea market. Blue point BP2a 2 oz head and an unmarked 2 oz. $3 bucks for both. So I went onto snap on’s site to get a replacement handle, $27 for the wood, eh kinda ***** but I wanted to keep it “original ish” but then $24 F-ing dollars for shipping!! No thanks, house handle has it for $4. I’ll go that route.

Mintgrun
Well-known member
I uploaded these photos and then used Google lens to figure out who made them. It's an empowering tool, being able to search from an uploaded photo. I learned that they are Atlas welding hammers. It's a rather distinctive design, with the collar around the handle opening and the rounded divot at the top handle opening. There aren't any maker's marks. The one with a diamond shaped end is unique.


Private Lugnutz
Well-known member

woodkill
Member
Found this online. Zubi-Ondo looks like it is made in Spain

Private Lugnutz
Well-known member
Thanks.Found this online. Zubi-Ondo looks like it is made in Spain
woodkill
Member
2 of my new mysteries.


Found an unusual multi-claw nail hammer last month. This was the only one I'd seen in years of looking, until last week when I saw another (but with one half of the multi-claws missing)
Seems to be 1941 patent 2239719 issued to J N Jarrett of Toronto

Seems to be 1941 patent 2239719 issued to J N Jarrett of Toronto
Attachments


Patrickm82
Well-known member
Very interesting!!
Beerhippie
Well-known member
A solution to a problem no one had?Found an unusual multi-claw nail hammer last month. This was the only one I'd seen in years of looking, until last week when I saw another (but with one half of the multi-claws missing)
Seems to be 1941 patent 2239719 issued to J N Jarrett of Toronto

Beerhippie
Well-known member
But those poor open-end wrenches! The humanity!.....
Only previously broken hatchets were used for these.
I can't recall many times when I was pulling nails on the job site that a few scraps of two-by weren't close at hand. Plus, with ripping claws, you pull the nail as far as you can with the first set, then swing the hammer claw onto the shaft--the jaws are sharp enough to grip the bare shaft of the nail.
Do this with one of my wood-handle Harts and....It's gonna get real western, real fast.

Last edited:


Private Lugnutz
Well-known member
Probably also why the only other one kwigs has seen had...there is a reason it never caught on...
...one half of the multi-claws missing
fishwatcher
Well-known member
- Joined
- Jan 26, 2023
- Messages
- 759
I added a Craftsman USA made rubber mallet today to my restored hammers rack. It was in like new condition from a Facebook marketplace seller. I wiped the rubber down with Goof Off, then some silicon and it now looks brand new.

four.cycle
Well-known member
keep it away from your wood-working projects.then some silicon
fishwatcher
Well-known member
- Joined
- Jan 26, 2023
- Messages
- 759
Thx. I just read.. I shouldn’t have used goof off. It dissolves rubber. There was some black that came off onto the paper towels I used. The silicone spray I used afterwards was okay though.keep it away from your wood-working projects.
Beerhippie
Well-known member
What 4C means is that silicone really messes with any kind of finish--wood or metal.Thx. I just read.. I shouldn’t have used goof off. It dissolves rubber. There was some black that came off onto the paper towels I used. The silicone spray I used afterwards was okay though.
You want orange peel? You got it.


fishwatcher
Well-known member
- Joined
- Jan 26, 2023
- Messages
- 759
Ah.’ Okay, Thanks for the clarification. I thought the black rubber might rub off on other projects for some reason.What 4C means is that silicone really messes with any kind of finish--wood or metal.
You want orange peel? You got it.
Beerhippie
Well-known member
Well, maybe that, too.Ah.’ Okay, Thanks for the clarification. I thought the black rubber might rub off on other projects for some reason.
Silicone is incredibly bad for any kind of paint or stain--and almost impossible to remove.
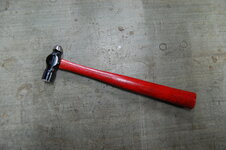
I picked up a 4 oz Plumb ballpeen at the local Restore; it was in excellent shape, but red paint on the handle had some bare spots and I decided to try restoring the handle's finish. Thanks to an Arizona friend who did a similar job on a Plumb bricklayer's hammer. I passed up the hardware and paint stores, and went straight to Michael's Arts & Crafts for some RIT clothing dye.
My friend had been repeatedly trying to get a match for Plumb's factory color through Sherwin-Williams' paint-matching system, but no luck. Someone suggested RIT dye and — bingo, their scarlet color works nicely. (I used the powder version.)
I sanded the handle enough to take the shine off the parts where the original color was still intact — didn't want those to stand out by contrast. Mixed up the dye in 64 oz juice bottle, inserted the handle letting the head (which didn't fit into the bottle's mouth) hold it in place, added a little water to top up the dye level, and let it sit there for about 45 minutes to an hour.
Pulled it out, let it dry, wiped down with a used green scotchbrite, then three coats of shellac, plus two paste wax. Done. (I also touched up a couple of places on the head where the black had gotten scuffed.)
Attachments

Last edited:
I picked up a 4 oz Plumb ballpeen at the local Restore; it was in excellent shape, but red paint on the handle had some bare spots and I decided to try restoring the handle's finish. Thanks to an Arizona friend who did a similar job on a Plumb bricklayer's hammer. I passed up the hardware and paint stores, and went straight to Michael's Arts & Crafts for some RIT clothing dye.
My friend had been repeatedly trying to get a match for Plumb's factory color through Sherwin-Williams' paint-matching system, but no luck. Someone suggested RIT dye and — bingo, their scarlet color works nicely. (I used the powder version.)
I sanded the handle enough to take the shine off the parts where the original color was still intact — didn't want those to stand out by contrast. Mixed up the dye in 64 oz juice bottle, inserted the handle letting the head (which didn't fit into the bottle's mouth) hold it in place, added a little water to top up the dye level, and let it sit there for about 45 minutes to an hour.
Pulled it out, let it dry, wiped down with a used green scotchbrite, then three coats of shellac, plus two paste wax. Done. (I also touched up a couple of places on the head where the black had gotten scuffed.)
That looks awesome. The wood grain looks great.
I have always wanted to try staining a hammer handle purple, but I always wimp out. I don’t want it to end up looking like ****.
That looks awesome. The wood grain looks great.
I have always wanted to try staining a hammer handle purple, but I always wimp out. I don’t want it to end up looking like ****.
Thanks! Yes, the grain came through nicely. I have a 40 year old Plumb ax with nearly all its original finish on the handle, and my observation is that the paint or stain the company used is somewhat more opaque than the dye. That is, the grain of the ax handle (hickory or ash presumably) is less visible than the grain on the ballpeen. Of course the wood on the ax handle may have had less visible grain to start with, so — who knows?
Anyway, one reason I used shellac was to seal the dyed wood so it didn't leave my hand scarlet in places if I used the hammer with wet hands. Varnish or urethane would have done as well, but the shellac was readily available. So if you try this with RIT or some other clothing dye, consider using some kind of top coat.
I figure that I would use a stain and then spray it with clear enamel, buff it, clear enamel, buff it… like four layers of clear.
If it seems like it needs it, maybe light sanding between enamel coats.
Sounds good to me but to tell the truth, this is first time I've tried a restoration such as this. My usual approach with a hammer (say) is to sand the handle to get it as clean as seems good enough. Then stain it; I use a Minwax stain such as gunstock, red mahogany, dark walnut, etc. with perhaps two coats of stain. A wipedown with scotchbrite comes between stain coats, then two or three shellac layers, again scotchbriting between coats. Finally — and this is seldom done — a coat or two of paste wax.I figure that I would use a stain and then spray it with clear enamel, buff it, clear enamel, buff it… like four layers of clear.
If it seems like it needs it, maybe light sanding between enamel coats.
Although four years old, this shows what hammers look like when I'm done with them:
Hammer time!
The number 4 is so rare...can't find any closed listings. Only on Worthpoint which I don't have a membership to.
 www.garagejournal.com
My goal with a wood handle is to get something clean, smooth to the touch, nice-looking, and call it done. So this Plumb project was out of the ordinary -- and no museums are going to hire me as a tool restorer & curator. That friend in Arizona I mentioned takes things a whole lot further and not just with hand tools. He restores lathes and milling machines, even to searching out the industrial paint color they had coming out of the factory. It's wonderful to see what he does, but that's well beyond what I'd do.
Last edited:
American Iron
Well-known member
Just found this old cross peen hammer in a box of other tools I picked up this past weekend. From what I can see it is marked 600 (grams?) along with what looks like a zero or S (combined) with a small v on top of the Zero/S mark. I can't even begin to figure out the logo above the 600 mark. Maybe an image of an iron beam? Any help is appreciated...
Attachments


RTM
Well-known member
That's only 21 ounces.600 (grams?)
American Iron
Well-known member
It weighs 1 lb 4 oz / a 20 oz hammer. The logo to me looks European so I thought maybe the 600 was grams. Just don't know..
genog
Well-known member
I bought this for the handle
Unmarked.....
Some sort of Peening Pick Hammer

Unmarked.....
Some sort of Peening Pick Hammer
jeffmoss26
Well-known member
posted in wrong thread
Last edited: