To avoid these ads, REGISTER NOW!

Heavy 10 Garage Build

rckymtnab

Well-known member
Joined
Jan 21, 2021
Messages
61
Location
Alberta
Making my inaugural post. After finding garage journal and reading through the classics (maybe more on that later) I swore I was going to post my garage project as it progressed...but low and behold I am neck deep in my porcelain floor and haven’t started my thread. Unfortunately that means I will need to weave this tail across multiple chronological timeframes like a bad movie. Bear with me.


In short: 21’x23’ garage build to facilitate metal work, wood work, and general mechanics.

In the long run: porcelain tile floor in cold weather climate, cabinet build, South Bend Drill press restore, South Bend Heavy 10 lathe clean up, Wilton vise restore, Reed vise restore, two blacksmith leg vises to be restored, and later (over time) bladesmithing equipment.

I also have a 1962 GMC Custom Canadian pickup truck. More on this later.

Finally, I will end this first post with a thank-you to garage journal members who have inspired and enlightened me. Thank-you for taking the time to post and share with us.


Sent from my iPhone using Garage Journal
 
To avoid these ads, REGISTER NOW!

karoc

Well-known member
Joined
Dec 19, 2017
Messages
1,998
Location
Hemphill Tx
Welcome to forum, you will fit right in. What interest you there are lot of members who are interested in same things. Some say its just hobby but from the looks of their projects I would put them on professional level. Dang this place is full of talented people, so jump right in and welcome aboard.
 

matt_i

Well-known member
Joined
Mar 14, 2008
Messages
10,725
Location
SE Michigan
Tile floor sounds every interesting. Was not a thing when I built my shop addition but now working inside the house on several ceramic projects I can "see" new applications for it. Will look forward to seeing your pics!
 
OP
R

rckymtnab

Well-known member
Joined
Jan 21, 2021
Messages
61
Location
Alberta
Porcelain Floor Progress

Progress thus far: working in the south half of the garage while everything is pushed to the north. After a thorough cleaning I painted on Mapei Prim Grip and then laid down Mapei Ultraplan Extreme 2 floor levelling compound. I am using a decoupling membrane to help protect from freeze thaw cycles and as well as crack propagation from my slab (15 year old slab that was in good condition). Thinset is Mapei Kerabond / Keralastic and I am not diluting the Keralastic with water.

I have placed a grout joint over my control joints in the slab but haven’t yet decided whether to risk grouting (will be Kerapoxy) or using a suitable elastic sealant above these. I am tempted to test the efficacy of the products being used and see how things hold up.

We had a beautiful weekend - unseasonably warm. I have about a quarter of the garage tiled and also managed to smoke some ribs and have fun with my girls. All in all a great weekend.


Sent from my iPhone using Garage Journal
 

Attachments

  • IMG_0203.jpg
    IMG_0203.jpg
    60.1 KB · Views: 327
  • IMG_0214.jpg
    IMG_0214.jpg
    58.9 KB · Views: 307
  • IMG_0222.jpg
    IMG_0222.jpg
    109.6 KB · Views: 298
  • IMG_0263.jpg
    IMG_0263.jpg
    117.9 KB · Views: 327
  • IMG_0336.jpg
    IMG_0336.jpg
    91.6 KB · Views: 420
OP
R

rckymtnab

Well-known member
Joined
Jan 21, 2021
Messages
61
Location
Alberta
On a non-flooring note my new South Bend Heavy 10 Lathe was loaded on Friday. Sould be here in about a week, though I may try to claim free parking at the distribution centre for a few days while I try to get the floor finished.

Any of these smaller machines are selling like wild fire in our part of the world, so I am stoked to get this landed and go through it.


Sent from my iPhone using Garage Journal
 

Attachments

  • IMG_0370.jpg
    IMG_0370.jpg
    133.3 KB · Views: 419

Derek91

Active member
Joined
Sep 19, 2020
Messages
33
Location
Colorado
Looks great!

I am finishing up a porcelain tile job on the 2nd half of a 1,000sqft garage. We used Ditra as well and Dilex BWB over the control joints (to the nearest whole tile). For the joints, ideally you would leave the concrete control joint clear of any leveling compound or recut them after.

I would use the Mapei caulk color that matches your epoxy grout in the grout lines over the control joints (or as close as possible). Without relief a tile could pop or break a ways from the control joint and leave you scratching your head. With Ditra over concrete you would of used a non modified thin-set. Although I feel this is largely due to drying concerns.

Wait a solid two weeks before grouting (more with larger tiles)and at least a week after epoxy grout.

Tile is underrated and misunderstood!


Sent from my iPhone using Garage Journal
 
OP
R

rckymtnab

Well-known member
Joined
Jan 21, 2021
Messages
61
Location
Alberta
Looks great!

I am finishing up a porcelain tile job on the 2nd half of a 1,000sqft garage. We used Ditra as well and Dilex BWB over the control joints (to the nearest whole tile). For the joints, ideally you would leave the concrete control joint clear of any leveling compound or recut them after.

I would use the Mapei caulk color that matches your epoxy grout in the grout lines over the control joints (or as close as possible). Without relief a tile could pop or break a ways from the control joint and leave you scratching your head. With Ditra over concrete you would of used a non modified thin-set. Although I feel this is largely due to drying concerns.

Wait a solid two weeks before grouting (more with larger tiles)and at least a week after epoxy grout.

Tile is underrated and misunderstood!


Sent from my iPhone using Garage Journal


Thanks Derek! I was just checking out your floor last night and it looks spectacular.


Sent from my iPhone using Garage Journal
 
OP
R

rckymtnab

Well-known member
Joined
Jan 21, 2021
Messages
61
Location
Alberta
Last week I finished up the tile on the ‘first half’ of the garage, which set us up to try our hand at the epoxy grout over the weekend. I say ‘us’ because I had to recruit my wife to help wash down behind me. It was a great product to work with, I am really impressed. Definitely a two-person job to get through an entire pot of epoxy.

07e2a252b68765a9c2f7f15d4486e898.jpg


Now I need to get the lathe offloaded from my 62 before starting the next side of the garage.

6825a20c5525a07876e4209501517942.jpg


Sent from my iPhone using Garage Journal
 

Attachments

  • 6825a20c5525a07876e4209501517942.jpg
    6825a20c5525a07876e4209501517942.jpg
    188.2 KB · Views: 178
  • 07e2a252b68765a9c2f7f15d4486e898.jpg
    07e2a252b68765a9c2f7f15d4486e898.jpg
    177 KB · Views: 144

nadogail

Well-known member
Joined
Jan 23, 2009
Messages
31,940
Location
Coronado, CA
Welcome Aboard from Southwestern California. We get a few of your countrymen here when the want to escape the cold.
 
OP
R

rckymtnab

Well-known member
Joined
Jan 21, 2021
Messages
61
Location
Alberta
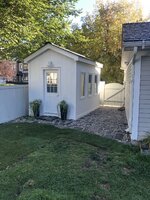
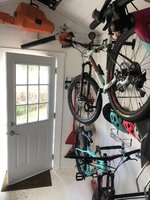
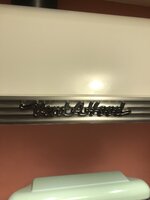
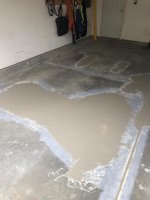
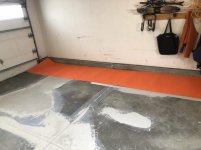
I finally finished the South side of the garage with epoxy grout, which thus (finally) enabled me to offload the heavy 10 lathe which has been sitting in the back of my ‘62.

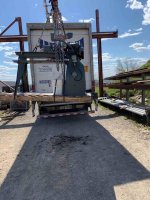
This was a job I had put some thinking behind. I used 700 lbs for shipping but I suspect this may have ignored the weight of the cast iron base. If anyone knows the weight of a South Bend Heavy 10 with cast iron pedestal please let me know!

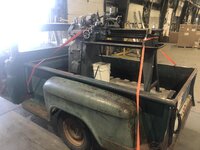
When I loaded this at the shipping depot I first had them load with the headstock at the back of the truck hoping to keep the heavy side more accessible for offloading. As many of you will guess - this bottomed out the suspension on my 62. I had the offload, spin 180, and load again with the headstock up by the cab. This did a much better job of distributing the load of the front and rear axles. My father-in-law tells stories of loading 2000 lb bulls into these half-tons with side rails, so I figured I was well within the capacity of the truck. My journey, mind you, had me driving through a city at highway speeds vs back roads and rural highways. Anyway the truck did its job perfectly, and I hardly even noticed the load.

IMG_0379.JPG

IMG_0381.JPG

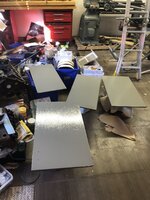
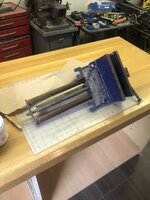
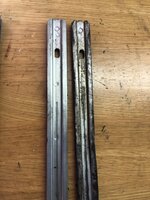
I had thought about several options to offload, but decided that ramps and rollers was the easiest in terms of equipment, running around sourcing things, and cost. I needed to buy some 3” angle and 2x10’s but these will be used for future projects so there isnt any regret cost. I also bought some 1-1/2” birch dowels. More on this later.

For those that are curious the pressure treated 2x10’s were $40 CAD each...ouch! [emoji30]


I did manage to scoop some free dunnage from the lumber shop which helped me block up my ramps.

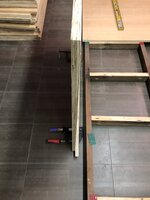
I backed into my garage apron which resulted in 18” drop over 8’ which is about 11 degrees.

183fd598516cfec715819b2d999726cc.jpg

I removed my tailgate and blocked up the ramps to arrest the suspension drop. I thought about jacking up the front of the truck and deflating tires onto axle stands but everything looked ok in terms of bed slope (slightly to rear) and stability.

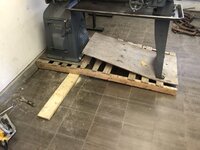
i used a pry-bar to lift the rear of the pallet and then pry up the headstock end to het my dowels places under the skid.

I wrapped the bed and pedestal with slings and used a 3,500 lb ratchet strap over the cab and under the truck to the frame. I was concerned with a “runaway” but also knew that at my ramp angle the tension here was approx 20% of the weight (so say 200 lbs).

IMG_0441.JPG
The lathe rolled down the bed of the truck beautifully despite my old, cracked, twisted, and rotten (original) pine deck boards.

One I dropped off the bed onto the ramp on the headstock I stalled out a bit. As I mentioned I chose birch dowels instead of steel. I did this because I was wanted to avoid chipping my tile with a drop or rolling over a leading edge with and lippage. Maybe this speaks to a weakness of tile floor, but in fairness I didnt put it to the test - and most likely I would not have had an issue.

Anyway as you will see my ramp didnt have any support in the middle and as the headstock rolled over onto the ramp I believe the dowels had some weight from the center 2x4 on the pallet that caused them to deflect...which halted my gravity powered motive force. IMG_0445.JPG

I had planned for this and rigged up a sling over some HSS square tubing that I placed across my man-door along with a come along. Now this is something that I was very careful with and really on tensioned up to “help” but primarily used my crowbar from the rear to get past this sticking point. When it moved, it MOVED and my safety strap did its job. From that point forward I would move in 6” increments and just push the lathe to get it rolling and then slow it down as it reached the end of my safety strap.

IMG_0448.JPG

IMG_0449.JPG

IMG_0451.JPG

And then let the kids have some fun while I cleaned up.

IMG_0454.JPG

Its nice to have the lathe in the garage and now I am getting started on the North end of the garage.


Sent from my iPhone using Garage Journal
 

Attachments

  • 183fd598516cfec715819b2d999726cc.jpg
    183fd598516cfec715819b2d999726cc.jpg
    258.5 KB · Views: 116
OP
R

rckymtnab

Well-known member
Joined
Jan 21, 2021
Messages
61
Location
Alberta
Epoxy vs Oak

I have been planning a 12’ built-in bech with cabinets top and bottom.

I have sourced some 1” lab-grade epoxy countertops I was planning to use for my main bench. Later I will build a welding desk(steel top) and wood working bench.

Today I came across 14’ of 3” oak bar from a restaurant.

IMG_0470.JPG

IMG_0471.JPGIMG_0472.JPG

IMG_0473.JPG

Any advice on material selection for my main bench?
 

layback209

New member
Joined
Jan 5, 2014
Messages
1
Oh man, that's a excellent work surface! I know you'd probably want to do something to get a nice clean finish. If it was me, I'm cheep BTW. I'd go with 4x4 fence posts for the structure (columns), then go from there, probably frame with 2x4 or something similar. Plywood for shelving, may even leave open with say two main lateral shelves. I'd tuck my little aircompressor on the bottom shelve. I'd also want to have it on castors to roll it around depending on the job at hand. Forgot I had an account here,

My 2cents.

The tile floor is really top notch, I'm interested to learn how it holds up after a freeze cycle. I like that your slab has crack panels. That is not common, or rather I haven't seen that often.

Cheers,

Derek
 

matt_i

Well-known member
Joined
Mar 14, 2008
Messages
10,725
Location
SE Michigan
I would think excellent results with the decoupling membrane underneath.

That 3" oak top is something truly special. I would build your bench from that. Could use welded steel undercarriage for rock-resistant (use X- or V- style welded bracing between the legs) construction.

Your ramps and rollers turned out better than any time I've used them, seems like the rollers all roll to a low point and then suddenly left with minimal support just when you don't want that. Now all you have to do is remove it from the pallet (!) Engine hoist (?) Or build a gantry for unloading more treasures :)
 
OP
R

rckymtnab

Well-known member
Joined
Jan 21, 2021
Messages
61
Location
Alberta
Thanks guys, good ideas!

I must admit when garage journal app disappeared my postings curtailed.

The garage floor is finished and I am really enjoying it. The other day I had a crank shaft drop on the floor and no damage whatsoever.

Over the summer I was able to get my shed built. I used a lot if recycled materials, including a fair number of free items. My total hard costs were about $2,000 CAD which is quite good given the material cost escalations this year.

Foundation: Ground disturbance and One Call completed first! I buried rough pressure treated 6x6 into the ground and backfilled gravel. Covered that with poly vapour barrier. 2x6 joists and 3/4 plywood floor. 2x4 framing, 2x6 rafters with a ridge beam; birds mouth cutout on these. Hurricane clips used as well. Sheeted the roof with 1/2” fir plywood. Wrapped the shed with Tyvek over the studs, then sided with LPsmartside (the siding is the sheeting, but I still have a water proof membrane. Inside, I insulated and then vapour barrier. I sided the inside with free hardwood flooring (a combination of engineered hardwood which was wide plank and solid maple). I added maple everywhere I wanted to screw brackets and hangers. The floor was also completed in 3/4” maple hardwood that I got for free and recycled by grinding off all the nails. On the roof I added a ridge vent, and there is. 1-2” space above the roof insulation for air to travel from the soffit to the ridge vent. Soffit and fascia is aluminum for zero maintenance.

The best part is the roof - Gem Euroshake black rubber roof - truly hail proof!!

Inside was painted white everywhere, and then I added a thick urethane coat to the floor. I trenched electrical from the garage but haven’t finished tying it in.

The shed is amazing, and most importantly- it is keeping the garage for doing the important things!
 

Attachments

  • 115091DF-61B4-40D3-8F4C-60AE760E5408.jpeg
    115091DF-61B4-40D3-8F4C-60AE760E5408.jpeg
    605.4 KB · Views: 171
  • 23B3827D-BCFF-46E8-B562-AF121CC4ACB6.jpeg
    23B3827D-BCFF-46E8-B562-AF121CC4ACB6.jpeg
    329.8 KB · Views: 167
  • F006967F-603D-433D-878B-48F975930A75.jpeg
    F006967F-603D-433D-878B-48F975930A75.jpeg
    332.7 KB · Views: 165
  • F67A58C6-0D43-4FAB-93DF-064599B050F0.jpeg
    F67A58C6-0D43-4FAB-93DF-064599B050F0.jpeg
    477 KB · Views: 192
OP
R

rckymtnab

Well-known member
Joined
Jan 21, 2021
Messages
61
Location
Alberta
With the shed done, I had a disaster in the garage. I had dangerous goat trails to navigate around piles of tools and mess. It has been slow and painful to get organized, which includes long deliberations on what to toss out and what to keep. I finally managed to get clean enough to start on a garage project and started with a decision to mount some Youngstown kitchen cabinets along the south wall. This is the “parking” side if the garage, so I have them up high where my wife’s car doors swing under. If you havent heard of Youngstown, its really cool stuff. Made in the 1950’s in Ohio. I had purchased these from a wonderful lady that had restored her whole kitchen to 50’s stylings - it was awesome - in fact I am going to post a few pictures of her kitchen.
 

Attachments

  • 6C1EFD49-8741-44D3-BCB4-481FBFB59831.jpeg
    6C1EFD49-8741-44D3-BCB4-481FBFB59831.jpeg
    265.5 KB · Views: 184
  • 8D21E319-325B-469E-9826-B0BCEE8AC123.jpeg
    8D21E319-325B-469E-9826-B0BCEE8AC123.jpeg
    224.2 KB · Views: 170
  • E830904F-7B3C-4674-930C-C0266C43A108.jpeg
    E830904F-7B3C-4674-930C-C0266C43A108.jpeg
    138 KB · Views: 162
  • 5B230E9F-0A92-4E2C-8812-9153134BA9F2.jpeg
    5B230E9F-0A92-4E2C-8812-9153134BA9F2.jpeg
    190.2 KB · Views: 164
OP
R

rckymtnab

Well-known member
Joined
Jan 21, 2021
Messages
61
Location
Alberta
I wanted to paint the cabinets up in “South Bend Grey” and I was able to use the info from https://www.practicalmachinist.com/vb/south-bend-lathes/south-bend-paint-color-update-236397/ to get a paint mixed up at Sherwin Williams. The US and Cad product lines are different and I couldnt get the same deep base, but overall I am happy with the product I used (alkyd urethane) and the colour.

My only real disappointment was that my blue painter’s tape ended up pealing off the lettering on the Youngstown logos.
 

Attachments

  • BFA6BEE0-79AA-429A-ACC0-F3BBB977647A.jpeg
    BFA6BEE0-79AA-429A-ACC0-F3BBB977647A.jpeg
    102.4 KB · Views: 158
  • 68CC7556-2D31-4DFA-94BD-F8562606637A.jpeg
    68CC7556-2D31-4DFA-94BD-F8562606637A.jpeg
    290 KB · Views: 152
  • 2EFB6927-E4D9-426A-AFA7-BE17928B79DA.jpeg
    2EFB6927-E4D9-426A-AFA7-BE17928B79DA.jpeg
    270.3 KB · Views: 142
  • A6EC201C-A933-47FB-B5FA-5507A7B00ECF.jpeg
    A6EC201C-A933-47FB-B5FA-5507A7B00ECF.jpeg
    191 KB · Views: 139
  • DBA8EFCC-3623-4572-A538-960156B071FD.jpeg
    DBA8EFCC-3623-4572-A538-960156B071FD.jpeg
    188.3 KB · Views: 138
  • 6C6721C7-2123-4263-A9C9-D05FF398EA7A.jpeg
    6C6721C7-2123-4263-A9C9-D05FF398EA7A.jpeg
    163.8 KB · Views: 130
  • E3F84B5E-51A0-417E-AABF-762DCEECB810.jpeg
    E3F84B5E-51A0-417E-AABF-762DCEECB810.jpeg
    176.5 KB · Views: 148
OP
R

rckymtnab

Well-known member
Joined
Jan 21, 2021
Messages
61
Location
Alberta
Its been a busy fall but I ended up getting out chasing pheasants with some new friends. Winston, my dog, did a great job for a lazy ol’ boy. He flushed the only two roosters of the day but unfortunately I was in a bad position and didnt get a good shot. A perfect day though, just gorgeous.
 

Attachments

  • E8C2AA80-CEE7-4F78-A07E-F52FE0ADED79.jpeg
    E8C2AA80-CEE7-4F78-A07E-F52FE0ADED79.jpeg
    457.4 KB · Views: 137
  • C430937E-2197-48A8-BC09-F47858A2B6F9.jpeg
    C430937E-2197-48A8-BC09-F47858A2B6F9.jpeg
    657.9 KB · Views: 126
  • D6167A2F-475F-4E01-BAAB-BBE299F0F81D.jpeg
    D6167A2F-475F-4E01-BAAB-BBE299F0F81D.jpeg
    324.3 KB · Views: 134
To avoid these ads, REGISTER NOW!
OP
R

rckymtnab

Well-known member
Joined
Jan 21, 2021
Messages
61
Location
Alberta
I have been watching for a nice drill press vise for my South Bend press and I finally decided to pull tje trigger on this Starrett 913 1/2. I need to do some clean up and repair some drill tracks but its a great vise. Its a quick release and the threads are clean, and intact. Lots of bite and it clamps down tight.

Unfortunately I have not been able to find much info online about these, and would appreciate any info from the GJ community.

I also managed to finally date my Heavy 10 thanks to the gents over on the South Bend Facebook page - 1956.

To any interested parties this was the key:


Merry Christmas and Happy New Year!
 

Attachments

  • 4BB7BFD4-D2E8-4072-BF98-3BA4E79D84FB.png
    4BB7BFD4-D2E8-4072-BF98-3BA4E79D84FB.png
    598.1 KB · Views: 100
  • 8E15E051-C9EF-4D16-B7CD-72AECFEC2C80.jpeg
    8E15E051-C9EF-4D16-B7CD-72AECFEC2C80.jpeg
    265.4 KB · Views: 87
  • 0A4CEFA9-A9CD-4337-B3E5-5D717288BE70.jpeg
    0A4CEFA9-A9CD-4337-B3E5-5D717288BE70.jpeg
    241 KB · Views: 113
OP
R

rckymtnab

Well-known member
Joined
Jan 21, 2021
Messages
61
Location
Alberta
Over holidays I was able to get some organization done, and start placing some equipment - including my newly acquired South Bend metal shaper! Here is the lathe coming off the pallet (someone had asked what I was going to do). Working solo I cut out the middle and then slowly replaced with sequentially smaller blocks just using my long pry bar.
 

Attachments

  • EDAA5D83-476F-4726-8BAC-8CBAA11412A3.jpeg
    EDAA5D83-476F-4726-8BAC-8CBAA11412A3.jpeg
    263.4 KB · Views: 90
  • 0C3C3BD8-99CF-4F90-90A5-32627366EB36.jpeg
    0C3C3BD8-99CF-4F90-90A5-32627366EB36.jpeg
    252.4 KB · Views: 74
  • 66D9A9CE-A056-4281-B376-90A514F7CB12.jpeg
    66D9A9CE-A056-4281-B376-90A514F7CB12.jpeg
    253.8 KB · Views: 73
  • 291C5453-F4EA-4B8F-8AA5-854244586D06.jpeg
    291C5453-F4EA-4B8F-8AA5-854244586D06.jpeg
    233.8 KB · Views: 77
  • 915BBD3D-432A-45A4-8AA7-AED4459A7C25.jpeg
    915BBD3D-432A-45A4-8AA7-AED4459A7C25.jpeg
    237.7 KB · Views: 98
OP
R

rckymtnab

Well-known member
Joined
Jan 21, 2021
Messages
61
Location
Alberta
Here is the metal shaper and slightly more organized garage.
 

Attachments

  • E096E2E0-90C3-4C95-893F-5DF25DA22F76.jpeg
    E096E2E0-90C3-4C95-893F-5DF25DA22F76.jpeg
    297.8 KB · Views: 99
  • 6F3C24FA-7C6D-4D17-9C18-0DB69B5E78E4.jpeg
    6F3C24FA-7C6D-4D17-9C18-0DB69B5E78E4.jpeg
    237.3 KB · Views: 106
OP
R

rckymtnab

Well-known member
Joined
Jan 21, 2021
Messages
61
Location
Alberta
And finally I started construction on a bench that will essentially be an island and also house three Beach toolboxes. My garage floor was slopes substantially to the overhead door so levelling my base will require some work. I started by ripping these old fir 2x4’s that I had salvaged from a local demo and used in the shed.

The plywood I just acquired from a local guy that had about 200 sheets. It was used in shipping apple juice apparently…it has 16 plys and is 7/8” thick. I bought about 20 sheets for $10 per sheet and will use it for my various garage cabinets.
 

Attachments

  • 0853D766-101E-49BD-9349-F06870097554.jpeg
    0853D766-101E-49BD-9349-F06870097554.jpeg
    207.7 KB · Views: 95
  • 4D2252DE-80E2-40B6-9435-A0B18EA7B170.jpeg
    4D2252DE-80E2-40B6-9435-A0B18EA7B170.jpeg
    238.7 KB · Views: 77
  • 24160EF0-6ED1-42A4-B61A-22EBA1F41663.jpeg
    24160EF0-6ED1-42A4-B61A-22EBA1F41663.jpeg
    244.9 KB · Views: 80
OP
R

rckymtnab

Well-known member
Joined
Jan 21, 2021
Messages
61
Location
Alberta
Although not exactly the normal way to build cabinets I wanted to do some additional levelling and so I placed shims and then PL300 and set the base sheets in place. This has me very close to perfect and I will do a final shim if needed on the oak slabs when they are placed.
 
OP
R

rckymtnab

Well-known member
Joined
Jan 21, 2021
Messages
61
Location
Alberta
Making progress when I can find time to get to the garage.

I am really trying to ensure accurate and level boxes. The sloping garage floor has made this a but of extra work - but so far so good!
 
Last edited:
OP
R

rckymtnab

Well-known member
Joined
Jan 21, 2021
Messages
61
Location
Alberta
I have been progressing on the bench.

DD67386D-C21D-4BB5-B5CA-280B5ABCE405.jpeg

This bar came in two pieces and I needed to splice in a small piece to fit the cabinet. there was an existing biscuit I reused with glue.
85001CB9-023F-4E8A-869B-C643E1D09078.jpeg
 
OP
R

rckymtnab

Well-known member
Joined
Jan 21, 2021
Messages
61
Location
Alberta
And then shifted gears to cleaning up this Record 52-1/2 vise to het mounted.
 

Attachments

  • 05777677-58B3-4828-8D1E-01E1EF577863.jpeg
    05777677-58B3-4828-8D1E-01E1EF577863.jpeg
    269.6 KB · Views: 62
  • 17F01629-3254-4F89-AABF-5178EB2C73FA.jpeg
    17F01629-3254-4F89-AABF-5178EB2C73FA.jpeg
    242.4 KB · Views: 65
OP
R

rckymtnab

Well-known member
Joined
Jan 21, 2021
Messages
61
Location
Alberta
Now that my bench is done I stared cleaning up a couple of old Beach tool boxes that I have been acquiring for this project. Its amazing how dirty tool boxes can get, and it was a lot more work than I was expecting.

I removed all the drawers and cleaned everything.

After researching I decided to try canning wax instead of grease or oil. After all the cleanup I see the merit of a dry wax. Initial impressions are positive. I still have one box on grease (it came from an aircraft mechanic and was really well taken care of).
 

Attachments

  • 5EF4E90C-17E6-4C8B-AB32-03480BA4B3D3.jpeg
    5EF4E90C-17E6-4C8B-AB32-03480BA4B3D3.jpeg
    174.5 KB · Views: 48
  • CF6DF289-A1B2-4CA7-A168-B7AD40353C04.jpeg
    CF6DF289-A1B2-4CA7-A168-B7AD40353C04.jpeg
    232.3 KB · Views: 42
  • 76A7E4E5-9761-4CF1-8DEB-7BE7873374DD.jpeg
    76A7E4E5-9761-4CF1-8DEB-7BE7873374DD.jpeg
    272.5 KB · Views: 41
  • 0A37471A-818D-4591-B6DC-0C2A23C4AFDA.jpeg
    0A37471A-818D-4591-B6DC-0C2A23C4AFDA.jpeg
    347.8 KB · Views: 45
OP
R

rckymtnab

Well-known member
Joined
Jan 21, 2021
Messages
61
Location
Alberta
I got a kick out of the old Canadian Airlines stickers on this box.
 

Attachments

  • 552DE160-DE5B-40CE-B39A-C04B9461678F.jpeg
    552DE160-DE5B-40CE-B39A-C04B9461678F.jpeg
    212 KB · Views: 45
  • 607283EC-95ED-4BDD-8004-EEF49AE663E3.jpeg
    607283EC-95ED-4BDD-8004-EEF49AE663E3.jpeg
    203.9 KB · Views: 68
OP
R

rckymtnab

Well-known member
Joined
Jan 21, 2021
Messages
61
Location
Alberta
I set up my South Bend drill press to drill out some 3/4” holes for bench dogs.
 

Attachments

  • 0DE9DA80-14C8-45F7-90E9-35AD5A18BAD0.jpeg
    0DE9DA80-14C8-45F7-90E9-35AD5A18BAD0.jpeg
    257.9 KB · Views: 67
  • 427B6A6A-F615-4F4B-9314-29912D61CCD2.jpeg
    427B6A6A-F615-4F4B-9314-29912D61CCD2.jpeg
    232.9 KB · Views: 66
  • FE7CBD62-1F3E-4E75-B779-DE98C318D105.jpeg
    FE7CBD62-1F3E-4E75-B779-DE98C318D105.jpeg
    234.1 KB · Views: 101
OP
R

rckymtnab

Well-known member
Joined
Jan 21, 2021
Messages
61
Location
Alberta
And finally! More work to do but everything has finally ben put in position. I screwed the boxes down to the cabinet bases and this bench is solid. And I do mean solid!
 

Attachments

  • AA2BAE76-CECE-4AE4-AE26-D4A3475BDF52.jpeg
    AA2BAE76-CECE-4AE4-AE26-D4A3475BDF52.jpeg
    240.4 KB · Views: 122

tool_scrounge

Well-known member
Joined
Jul 20, 2010
Messages
4,179
Location
Southern California
Canning wax = paraffin wax I believe. Snap-on recommended using that on their tool box friction drawer slides and i have found it to work quite well. It works best if you clean off all the old lube first.
 
OP
R

rckymtnab

Well-known member
Joined
Jan 21, 2021
Messages
61
Location
Alberta
Yes exactly tool_scrounge, I read that here and tried it. Its nice and clean, and easy to apply. I still have one box on grease to compare.
 
OP
R

rckymtnab

Well-known member
Joined
Jan 21, 2021
Messages
61
Location
Alberta
Thanks 67carguy!

I have not posted in a while and have been busy the last several weekends driving around southern alberta.

I recently purchased a ton of machining items from a retired machinist and ended up with these european tool holders. If anyone is interested in them let me know. I currently have them posted on kijiji in Calgary and might eventually sell on ebay.


Attachments

  • 1EE8EC78-D9E0-40D5-9739-CDC9FE7B5F16.jpeg
    1EE8EC78-D9E0-40D5-9739-CDC9FE7B5F16.jpeg
    270 KB · Views: 85
  • 44A5F533-344D-41D6-ADF3-4FC91D8FD460.jpeg
    44A5F533-344D-41D6-ADF3-4FC91D8FD460.jpeg
    135.7 KB · Views: 50
  • 5784D761-702F-48FD-92E0-639C6E22587E.jpeg
    5784D761-702F-48FD-92E0-639C6E22587E.jpeg
    247 KB · Views: 67
OP
R

rckymtnab

Well-known member
Joined
Jan 21, 2021
Messages
61
Location
Alberta
I needed to make some simple parts for my bench so I did a quick clean and oil and started using my Heavy 10 for the first time!
 

Attachments

  • 675F45A5-82ED-444D-A5E0-43C2231CF62F.jpeg
    675F45A5-82ED-444D-A5E0-43C2231CF62F.jpeg
    341.9 KB · Views: 64
OP
R

rckymtnab

Well-known member
Joined
Jan 21, 2021
Messages
61
Location
Alberta
I made a couple nice brass pins but decided to save them for something else. This long level will be tucked up out if site so I turned some nylon pins instead. Its nice to get something hung. I then pulled apart my watch only to realize I had the wrong battery. Damn.
 

Attachments

  • 5BA53BA3-1D4A-46EF-9870-F58D82CDA8D2.jpeg
    5BA53BA3-1D4A-46EF-9870-F58D82CDA8D2.jpeg
    351.1 KB · Views: 59
  • 8D2B0F1A-12B5-43FD-9FC1-240321FD489B.jpeg
    8D2B0F1A-12B5-43FD-9FC1-240321FD489B.jpeg
    261.3 KB · Views: 53
  • 863FE44B-9C0F-4262-B848-E217F7114BB9.jpeg
    863FE44B-9C0F-4262-B848-E217F7114BB9.jpeg
    302 KB · Views: 57
OP
R

rckymtnab

Well-known member
Joined
Jan 21, 2021
Messages
61
Location
Alberta
Today I picked up a Versa Vise at a used tool shop in town. Its a neat little vise and I am hoping I can find a way to use it in the garage.
 

Attachments

  • FA9B26D3-7035-49F9-9313-9841DEA874AD.jpeg
    FA9B26D3-7035-49F9-9313-9841DEA874AD.jpeg
    186.5 KB · Views: 49
  • FECED2AF-0749-4B29-B8F9-FEE74DA4818E.jpeg
    FECED2AF-0749-4B29-B8F9-FEE74DA4818E.jpeg
    216.5 KB · Views: 35
  • 04DC903A-8375-49C2-BFEF-860EF68E43CF.jpeg
    04DC903A-8375-49C2-BFEF-860EF68E43CF.jpeg
    248.7 KB · Views: 94
OP
R

rckymtnab

Well-known member
Joined
Jan 21, 2021
Messages
61
Location
Alberta
Yesterday I managed to get some time in the garage between hanging curtains and riding bikes with mg kids. 9C2F1B07-024C-41B1-A09B-C9AB1A82067A.jpeg

The left bay is is open and will be home for an engine I hope to rebuild. The middle cabinet will be for parts, and the box on the right will be something of a catch-all for various tools that are awkward to store but used often enough that I want reasonable access; I haven’t decidedly between folding doors on a cupboard with hangers inside, or a pull out drawer with a center pillar and tools on both sides. I am leaning toward the latter so as to avoid a deep, dark, chasm where things get shoved in.

Everything else is looking good and I am excited to get my Wilton bullet vise mounted on this cabinet soon!
 
To avoid these ads, REGISTER NOW!
Top Bottom