To avoid these ads, REGISTER NOW!

Hein Werner 2Ton?

roblouvasz

Well-known member
Joined
Nov 12, 2011
Messages
1,314
Location
Somewhere between the end of the line and the midd
I was hoping someone out there can help me identify this old Hein Werner. I recently got this from my grandfather. I remember using this jack when I was about 12-14 years old (I'm 43 now) in his tire shop. There's no ID tag on it just "2 TON". I need to find a rebuild kit for it or have it professionally rebuilt. It barely lifts. I checked the fluid level and it seems OK. I know these are good jacks. I think it may be as old as I am! Thanks, Rob.
 

Attachments

  • 005.jpg
    005.jpg
    157.1 KB · Views: 126
  • 006.jpg
    006.jpg
    155.4 KB · Views: 99
  • 009.jpg
    009.jpg
    152.5 KB · Views: 87
To avoid these ads, REGISTER NOW!
OP
R

roblouvasz

Well-known member
Joined
Nov 12, 2011
Messages
1,314
Location
Somewhere between the end of the line and the midd
Thanks for the replies. I'm going to check around my area to find out how much it would cost to fix it. I did find a rebuild kit from a company in Ohio for 100.00. But I'm not sure if it would be new parts or N.O.S. that's been sitting on the shelf for over 30 years. If I decide to attempt a rebuild myself, I'll keep everyone posted. (and yes I'll post pictures!) Any advice would be appreciated. Rob.
 
OP
R

roblouvasz

Well-known member
Joined
Nov 12, 2011
Messages
1,314
Location
Somewhere between the end of the line and the midd
Hi everyone. I finally got around to disassembling the Hein-werner. As you can see in the photos, there is a tear in the cup seal on the ram. I believe the material is leather. I checked the Hein-werner site to see how this assembly is held together. I think the retainer is held in place by "mushrooming" the one end of the piston. What I don't know is how the piston is held onto the ram. I'm going to check with Hein-Werner to see if just these parts are available unless one or more of the Garage Journal Gurus have any other thoughts. I going to see if I can load bigger photos other than thumbnails. If I can't, someone please tell me what I'm doing wrong. Thanks, Rob.
 

Attachments

  • 004.jpg
    004.jpg
    136.2 KB · Views: 119
  • 003.jpg
    003.jpg
    145.4 KB · Views: 112
  • 001.jpg
    001.jpg
    141.8 KB · Views: 109

Hiball

Well-known member
Joined
Apr 30, 2009
Messages
14,027
Location
Missery
Hi everyone. I finally got around to disassembling the Hein-werner. As you can see in the photos, there is a tear in the cup seal on the ram. I believe the material is leather. I checked the Hein-werner site to see how this assembly is held together. I think the retainer is held in place by "mushrooming" the one end of the piston. What I don't know is how the piston is held onto the ram. I'm going to check with Hein-Werner to see if just these parts are available unless one or more of the Garage Journal Gurus have any other thoughts. I going to see if I can load bigger photos other than thumbnails. If I can't, someone please tell me what I'm doing wrong. Thanks, Rob.

Hein Werner wont be able to Assist you, They No longer Support the Older Models. On some of those Old Hein Werner Jacks, They did use a Washer that was then Staked to prevent them from coming off. I guess im not following what your asking in regards to: "How the Piston is held onto the Ram".

Steven
 

Hiball

Well-known member
Joined
Apr 30, 2009
Messages
14,027
Location
Missery
I guess I need to know do I have to replace the piston, seal and retainer or just the seal? The bigger question would be-is this kind of seal still available or am I just wasting my time?

The Seal is still Available.. PM sent
 

GeorgiaHybrid

Well-known member
Joined
Sep 9, 2008
Messages
3,763
Location
Extreme NW Georgia
You are talking to a guy that rebuilds jacks and has since he was in short pants next to his grandpa. He also supplies a LOT of us on here our rebuild kits. I think he can help....
 

cubfarm 1

Well-known member
Joined
Jan 16, 2011
Messages
190
Save the jack,,, you will thank yourself. I do jacks for a living and can learn from HIBALL.
 
OP
R

roblouvasz

Well-known member
Joined
Nov 12, 2011
Messages
1,314
Location
Somewhere between the end of the line and the midd
I'm hoping I can save the jack. Because of what I've learned on this forum, rebuilding older jacks is cool, chinese jacks are junk and a 2 ton Milwaukee is a bit out of my price range let alone a 4 ton Milwaukee. When I get through getting this HW working again, I have Joyce 4 ton long body I'm going to start a new thread on. (And yes there will be photos!).
 
OP
R

roblouvasz

Well-known member
Joined
Nov 12, 2011
Messages
1,314
Location
Somewhere between the end of the line and the midd
Here's some more shots of the leather seal removed from the ram. Also I found some rust/corrosion on the top of the inside cylinder (the pump body is upside-down on the bench. It doesn't seem to be pitted so I'd like to know what would be the best way to remove the rust? Could it be honed with a brake cylinder hone tool or what? And should I attempt to remove the cylinder from the pump body? I believe there is a seal at the base of the cylinder that most likely needs to be replaced. Soon I'll be disassembling the valve body. I'll keep everyone posted.
 

Attachments

  • 005.jpg
    005.jpg
    147.8 KB · Views: 88
  • 007.jpg
    007.jpg
    106.6 KB · Views: 76
  • 008.jpg
    008.jpg
    104.3 KB · Views: 71

Hiball

Well-known member
Joined
Apr 30, 2009
Messages
14,027
Location
Missery
Here's some more shots of the leather seal removed from the ram. Also I found some rust/corrosion on the top of the inside cylinder (the pump body is upside-down on the bench. It doesn't seem to be pitted so I'd like to know what would be the best way to remove the rust? Could it be honed with a brake cylinder hone tool or what? And should I attempt to remove the cylinder from the pump body? I believe there is a seal at the base of the cylinder that most likely needs to be replaced. Soon I'll be disassembling the valve body. I'll keep everyone posted.

I Very Seldom change out those Cut Gasket/Oring seals on the Cylinder where it screws into the Block. I cant really tell by the Picture if that is just surface rust or Heavy Pitting, Its possible to clean up some imperfections with a Hone but you need very fine stones with the intentions of not trying to remove alot of Metal, Its really a case by case basis. Can you see any big gauges on the Ucup? Possibly where it was rubbing against the Upper imperfections? Alot of unknowns for me to make a call either way. Are the imperfections Far enough up the cylinder where its not gonna cause a problem etc...
 
OP
R

roblouvasz

Well-known member
Joined
Nov 12, 2011
Messages
1,314
Location
Somewhere between the end of the line and the midd
I'm not sure I understand 'big gauges on the Ucup' Hiball. If you mean the metal Ucup that holds the leather seal on the piston then no I don't think it was coming in contact with the cylinder wall. The rust you see in the photo goes about 1/2-3/4 of the way into the cylinder. From what I can see, it just looks like surface rust. I'll take a closer look tomorrow with a magnifier. Thanks.
 

Hiball

Well-known member
Joined
Apr 30, 2009
Messages
14,027
Location
Missery
I'm not sure I understand 'big gauges on the Ucup' Hiball. If you mean the metal Ucup that holds the leather seal on the piston then no I don't think it was coming in contact with the cylinder wall. The rust you see in the photo goes about 1/2-3/4 of the way into the cylinder. From what I can see, it just looks like surface rust. I'll take a closer look tomorrow with a magnifier. Thanks.

I meant gouges.. Sorry my phone is smarter than me. If the imperfections turn out to be rougher than you think, you still might be ok as long as they are above the actual working area of the seal.
 
Last edited:

EDGAR

Well-known member
Joined
Aug 21, 2010
Messages
437
I believe that the gouges Hiball is refering to are the the dark straight lines going into the cylinder. In the photo you can see two set of those. If these are too deep, you may have problems with the u-cup sealing when it goes over them.

As for the "gouges on the u-cup" part, it means if the gouges cut the u-cup sealing edge or left any mark on the sealing edge that could affect sealing. Anyway, a new u-cup will not seal properly if the gouges are too deep. In this case you may need to fill the gouges, either with epoxy or with one of the super glues (preferred) after cleaning the cylinder with acetone or lacquer thinner (used to paint cars) and them hone the cylinder to get an even surface. If the gouges are not to deep, you may get away with a good honing. Usually what happens is that the metal part behind the u-cup drags some metal particles that got into the cylinder somehow. These metal particles, which get caught between the cylinder wall and the metal part, then make the gouges up and down the cylinder wall. Of course, in your case they could be just dirt, or o-ring particles, that were dragged along the cylinder therefore leaving those marks.

By the way, if you are going to hone with a car cylinder hone, you need fine stones, the common 220 grit will not do as they leave a cross etched surface suitable only for car engine cylinders but not for hydraulic cylinders. Hydraulic cylinders require a polished surface as the u-cup runs compressed against the cylinder wall while lifting a load. A polished surface in this case means no scratches or cross hatching on the cylinder wall, otherwise, the u-cup will wear much faster than expected.

There is another way to polish the cylinder and it involves the use of a tube, or pipe, of an outside diameter slightly smaller than the inside diameter of the cylinder. To this tube you tape a piece of fine wet and dry sandpaper using two inch masking tape and the sandpaper should go around the tube at least a turn and a half. You could start by using a 320 grit wet and dry sandpaper for a firts pass, subsequent passes can be done with finer grit. The tube can be turned either by hand or, if you can attach a mandrel to the tube, you can use a low speed drill to spin the tube. Move the polishing tube in and out while spinning the tube. The cylinder should be in a horizontal position so that nothing flows into the pump body if the cylinder was not removed from the pump body.

To regulate the tension the sand paper applies to the cylinder, you have to cut several pieces of either paper or acetate, and put them under the sandpaper as needed. Do not put too many papers under the sandpaper as this may cause the tube to jam inside the cylinder; use just enough to apply a moderated tension to the sandpaper to do the polishing. Several passes may be required, so clean after each pass and check the progress. Under no circunstance let the sandpaper touch the floor or the work bench surface as it can pick up dirt or grit and ruin the finnish inside the cylinder, so hold the polishing tube in a way that it does not touch anything. Wet the sandpaper with water instead of oil so if you need to fill the gouges a little more with the filler of your choice, you don't have to clean again the cylinder wall with a solvent. When finnished, oil the cylinder wall right away.

See below where the gouges are located.
 

Attachments

  • GOUGES.JPG
    GOUGES.JPG
    77.5 KB · Views: 52
Last edited:
To avoid these ads, REGISTER NOW!
OP
R

roblouvasz

Well-known member
Joined
Nov 12, 2011
Messages
1,314
Location
Somewhere between the end of the line and the midd
Thanks for the response Edgar. I plan on removing the cyclinder from the pump block. Should I run a hone through the cylinder first to remove the worst of it and then the fine sandpaper or just start with the sandpaper? I'm going to back to the disassembly sometime soon. I'll keep everyone posted.
 

Hiball

Well-known member
Joined
Apr 30, 2009
Messages
14,027
Location
Missery
Thanks for the response Edgar. I plan on removing the cyclinder from the pump block. Should I run a hone through the cylinder first to remove the worst of it and then the fine sandpaper or just start with the sandpaper? I'm going to back to the disassembly sometime soon. I'll keep everyone posted.

How far you go depends on how bad (deep) the grooves are, remember if the damage is substantial you should look into filling versus removing metal. Remember... While that stock ucup can conform to a slight change in cylinder size, don't expect to remove lots of metal without changing a few things. Have you verified that the damage is even in the cylinder working area? "If" the damage is above where the sealing surface is, I wouldn't even mess with it.
 
OP
R

roblouvasz

Well-known member
Joined
Nov 12, 2011
Messages
1,314
Location
Somewhere between the end of the line and the midd
The pitting is almost down to where the cylinder meets the pump block. So yes the damage/pitting is where the sealing surface is for the Ucup. I'm going to measure the inside diameter before and after honing/polishing. If there's too much metal removed, I'll let you know and maybe you can advise me on what can be done next. If the cost to rebuild this jack gets too great, I'll have to see about purchasing a new jack, probably a Norco.
 

Hiball

Well-known member
Joined
Apr 30, 2009
Messages
14,027
Location
Missery
The pitting is almost down to where the cylinder meets the pump block. So yes the damage/pitting is where the sealing surface is for the Ucup. I'm going to measure the inside diameter before and after honing/polishing. If there's too much metal removed, I'll let you know and maybe you can advise me on what can be done next. If the cost to rebuild this jack gets too great, I'll have to see about purchasing a new jack, probably a Norco.

I might have a good used cylinder if all else fails... And can have any size made as far as that goes, unfortunately that is $$$$.
 

EDGAR

Well-known member
Joined
Aug 21, 2010
Messages
437
As Hiball mentioned, if the pitting is too deep, you will have to remove too much metal just to get to an even surface, if you are not planning to fill the pits. For this reason, filling the pits is the best solution in this case.

If you decide to fill, you really do not need to hone the cylinder first, but you have to remove as much rust in the pits as possible by either using a wire brush that fits the cylinder diameter or by using a small diameter wire wheel. I have done this by using a spare drill chuck, either a 1/4" or a 3/8", and mounting it on a long bolt having the appropiate thread size and cutting the bolt's head so it becomes like an extension. I mount this extended chuck in my drill and pass the wire wheel up and down inside the cylinder in the same way one would pass a regular honing tool. I prefer this method as it is faster and removes more rust than doing it by hand with a wire brush. In your case, the pitting is on one side of the cylinder so you may try to apply a little more force in that particular section.You really don't want to fill over rust scale that can become loose later.

I prefer to fill with Super Glues ( cyanoacrilates ) as they behave like a plastic (acrylic) and they are easier to sand than epoxy. To spread the filler inside the cylinder, use Q-tips or similar swabs, but preferably made of synthetic materials as cotton reacts with cyanoacrilate and the swabs get hot. Just spread or, if you prefer, dab the glue over the pits and let it harden but be absolutely sure that it has hardened completely as it may harden first on the surface before hardening below the surface if the coating applied is too thick. By the way, water hardens the super glues almost instantly. Cyanoacrilates harden because of the humidity, or moisture, on the surface being glued, that is why it glues the fingers so well. So some humidity in the cylinder may be desired before applying the filler super glue. Try not to fill the pits right after you clean the oil with acetone or lacquer thinner. Let it sit a while or maybe blow into the cylinder a couple of times to give it just a little humidity. Do not get the cylinder wall wet just to give it some humidity as the glue will harden on any water left there and not stick to the surface.

If you use the thin liquid type, it will take several applications. If you use the gel type, you can do it in less applications. I myself prefer the thin type over the gel as it may dry or harden faster and better than the gel. The important thing is to put enough so that you don't need to reapply after you start sanding. So check the height of the filler; make sure it is just slightly proud of the good metal surrounding it.

Start sanding with wet or dry 320 grit sandpaper. Use water to wet the sandpaper. Depending on how much filler glue applied, you may do one or two passes with this grit, more if really needed but not just to finnish faster. Change to a 400 grit wet or dry sandpaper and do a few more passes, followed by a few more passes with 500 or 600 grit paper until you see that the filled portion is even with the surrounding metal. In the last passes, you may want to leave the partly worn sandpaper on the polishing tube as this will give a better finnish; do not use a new sandpaper for the last pass as it will leave some scratches. It is better to wear out the sandpaper a little. And remember, do not let the sandpaper touch any surface other than the inside cylinder wall as it may pick up dirt or grit and ruin the surface finnish. Inspect the sandpaper before each use and clean the sandpaper if you suspect any contamination with dirt. Also, do not use any household or general use cleaners to remove the oil inside the cylinder before applying the filler, as these cleaners may contain carnauba wax. Carnauba wax is not easily removed with acetone or lacquer thinner.

Try not to leave glue over the good metal, the sanded filler should just cover the damaged area. This method does not removes too much metal as you are sanding with fine sandpaper and the filler sands faster than the metal. The surface should show no scratches and it should reflect, almost like a mirror, any object that you put under or close to the cylinder inner wall. Beware, you don't want a perfectly polished surface either, just close to one, as a perfectly polished surface does not retain oil on the surface, oil will bead and run off just like water does on a waxed car surface. Some oil retention is needed on the cylinder wall and an almost perfectly polished surface will retain enough oil.

Do not use an engine hone with the super glue as it might tear the glue out.

Properly done this method works well but remember to clean all the oil inside the cylinder as well as the rust in the pits. After you finnish all the sanding, and if you don't plan to refill any pits, oil the cylinder surface right away to prevent flash rust.

As general information, it is possible to have an u-cup made to any particular size. Also, if anyone wanted to increase the diameter of a metal part, for example, the part that sits behind the u-cup, ( in case the cylinder's inside diameter was slightly increased by heavy honing) one could do it with thermal spraying, were molten metal is sprayed on the surface while the part is turning, much like the way crankshafts are rebuilt, and then the surface can be machined to the required diameter. But this may not be cheap. Anyone interested may check "Thermal spray" on Youtube as there are some videos of this repair or reconditioning method shown there.
 
Last edited:
OP
R

roblouvasz

Well-known member
Joined
Nov 12, 2011
Messages
1,314
Location
Somewhere between the end of the line and the midd
Excellent advice Edgar! I will definitley try that method. What about using a "rust remover" such as POR15's metal conditioner or the rust remover that comes with T9 Boeshield. Also is lacquer thinner OK for cleaning before applying the super glue gel? It will be some time before I can get to it, but I will keep everyone posted. Thanks!
 

EDGAR

Well-known member
Joined
Aug 21, 2010
Messages
437
Do you mean using rust removers instead of removing the rust with a wire brush or using the rust remover after using the wire brush? I would prefer to remove as much rust as possible before applying the super glue.

As for rust remover, the basic rust remover is Phosphoric acid which "converts" rust to a black ferric phosphate. I would try to remove as much of this black phosphate as possible as it could become loose over time and the super glue would be sticking to this black phosphate. Unless you are planning to use one of those rust removers that state that the product will remove all the rust from the surface after several applications, by itself, without any wire brushing, you may have to wire brush the surface a little or a lot, depending on the severity of the rust. I read, on the Boeshield web page, that the "Boeshield RUST FREE" supposedly removes all the light rust with several applications but you still have to scrub heavy rust to remove it. Do not use the "Boeshield T9" as it has waxes and lubricants.

As for POR15, it seems to be more of a permanent coating, like paint, than a rust remover. I don't know if super glues will stick to it.

If you plan to use any type of rust remover, you have to be certain that it does not contain any wax or lubricant in its formulation. The issue of applying any type of rust remover is that you don't know if it will leave any residue that may prevent the super glue from sticking to the surface. If you decide to use a rust remover, wash the surface afterwards with water to remove any rust remover residue. Also, it would be a good idea to clean the cylinder with lacquer thinner (not enamel reducer) after cleaning with water, just to be on the safe side. You may use any type of small brush, like a tooth brush, to help remove the oil from inside the pits when using the lacquer thinner. When cleaning the cylinder with lacquer thinner it is better to use more than less just to be sure that the surface is completely oil free.

I forgot to mention on my previous post that if the sanding is done correctly, meaning that you can feel some resistance to spin from the polishing tube, the cylinder will get warm. Try to make each pass in as little time as possible, like 10 to 20 seconds, depending on how much resistance you feel fron the sandpaper as the water used to lubricate the sandpaper will dry in a short time and you don't want to get the cylinder to hot. If the cylinder gets too warm, stop, remove the polishing tube and let it cool down for a couple of minutes. If the polishing tube spins too freely, you are not doing much sanding. Always clean the cylinder and the sandpaper after each pass to remove the material previously removed by sanding. To clean the cylinder after each pass, you can use clean paper towels.

As general info, there is a product sold by the auto paint stores called PREPSOL, which is used to remove waxes and silicones.
 
Last edited:

Hiball

Well-known member
Joined
Apr 30, 2009
Messages
14,027
Location
Missery
Question for Edgar? I haven't seen a real good picture of how extensive the damage is in on this cylinder but based off a couple of the pictures it looks fairly wide spread. I have in the past filled small blemishes with a 2 part epoxy that a guy from NY turned me onto years ago, I will admit I've had limited success with doing this. I've never used "Superglue", but I will store that in the back of my memory bank. I guess from a rebuilding standpoint and more importantly having to stand behind your work, where do yo personally say "Enough is Enough"? I generally try a live by the "K.I.S.S Principle" and while a lot of factors go into to deciding on how much to invest into a Jack, and more importantly how are my repairs Gonna hold up down the road. In the OP's case based of the limited information I have, here's what I see.

1. Seal used? Leather Ucup, this material doesn't dominate the marketplace in ucup form so finding a Oversized seal or having a company that is willing to set up and make "1" might be cost prohibitive.

2. If I do decide to remove metal, how deep do I have to go? What type of guide bushing material does the jack utilize? Steel? Brass? Poly? Will I be removing enough to where I'm gonna have to oversize these parts also? Costs?

3. If I decide to try and "fill" blemishes, will it hold up over time? Or will a piece come loose and find its way into the seal lip and damage it under repeated load cycles. Albeit leather seals are very durable but if the lip is damaged you won't get a clean seal on the outer cylinder.

Obviously the Op is the one footing the labor costs on this project (kudos), so trying to fix the cylinder isn't gonna put him out much money, depending on how he values his time.


There is a lot that goes into the decision making process when I deal with customers here and abroad, determining when it's better to head in a different direction in cases like this normally come down to risk versus reward.
 
Last edited:

EDGAR

Well-known member
Joined
Aug 21, 2010
Messages
437
An answer for Hiball

Repairing and restoring old equipment can be expensive indeed. That does not stop people from restoring old cars, old planes, boats. It all depends on the amount of money and time the person is willing to expend, or invest, in doing so. If the equipment is worth restoring, the person might be willing to do it and expend more money than he would fixing average equipment. If the equipment is nothing special, then the person might just forget about it.

I did mention on the post that having an u-cup made to a particular size could be expensive. Even if he is not changing the size of the u-cup, it is possible to change the material from leather to urethane if he does not find a suitable replacement in leather. And this alternative should not cost an arm and a leg.

I do not recommend removing metal from the cylinder as cylinder walls are thin enough already. For this same reason I do not recommend inserting a liner either as this requires boring the cylinder. If the inside diameter is increased (or reduced) by removing (adding) metal, then other parts will have to be modified to maintain the tolerances set by the manufacturer. This can be expensive if the person does not own a lathe, for example, to do this work himself.

The cyanoacrilates or super glues have been around for many years. Eastman Kodak was the first to sell cyanoacrylates in 1958. Nowadays there are many companies selling different grades of super glues for different applications, so this is a proven technology. Super glues are not just the basic glues, like Crazy Glue, sold at drugstores, there are many high quality formulas been sold but they can be expensive in relation to the amount sold per package. Certainly these high quality instant glues are more expensive than epoxies per ounce. And you can use super glues to make laminates by using tissue paper which is perfect for small repairs, or building up parts, in most types of plastic (not all) components.

So how long will these super glues last adhered to the cylinder surface depends first, on the quality of the glue used and second, on how well the surface was prepared. A sloppy surface preparation produces sloppy results like everyhing else that is not done right. Cyanoacrilates are acrylic resins that set hard so it all depends on how long acrylics in general last, on how long it takes for them to decay or degrade naturally. I certainly believe that done right, the super glue could stick indefenitely to the cylinder wall.

About a year and a half ago I myself used a super glue to fill some pits, caused by rust, in a rear drum brake cylinder. Certainly, brakes see more intense use per day than what a jack used occasionally sees. So I did this just to check the longevity of such a repair. I check the condition of this cylinder about every three months and to this date it has performed as good as a new cylinder with no leakage whatsoever and no peeling of the filler super glue. And remember that brakes get hot and that brake fluid is a more "aggresive" liquid than hydraulic oil so the glue repair is being tested in harsher conditions than what you get in a jack.

As for the extension of the damage in the jack's cylinder, the super glue will cover it with no problem because of its superior adhesive qualities and because it behaves like a hard plastic or acrylic, not as a soft filler like many epoxies would. The super glue will retain the hard shape it gets after sanding. Also, super glues are easier to sand than epoxies and the edges feather nicely, unlike epoxies, so the transition from metal to super glue is seamless. From the point of view of the u-cup, it would feel the same sliding over steel as sliding over super glue. So the size of the damaged area does not affect the performance of the super glues.

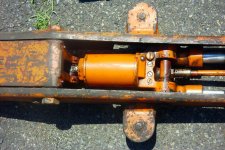
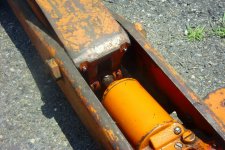
I have repaired damages as extensive as the one shown on the pictures and they are still working perfectly. But the sanding procedure has to be done right, with fine grit paper taped around a round tube or pipe, as I mentioned on a previous post, and not with car engine hones with the usual 220 grit stones.

Epoxies are usually somewhat soft and flexible and for that reason they are harder to sand. And, if thickened epoxies are used instead of liquid epoxies, these thicked epoxies are somewhat porous because of the filler materials used to thicken them. This porosity makes them less suitable for this repair application. I do know of some epoxies that are really hard and not flexible at all, like "MARINE TEX," that are used for marine applications, like boat repairs but if you were not using that type of epoxy you were not going to have good results. The only problem is that these high strenght epoxies are still harder to sand than super glues although they should produce a surface finnish close to that of the super glues if sanded correctly.

I have used epoxies a lot but for this particular type of repair I do not recommend them. Also, if the epoxy has ammonia in its formulation, as many of them do, the metal under the epoxy might rust as ammonia is highly corrosive to bare steel. If the metal under the epoxie rusts, the epoxy filler will fall off.

Do I recommend this alternative super glue repair for every jack? Certainly not, I would only recommend this if the jack is worth saving for some special reason. I would not waste my time doing this to a cheap china made jack.

The best alternative to repair this jack would be to find a used cylinder in good condition. If he is not able to find a replacement cylinder, I am suggesting him a relatively cheap alternative to repair the pitted cylinder, a repair that I believe can last a long time. It is up to him to decide if he is willing to try it or not.

Since this jack belonged to his grandfather, he may be more inclined to fix it due to sentimental issues more than the actual monetary value of the jack. He can always throw it away or give it to someone else interested in repairing it if he decides not to fix it.
 
Last edited:

Hiball

Well-known member
Joined
Apr 30, 2009
Messages
14,027
Location
Missery
Edgar, it's a interesting approach to say the least. I'll file it away for future scenarios and may give it a try on a weaver I have laying around that had a rough life. I feel somewhat lucky I suppose that I have a vast supply of hard parts laying around, my grandfather never threw anything away. I spent my early childhood tearing down old jacks and categorizing parts etc. the great thing about alot of these jacks is how many parts (cylinders) will interchange amongst other brands back before the influx of metric imports. It seems with alot of the newer jacks it's a full time job keeping up with some of the odd ball sizes they are implementing into there jacks. My earlier question wasnt intended to derail/deter the op from trying to fix his grandfathers jack, I enjoy watching people bring stuff back to life versu the alternative. I never was a real big fan of those HW models and even there competitor Walker has irritated me at times. I suppose from a rebuilding standpoint I would rather rebuild 5 weavers versus 1 of the Hw/walker long frame jacks. At least you don't need to completely diamantle the frame to remove the unit versus the walker design. I suppose that is more of that K.I.S.S principle.....
 
OP
R

roblouvasz

Well-known member
Joined
Nov 12, 2011
Messages
1,314
Location
Somewhere between the end of the line and the midd
Hi Hiball. Actually I didn't have to dismantle the whole frame to remove the unit. If I remember correctly, I pullled the main pin along with the two pins on the rear pump cylinders and disconnected the ram from the lift arm. Again It will be a while before I can get to it. And I wish both Hiball and Edgar would be my next door neighbors!! Thanks again for all of the advice.
 

Hiball

Well-known member
Joined
Apr 30, 2009
Messages
14,027
Location
Missery
Hi Hiball. Actually I didn't have to dismantle the whole frame to remove the unit. If I remember correctly, I pullled the main pin along with the two pins on the rear pump cylinders and disconnected the ram from the lift arm. Again It will be a while before I can get to it. And I wish both Hiball and Edgar would be my next door neighbors!! Thanks again for all of the advice.

You are Correct, I was referencing the the New Hein Werner jack (hw93657) which is actually based off the Walker design which was once sold under Lincoln. If you run into any problems or need any parts give me shout, I know I have some hard parts laying around and "Might" have a good used cylinder laying around
 

EDGAR

Well-known member
Joined
Aug 21, 2010
Messages
437
For ROBLOUVASZ

Before removing the cylinder, make a mark on it, like a scratch or with a pointy punch. That way, when you mount it back, you will be able to tighten it close to what it was before you removed it by returning that mark to were it was before removal. Some people remove the cylinder without marking it and then they don't tighten it enough beause they don't have a way to know how much torque was applied. They just tighten it until it feels tight enough when in fact it may need more tightening. This should prevent a leak between the cylinder and the pump body.
 

huffer

Member
Joined
May 10, 2009
Messages
6
Location
So Cal
Nice jack!
I rebuilt one a few years ago and from two that had both suffered some damage. It's been a great piece of equipment!

I still have the spare parts and cylinder. If yours is too far gone I can take a look at the condition of the one I have.

Before:
2rqzq7a.jpg


After some use:
k30qbq.jpg
 
OP
R

roblouvasz

Well-known member
Joined
Nov 12, 2011
Messages
1,314
Location
Somewhere between the end of the line and the midd
Hi Huffer. Nice rebuild! I see you found out that the saddle was originally white. Sometime this week I'm going to try and get the cylinder out and see how bad the pitting is. Thanks for letting me know that you have some spare parts. I would like to know if you totally removed everything from the pump body. You know, all the springs and check balls under the four bolts. Is there anything I should know before I attempt taking it apart? Thanks.
 

EDGAR

Well-known member
Joined
Aug 21, 2010
Messages
437
For ROBLOUVASZ,

and anyone interested in removing cylinders.

Whenever removing or installing a cylinder, whether it is new or used, it is important to use a tail pipe expander inserted in the cylinder to prevent any flattening of the cylinder. Just a very little flattening of the cylinder will prevent the ram from entering or moving inside the cylinder. The tail pipe expander does not have to be tightened to hard, just enough that it will prevent any flattening.

Some cylinders require high torque values (350 - 450 + ft. lbs), like the ones where the seal between the cylinder and the pump body is metal to metal, without the use of any copper or aluminun sealing washer. The force needed to achieve those torque values can flatten the cylinder. Cylinders with a sealing washer between the cylinder and the pump body require lower torque values.

Before using the tail pipe expander make sure that it has no raised sharp edges on the exterior surface as these can really mark the cylinder wall, which is a big no no. Some times these tail pipe expanders are not well finished at the factory and it is up to the user to take them apart and soften any sharp edges.

If you have a Harbor Freight near, they sell three different sizes of adjustable tail pipe expanders.

Also, you may need a 18 or 24 in. pipe wrench with a four or five feet lenght of pipe to remove and install the cylinder.
 
Last edited:
OP
R

roblouvasz

Well-known member
Joined
Nov 12, 2011
Messages
1,314
Location
Somewhere between the end of the line and the midd
Hi Edgar. Again thanks for the advice. I haven't removed the cylinder as of yet. It looks like I'll be making a trip to HF. I believe there it a seal at the base of the cylinder but I don't know what kind. I've got about 20 million things going on right now so It'll be a while untill I can get to it. I'll keep everyone posted.
 

huffer

Member
Joined
May 10, 2009
Messages
6
Location
So Cal
roblouvasz,

I didn't remove the check balls or the cylinder from the body. Other than that, it all came apart.

Do you have the exploded view document for the jack? I have a copy; if you PM me your email i'll send it your way.

Once you get it taken apart, check the main lift arm casting near the grease fittings, as one of mine had a nice crack. Also, the kit I used worked well except for one piece that seals a small screw on the small-piston side of the cylinder body. It would leak under load. I reused the original all all has been well since then.
 
OP
R

roblouvasz

Well-known member
Joined
Nov 12, 2011
Messages
1,314
Location
Somewhere between the end of the line and the midd
I still haven't removed the cylinder from the body, but I did find another issue with the Hein-Werner. One side of the frame body is twisted. It looks as if it may have been on a unlevel surface or maybe whatever it lifted once had the weight shift on it. I hate to say it, but I don't think I'll be rebuilding this jack. I appreciate everyone's help and suggestions. I guess on the bright side (brace yourself) my wife is allowing me to get A Milwaukee 40 sometime in the near future! After talking to another jack distributor (I can't call them a manufacturer because everything they sell comes from a manufacturer in China that they have no control over), my mind was made up. And after going through four jacks in six years (one new one and three used) I'm pretty much fed up. So when my garage is graced with the presence of a Milwaukee 40 I'll definitly have photos.
 
To avoid these ads, REGISTER NOW!
Top Bottom