To avoid these ads, REGISTER NOW!

Help a Dummy Do Some Framing: The Bull Project

Bull

Super Moderator
Joined
Dec 12, 2005
Messages
16,189
Location
MA
Once again, I come to you humbly, hat in hand, to ask for some guidance. I would like to make some progress on finishing the upstairs of my barn before my vacation ends. Currently, I must confront how to frame a wall for an attic space to enclose it so that the rest of the upstairs can be heated, and so the attack cats are prevented from hopping up there.

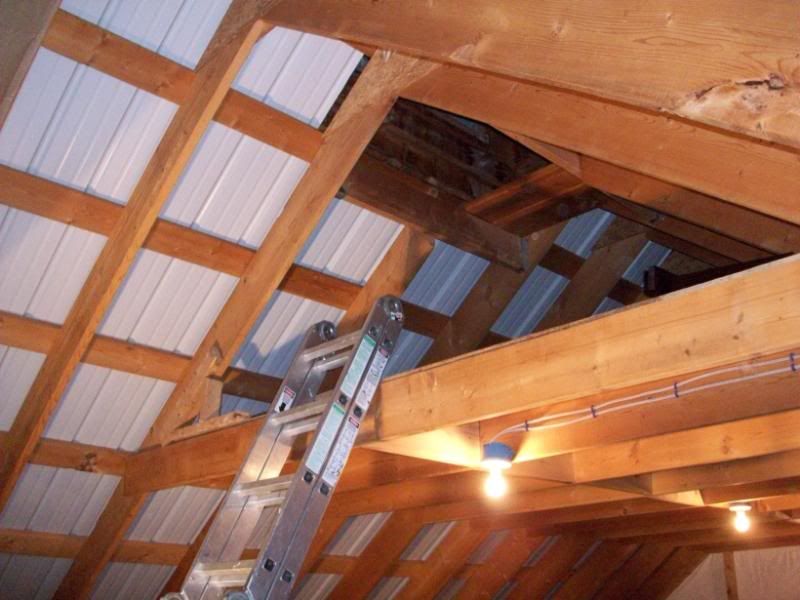
Here is the space in question:

100_7203.jpg


100_7204.jpg


Now, I know that I could cobble something together, but I would like for this not to look like something that a chimp training program dropout did.

I used some scraps of wood to try and demonstrate what I am thinking about doing now, for your review. Is this a sensible method? Essentially, nail a 2x to the side of the two diagonal rafters so that they are at the same plane as the straight rafter below (which makes up the ceiling for the lower part of the upstairs), then put down some kind of plate and connect with 2x uprights?

100_7205.jpg


If this is correct, then what do I do about the ceiling surface for the bay just outside of this new attic wall? How do I insulate and finish that space? Am I even making sense here?

100_7206.jpg
 
To avoid these ads, REGISTER NOW!

930dreamer

Super Moderator
Staff member
Joined
Oct 7, 2009
Messages
22,952
Location
Amarillo,TX and Stinnett,TX
O' boy back to math.:bounce: Framing isn't my strong point, but if you add another vertical 2x your adding another angle? Couldn't you use plywood/osb and fill in between the rafters and then do the some for the floor. Just spit balling here and the spiked Eggnog is kicking in.
 
Last edited:

socapots

Well-known member
Joined
Jan 3, 2011
Messages
544
Location
Canada
honestly no pro...
and not entirely sure what you mean. But if insulating the upstairs are you are showing is the project. I'd continue to do it the way the rest of the roof is done.
Then you can just sheet (or whatever you plan to do) over the rafters that make the roof.
for the floor of that upstairs area, id sheet it from the bottom. drop your insulation in from the top. then sheet the top as well. Dont forget the vapour barrier on the warm side of your sheeting.
 

pattenp

Well-known member
Joined
Jun 4, 2008
Messages
10,175
Location
Virginia - USA
To insulate the roof bay next to the attic wall that you are framing you will need to run a second 2X4 on top of the one you scabbed to the roof rafter to have a nailing surface for the batt insulation and what ever ceiling covering you use.
 

flattire

New member
Joined
Dec 17, 2011
Messages
1
your best bet is to put your scab 2x4 on the inside of your attic and then nail a header laying flat ting your truss and 2x4 together and giving you something to toenail your studs to. Then you will have a nice clean finish look when you look up.(after you plywood it!)
 

6768rogues

Banned
Joined
Nov 28, 2007
Messages
4,524
Location
Western NY
Maybe I don't understand your intentions.
Are you trying to frame a small knee wall so that you can use the triangular space as an attic? What do you plan to put up there?
Those horizontal members appear to be collar ties, they hold the rafters from spreading. They can be used as ceiling members. They are not strong enough to be used as a floor, especially supported by their ends being nailed in place alongside the rafters.
 

D.J.

Well-known member
Joined
Sep 16, 2009
Messages
1,116
Location
New Haven IL
So Bull; are you talking about the area around what looks to be the coupula or just the angled area near the area where the floor and the ceiling joists meet on the left side of the ladder?
 

1320stang

Well-known member
Joined
Dec 28, 2006
Messages
4,573
Location
Edmond, OK
Well, I would split the top part of your stud down the middle (width-wise) to notch it for the rafter, then toe nail it to the floor. This will make the studs flush with the face of the floor joist. If you're nifty and ****, you can cut the back side at the same angle as the rafter.

**EDIT** Ooooh, insulation. In that case, I'd go ahead and insulate up to that joist, then facenail a 2x4 to the bottom of the joist (as a top plate) where the face was flush with the floor joist, then fill the space in with studs. If you're going to finish the ceiling, you might put that up first or put some 1x blocking on the top of the 2x4 to attach drywall, sheetmetal, 1x8 resawn, T&G or whatever your ceiling treatment is.
 
Last edited:

Kevin54

MEMBER EMERITUS
Joined
Jan 12, 2005
Messages
29,341
Location
Urbana, Ohio
Bull.......what are the dimensions of the triangle itself. Approx. dimensions. It doesn't look to be very large of an opening. If it were mine, I would frame in your door for access first. You can do that a couple of ways but the way you are showing at the last is best. Sister a 2x onto the side of the rafter because your floor is coming out that far. Then I would add in the 2x's and cover with OSB. Like this if you get the idea.

BTW, the red is a sistered 2x
 

Attachments

  • framing.jpg
    framing.jpg
    67.7 KB · Views: 44

nehog

Well-known member
Joined
Jan 2, 2010
Messages
7,935
Location
Jaffrey, NH
I used some scraps of wood to try and demonstrate what I am thinking about doing now, for your review. Is this a sensible method? Essentially, nail a 2x to the side of the two diagonal rafters so that they are at the same plane as the straight rafter below (which makes up the ceiling for the lower part of the upstairs), then put down some kind of plate and connect with 2x uprights?

100_7205.jpg


If this is correct, then what do I do about the ceiling surface for the bay just outside of this new attic wall? How do I insulate and finish that space? Am I even making sense here?

Sense? Yes.

Only thin I'd do would be to turn the top (header) 2x4 the other way so you framed the wall basically like any other interior wall, but one with a variable height. Are you finishing off the ceiling on the 'outside' part of that 'room'? If yes, then you'd need a bit more to give a surface to attach sheetrock to.
 

johnnybentwrench

Well-known member
Joined
Aug 16, 2010
Messages
1,737
Location
Los Angeles
your best bet is to put your scab 2x4 on the inside of your attic and then nail a header laying flat ting your truss and 2x4 together and giving you something to toenail your studs to. Then you will have a nice clean finish look when you look up.(after you plywood it!)

a typical interior wall is 5/8 drywall 2 1/2 framing 5/8 drywall.
scab a piece of plywood then a 2X4 to the exsisting rafter, then you can nail a 2X4 flat to it and you will have a top. you are going to need extra 3/4 X 3/4 or scrap to nail up in some spots as backing for the drywall to be nailed to. I hope this made sense.
you basically have to create a top and bottom plate to toe nail your vertical studs to.
 

betterbillt

Active member
Joined
May 31, 2011
Messages
44
View media item 14307
This picture is about the best example of how it would be done right. Your problem is you may need support on both sides of the rafter. My advice is to remember studs are cheap. Build it the best you can.
 
Last edited:

327-365hp

Active member
Joined
Jun 8, 2006
Messages
43
Location
Central Mass
Insulate first, then strapping across the rafters, then build the wall. Keep your top plate flat, like the bottom plate. Layout your studs on the bottom plate, then use a level to mark the top plate on the uphill side. So when you measure you're measuring to the long point of the cut. Nail the short ones in first, hard to get the gun in there.
 
OP
B

Bull

Super Moderator
Joined
Dec 12, 2005
Messages
16,189
Location
MA
I appreciate all of the replies. I feel like I have gotten some good ideas, and am far more comfortable moving forward.

As far as storage in that space: I won't be keeping bags of cement or boxes of books up there, but do intend to use it for general household storage. I told my builder that I wanted to use it as an attic, and he didn't blink an eye about the weight bearing capacity of the 2x8s tied into the rafters. I might run a piece of 1/2 threaded rod through each 2x8 and rafter, one on each end, and then secure it with large washers and nuts. That way, it's not just the nails that will be absorbing and shear forces.
 

p_mori7

Well-known member
Joined
Mar 23, 2010
Messages
3,340
Location
Montreal, QC., Canada
Post #15 is the right way to do it.

Nails have a high shear strength. Looks like you got about 9~10 at each end. I wouldn't worry about it. If you are still concerned, use one bolt/nut with large flat washers at each end.

3" screws driven with an impact driver will also do a good job on the individual studs, easier to manipulate in a tight space.
 
Last edited:

Frank The Plumber

Well-known member
Joined
Feb 19, 2011
Messages
2,644
Location
Chicago.
I see a couple of problems.

The first problem that I see would be that you may have the insulation up against the steel roofing with no air space and or no air flow raceway. This situation will cause a condensation issue on the back side of the insulation and result in mold and rot as well as possible water issues from condensate moisture.

This enclosed attic space is going to need to be able to breathe and exchange exterior temperature air through a vent at the crown or eves or it will condensate and create high temperatures in the summer. You need to research how the sealed in air space is going to breathe.

if you are drywalling the surfaces you will want to frame as per how the wall product will interact with your framing. This would mean that you would need to rip a stud being used as a plate for the top to fit against the roof angle and present a face parallel to the wall across the length of the plate. You would then cut the framing member to intersect this plate at the top. The floor plate would be 90 degrees as well as the wall stud at the floor intersection.

The infill framing you are presenting running parallel to the roof joist is not necessary.

If you use an angle finding tool for framing you can set up your wall section on the floor and prefabricate it on the ground and then install it in a section rather than doing all of the detail framing in the cramped space. Or, take a level, find 90 degrees with a stud up into the roof joist and run a pencil mark onto the stud using the joist as your reference. That is your angle for all of your studs on the wall. Take a scrap of 2x4 and place it against the roof joists crossing multiple joists squarely. At the end of the stud hold a level plumb at 90 degrees, mark it. That is the degree of angle that you need to set your table saw at to rip the wall face side of the top plate. No math, just knowing which angles you need to reproduce and how to copy them onto masters so you can apply them to the work pieces.
 
To avoid these ads, REGISTER NOW!

Frank The Plumber

Well-known member
Joined
Feb 19, 2011
Messages
2,644
Location
Chicago.
For the holding of the weight I would not drill the joists and use bolts. Keep in mind that the bolt will only be holding any material above the hole. If you drill a hole at 4 inches down from the top you only essentially are holding a 2x4 worth of wood product, the joist could split and you would be no better off.

If you were worried about the weight load and how the loft floor joist is tied into the roof joist you could truss the corners using 3/4 plywood. You would attach a 2x8 to the roof joist to gain the thickness of the loft floor joists plane, nail it properly, then cut an angled piece of plywood to fit the dimension of the corner as it exists. You would nail it securely. You now would essentially have a semi rigid boxed truss and the roof joist and loft floor joists would be one unit, you would gain the nailed surface of the plywood as load bearing making the loft floor joist hung and affixed to the roof joists. This would also increase your snow load bearing a bit in the roof. The flex of snow loading would be the force that could eventually flex the wire nails to the point of fatigue failure and possible collapse. By preventing flex we eliminate stress fatigue in the fasteners.
 
OP
B

Bull

Super Moderator
Joined
Dec 12, 2005
Messages
16,189
Location
MA
I can't visualize what it means in post #15 regarding "strapping across the rafters." I understand that the idea is to insulate the bay just outside of the attic area first, but then which rafters am I going to put strapping across? I can't do just one bay...?

Frank, I like your idea about the trussed corners. Reading it through once, I am not sure I understand how to do it. After a couple more, slower readings, I hope that I will.

Regarding the insulation: at least one other fellow mentioned that in another thread in which I had some pics of the space. The insulation is not touching the roof. There is a 1.5" space between the bottom of the metal roofing panels and the back of the insulation. There are vents running the length of each eave of the barn, and the entire ridge is vented. The air enters the eaves, flows up through the space above the insulation and along the molded channels on the bottom of the roof panels, and enters the ridge vent. The attic area itself has both a section of the ridge vent, and also this is the part of the barn where the vented cupola is. I don't think there is going to be any problem with air flow, but that's my amateur hack opinion.

100_7167.jpg


Right behind this blocking, you would see the ridge vent. Air enters each bay here.

100_7170.jpg


Looking down one of the bays. The insulation is kept away from the roof panels by the 2xs that run across the rafter tops, and to which the roofing sheets are screwed. I can't recall their correct name right now.

100_7178.jpg


Peering into an insulated bay from an uninsulated bay right beside it, you can see the space between the insulation and roof.

100_7177.jpg


Standing in the cupola, if you look to the east or west, you will see this ridge vent that leads to the outside of each gable peak.

100_7180.jpg


And Photobucket has now crapped out, so I can't show the vented cupola at this time. Edit: here it is
100_7182.jpg
 
OP
B

Bull

Super Moderator
Joined
Dec 12, 2005
Messages
16,189
Location
MA
A very generous and kind member from here took the time to hand-sketch a couple of options for me for this. He converted the sketches to .PDF files and sent them to me. They helped me to understand what to do. I am going to use 1x3s across my rafters so that I have more surface area to screw my drywall to, and to facilitate the attic framing. I'll put my header flat across the strapping so that the outside edge is flush with the edge of that bottom rafter/joist. So, today I insulated the bay nearest the attic and started attaching the strapping. I'll lose some headroom, but I can live with that.

100_7228.jpg
 
Last edited:

dhardin53

Member
Joined
Nov 28, 2011
Messages
9
Bull I think your getting along well, I am new here and hope NOT to start off on the wrong foot. From my experience can inform you that there can be nothing touching the steel roof covering. If any insulation is resting agents the metal you are going to have condensation sweating (with or without ventilation). And when the steel is wet or even damp the insulation will wick the water into your cover inside/drywall.

I recently bought a skid steer on ebay and went to Indiana and found the seller ripping all the drywall off his 1 year old huge poll building. What he did was cover the entire inside and the blew in 6" between the drywall and steel, both ceiling and walls. What a mess he had, he predicted the condensation would have totally destroyed his shop within 3 to 5 years. I felt sorry for him till I found out he is a owner of a HVAC company. HUMMMM

So remember 1 1/2 is the minimum free space and no gable end vents unless you have matching roof ridge vent openings. One of your pics show some air space now but if and when you put any kind of hard board/drywall over the insulation you will push up the insulation just enough to worry me for a BIG potential problem.
 
OP
B

Bull

Super Moderator
Joined
Dec 12, 2005
Messages
16,189
Location
MA
Hi dhardin; no worries about ruffling any feather; your advise is clearly intended to be helpful, and that is what we want here.

If I look into the space above the rafters, even after adding the strapping, I still seem to have my 1.5" spacing. I took a quick look today in one of the bays after adding a few of the 1x3s. I will continue to monitor and be vigilant about this.
 
OP
B

Bull

Super Moderator
Joined
Dec 12, 2005
Messages
16,189
Location
MA
Well, it's all framed out. I am satisfied with the job in the sense that I don't think my work was terrible, and it feels good to have learned some things along the way. I said learned and not perfected, because nothing about what I did is perfect. I had asked my carpenter to do this job as well as some other smaller stuff a couple of times, and he never got around to it. So, in the end I was able to save some money, feel sort of good, and make some progress during my vacation.

Anyway, this is what I started with a couple days ago, after the insulating and ceiling strapping were done in the area adjacent to the attic.

100_7229.jpg


Here's how it looks as of an hour ago. I realize that it would probably have been better to make the door opening perfectly square or rectangular instead of having the diagonal edges at the top corners. But, I decided what height and width I wanted for comfortable use of the opening, and just went with those measurements.

100_7256.jpg


In the interests of full disclosure, let me show you my angled cuts, most of which I am not happy with. Some of the problem is just that I am getting used to doing this. I also don't have a miter saw that goes beyond 45 degrees, and the way you select the angle on it is imprecise at best. I made a lot of these cuts with my Ridgid worm drive saw, but I didn't use a straight edge to guide the saw as I cut, so I did not go perfectly straight.

100_7257.jpg


The vertical studs didn't come out too badly. One here needed shimming.

100_7258.jpg


100_7260.jpg


I didn't have a long enough piece of lumber for a single sill plate, so I used a shorter piece on one end. The joint was tighter before I started screwing the shorter piece down, then I hit a knot or a screw in the sub-floor and it tweaked things. I decided to live with it. I would never do this if it was going to be weight bearing, but since none of this is,I accepted it and moved on.

100_7261.jpg


This meeting of angles at the peak bothers me. I thought I had figured the other two angles in this big triangle to be 51.5 degrees. So, I subtracted that from 180, divided by 2, and used that number to make these two cuts. To try and cover my ****, after securing the left header in place, I used a bevel gauge to get the angle for the right rafter. Transferred it to my lumber, cut it and...disappointment. I believe that I messed up some part of the calculation as well as the length cut for the header on the right. Again, since it isn't load bearing and is really just a nailer for my drywall, I decided to live with it. But, it does bother me.

100_7259.jpg


Does anyone have any suggestions for constructing the door? I am trying to use leftover materials. I have plenty of 2x4s, a large enough piece of 1/4 or 3/8 plywood, and some smaller pieces of 3/4 plywood or 7/16 OSB. Whatever method I used, I will insulate the back using rigid foam cut to size. I found a pair of sweet, NIB brass hinges in my dad's forgotten basement work bench. These things are clearly USA-made and heavy as heck. The box is marked as "Hager 3 1/2 x 3 1/2 non-template butts." Is the single 2x on the hinge side all I need for framing in terms of securing my hinges?
 

p_mori7

Well-known member
Joined
Mar 23, 2010
Messages
3,340
Location
Montreal, QC., Canada
Nice job Bull ! :thumbup:

Don't sweat the small imperfections with the angles, the sheetrock will hide all that.

For the peak angles, next time just cut the 2x4 to length, hold it in place, then mark the angle with a level. For the opposite side, cut to length, hold it in place, then trace the angle from the previously installed piece.

For the door, I would use the 1/4" plywood. Trace the outline of your opening, then do the cut-out "inside the line". That will leave a 1/8" gap all arount (thickness of your saw blade). Repeat for a second exact same panel.

Rip some 2x4 into 2x2, and screw around the perimeter of the plywood door cutout. Your foam insulation goes inside the 2x2 perimeter. Fasten the second panel to the 2x2 frame. Don't forget some 3/4" x 1.5" for the door stop (to be installed on the wall studs).

EDIT: You can cut out the portion of sill where the door is... will make the door a bit taller and no trip edge.

Normally, you want to frame out the door opening with some 1x5. Depending on the hinges, you may need to inset them into the door frame and the door.
 
Last edited:
OP
B

Bull

Super Moderator
Joined
Dec 12, 2005
Messages
16,189
Location
MA
Thank you for the new information, Phil. Your drawings gave me great confidence in moving forward on this in the first place.

I had not even thought about tracing the door opening, but it makes perfect sense. I was going to measure twice and cut once, but the tracing is clearly the superior method. The frame for the insulation sounds good, too.

So, you only put door stops on the two vertical studs? I had thought about putting a lip all around the perimeter of the opening, which I thought I could then apply foam tape to to help seal cold attic air from entering the rest of the barn. What do you think? Now, why are the dimensions of the stops 3/4" by 1.5"?
 

p_mori7

Well-known member
Joined
Mar 23, 2010
Messages
3,340
Location
Montreal, QC., Canada
So, you only put door stops on the two vertical studs? I had thought about putting a lip all around the perimeter of the opening, which I thought I could then apply foam tape to to help seal cold attic air from entering the rest of the barn. What do you think? Now, why are the dimensions of the stops 3/4" by 1.5"?

Normally they go along the sides & the top. Foam tape is a good idea. Remember to leave some gap all around before putting the foam, otherwise the door could be hard to close. Those were what I am used to seeing, you can use whatever your hardware store / lumber yard carries as door stop strips.
 

Kevin54

MEMBER EMERITUS
Joined
Jan 12, 2005
Messages
29,341
Location
Urbana, Ohio
100_7256.jpg


Does anyone have any suggestions for constructing the door?


Bull....You may want to reconsider the door opening. Reason being is that the way it is now you cannot have a square door. Either the top corners will have to be angles or the door will be shorter leaving the top exposed some.

What you need to do is straighten up the right hand stud, then double up both vertical studs on the sides. This will allow room for hinges and /or any trim. Also add another horizontal header 2x. This will bring the top down slightly so you don't have any problems in that area like having to 45 the corners at the top of the door or having a slight opening.
 

Attachments

  • bull.jpg
    bull.jpg
    87.6 KB · Views: 32
Last edited:

1320stang

Well-known member
Joined
Dec 28, 2006
Messages
4,573
Location
Edmond, OK
I agree on removing the bottom plate, you can let the door hang below the opening and put foam tape on the door for sealing purposes.

Also, the door could swing up instead of the the side. Use a pulley system would allow you to tie it off, a deadbolt would compress the gasket for a good seal. Plus it would be out of the way.
 
Last edited:

Frank The Plumber

Well-known member
Joined
Feb 19, 2011
Messages
2,644
Location
Chicago.
The swing up door will kill you one day. Square her up at the top and make yourself a split hinged door that you can attach to a trim member on each side of the door. You can use some light weight MDF and some through bolt hinges a good sealing paint and have a nice set up. I'd remove the lower plate too, it will be a PIA later.
 

JimVonBaden

Well-known member
Joined
Dec 2, 2011
Messages
15,716
Location
Northern Virginia
What am I missing? If he simply cut a 1/2" piece of plywood to match the opening, overlapped by 1" on the sides, hinged at one side, latched at the other, what is the problem with what he did? It is storage access in a garage. It will look fine and do the job, what more do you want?

Jim :cool:
 

Kevin54

MEMBER EMERITUS
Joined
Jan 12, 2005
Messages
29,341
Location
Urbana, Ohio
What am I missing? If he simply cut a 1/2" piece of plywood to match the opening, overlapped by 1" on the sides, hinged at one side, latched at the other, what is the problem with what he did? It is storage access in a garage. It will look fine and do the job, what more do you want?

Jim :cool:

If you look closely or at the sketch I drew, he would have to cut an angle at the top of his door on each side to get it to fit properly and cover the 2x framing. The top header should be down to the top of the side jambs or studs whichever you prefer to call them, to make the square. Or the side studs pulled in and longer to match the ends of the header. The way it is now, it would be awful close, if not missing the top header and still getting the door to swing without interference.
 

327-365hp

Active member
Joined
Jun 8, 2006
Messages
43
Location
Central Mass
100_7256.jpg


That is exactly what I meant. Great job! Remember, framing doesn't have to be pretty... "Cover it up quick" we always say! I would take Kevin54's advice and add a 2 x4 to the sides and top of your door opening. Easier to nail on trim and attach hinges, plus gets you away from the roof, like he said.
 

Frank

Well-known member
Joined
Apr 3, 2006
Messages
295
Location
Mesquite, TEXAS
Does one have to worry about these condensation issues when its just a standard asphalt shingle roof? Just wondering about how I should go about doing the same project with the attic in my garage.
 

p_mori7

Well-known member
Joined
Mar 23, 2010
Messages
3,340
Location
Montreal, QC., Canada
Does one have to worry about these condensation issues when its just a standard asphalt shingle roof? Just wondering about how I should go about doing the same project with the attic in my garage.

With a shingle roof, the issue is not sweating on the inside, but premature failure of the shingles if they overheat, or rotting of the roof decking from trapped humidity. The air space is to allow venting of the underside of the roof. It needs to draw in air from under the eaves, and allow it to flow out at the top. For a roof like Bulls, a ridge vent would be ideal IMHO, whereas truss roofs can vent thru the gable ends or via roof vent cut into the roof decking.
 
OP
B

Bull

Super Moderator
Joined
Dec 12, 2005
Messages
16,189
Location
MA
Kevin, I think that right stud is plumb. I will check again, but I was pretty **** about using two levels before and as I was screwing the studs in place. I don't understand why there are different diagonal distances between the top of the left stud and the header and the top of the right stud and the header. Not sure what I did to have that happen. I measure to what I believed to be the center of the span, then from that mark sixteen inches to either side to mark the inside edge of each stud. That's the width I wanted for ease of access into the hatch. I put the header where I did also because it was the height I wanted. I just figured I'd live with a goofy, non-square door, but now you fellas have me committed to squaring it up, I guess.

Perhaps I will cut a new header that will meet the studs in such a way to give me 90 degree corner for the door.

Are you guys thinking that the door should sit inside the framing, and rest against stop strips, or rest outside of the framing? Do I add the hinges and install the door after the drywall and trim are up?
 
To avoid these ads, REGISTER NOW!
Top Bottom