You already have gutter drains, you can tie into those if they are any good. The photo of the front left corner of the house shows a broken down spout and clay tile drain under it. No photos but you should have same set up for the rear gutters. Check with city and tie garage into them. Also check your plot plan with the city for yard drainage and lot lines if needed.


You are using an out of date browser. It may not display this or other websites correctly.
You should upgrade or use an alternative browser.
You should upgrade or use an alternative browser.
Help! Drainage Situation
- Thread starter SHAKEnBLAKE
- Start date
OP
SHAKEnBLAKE
Active member
You already have gutter drains, you can tie into those if they are any good. The photo of the front left corner of the house shows a broken down spout and clay tile drain under it. No photos but you should have same set up for the rear gutters. Check with city and tie garage into them. Also check your plot plan with the city for yard drainage and lot lines if needed.
I do have a clay tile drain there, and on the back of the house along my driveway. I'm not sure where they end and if those tie into the clay tile sewer line from my house. This brings up another headache on my property: the clay tile sewer line from my house is compromised with roots and a broken pipe (80 ft from the house, almost to the street). It backed up into the basement recently so I had roto-rooter out to clean and camera it. Really wish I had the guy camera through the gutters drains too.
As far as tying my drainage into those, I'd be worried about flooding the basement or contributing to the sogginess at the end of my driveway. Also, they are right at the house, which is the high point of the property.
OP
SHAKEnBLAKE
Active member
Welp, I had a landscape company come out this morning and the guy came up with a pretty similar plan as what I had already guessed. He suggested some French drains from garage and backyard areas tying into a solid piped system running along the southern property line (gravel driveway) and tying into the curb at the street. He thought it would be easier to trench there than along the paved driveway, and wouldn't require any pumps or cutting of the driveway. He thinks the arbor vitaes will have to come down. I'm still curious about how difficult it will be to trench through all those roots. He said if they put in a 4"pipe, they use a walk-behind chain trencher, and if they put in 6" pipe they use a mini hoe. He said 6" costs 30-40% more, partially because of equipment. He suggested 6" in order to drain the mass amounts of water during a downpour. If that's all draining into a 3" curb drain, I feel like a 6" would be overkill.
He's coming back later this week to calculate the amount of fall from the garage area to the street. I'm trying to figure out exact property lines and if we're allowed to make additional bores through the curb (one 3" pipe will be launching water into the street if we tie into the existing setup). I got in touch with my neighbor and he says "do what needs to be done," as far as cutting the trees along our property line. I knew I liked him.
I'll keep you guys posted as I figure out more, and I'll try to get some progress pics when it finally happens.
Last edited:
garagelogician
Well-known member
I haven't read through this entire thread, but there are a couple things I can tell you that you will not be able to do.
1) You can't send water onto your neighbor's property.
2) The city isn't going to let you discharge into their storm sewer.
3) The city would also likely frown on pumping water up to the street.
You're in a tough situation, and I feel for you. Just be prepared to open your wallet wide, there aren't any cheap options here.
DGersic
Well-known member
I haven't read through this entire thread, but there are a couple things I can tell you that you will not be able to do.
1) You can't send water onto your neighbor's property.
2) The city isn't going to let you discharge into their storm sewer.
3) The city would also likely frown on pumping water up to the street.
You're in a tough situation, and I feel for you. Just be prepared to open your wallet wide, there aren't any cheap options here.
1) true
2) false. Depends on your city. Mine prefers it.
3) also false. Depends on your city. Mine permits it, but prefers a storm sewer tie in if possible.
Sent from my iPad using The Garage Journal mobile app
rburke65
Well-known member
I believe that you cannot alter your terrain to direct water to a neighbors property. I see no reason that you would be forbidden to pump water to the street.
volleyball
Well-known member
I say jack up your garage since you want it higher anyways. The concrete is all broken so putting down a pad on top would be a good idea. I would put a dirty water pump in a barrel pit where the water collects and you could use an above ground hose to run out to the street. That would get rid of the excess water that might only be a problem a few times a year.
Since your garage is getting power anyways, it won't be that much more.
You don't need to think forever house. A good dry garage adds value to your property. Even if a buyer doesn't want a garage, they can rent out space for storage or a classic car over winter.
And how long is not forever? Sometimes you stay way longer than planned
OP
SHAKEnBLAKE
Active member
I haven't read through this entire thread, but there are a couple things I can tell you that you will not be able to do.
1) You can't send water onto your neighbor's property.
2) The city isn't going to let you discharge into their storm sewer.
3) The city would also likely frown on pumping water up to the street.
You're in a tough situation, and I feel for you. Just be prepared to open your wallet wide, there aren't any cheap options here.
1. Not trying to. The neighbor and I are going to drain OUR backyards (90% mine, 10% his) into a system that runs along the property line towards the street. My initial thought was to terminate at the end of his driveway, which definitely wouldn't be allowed.
2. After speaking with Building and Zoning today, it sounds like the city actually prefers that I tie into their storm sewer. A gentleman from the city is supposed to be contacting me tomorrow to discuss the best way to do so. I'm only about 2 blocks from the river that the storm sewer drains to, and I don't think the city has any issues with their storm sewers backing up.
3. Still hoping not to pump any water anywhere. I think gravity will handle it. But you are right, the city would rather not have me dumping everything into the street. The nice lady from Building and Zoning was worried all that water in the street would freeze.
This solution may be your best chance of getting this done by you at lowish costs.
Al
HydroBlox eh? Never heard of them, but it seems like a great idea. Also kinda seems like a load of BS. I can't find any substantial evidence that they work, other than promo videos from people selling them. But they claim to flow better and last longer than French drains. Anyone here ever used them? Think they could handle the amount of water I've got?
HydroBlox eh? Never heard of them, but it seems like a great idea. Also kinda seems like a load of BS. I can't find any substantial evidence that they work, other than promo videos from people selling them. But they claim to flow better and last longer than French drains. Anyone here ever used them? Think they could handle the amount of water I've got?[/QUOTE]
Not BS. I've used them to clear my yard via a main drain + 3 tributaries so a non-trivial solution. However, if you still think BS then so be it.
Not BS. I've used them to clear my yard via a main drain + 3 tributaries so a non-trivial solution. However, if you still think BS then so be it.
OP
SHAKEnBLAKE
Active member
Not BS. I've used them to clear my yard via a main drain + 3 tributaries so a non-trivial solution. However, if you still think BS then so be it.
Do you have any before/after pics or videos showing the layout and amount of water you're dealing with? I'd love to see more. I'm not actually claiming that they're BS, but a lot of their claims are not really supported on their website, and most of the videos I found were "install videos." The one regional HydroBlox distributor used a Noodles and Co. take-out lid to tie his hydroblox system into a pop-up. "C'mon man!"
Update on my end:
The City just called me and said there is a storm sewer in front of the house. It's in the southbound lane (across the street). It's an 18" pipe and is "only" 2.5 feet under the surface. I replied and said "sounds expensive," to which the technician agreed. He seemed to think that the city puts new curb bores in all the time and wouldn't think it would be a problem to drain into the street "because it's going to drain rain water, so the street will be wet anyway." But, ultimately, it's the head of Building and Zoning who decides. His other input was that he thought a 6" system would be needed because of the length of my property.
My next thoughts are: What kind of price difference are we looking at to tie into sewer vs make curb bores? How do I convince Building and Zoning to let me do curb bores? At what point do I say "screw this" and just tear out my driveway (and maybe garage) and re-grade the entire property toward the street?
Bondo
Well-known member
At what point do I say "screw this" and just tear out my driveway (and maybe garage) and re-grade the entire property toward the street?
Ayuh,..... Ya mean,... "Do it Right",..??..??
Do you have any before/after pics or videos showing the layout and amount of water you're dealing with? I'd love to see more. I'm not actually claiming that they're BS, but a lot of their claims are not really supported on their website, and most of the videos I found were "install videos."
They look to be nothin' but a tree, 'n bush root magnet, which will plug 'em up in no time,......
Also the main reason not to use drainage tile with holes,.....
volleyball
Well-known member
Hydroblox is just another pipe solution. It still requires pitch to make it work for anything more than a drywell. I could see situations where it would be ok. But limited. It would have to be cheap to make viable.
That new distributor needs to pull that video if he wants customers
That new distributor needs to pull that video if he wants customers
3onthetree
Well-known member
- Joined
- Nov 14, 2018
- Messages
- 191
I'm betting by the fourth time your garage floods from a 100 year rain (that we in the midwest seem to get every 2 months now). Or when you realize lifting and remodeling the carport is more trouble than new. Taking an over/under?At what point do I say "screw this" and just tear out my driveway (and maybe garage) and re-grade the entire property toward the street?
But no matter what you do you'll still need the french drain because there will be surrounding water flowing underground to your lot, so your saturation point happens quicker. Even if you could tie into the storm, what a hassle and $$$. And dumping into the street will be wet long after the rains have dried up.
Platonic Solid
Well-known member
You have water issues everywhere. IMO, Go big or sell. Anything else is just wasted money.
fourjeepin
Well-known member
This won’t work for everyone and I’m sure several will disagree but here’s what I have done at my place which had standing water in the sunroom when I bought it. Oh, and my carport also would occasionally flood. I also thought I needed French drains but ended up not putting any in. I put in 3 regular drains with pop up emitters. I also have a couple of small dry wells. All drains are dug at the low point of the yard/sidewalk/driveway so the water flows to them.
As others have said, do NOT use that black corrugated stuff. I ran 4” pvc sewer pipe between, probably just shy of 200 feet total. Every section is sloped, but some only slightly and it still drains a ton of water really quickly. Some sections are glued but most are not.
I dug all of mine by hand. Most of my soil is red clay surrounded by rock, sometimes large rocks. No permits, but I do know where all of the utilities are.
That’s all I can think of. Bet of luck to you and don’t let anyone tell you that you ne d to tear down the garage and regrade.
OP
SHAKEnBLAKE
Active member
UPDATE! Sorry guys, I was out digging in the yard a lot longer than I planned!
After getting a couple quotes for 5-7K, I decided to go it alone. I think I ended up spending around 3K, but it took me 4 weeks of all my free time, and caused a ton of stress. In hindsight, I should have paid to have it done. But hey, I learned something and feel somewhat accomplished. The contractors agreed that running along my south property line (gravel drive) was the best way to drain water to the street. Since my neighbor is cool as a cucumber, he didn't care and signed a "neighborly agreement" to allow me to wreak havoc on his driveway for a while.
I ended up coincidentally meeting a ditch witch employee and he offered me a free weekend, which really pushed me in the direction of DIY. I gave him the details and he said "I'll bring you the biggest one we've got." Unfortunately he only had the second-biggest one available, which was 6 inches shorter. No big deal, right? Wrong. This ended up being 6 inches shorter than what I needed the deepest part of my trench. That meant hand-digging. Long story short: using the smaller trencher added several days to this project.
I was a little worried about the capabilities and operation of the trencher, but I must say I was pretty impressed. It was easy to learn and use, and pretty powerful.
Trencher / Ditch-Witch tips:
1. Unless your soil is soft and your tench is shallow, get one with tracks, not tires.
2. Go slow. Going too fast just means a more shallow trench and more loose dirt in the bottom. Going slow also helps you gently cut through roots without bouncing the machine all over the place.
3. Operation becomes significantly more difficult in rainy/wet conditions. (My yard wasn't waterlogged, but it started raining about 2/3 through the trenching and it got way more challenging. I should have taken a pic of it stuck. Had to pull it out of its own ditch with my 4runner.)
4. Operating off-camber (trenching accross a hillside) means that your trench is slanted. A slanted trench is much more likely to cave in. Mine did. A lot. It was somewhat of a blessing in disguise because the off-camber part was where I needed to dig my trench deeper, and it's nearly impossible to get in there unless it caves in. I will say that cave-ins probably added 24 hours of manual labor to this project. If you're going deeper than 30 inches, it's worth considering putting boards under the downhill side of the trencher (or getting a skid loader and leveling out the trencher path) to make the trencher cut straight down instead of at an angle into the hill.
5. Roots don't matter. If you get a somewhat larger trencher like mine, it can handle decent-sized roots with ease. I'd say I was cutting up to 4" roots and usually barely noticed them. I was considering removing the landscaping trees along my driveway and excavating the roots for fear that the trencher couldn't handle roots. No need. I ran the trencher as close to the trees as I could and had no issue. The trees seem to be surviving well, too, although I wouldn't recommend chopping a bunch of roots around trees that you truly value. (I like mine but if they died I wouldn't be heartbroken; they're somewhat overgrown and unruly anyway.)
6. Rocks do matter. Any rock bigger than your fist can jam the machine. No biggie, just reverse the chain for a second and the rock pops up to where you can grab it. But if you're in rocky terrain, you'll spend lots of time wrestling them out of your trench.
7. If your soil is clay like mine, and if you're making a deep trench like mine, you NEED a skid loader to backfill the ditch. (unless it's a really short ditch). Backfilling dirt and removing the excess was definitely the most labor-intensive part of this job. The clay here is some of the heaviest I've ever worked with, and each shovel-full is impressively heavy.
More to come, including pics!
Last edited:
OP
SHAKEnBLAKE
Active member

rayra
Well-known member
I haven't read through this entire thread, but there are a couple things I can tell you that you will not be able to do.
1) You can't send water onto your neighbor's property.
2) The city isn't going to let you discharge into their storm sewer.
3) The city would also likely frown on pumping water up to the street.
You're in a tough situation, and I feel for you. Just be prepared to open your wallet wide, there aren't any cheap options here.
The city can **** it, if their demands create such a catch-22. The water HAS to go somewhere other than the homeowner's structures. The street gutter / storm drain is where it HAS to go. That's the whole purpose of the storm drain system, NOT just draining the street. The homeowner's property taxes are paying for that infrastructure.
ludakris04
Well-known member
have you checked the structure of the garage? that water looks like its up to the siding.. there has to be some rot in there... I am also leary of flat roofs.
That water would worry me. Tear down garage, run a ditch along the driveway, bring in fill, grade to ditch.. grade ditch to front yard.. build new garage.
That is just spit balling. I would try to get rid of it with grading first, but that's just me.
That water would worry me. Tear down garage, run a ditch along the driveway, bring in fill, grade to ditch.. grade ditch to front yard.. build new garage.
That is just spit balling. I would try to get rid of it with grading first, but that's just me.
OP
SHAKEnBLAKE
Active member
have you checked the structure of the garage? that water looks like its up to the siding.. there has to be some rot in there... I am also leary of flat roofs.
That water would worry me. Tear down garage, run a ditch along the driveway, bring in fill, grade to ditch.. grade ditch to front yard.. build new garage.
That is just spit balling. I would try to get rid of it with grading first, but that's just me.
The water has gotten up to the siding, but maybe only twice in the year I've been here, and none since I completed the french drain this Spring. The real test will be this Winter/Spring during heavy rains after a hard freeze. Regardless, there's little to no rot to the garage structure. I think it's got asbestos shingle siding; they don;t seem like wood. Is that thing?
All that said, your plan is probably the best way to "do it right." I'm still torn on tearing the garage down and investing heavily in a property I don't think I'll stay at more than 5 years. I'll keep you posted!
Last edited:
strutaeng
Well-known member
So what size line did you run? 4"? Solid pipe I assume? What slope did you have? Overall drop per total length of pipe? Did you leave a clean out somewhere to snake it if the system ever clogs?
NDS has some nice calculators for sizing pipe, based on wastershed area, runoff coefficient, slope and location.
I did about 115' of solid drain last year, from a catch basin to my alley. 4" was just adequate, but then I found 9 sticks of SDR 35 6" for like $50, so I went that route. The additional 3 sticks that I needed were another $100, but overall pretty cheap for 6".
I borrowed a PLS3 laser, and that made establishing the fall per 10' stick super easy. Unfortunately for me, I had to jack hammer some subsurface solid limestone to get my slope correct...
theoldwizard1
Well-known member
My buddy has lived in his house for over 20 years and had a big problem this spring. Finished lower level on grade at the back of the house (grade in front of house is about 10'-12' higher). There is a dam/bump/ridge about 6" high about 20' from the back to the house to prevent the water from getting close to the back door.
A "50 year" rain event had the water at the back door about 3" up the door and pouring in, flooding the basement. (I think this was late winter, so the ground was still partially frozen, or there was so much rain it was saturated.) After all was repaired, he installed an outdoor sump pit and pump next to the back door. It has not kicked on, and I doubt it will until the spring thaw/rains. I think he plans on removing the pump during the winter and only re-installing it it there is a threat of rain.
A "50 year" rain event had the water at the back door about 3" up the door and pouring in, flooding the basement. (I think this was late winter, so the ground was still partially frozen, or there was so much rain it was saturated.) After all was repaired, he installed an outdoor sump pit and pump next to the back door. It has not kicked on, and I doubt it will until the spring thaw/rains. I think he plans on removing the pump during the winter and only re-installing it it there is a threat of rain.
OP
SHAKEnBLAKE
Active member
So what size line did you run? 4"? Solid pipe I assume? What slope did you have? Overall drop per total length of pipe? Did you leave a clean out somewhere to snake it if the system ever clogs?
NDS has some nice calculators for sizing pipe, based on wastershed area, runoff coefficient, slope and location.
It's all 4" pipe. Perforated SDR35 "french drains" along the back and side of garage as well as the "basketball lawn", tying into 4" Schedule 40 from the front corner of the garage to the street. The garage gutter ties in, too. I went with 4" because it was the biggest that would fit in a ditch witch trench. Also, I didn't think going any wider would be of much benefit because the whole system ties into a 3" curb bore. Tying into storm sewer was cost-prohibitive. Yes, I put a cleanout for future snakings of the Schedule 40. I don't remember exact slope but it was just over 1% I think. I'll try to look that up.
Would have been nice to know about the NDS calculators before!
I borrowed a PLS3 laser, and that made establishing the fall per 10' stick super easy. Unfortunately for me, I had to jack hammer some subsurface solid limestone to get my slope correct...
No lasers for me! We did it all with stakes and string levels. It was awful. Wouldn't do it again, but I have no experience with the lasers and didn't want to rent/borrow one for this long, drawn-out DIY project.
strutaeng
Well-known member
Yeah, 6" requires more excavation. I rented a trencher, then had to hand dig. Extra work.
I ran a quick calc. and assuming all grass, you should be good. You have a bit of concrete, but still be okay.
https://www.ndspro.com/tools-and-ca...=0.35&25-year-rainfall=2.5&slope-drain-pipe=1
I found another map that had rainfall intensity for a 50 or 100-year storm (can't remember which) at 2.5 in/hr. The NDS map is 25 year.
Here's were you can see the huge difference from smooth wall to corrugated: A 4" smooth was has roughly the same capacity of 6" corrugated!
Report back after you get a heavy rainfall, but I bet you will be happy that all that water back there is gone!
OP
SHAKEnBLAKE
Active member
Update: The system works pretty well, but still can't get a heavy day or two of rain out to the street faster than it falls. I'm still largely blaming this on the fact that the system all runs into a 3" pipe to come out at the curb. Would it be beneficial for me to install a pop-up emitter on that 3" pipe near the street, or would that not matter since it's all coming out the same 3" pipe?
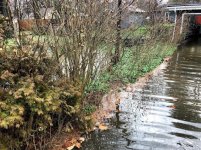
I've been trying to convince the landlord of the empty house next door to install a similar system on the other side of my property. During our Spring flood in Mid-March, he was out draining his yard with a portable pump. He was unaware that his yard floods like that several times a year. (see pic)
In the meantime, I installed a small rain barrel on the side of the garage, which diverts the first 50 gallons of rain out of the drainage system. Unfortunately, 50gal is a pretty insignificant amount when draining a 20x35' garage roof. That said, I'm happy with how it turned out, and I'm excited that it will reduced the amount of times I'll have to drag a hose out to the garden. (see pic)
Attachments

Last edited:
volleyball
Well-known member
The popup would help if you are backing up at the street. You need to watch it when you are getting a storm to actually see what is going on.
You can also see if putting another pipe closer to the house for example would pick up other water that might be draining the wrong way.
It may be hard to convince a landlord not living there to invest in drainage to help you out. Would you be willing to cover the work and expense?
I think more 4" pipe is better than just going larger in 1 pipe. I have several 4" pipe surrounding my house to catch the water. And I do use perforated as when the water is running it won't be draining out the holes. But will allow the pipe to drain when it is dry out.