To avoid these ads, REGISTER NOW!

HF Toolboxes Workbench - Phase 3

Jagmandave

Well-known member
Joined
Nov 6, 2011
Messages
6,299
Location
Overland Park, Ks.
I'm sorry, but I disagree.....at least where these boxes are concerned.

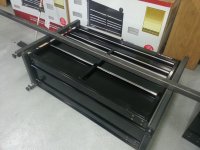
There is a large piece of tubing welded underneath, where the wheels bolt on. There is a fairly heavy frame of metal around the bottom that the pieces that the wheels bolt to are welded to also, but the exterior of the sheet metal is about 20 ga, and is bent over this framework. It protrudes about a 1/4" below the framework, and that's what Steevo's boxes look like they're are sitting on, hence my comment. Unless he welded some cross braces that the wheel portion rests on, all the weight of the box and it's contents is being carried on the sheet metal skin of the toolbox.

This pic looks to the back edge of the box, you can see the sheet metal extends past the framework.....

View media item 33683
This pic looks to the front of the box, you can see the sheet metal has a nice finish return bent under, but that's what's the box would be resting on, not the framework designed to support the load.

View media item 33685
That's why I asked......
 
To avoid these ads, REGISTER NOW!
OP
S

Steevo

Well-known member
Joined
Aug 18, 2009
Messages
8,738
Location
43.49600, -112.04300
Dave,
I did look at the construction of the HF box before I decided to support them around the perimeter. I decided that the box was plenty stout to support a static load on the bottom edge.
If you were really worried about it, just add a 3" wide by 1/4" thick strap running front to back on each side of your frame, lined up to mate with the caster supports.
 

Jagmandave

Well-known member
Joined
Nov 6, 2011
Messages
6,299
Location
Overland Park, Ks.
Since I'm building my bench framework with wood, I decided to go a different way....I'm going to set my boxes on a frame of 2X4's on edge, and notch out around the tube that the wheels attach to, so they'll be supported entirely on the internal frame, then I'll put crosspieces under the wheel tubes as well, that should do it! :D

Once I have the frame built and shimmed level (my garage floor slopes toward the door, like most) I'll then make a kick panel that I'll trim to fit the slope, hiding the shim work. I don't have a table saw or I'd see about cutting the long side 2X4's at a slight angle to counter the slope....there's about 1/4" difference from one end to the other of the 8 ft bench top.

Likewise, this won't be a pound on bench, I have an all metal bench for that, which is where my Wilton is mounted.

I really like those leveling feet, but I'm trying to keep my bench height right at 36", as I'm not that tall.
 

JasonJ

Well-known member
Joined
Aug 4, 2006
Messages
424
Location
Las Vegas
Dave,

I am in the process of doing what you are thinking. I have two cabinets side by side. I removed the casters and used leveling feet to compensate for the slope in the garage floor.

I have two pieces of 3/4" MDF cut to fit the top of each box (1 piece for each box). This allows me to lay the next layer of 3/4 MDF (8 feet long) over each box to clear the lip at the top. I added one more 8 foot 3/4" MDF for a total of 1.5 inches thick work surface.

All said and done, my work bench stands 37" tall.

I am ordering my steel top tomorrow.

20130907114627-210a2bfb.jpg
 

Jagmandave

Well-known member
Joined
Nov 6, 2011
Messages
6,299
Location
Overland Park, Ks.
Jason that looks nice.....

I have pegboard on the wall over where the bench will be, I'm debating whether to put it back up or put some cabinets up there instead like you did.

My bench won't rest on top of the boxes, it will be attached to the frame, like Steveo's....

Is that a dog door I see behind your press?
 

ishiboo

Well-known member
Joined
Oct 27, 2010
Messages
9,481
Location
Oshkosh, WI
Dave,

I am in the process of doing what you are thinking. I have two cabinets side by side. I removed the casters and used leveling feet to compensate for the slope in the garage floor.

I have two pieces of 3/4" MDF cut to fit the top of each box (1 piece for each box). This allows me to lay the next layer of 3/4 MDF (8 feet long) over each box to clear the lip at the top. I added one more 8 foot 3/4" MDF for a total of 1.5 inches thick work surface.

All said and done, my work bench stands 37" tall.

I am ordering my steel top tomorrow.

20130907114627-210a2bfb.jpg

Why is there a giant ***** on your workbench? :eyecrazy:
 

JasonJ

Well-known member
Joined
Aug 4, 2006
Messages
424
Location
Las Vegas
Jason that looks nice.....

I have pegboard on the wall over where the bench will be, I'm debating whether to put it back up or put some cabinets up there instead like you did.

My bench won't rest on top of the boxes, it will be attached to the frame, like Steveo's....

Is that a dog door I see behind your press?

First I want to say that I'm not trying to high jack Steevo's thread. :) Actually it was this thread that motivated me to do something with my space. but unfortunately, I'm not a welder so I had to make some compromises.

I do have peg board up now, it was always planned but didn't have it up in the picture that I posted earlier.

Yes, that's a dog door under my press. :) It's a single garage and I have very limited space. This seemed like a good option to place my press. I don't use it very often so I do not have to worry about the dogs taking my legs out that much.

a more current pic:
i.php


The story behind the "Giant *****" :
http://garagejournal.com/forum/showthread.php?p=3359365#post3359365

and thanks to Steevo for the inspiration. :)
 
Last edited:

nolimits76

Well-known member
Joined
Jul 11, 2013
Messages
959
Location
Oklahoma
First, hats off to Steveo for a friggin' AWESOME setup...and sharing of the details!

Like many guys here, I am in the process of trying to do something similar. Have any of you built a WOOD frame where maybe you use just (1) HF box and have open space below?

Love the metal, but it's not a skill I have acquired yet and trying to work with what I know for the time being.

I do have a few specific questions...

1. What is the height of the box WITHOUT the casters?

2. Does anyone have any details (with links) of where to get the leveling feet, if any special connection is required to attach to the box, etc?

Thanks for any and all help.
 
OP
S

Steevo

Well-known member
Joined
Aug 18, 2009
Messages
8,738
Location
43.49600, -112.04300
1. What is the height of the box WITHOUT the casters?

2. Does anyone have any details (with links) of where to get the leveling feet, if any special connection is required to attach to the box, etc?

Thanks for any and all help.


The box itself is 33-5/8" high, without casters.

You can get any size or length of threaded, adjustable feet here:

http://www.jwwinco.com/products/section7/index.html
 

Outlawmws

Well-known member
Joined
Aug 9, 2011
Messages
39,097
Location
The Badlands
You can also get the screw in type leveling feet off of most any cast off appliance: Washer, dryer, dishwasher, possibly even a refer.

Almost all are 3/8 coarse thread, cut a plate the size of the caster plates, drill 4 holes for mounting, drill and tap a center hole for the levelers. I'd probably go a tad thicker than the original caster plate both for flexing and for having sufficient threads for the levelers.
 

Jagmandave

Well-known member
Joined
Nov 6, 2011
Messages
6,299
Location
Overland Park, Ks.
Whitefeather, I'm building my framework out of wood....just a whole lot of cut 2X4's.......I haven't decided what I'm going to use on top - I thought I could reuse the 2X6's that were on the old bench, but once I started pulling the nails out I realized how twisted and cupped they were. I don't think the previous bench builder bothered to use a level or a tape measure, he just eyeballed everything and nailed 'em down.

I was thinking of using the old timber on top, then covering with a nice piece of stainless steel, but budget concerns may take me to a used or scrap piece of laminate and some MDF.

Here's the thread on mine, it's still ongoing.... http://www.garagejournal.com/forum/showthread.php?t=216637&highlight=garage+reorganization
 

Outlawmws

Well-known member
Joined
Aug 9, 2011
Messages
39,097
Location
The Badlands
I've been using Formica kitchen counter tops for workbench tops for decades. My current top is over 25 years old and shows minimal signs of wear. Another advantage to these tops is the have a back-splash built in (keeps small parts form disappearing behind the top) and a rolled front edge so if you spill something it's less likely to cone over the front edge. it also helps (but wont completely prevent) things from rolling off the front.
 

rday78

Well-known member
Joined
Aug 6, 2013
Messages
46
Just wanted to step in an say thanks Steevo... Your blueprint is on the money for this workbench... Should be getting the Husky boxes installed today! More pics in my signature!
 

Attachments

  • garage31.jpg
    garage31.jpg
    120.7 KB · Views: 996
  • garage18.jpg
    garage18.jpg
    145.5 KB · Views: 1,253
  • garage20.jpg
    garage20.jpg
    137.1 KB · Views: 1,081
  • garage23.jpg
    garage23.jpg
    58.2 KB · Views: 1,168
  • garage24.jpg
    garage24.jpg
    80 KB · Views: 1,084

rday78

Well-known member
Joined
Aug 6, 2013
Messages
46
No Miller blue here... Enough work just to get to this point... Cant wait to get the boxes in
 

akdiesel

Well-known member
Joined
Aug 8, 2008
Messages
2,617
Location
Wasilla, AK
No Miller blue here... Enough work just to get to this point... Cant wait to get the boxes in

It's kinda like building a car. put it all together to check fit and finish and then take it all apart to paint it. Paint will give it a better look and protect it from the humidity.
 
To avoid these ads, REGISTER NOW!

rday78

Well-known member
Joined
Aug 6, 2013
Messages
46
Ok... finally got some help at the house to get the boxes lowered into place. Also picked up the countertops from ikea. Just have to cut them to size and rout the seems together
 

Attachments

  • bench1.jpg
    bench1.jpg
    140.1 KB · Views: 1,967
  • bench2.jpg
    bench2.jpg
    127.5 KB · Views: 1,669

MegaManny009

Well-known member
Joined
Nov 11, 2012
Messages
100
Ok... finally got some help at the house to get the boxes lowered into place. Also picked up the countertops from ikea. Just have to cut them to size and rout the seems together

great job on the workbench build its coming out flawless, i too have that cabinet that came with the bottom and top well worth the $$$:beer:
 

sparksftball69

Well-known member
Joined
Sep 8, 2013
Messages
116
about to start a similar build…Looking at getting some vidmar cabinets through work (hopefully free) overall length will be around 90-96 inches…but i want it to roll similar to a big brand rolling tool cart. I will also either use a double stacked one on top of another
small chest or hopefully get the taller cabinets…the 90-96 will be 3x30" wide or again hopefully the taller wider 45" wide cabinets… Will the 2x2 square and 1.5x1.5 L be strong enough to support/roll this…basically if you were to have put casters on yours would you feel comfortable enough to roll it around…not daily but if needed…also would it be strong enough to support two stacked. not directly on top of each other but a similar frame on top of the bottom cabinet to support the weight of the top.
 

sparksftball69

Well-known member
Joined
Sep 8, 2013
Messages
116
would you use square tubing all the way around instead of angle iron…or just thicker/bigger materials
 

akdiesel

Well-known member
Joined
Aug 8, 2008
Messages
2,617
Location
Wasilla, AK
about to start a similar build…Looking at getting some vidmar cabinets through work (hopefully free) overall length will be around 90-96 inches…but i want it to roll similar to a big brand rolling tool cart. I will also either use a double stacked one on top of another
small chest or hopefully get the taller cabinets…the 90-96 will be 3x30" wide or again hopefully the taller wider 45" wide cabinets… Will the 2x2 square and 1.5x1.5 L be strong enough to support/roll this…basically if you were to have put casters on yours would you feel comfortable enough to roll it around…not daily but if needed…also would it be strong enough to support two stacked. not directly on top of each other but a similar frame on top of the bottom cabinet to support the weight of the top.

Do some research on the Vidmar. I believe they will support their own load. In other words their mobile may be the same platform as their stationary ones.
 

sparksftball69

Well-known member
Joined
Sep 8, 2013
Messages
116
the ones i'm looking at getting i could just slap some casters on…but i want a larger single unit rolling tool cabinet that…i'm probably just being difficult but i also wan't something that is unique to me as well.
 

jeep534

Member
Joined
Sep 11, 2007
Messages
22
I was planning the same thing but as an island 2 big boxes and 4 side boxes back to back with a thick sheet of steel on top with a place for long stock in between the boxes lengthwise
 

sparksftball69

Well-known member
Joined
Sep 8, 2013
Messages
116
Sounds sick...let me know how it goes...I got all the cabinets now...either doing a 90" 2 wide double stacked or just doing two . separate double stack rollers...not sure yet

Sent from my SAMSUNG-SGH-I337 using Tapatalk
 

JakeKohl

Well-known member
Joined
Feb 23, 2012
Messages
1,365
Location
Greenville, SC
what kind of floor to work surface heights are you guys achieving with these benches? I was thinking I wanted to target around 39" but the rolling box at HF appears to be that tall already.
 

sparksftball69

Well-known member
Joined
Sep 8, 2013
Messages
116
I'm looming for mine to be a large rolling tool box...not.so much of a rolling work.surface...I haven't quite figured out my configuration but I never thought really of using it like that.... mine should be around 66-70" tall... looking at maybe cutting the top some way to allow for the top to have a pull up top with struts

Sent from my SAMSUNG-SGH-I337 using Tapatalk
 

56vette461

Well-known member
Joined
Jan 13, 2013
Messages
491
Location
Northern California
I just did the HF 44 inch 13 drawer bottom box in my garage as a work bench. I have a standard run of the mill garage with finished walls, but with the cement wall of the foundation showing about 2-1/2 inches out from the wall and 3" above the floor. The box is a little tall as a work bench because I added an old Beech Butcher Block top to the mix. But with the wheels the entire unit pushes up to the sheetrock and over the foundation. Locking the wheels in place makes for a fairly strong bench. I'm sure the heighth could be a little uncomfortable for some jobs, but with a tall stool it works fine.
 

56vette461

Well-known member
Joined
Jan 13, 2013
Messages
491
Location
Northern California
Is it too tall for a stand up benchm

Sent from my SAMSUNG-SGH-I337 using Tapatalk

It is taller than I would like if I were working at it for long periods of time. But it is important that the top is against the wall to prevent smaller parts from falling behind the box.

I do my primary work on a lower table that I can sit at in a chair or roller stool.
 

rday78

Well-known member
Joined
Aug 6, 2013
Messages
46
I believe mine came in at about 39" or so. Seems to be a good height. you can see the progress in the link in my signiture. Got the lights from superbrightleds.com at the advice of someone here.... plenty of light
 

Ross/Kzoo

Well-known member
Joined
Oct 22, 2013
Messages
2,191
Location
Richland Mi.
I may have missed it but why did Steevo use the HF toolboxes? I'm not tearing them down I'm just wondering because I hope to be in a position of doing something similar in a year.
 
Last edited:
To avoid these ads, REGISTER NOW!
Top Bottom