Use pieces of graphite for the cathode, it doesn't produce the scummy build up like steel does.

You are using an out of date browser. It may not display this or other websites correctly.
You should upgrade or use an alternative browser.
You should upgrade or use an alternative browser.
Homemade electrolysis. What do you use?
- Thread starter texasfiremedic
- Start date
n8n
Well-known member
Are there any issues with leaving the part submerged in the vat for an extended period of time (~1 day, or more) with the power off?
Would it make the black sodium carbonate coating be harder to remove?
I've had pieces left in the tank and something happened - wire burned through, fell off, etc. - and they do rust. If you have to leave I would toss the part in the lye bucket, it can stay in there indefinitely. (I'm assuming you're stripping with lye and then doing electrolysis; I'm coming at this from the perspective of restoring cast iron and carbon steel cookware primarily although I have done car parts in the past)
Shiftless
Well-known member
Thanks for the tip. How do you attach wires to the graphite electrodes? Do you use chunks of graphite suspended into the liquid on copper wires? Or nice half inch diameter long rods extending above the water level?Use pieces of graphite for the cathode, it doesn't produce the scummy build up like steel does.
I have used steel 60p nails in the past and that results in lots of scum.
I wrapped bare copper wire around the graphite.Thanks for the tip. How do you attach wires to the graphite electrodes? Do you use chunks of graphite suspended into the liquid on copper wires? Or nice half inch diameter long rods extending above the water level?
I have used steel 60p nails in the past and that results in lots of scum.
Outlawmws
Well-known member
Shift, mostly I've seen people drill the graphite bar, bolt it to the side of the tank, and run the wire to the screw holding it (Open threads on the outside, so it has a stud). That's my plan at least. I've had a larger (vise sized) tank waiting in the wings and 6 graphite bars. for awhile now.
larry4406
Well-known member
I took a piece of scrap 3/4 mesh expanded metal and rolled it into a cylinder. Stuffed it in 5 gallon bucket and it sprung outwards tight to inside of the bucket. Connected wire to it. Suspended vice in center of bucket with wire attached.


mingiunate
Member
- Joined
- Dec 2, 2023
- Messages
- 13
Thanks, sounds like it is not a good idea to leave in the tank without power. I'll plan this out so the electrolysis starts and stops in one setting, with time at the end to clean off the black oxide.I've had pieces left in the tank and something happened - wire burned through, fell off, etc. - and they do rust. If you have to leave I would toss the part in the lye bucket, it can stay in there indefinitely. (I'm assuming you're stripping with lye and then doing electrolysis; I'm coming at this from the perspective of restoring cast iron and carbon steel cookware primarily although I have done car parts in the past)
Shiftless
Well-known member
Thats a great idea. 360 degree exposure for great “line of sight” effectiveness.I took a piece of scrap 3/4 mesh expanded metal and rolled it into a cylinder. Stuffed it in 5 gallon bucket and it sprung outwards tight to inside of the bucket. Connected wire to it. Suspended vice in center of bucket with wire attached.

n8n
Well-known member
Thanks, sounds like it is not a good idea to leave in the tank without power. I'll plan this out so the electrolysis starts and stops in one setting, with time at the end to clean off the black oxide.
If the part doesn't look "done" you can either toss it in lye solution, or if you're not doing that, rub with mineral oil to hold it and then when you get back to it just wash with hot soapy water.
mingiunate
Member
- Joined
- Dec 2, 2023
- Messages
- 13
Whats the consensus on using electrolysis on parts that also have rusted out iron with brass, copper, or aluminum?
eg a brass boiler lid with iron bolts.
eg a brass boiler lid with iron bolts.
Bolster
Well-known member
There's quite a few different issues there. The hex* issue with stainless, for example, is still an unproven, (though there's no harm erring on the side of caution), as far as I know, issue. That's not to say there aren't plenty of warnings out there about it, but still no actual facts to back it up.
....
If anyone does have any links to proven scientific fact on any of these issues though, I'd be glad of any further info.")
What a great old thread, very happy to find. Have read as far as page 3 and taking notes madly...to add to my several pages of notes already taken from other sources.
I have read many warnings about chromium (such as: stainless steel) in the sacrificial anode, its use creating hexavalent chromium.
Regards putting a chrome-plated item in the tank as cathode, I asked my daughter's chemistry professor at her University. Here was his reply:
“If your chrome plated tool is the cathode, the chromium will not be oxidized so no hexavalent chromium would be produced."
Bolster
Well-known member
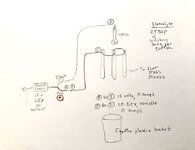
Having read about volts & amperage, am confused about mine. Using an e-waste power supply that outputs 12V 1.5A DC. If I use a VOM to measure inline from point A to B on the red wire, I get 12V, 0 amps. If I measure from point C (top of an anode stake) to point D (top of tool) I get a variable, cycling 1.5-3.5 volts and again 0 amps. I have 2 Tbsp washing soda per gallon in about 4.5 gallons of tap water (so about 9 Tbsp in all). Despite the 0 amps, I am getting fine white hydrogen bubbles from the tool, and nice results...anodes load up with gunk and need occasional wire brushing; just cleaned them before this test...all seems to work well, if rather slowly. For example, an 8-inch C-clamp might take me a day to de-rust.
Please troubleshoot? How to explain the zero amps? Am I measuring wrong?
Please troubleshoot? How to explain the zero amps? Am I measuring wrong?
Attachments
Last edited:
When you take amp measurements. You take it inline with the current flow means you will need to break A and B then put meter in amp mode and the red lead in amp.
if you are using amp mode or you are taking measurement of voltage across a know resistor (it’s called shunts) that is inline to the current flow, then you measure the voltage across the shunt divided by the known stable shunt resistance to get your amp. Or use a clamp amp meter specific for dc mode or ac mode to measure your current.
When you are taking voltage measurements, you take it across two point of voltage flow.
Last edited:
Shiftless
Well-known member
Right
Set your meter to amps and hook up the leads in series.
Set your meter to volts and measure in parallel.
Set your meter to amps and hook up the leads in series.
Set your meter to volts and measure in parallel.
RTM
Well-known member
Your drawing appears to show a break in the wire between A and B. This seems correct to me for measuring current.If I use a VOM to measure inline from point A to B on the red wire,
If you are derusting a C Clamp in one day, I’d be happy with that speed, based on a few of the C Clamps I’ve passed on.
Shiftless
Well-known member
A to B should measure zero volts and zero amps until the rusty part is lowered into the soup. At that point it should read more than zero amps. Don’t measure volts between A and B. It is my experience that as the electrolysis process progresses, the amperage gradually decreases. At some point, I stop and clean the sacrificial electrodes, restart the process and get more amps. It is current flow, measured in amps, that powers the process.
logixjock
Well-known member
The fuse in your multimeter that protects the current measuring circuit is likely blown. I used to keep a dozen of them around when I was teaching.Having read about volts & amperage, am confused about mine. Using an e-waste power supply that outputs 12V 1.5A DC. If I use a VOM to measure inline from point A to B on the red wire, I get 12V, 0 amps. If I measure from point C (top of an anode stake) to point D (top of tool) I get a variable, cycling 1.5-3.5 volts and again 0 amps. I have 2 Tbsp washing soda per gallon in about 4.5 gallons of tap water (so about 9 Tbsp in all). Despite the 0 amps, I am getting fine white hydrogen bubbles from the tool, and nice results...anodes load up with gunk and need occasional wire brushing; just cleaned them before this test...all seems to work well, if rather slowly. For example, an 8-inch C-clamp might take me a day to de-rust.
Please troubleshoot? How to explain the zero amps? Am I measuring wrong?
Shiftless
Well-known member
I agreeThe fuse in your multimeter that protects the current measuring circuit is likely blown. I used to keep a dozen of them around when I was teaching.
The fuse blows at the slightest wrong move when connecting with the ampere setting. Series = good. Parallel = blown fuse
Beerhippie
Well-known member
To make any sense of the roles of voltage and amperage in electrolysis, (or anything electrical), you need to have a grasp of Ohm's Law (it's not just a good idea, it's the law!):
E=IR
In English, that's Volts = Amps times Resistance (in Ohms).
Increasing the amperage of the power supply just gives you more room to play--it does not necessarily increase the amps of the circuit. To increase the draw of the circuit--the amperage--you decrease the resistance while keeping the voltage steady.
To reduce the resistance in your electrolysis system you can do any, some or all of the following:
Increase the concentration of the electrolyte.
Increase the surface area of the electrodes (workpiece and anode).
Decrease the distance between the electrodes (this can get hairy as it increases the chances of accidental shorts).
Something else I've forgotten, no doubt.
If you increase the amperage beyond the capacity of your power supply, it will likely start to release the magic smoke that makes it run. Often, where there's smoke, there's fire, so this is a safety concern.
The easiest way to safely set up your system is to use an inline fuse (on either lead) that is rated slightly less than the rated output of your PS--this will keep the magic smoke where it belongs. Set up your system with the connections in the right places and add plain water. Turn on the PS and slowly add your electrolyte of choice ( I use lye as it covers lots of bases at once) until the vat starts bubbling nicely. If you overdo it, the fuse will pop. Use wires that are rated for the amperage you intend to work with! Slightly higher than the fuse is proper and safe. When the smoke gets out of the wires, it often results in other damage.
Using 12 AWG wires will get you safely up to 20 amps, which should be more than you need.
An easy-to-use device for monitoring amperage and voltage cheaply and without worrying about blown fuses in your VOM/multimeter is this:
https://www.amazon.com/gp/product/B01DDQM6Z4/?tag=atomicindus08-20
Or a similar inductive ammeter. Connect the line-in leads to your power supply and it will display the voltage of the system. The ring goes over one of the leads to the electrodes--doesn't matter which--to read amps.
I do most of my cleaning at 12V and between 5 and 10 amps.
I've learned from experience to keep copper wires out of the solution on the anode side. I've had 12 AWG solid wire completely corrode away in a hour on the anode side. On the workpiece side, it's not a concern.
Bolster
Well-known member
Thanks for the replies, and will check fuses. Sorry, also some bad communication on my part. I am trying to measure amps with my Sperry VOM inline, between points A and B. On a whim, I tried using the clamp to measure amps instead, and on this attempt, left it in place for several minutes. The clamp method measured increasing amps with increasing time, slowly increasing from 0.0 and 0.1 at first, and over the next few minutes, built up to 1.5, even 1.6 amps, which would actually exceed the power supply’s rating. I’m puzzled why the inline measurement doesn’t work, and the clamp does. Also puzzled why there is a cycling action to both volt and amp measurements, that they regularly rise and fall like breathing. Oh well, all is working well. Pictured is a before and after of an antique Billings wrench that was rusted up solid and would not open. Now glides open and closed as if it were new. Took what, 2-3 days? Lost track!
Attachments

Beerhippie
Well-known member
Because, once again, you've blown the fuse in your Sperry. It's inside the case but not soldered. The fuse is fast-blow, so you never know you've overloaded it. I don't think I've much used my Fluke for in-line amps testing without blowing the fuse.Thanks for the replies, and will check fuses. Sorry, also some bad communication on my part. I am trying to measure amps with my Sperry VOM inline, between points A and B. On a whim, I tried using the clamp to measure amps instead, and on this attempt, left it in place for several minutes. The clamp method measured increasing amps with increasing time, slowly increasing from 0.0 and 0.1 at first, and over the next few minutes, built up to 1.5, even 1.6 amps, which would actually exceed the power supply’s rating. I’m puzzled why the inline measurement doesn’t work, and the clamp does. Also puzzled why there is a cycling action to both volt and amp measurements, that they regularly rise and fall like breathing. Oh well, all is working well. Pictured is a before and after of an antique Billings wrench that was rusted up solid and would not open. Now glides open and closed as if it were new. Took what, 2-3 days? Lost track!
The inductive PU clamp reads as millivolts, so a totally different circuit in the tester.
If you don't want to use the inductive clamp, use the shunt method described by another poster above.
Get a bigger PS--Computer ATX PSs run in the 25+ amp range--if you want to do in hours what you achieved in days. 5-10 amps at 12 V and I've degreased, stripped paint and removed rust in two or three hours.
seber
Well-known member
Maybe I missed it but why do you care what the amperage is as long as it is working?
Bolster
Well-known member
I'm O.T. now, but to close the loop, the zero-amps mystery is solved: I re-RTFM for the Sperry VOM and there is a bullet point that says: "Do not make current measurement with the test leads connected to the instrument." That implies this model VOM measures amps via the clamp ONLY! My other VOMs do ohm testing in-line using the leads, so this caught me by surprise! Operator error here. Like the man says: RTFM!
Regards question why I care about amperage as long as it's working: it's for the same reason I care about my blood pressure even though my heart is still beating.
Regards question why I care about amperage as long as it's working: it's for the same reason I care about my blood pressure even though my heart is still beating.
Beerhippie
Well-known member
See "magic smoke escaping".Maybe I missed it but why do you care what the amperage is as long as it is working?
Drawing more amps than your PS can supply releases the smoke. If you have a good PS with over-current and short protection, not such a big deal, until you come back a few hours later to find it isn't doing anything.