For the love of all things good please cut that zip tye flush! Gives me anxiety.I used it on J sized fitting today. I guess I could have used a 1" as well.


You are using an out of date browser. It may not display this or other websites correctly.
You should upgrade or use an alternative browser.
You should upgrade or use an alternative browser.
Homemade Tools
- Thread starter Ryan
- Start date
Radio Flyer
Well-known member
For the love of all things good please cut that zip tye flush! Gives me anxiety.
I know what you mean. That one just came back from the dealer that was performing warranty work. I kinda expect that.

Ole Slewfoot
Well-known member
47RE overdrive spring tool from a wheel bearing and a 'Yota hub
It's an 800+lb spring inside.


It's an 800+lb spring inside.
Last edited:
I decided to make my own piston installer for a John Deere 466. The liner according to the book is 4.5615 to 4.5625". The piston is 4.5582 to 4.5589. I wanted to make the tool as close to 4.5615 as possible and according to my telescoping gauge and micrometer I'm right on it. I got close to my size and worked on my taper. I waited until the next morning after the piece cooled down to finish to size and it was also getting fairly late.
I had to turn the piece around in order to part it off because my chuck jaws would be in the way. I was going to have to switch to my 4 jaw chuck. Before I did that, I machined a spot on the outside so I could make sure I could indicate the piece just right and be in line with the bore.
I was a little nervous because I have never used telescoping gauges while trying to be within 0.001" but it was a success and I was able to improve my skills. I tested it on a used piston and liner and works just as intended. I did practice my measuring on the liner because it should be within spec because there was still cross hatching and I should have a known size within 0.001".
Unfortunately or fortunately depending on how you look at it, I'm going to have to use this tool quicker than I thought.
Attachments


zmotorsports
ALLIANCE MEMBER
47RE overdrive spring tool from a wheel bearing and a 'Yota hub
It's an 800+lb spring inside.
Nicely done. Mine is much more crude than yours. Just a piece of thick walled tubing at the bottom with a couple of pieces of 3/8" O1 drill rod for the verticals and a flat plate at the top to press on. I like yours better.
Ole Slewfoot
Well-known member
Sadly I have to credit my elegant design walking around the shop picking things up asking 'will this fit?' 
The taper is not an optical illusion, and it was actually fun setting up true, asymetrical and uniform if that makes any sense.
the window is wider on one side, I was concerned about having enough room to manipulate the inner snap ring, but its a non-issue.
The taper is not an optical illusion, and it was actually fun setting up true, asymetrical and uniform if that makes any sense.
the window is wider on one side, I was concerned about having enough room to manipulate the inner snap ring, but its a non-issue.
txvwnut
Well-known member
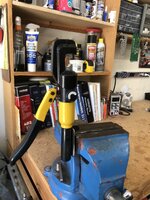
King pin press tool for split screen veedub busses. Volkswagen actually had two tools for this, one for removal and one for assembly. I went against the GJ mantra of more tools and made one that does both operations. In the pictures is the assembly operation.
Attachments

RoninB4
Well-known member
-After working in machine shops for over 35 years I never felt a lot of confidence working with telescoping gauges within .001 either. Some guys are good at it, I'm not. It's really a matter of feel and being able to do that same feel every time. I cheat and use inside mics, Intramik's, or a bore gauge. I still have my set of telescoping gauges, they look like new....I was a little nervous because I have never used telescoping gauges while trying to be within 0.001" but it was a success and I was able to improve my skills. I tested it on a used piston and liner and works just as intended.
Beelzeboss
Well-known member
I turned up a simple press tool to expand 60mm tubing to 2.5" (to fit standard 2.5" silicone couplers), then made a bodgy bead roller from some SHS, a couple of bearings and a washer.

SUCCESS!
SUCCESS!
engineer2
Well-known member
Pressure brake bleeder made from a garden sprayer. Works very well. Used an old Vacula to catch the fluid coming out, but anything will work. Just add the master cylinder adapter to fit your vehicle.
The plumbing parts are arranged in a circle to balance it. If the valve, regulator, gauge, fittings were on one side, it would tip over.

.JPG")


The plumbing parts are arranged in a circle to balance it. If the valve, regulator, gauge, fittings were on one side, it would tip over.
Last edited:
rmalkow2
Well-known member
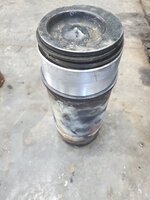
This weeks home made tool project was to use this steel pipe cut off (5.5” dia) and turn it into a portable pipe anvil. It’s about 1/4 inch thick so strong enough for forming sheet metal or light hammering. I wire wheeled the rust off, smoothed out some of the roughness with the flap disc, gave it a coat of rust converter and welded on a couple 1x1 legs to clamp in a vise when needed.


WWheeler
Well-known member
Posted these in the 'show us your new tools' thread earlier but figure they fit here just as well. I turned a couple $10 one gal sprayers, 1/4ID tubing, and a couple 3/8 PEX ball valves into a couple oil transfer pumps, one to be dedicated for transmission fluid and the other for gear oil. I also bent some stainless pipe I had scavenged from something at some point and a couple end caps from an assortment for ends that should let me hang the business end in a fill plug instead of me having to hold the hose in place while I pump 12 qts or more in a transmission. The Motive and other pumps like it that I was copycatting do tend to also have a pressure gauge which I contemplated adding too but didn't really see the point or benefit for the added cost. Those commercially available versions tend to sell for $80 and up each. I was able to make both of these for less than half that.

RTM
Well-known member
Are the internals of the system ok for petroleum based products? We've had a few repurposed projects in the past that melted down internally.I turned a couple $10 one gal sprayers, 1/4ID tubing, and a couple 3/8 PEX ball valves into a couple oil transfer pumps, one to be dedicated for transmission fluid and the other for gear oil.
WWheeler
Well-known member
Good question, and the best answer I have for it at this point is time will tell.Are the internals of the system ok for petroleum based products? We've had a few repurposed projects in the past that melted down internally.
Obviously I've voided the warranty. Worth the gamble IMHO. BTW this isn't my grand idea. This sort of hack has been discussed in forum posts and shown in many YT vids for at least 5 or more years now. I mighta put my own touch on it with the curved tube ends and caps but that's about it. I've not read or heard from anyone about the long term use of it.
As far as 'petroleum based products' I'm only using synthetic fluids in them if that matters. Toyota WS ATF and Valvoline SynPower 75-W90 and they worked fine so far. I could tell the gear oil was definitely a bit thicker and slower to push through it than it was ever designed for but it worked fine and was a WAAAAAY better experience than the stupid little auto parts store pump I used last time. (Edit: That pump cost as much or more than either of these and it went straight in the garbage the same day I bought it)
The box and 'Use and Care Guides' inside both bottles do say they're safe for "most solvents and oil-based products", but also say you should clean and rinse thoroughly after each use, which I'm not going to do. I'm not mixing fluids in them ever. I've labeled and stored the leftovers in the sprayers until next time. They both also have similar warnings against putting anything with acetone, "strong" solvents, "strong" acids or "strong" bases, bleach, epsom salts, vinegar, or citrus based cleaners, but I didn't see anything about synthetic trans fluid or synthetic gear oil. lol
Last edited:
67carl
Well-known member
You guys are making some fancy stuff. Recently I made a few more humble woodworking tools; bevel cut sled and a miter key sled for my table saw. Next will be a crosscut sled.


Just picked up a trio of HD spray bottles that have a chemically resistant sprayer as well as a chemically resistant bottle. Been hurting for a decent spray bottle for years.Are the internals of the system ok for petroleum based products? We've had a few repurposed projects in the past that melted down internally.
If anyone's interested I'll let you know how it works with a variety of chems after real use.

Harris Chemically Resistant Spray Bottles 32oz
Unlike other Harris Spray Bottles, these have a chemically resistant sprayer in addition to a chemically resistant bottle. It's made to withstand harsh chemicals better than any other sprayer in our line.
 pfharris.com
As I continue to work on newer and newer vehicles, I'm noticing that modern vehicles are getting to the point where the only safe jacking points are the four designated frame points that a two post lift would grab and use. Until now, I have been doing everything with vehicle ramps or floor jacks and jack stands, but that was becoming a hassle and a bit of a safety hazard in my opinion. The problem I was running into, was that as soon as I jacked up one side or one end of a vehicle with my two floor jacks, there weren't any good locations left to put my jack stands so I could safely work under the vehicle. They usually ended up being carefully placed somewhere near where main suspension parts connect to the subframe, but I never really liked those locations in general. I also disliked having to temporarily trust my hydraulic floor jacks while crawling partway under the vehicle to find and place my jack stands in those locations.
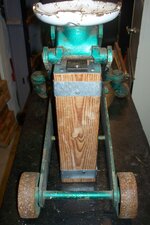
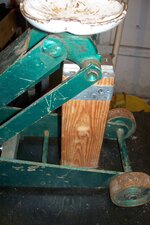
I decided to solve the problem by making some safety supports for my floor jacks. How they work, is I raise the floor jack to just above the level I need it to be, then I place the short or tall 4x4 wood block underneath the floor jack's saddle and slowly lower the jack until the jack provides just enough downward pressure on the block to keep the block from moving around if bumped. That block makes it physically impossible for the floor jack to drop, even if the hydraulics fail catastrophically.
It likely wasn't needed, but I used scrap steel I had laying around to cover the top of the wood blocks to reduce wear and spread the point stresses on the wood out more evenly. I also had some extra Simpson Strong Tie steel banding laying around, so I wrapped it around the 4x4 blocks as an extra layer of protection against splitting or failure of the blocks over time.
Now I can avoid jack stands entirely (without having to worry about the floor jack letting go) if I'm just going to be working next to the vehicle doing tire rotations, struts, wheel bearings, or brake work, and whenever I'm physically working under a vehicle I can still use jack stands but they will be there more for added safety instead of being an absolute necessity. I also no longer have to worry about relying on the hydraulics of the floor jack while I'm in the process of finding strong points to place the jack stands under the vehicle.
Attachments


RoninB4
Well-known member
Have made/used similar items for the same reasons. I intend to make "new and improved" versions as soon as I get all the other projects off my plate. Yeah that's not going to happen anytime soon.
Modern Garage
Well-known member
I use jack stands to keep the car from shifting sideways and tipping the jack over. I've never had a floor jack lower itself, either slowly or suddenly, but I have had the floor jack tip over dropping the car to the ground. (And bending the frame of the jack.) Keep using those jack stands, even if you're working at the outside of the car - that's where you're more likely to exert enough force to move the car.
Joe
Joe
oldwino
ALLIANCE MEMBER

Who has made a tool lately?
It's been awhile since this thread had any activity - but I think it's my favorite on GJ so I'm bringing it back to the top.
I don't have any tools to post at the moment, but I did make some micarta scales for my Byrd pocket knife the other day.


I've got a benchtop stand for my cordless bandsaw in the works too. It's nearly done, but I ran out of wire while welding up the last couple components. I'll be back once it's finished.
It's been awhile since this thread had any activity - but I think it's my favorite on GJ so I'm bringing it back to the top.
I don't have any tools to post at the moment, but I did make some micarta scales for my Byrd pocket knife the other day.
I've got a benchtop stand for my cordless bandsaw in the works too. It's nearly done, but I ran out of wire while welding up the last couple components.
I'll be back once it's finished.BigLeagueSmoes
Well-known member
The most unimpressive homemade tool you’ll ever see… a 2” square wrench that is used to turn the valve key on water main valves when you’re installing new pipe. The handle allows you to crank it quickly. Handle is made from a once broken sheer stud for a bridge, the body was an old wrench, and I made the 2” box from cutting and welding flat stock together. It’s pretty caveman like but it works


Last edited:
Outlawmws
Well-known member
One I forgot to post here: I needed a 1-9/16" open end for the top nut of a fire extinguisher I converted to a wash station that wasn't 16" long and a couple of pounds to deal with and I opened up the jaws of this shorty Hazet stamped out wrench, then soldered on brass to the jaws to get the right spacing, and I've been using it for near 3 years with no issues:

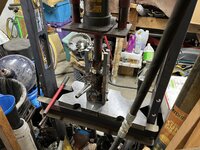
Cordless Bandsaw Benchtop Stand


While the design is simple, I'm particularly proud of my "stop" button and the fact that nothing is bolted down - you can just lift the saw out when it's turned off.
Unlike corded portable bandsaw, there's no easy way to interrupt the power on a cordless saw. Seems like most people just zip tie or clamp the trigger on - but that's not the safest in the event you need to turn it off fast. On mine, you just push in the button and it moves the trigger lock out of the way.
The trigger lock is also what keeps the saw from being able to lift out of the stand - so when it's not locked-on, you can just lift the saw out for regular use.
Attachments

Last edited:
Update: been using these bottles for a little while. Window cleaner, dish soap solution, and potassium hydroxide HD cleaner. All three bottles still spraying and not leaking all over my hands.Just picked up a trio of HD spray bottles that have a chemically resistant sprayer as well as a chemically resistant bottle. Been hurting for a decent spray bottle for years.
If anyone's interested I'll let you know how it works with a variety of chems after real use.
Harris Chemically Resistant Spray Bottles 32oz
Unlike other Harris Spray Bottles, these have a chemically resistant sprayer in addition to a chemically resistant bottle. It's made to withstand harsh chemicals better than any other sprayer in our line.
Radio Flyer
Well-known member
Over the years I have needed and made some stubby wrenches for hydraulic fitting and such.
Today I needed an 1-1/8". Looks like I have the complete set now.


So I needed a 13/16” today.
That looks great!
So I needed a 13/16” today.
rslaback
Well-known member
Need to change the shaft seal on a jet pump. Motor shaft is slotted but I've never find a wide enough thick enough screwdriver to hold it. 900 passes on a surface grinder and now I have this.

Outlawmws
Well-known member
Wouldn't a larger drag link drive socket have worked? how thick did it need to be?
rslaback
Well-known member
I tried to find a drag link but they were always too wide. The diameter of the hole in the casing is .600" and they were always bigger than that. If you move down to the screwdriver type they are not wide enough or thick enough and the taper helps them cam out.Wouldn't a larger drag link drive socket have worked? how thick did it need to be?
Outlawmws
Well-known member
The diameter of the hole in the casing is .600"
Gotcha, -yep the narrowest 3/8 drive DL driver I have in .675...

Outlawmws
Well-known member
I picked yhis onr up today, made from a 3/8 Williams Supewrench:

This side does say "Superwrench"

This side does say "Superwrench"
rslaback
Well-known member
It didn't quite go how I planned it but l broke out the back up tools of a hole saw, grinder and cold chisel and still won.Need to change the shaft seal on a jet pump. Motor shaft is slotted but I've never find a wide enough thick enough screwdriver to hold it. 900 passes on a surface grinder and now I have this.

PugetDude
ALLIANCE MEMBER
Where there is a will, there is a way.

rslaback
Well-known member
From the ashes...It didn't quite go how I planned it but l broke out the back up tools of a hole saw, grinder and cold chisel and still won.

PugetDude
ALLIANCE MEMBER
900 passes with the surface grinder or one pass with an angle grinder?
rslaback
Well-known member
400 passes.900 passes with the surface grinder or one pass with an angle grinder?